
You also want an ePaper? Increase the reach of your titles
YUMPU automatically turns print PDFs into web optimized ePapers that Google loves.
• When finished with editing, press GREEN button to<br />
save. You can press MENU button to cancel.<br />
Deleting a Timer<br />
• Select the timer you want to delete by pressing “<br />
” or “ ” button.<br />
• Press RED button.<br />
• Select YES by using “ ” or “ ” buttons to delete the<br />
timer. Select NO to cancel.<br />
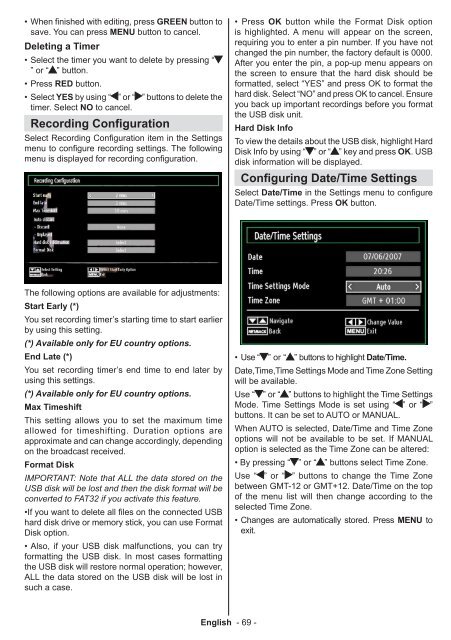
Recording Configuration<br />
Select Recording Configuration item in the Settings<br />
menu to configure recording settings. The following<br />
menu is displayed for recording configuration.<br />
The following options are available for adjustments:<br />
Start Early (*)<br />
You set recording timer’s starting time to start earlier<br />
by using this setting.<br />
(*) Available only for EU country options.<br />
End Late (*)<br />
You set recording timer’s end time to end later by<br />
using this settings.<br />
(*) Available only for EU country options.<br />
Max Timeshift<br />
This setting allows you to set the maximum time<br />
allowed for timeshifting. Duration options are<br />
approximate and can change accordingly, depending<br />
on the broadcast received.<br />
Format Disk<br />
IMPORTANT: Note that ALL the data stored on the<br />
USB disk will be lost and then the disk format will be<br />
converted to FAT32 if you activate this feature.<br />
•If you want to delete all files on the connected USB<br />
hard disk drive or memory stick, you can use Format<br />
Disk option.<br />
• Also, if your USB disk malfunctions, you can try<br />
formatting the USB disk. In most cases formatting<br />
the USB disk will restore normal operation; however,<br />
ALL the data stored on the USB disk will be lost in<br />
such a case.<br />
English - 69 -<br />
• Press OK button while the Format Disk option<br />
is highlighted. A menu will appear on the screen,<br />
requiring you to enter a pin number. If you have not<br />
changed the pin number, the factory default is 0000.<br />
After you enter the pin, a pop-up menu appears on<br />
the screen to ensure that the hard disk should be<br />
formatted, select “YES” and press OK to format the<br />
hard disk. Select “NO” and press OK to cancel. Ensure<br />
you back up important recordings before you format<br />
the USB disk unit.<br />
Hard Disk Info<br />
To view the details about the USB disk, highlight Hard<br />
Disk Info by using “ ” or “ ” key and press OK. USB<br />
disk information will be displayed.<br />
Configuring Date/Time Settings<br />
Select Date/Time in the Settings menu to configure<br />
Date/Time settings. Press OK button.<br />
• Use “ ” or “ ” buttons to highlight Date/Time.<br />
Date,Time,Time Settings Mode and Time Zone Setting<br />
will be available.<br />
Use “ ” or “ ” buttons to highlight the Time Settings<br />
Mode. Time Settings Mode is set using “<br />
buttons. It can be set to AUTO or MANUAL.<br />
” or “ ”<br />
When AUTO is selected, Date/Time and Time Zone<br />
options will not be available to be set. If MANUAL<br />
option is selected as the Time Zone can be altered:<br />
• By pressing “ ” or “ ” buttons select Time Zone.<br />
Use “ ” or “ ” buttons to change the Time Zone<br />
between GMT-12 or GMT+12. Date/Time on the top<br />
of the menu list will then change according to the<br />
selected Time Zone.<br />
• Changes are automatically stored. Press MENU to<br />
exit.