Anv CompMag JP.indd - Isotherm
Anv CompMag JP.indd - Isotherm
Anv CompMag JP.indd - Isotherm

Create successful ePaper yourself
Turn your PDF publications into a flip-book with our unique Google optimized e-Paper software.
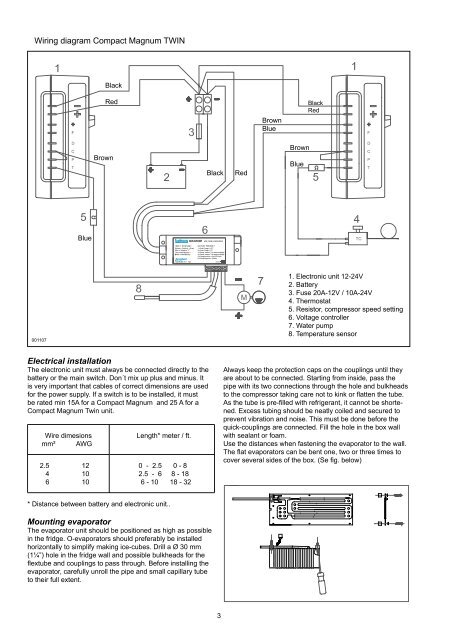
Wiring diagram Compact Magnum TWIN<br />
001107<br />
Blue<br />
Electrical installation<br />
The electronic unit must always be connected directly to the<br />
battery or the main switch. Don´t mix up plus and minus. It<br />
is very important that cables of correct dimensions are used<br />
for the power supply. If a switch is to be installed, it must<br />
be rated min 15A for a Compact Magnum and 25 A for a<br />
Compact Magnum Twin unit.<br />
Wire dimesions<br />
mm² AWG<br />
2.5 12<br />
4 10<br />
6 10<br />
Black<br />
Red<br />
Brown<br />
Length* meter / ft.<br />
0 - 2.5 0 - 8<br />
2.5 - 6 8 - 18<br />
6 - 10 18 - 32<br />
* Distance between battery and electronic unit..<br />
Mounting evaporator<br />
The evaporator unit should be positioned as high as possible<br />
in the fridge. O-evaporators should preferably be installed<br />
horizontally to simplify making ice-cubes. Drill a Ø 30 mm<br />
(1¼”) hole in the fridge wall and possible bulkheads for the<br />
fl extube and couplings to pass through. Before installing the<br />
evaporator, carefully unroll the pipe and small capillary tube<br />
to their full extent.<br />
Black Red<br />
3<br />
Brown<br />
Blue<br />
Brown<br />
Blue<br />
Black<br />
Red<br />
1. Electronic unit 12-24V<br />
2. Battery<br />
3. Fuse 20A-12V / 10A-24V<br />
4. Thermostat<br />
5. Resistor, compressor speed setting<br />
6. Voltage controller<br />
7. Water pump<br />
8. Temperature sensor<br />
Always keep the protection caps on the couplings until they<br />
are about to be connected. Starting from inside, pass the<br />
pipe with its two connections through the hole and bulkheads<br />
to the compressor taking care not to kink or fl atten the tube.<br />
As the tube is pre-fi lled with refrigerant, it cannot be shortened.<br />
Excess tubing should be neatly coiled and secured to<br />
prevent vibration and noise. This must be done before the<br />
quick-couplings are connected. Fill the hole in the box wall<br />
with sealant or foam.<br />
Use the distances when fastening the evaporator to the wall.<br />
The fl at evaporators can be bent one, two or three times to<br />
cover several sides of the box. (Se fi g. below)