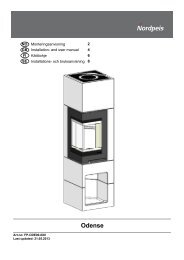
Monteringsanvisning Ronda - Nordpeis
Monteringsanvisning Ronda - Nordpeis
Monteringsanvisning Ronda - Nordpeis
- No tags were found...

You also want an ePaper? Increase the reach of your titles
YUMPU automatically turns print PDFs into web optimized ePapers that Google loves.
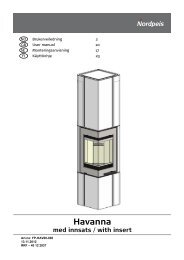
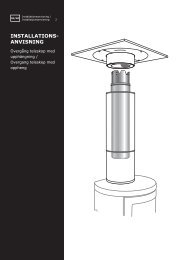
We recommend seasoned hardwood with a maximummoisture content of 20%.Surround<strong>Ronda</strong>InsertNI-26Material insert Steel/Cast ironSurface treatmentdoor / doorframeHeat resistant varnishFuelWood logs, 30 cmNominal output 5 kWEfficiency 79,3%CO % @ 13% O2 0,07Draught system Air vent controlCombustion systemSecondary combustion(clean burning)Heating area 60-120 m²Flue outletTopFlueInner Ø 150 mm(NB! In UK outer Ø)Weight of insert 93 kgWeight of surround 239 kgArea of convectionair vent under insert400 cm²Area of convectionair vent over insert500 cm²Flue gas temperature 313 °CAir supply11requirements (m³/h)Fuel charge1,4 kgRefueling interval 56 minOpening of the air 50%vent controlOperationIntermittent** Intermittent combustion refers to normal use of a fireplace,i.e. new wood is inserted when the previous load has burneddown to ember.Warning: If the requirements for ventilation areNOT complied with, the heating circulation effectwill be considerably reduced andoverheating can occur.This can in a worst case scenario cause a fire.4. Distance to Combustible MaterialFirewallEnsure that the safety distances are respected(FIG 1).When connecting a steel chimney to the top outlet usethe security distances required from the manufacturer.5. AssemblyAssembly instructions for the insert (FIG 2 - FIG 12)The following tools are necessary:• 5 mm Allen key• 13 mm spanner/wrench• Caulking gun (for the stove cement)1. Ensure that all the loose parts are included (FIG 2):A. Insert with door and heat shieldB. 4 legs with adjusting bolts and lock nutsC. 4 fastening bolts with disks for the legsD. Handle for ash grate and ashtrayE. GloveF. Assembly instructionsG. Warranty card2. Carefully lay the insert on its back. Ensure that thetransportation padding is put inside the insert beforeturning it over, so that the insulating plates in theburn chamber do not fall down and break. Pleasenote that the insulating plates may release coloureddust when touched. Avoid touching the cast iron withdust on your fingers. In case of dust on any cast ironpart, the glove included is well suited to brush it off.Start with assembling the legs (FIG 3) as follows:• Fasten the screws on to the insert with a 13 mmspanner/wrench. The legs are placed as shown (theopening in the legs should face outwards).• Use the adjusting bolts (FIG 4) and adjust the legsto the desired height (X) before returning the insertto an upright position (do not tilt the insert). Theheight depends on the surround.Regulation of leg height (X) for NI-26:From: 20 mm To: 160 mm.• Flue outletNI-26 is delivered standard with a top flue outlet collar.In order to change to a posterior mounted flue outlet:FIG 5A: Remove the perforated decoration lid in theback with a hammer, or saw it out with a hacksawFIG 5B: Unscrew the sheet steel lid.FIG 6: Unscrew the flue outlet collar with a 5 mm Allen key.FIG 7: Fasten the sheet steel lid on the top flue outlet.FIG 8: Fasten the collar on the posterior flue outlet.Connection of the FluePlease be aware when connecting the 150 mm flue tothe smoke outlet that the flue is placed outside the flueoutlet collar. Use stove cement in the joints.* The approximate centre height of the hole for theflue is marked in the dimensioned drawing. Considerpossible inclination of the flue prior to perforating thechimney. Distortions in floors and walls may influencethe height. Dry stack the fireplace for accurate heightand positioning of the flue/chimney connection. If12 GB