
Create successful ePaper yourself
Turn your PDF publications into a flip-book with our unique Google optimized e-Paper software.
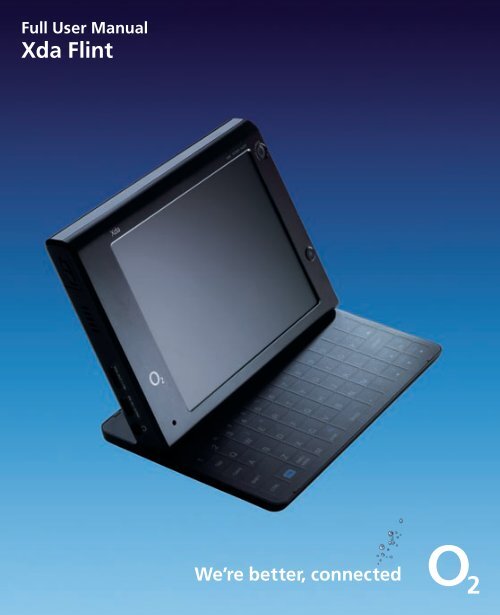
<strong>Full</strong> User Manual<br />
Xda Flint<br />
We’re better, connected
Please Read Before Proceeding<br />
THE BATTERY IS NOT CHARGED WHEN YOU TAKE IT OUT OF THE BOX.<br />
DO NOT REMOVE THE BATTERY PACK WHEN THE DEVICE IS CHARGING.<br />
YOUR WARRANTY IS INVALIDATED IF YOU OPEN OR TAMPER WITH THE<br />
DEVICE’S OUTER CASING.<br />
PRIVACY RESTRICTIONS<br />
Some countries require full disclosure of recorded telephone conversations,<br />
and stipulate that you must inform the person with whom you are speaking<br />
that the conversation is being recorded. Always obey the relevant laws and<br />
regulations of your country when using the recording feature of your PDA<br />
Phone.<br />
INTELLECTUAL PROPERTY RIGHT INFORMATION<br />
Copyright © 2008 High Tech Computer Corp. All Rights Reserved.<br />
, , , ExtUSB, and HTC Care are trademarks and/or service<br />
marks of High Tech Computer Corp.<br />
Microsoft, MS-DOS, Windows, Windows NT, Windows Server, Windows<br />
Mobile, Windows XP, Windows Vista, ActiveSync, Windows Mobile Device<br />
Center, Internet Explorer, MSN, Hotmail, Windows Live, Outlook, Excel,<br />
PowerPoint, Word, OneNote and Windows Media are either registered<br />
trademarks or trademarks of Microsoft Corporation in the United States<br />
and/or other countries.<br />
Bluetooth and the Bluetooth logo are trademarks owned by Bluetooth SIG, Inc.<br />
Wi-Fi is a registered trademark of the Wireless Fidelity Alliance, Inc.<br />
miniSD is a trademark of SD Card Association.<br />
Java, J2ME and all other Java-based marks are trademarks or registered<br />
trademarks of Sun Microsystems, Inc. in the United States and other<br />
countries.<br />
Copyright © 2008, Adobe Systems Incorporated. All Rights Reserved.<br />
Sprite Backup is a trademark or service mark of Sprite Software.
Opera® Browser from Opera Software ASA. Copyright 1995-2008 Opera<br />
Software ASA. All Rights Reserved.<br />
Copyright © 2008, Dilithium Networks, Inc. All Rights Reserved.<br />
Copyright © 2003-2008, ArcSoft, Inc. and its licensors. All Rights Reserved.<br />
ArcSoft and the ArcSoft logo are registered trademarks of ArcSoft, Inc. in the<br />
United States and/or other countries.<br />
All other company, product and service names mentioned herein are<br />
trademarks, registered trademarks or service marks of their respective owners.<br />
HTC shall not be liable for technical or editorial errors or omissions<br />
contained herein, nor for incidental or consequential damages resulting<br />
from furnishing this material. The information is provided “as is” without<br />
warranty of any kind and is subject to change without notice. HTC also<br />
reserves the right to revise the content of this document at any time<br />
without prior notice.<br />
No part of this document may be reproduced or transmitted in any form or<br />
by any means, electronic or mechanical, including photocopying, recording<br />
or storing in a retrieval system, or translated into any language in any form<br />
without prior written permission of HTC.
Disclaimers<br />
THE WEATHER INFORMATION, DATA AND DOCUMENTATION ARE PROVIDED<br />
“AS IS” AND WITHOUT WARRANTY OR TECHNICAL SUPPORT OF ANY KIND<br />
FROM HTC. TO THE MAXIMUM EXTENT PERMITTED BY APPLICABLE LAW,<br />
HTC AND ITS AFFILIATES expressly disclaim any and all representations<br />
and warranties, express or implied, arising by law or otherwise, regarding<br />
the Weather Information, Data, Documentation, or any other Products<br />
and services, including without limitation any express or implied warranty<br />
of merchantability, express or implied warranty of fitness for a particular<br />
purpose, non-infringement, quality, accuracy, completeness, effectiveness,<br />
reliability, usefulness, that the Weather Information, Data and/or<br />
Documentation will be error-free, or implied warranties arising from course<br />
of dealing or course of performance.<br />
Without limiting the foregoing, it is further understood that HTC and<br />
its Providers are not responsible for Your use or misuse of the Weather<br />
Information, Data and/or Documentation or the results from such use.<br />
HTC and its Providers make no express or implied warranties, guarantees<br />
or affirmations that weather information will occur or has occurred as<br />
the reports, forecasts, data, or information state, represent or depict and<br />
it shall have no responsibility or liability whatsoever to any person or<br />
entity, parties and non-parties alike, for any inconsistency, inaccuracy, or<br />
omission for weather or events predicted or depicted, reported, occurring<br />
or occurred. WITHOUT LIMITING THE GENERALITY OF THE FOREGOING,<br />
YOU ACKNOWLEDGE THAT THE WEATHER INFORMATION, DATA AND/OR<br />
DOCUMENTATION MAY INCLUDE INACCURACIES AND YOU WILL USE<br />
COMMON SENSE AND FOLLOW STANDARD SAFETY PRECAUTIONS IN<br />
CONNECTION WITH THE USE OF THE WEATHER INFORMATION, DATA OR<br />
DOCUMENTATION.
Limitation of Damages<br />
TO THE MAXIMUM EXTENT PERMITTED BY APPLICABLE LAW, IN NO EVENT<br />
SHALL HTC OR ITS PROVIDERS BE LIABLE TO USER OR ANY THIRD PARTY<br />
FOR ANY INDIRECT, SPECIAL, CONSEQUENTIAL, INCIDENTAL OR PUNITIVE<br />
DAMAGES OF ANY KIND, IN CONTRACT OR TORT, INCLUDING, BUT NOT<br />
LIMITED TO, INJURY, LOSS OF REVENUE, LOSS OF GOODWILL, LOSS OF<br />
BUSINESS OPPORTUNITY, LOSS OF DATA, AND/OR LOSS OF PROFITS<br />
ARISING OUT OF, OR RELATED TO, IN ANY MANNER, OR THE DELIVERY,<br />
PERFORMANCE OR NONPERFORMANCE OF OBLIGATIONS, OR USE OF<br />
THE WEATHER INFORMATION, DATA OR DOCUMENTATION HEREUNDER<br />
REGARDLESS OF THE FORESEEABILITY THEREOF.<br />
Important Health Information and Safety Precautions<br />
When using this product, the safety precautions below must be taken to<br />
avoid possible legal liabilities and damages.<br />
Retain and follow all product safety and operating instructions. Observe all<br />
warnings in the operating instructions on the product.<br />
To reduce the risk of bodily injury, electric shock, fire, and damage to the<br />
equipment, observe the following precautions.<br />
ELECTRICAL SAFETY<br />
This product is intended for use when supplied with power from the<br />
designated battery or power supply unit. Other usage may be dangerous<br />
and will invalidate any approval given to this product.<br />
SAFETY PRECAUTIONS FOR PROPER GROUNDING INSTALLATION<br />
CAUTION: Connecting to an improperly grounded equipment can result in<br />
an electric shock to your device.<br />
This product equipped with a USB Cable for connecting with desktop or<br />
notebook computer. Be sure your computer is properly grounded (earthed)<br />
before connecting this product to the computer. The power supply cord of<br />
a desktop or notebook computer has an equipment-grounding conductor<br />
and a grounding plug. The plug must be plugged into an appropriate outlet<br />
which is properly installed and grounded in accordance with all local codes<br />
and ordinances.
SAFETY PRECAUTIONS FOR POWER SUPPLY UNIT<br />
• Use the correct external power source<br />
A product should be operated only from the type of power source<br />
indicated on the electrical ratings label. If you are not sure of the type<br />
of power source required, consult your authorized service provider or<br />
local power company. For a product that operates from battery power or<br />
other sources, refer to the operating instructions that are included with<br />
the product.<br />
This product should be operated only with the following designated<br />
power supply unit(s).<br />
AC Adapter<br />
1. Delta, Model ADP-5FH X<br />
2. Tamura, Model JHA050100Uabb<br />
3. Phihong, Models PSAA05X-050, PSC05R-050, PSC05R-050 PH and<br />
PSAI05R-050YYY<br />
Car Adapter<br />
1. Phihong, Model CLM10D-050<br />
2. Hwa Ying, Model AP-03<br />
3. L&K Precision Technology Co., Ltd., Model G12PCL-***<br />
• Handle battery packs carefully<br />
This product contains a Li-ion battery. There is a risk of fire and burns<br />
if the battery pack is handled improperly. Do not attempt to open or<br />
service the battery pack. Do not disassemble, crush, puncture, short<br />
external contacts or circuits, dispose of in fire or water, or expose a<br />
battery pack to temperatures higher than 60˚C (140˚F).<br />
WARNING: Danger of explosion if battery is incorrectly replaced. To<br />
reduce risk of fire or burns, do not disassemble, crush, puncture, short<br />
external contacts, expose to temperature above 60° C (140° F), or<br />
dispose of in fire or water. Replace only with specified batteries. Recycle<br />
or dispose of used batteries according to the local regulations or<br />
reference guide supplied with your product.
NOTE: This product should be operated only with the following designated<br />
Battery Pack(s).<br />
1. HTC, Model ATHE160<br />
2. Sanyo, Model ATHE160<br />
• Take extra precautions<br />
• Keep the battery or device dry and away from water or any liquid as it<br />
may cause a short circuit.<br />
• Keep metal objects away so they don’t come in contact with the<br />
battery or its connectors as it may lead to short circuit during<br />
operation.<br />
• Do not use a battery that appears damaged, deformed, or<br />
discolored, or the one that has any rust on its casing, overheats, or<br />
emits a foul odor.<br />
• Always keep the battery out of the reach of babies and small<br />
children, to avoid swallowing of the battery. Consult the doctor<br />
immediately if the battery is swallowed.<br />
• If the battery leaks:<br />
• Do not allow the leaking fluid to come in contact with skin<br />
or clothing. If already in contact, flush the affected area<br />
immediately with clean water and seek medical advice.<br />
• Do not allow the leaking fluid to come in contact with eyes.<br />
If already in contact, DO NOT rub; rinse with clean water<br />
immediately and seek medical advice.<br />
• Take extra precautions to keep a leaking battery away from fire<br />
as there is a danger of ignition or explosion.
SAFETY PRECAUTIONS FOR DIRECT SUNLIGHT<br />
Keep this product away from excessive moisture and extreme temperatures.<br />
Do not leave the product or its battery inside a vehicle or in places where the<br />
temperature may exceed 60°C (140°F), such as on a car dashboard, window sill,<br />
or behind a glass that is exposed to direct sunlight or strong ultraviolet light for<br />
extended periods of time. This may damage the product, overheat the battery,<br />
or pose a risk to the vehicle.<br />
PREVENTION OF HEARING LOSS<br />
CAUTION: Permanent hearing loss may occur if earphones or<br />
headphones are used at high volume for prolonged periods<br />
of time.<br />
NOTE: For France, Earphones (listed below) for this device have been tested to<br />
comply with the Sound Pressure Level requirement laid down in the applicable<br />
NF EN 50332-1:2000 and/or NF EN 50332-2:2003 standards as required by<br />
French Article L. 5232-1.<br />
• Earphone, manufactured by Cotron, Models CHM-60STV07004 and<br />
CHM-60STV07004T.<br />
SAFETY IN AIRCRAFT<br />
Due to the possible interference caused by this product to an aircraft’s<br />
navigation system and its communications network, using this device’s phone<br />
function on board an airplane is against the law in most countries. If you want<br />
to use this device when on board an aircraft, remember to turn off your phone<br />
by switching to Airplane Mode.<br />
ENVIRONMENT RESTRICTIONS<br />
Do not use this product in gas stations, fuel depots, chemical plants or where<br />
blasting operations are in progress, or in potentially explosive atmospheres<br />
such as fuelling areas, fuel storehouses, below deck on boats, chemical plants,<br />
fuel or chemical transfer or storage facilities, and areas where the air contains<br />
chemicals or particles, such as grain, dust, or metal powders. Please be aware<br />
that sparks in such areas could cause an explosion or fire resulting in bodily<br />
injury or even death.
EXPLOSIVE ATMOSPHERES<br />
When in any area with a potentially explosive atmosphere or where flammable<br />
materials exist, the product should be turned off and the <strong>user</strong> should obey<br />
all signs and instructions. Sparks in such areas could cause an explosion or<br />
fire resulting in bodily injury or even death. Users are advised not to use the<br />
equipment at refueling points such as service or gas stations, and are reminded<br />
of the need to observe restrictions on the use of radio equipment in fuel<br />
depots, chemical plants, or where blasting operations are in progress. Areas<br />
with a potentially explosive atmosphere are often, but not always, clearly<br />
marked. These include fueling areas, below deck on boats, fuel or chemical<br />
transfer or storage facilities, and areas where the air contains chemicals or<br />
particles, such as grain, dust, or metal powders.<br />
ROAD SAFETY<br />
Vehicle drivers in motion are not permitted to use telephony services with<br />
handheld devices, except in the case of emergency. In some countries,<br />
using hands-free devices as an alternative is allowed.<br />
SAFETY PRECAUTIONS FOR RF EXPOSURE<br />
• Avoid using your phone near metal structures (for example, the steel<br />
frame of a building).<br />
• Avoid using your phone near strong electromagnetic sources, such as<br />
microwave ovens, sound speakers, TV and radio.<br />
• Use only original manufacturer-approved accessories, or accessories<br />
that do not contain any metal.<br />
• Use of non-original manufacturer-approved accessories may violate<br />
your local RF exposure guidelines and should be avoided.<br />
INTERFERENCE WITH MEDICAL EQUIPMENT FUNCTIONS<br />
This product may cause medical equipment to malfunction. The use of this<br />
device is forbidden in most hospitals and medical clinics.<br />
If you use any other personal medical device, consult the manufacturer<br />
of your device to determine if they are adequately shielded from external<br />
RF energy. Your physician may be able to assist you in obtaining this<br />
information.<br />
Turn your phone OFF in health care facilities when any regulations posted<br />
in these areas instruct you to do so. Hospitals or health care facilities may be<br />
using equipment that could be sensitive to external RF energy.
10<br />
HEARING AIDS<br />
Some digital wireless phones may interfere with some hearing aids. In the<br />
event of such interference, you may want to consult your service provider,<br />
or call the customer service line to discuss alternatives.<br />
NONIONIZING RADIATION<br />
Your device has an internal antenna. This product should be operated in<br />
its normal-use position to ensure the radiative performance and safety<br />
of the interference. As with other mobile radio transmitting equipment,<br />
<strong>user</strong>s are advised that for satisfactory operation of the equipment and<br />
for the safety of personnel, it is recommended that no part of the human<br />
body be allowed to come too close to the antenna during operation of the<br />
equipment.<br />
Use only the supplied integral antenna. Use of unauthorized or modified<br />
antennas may impair call quality and damage the phone, causing loss of<br />
performance and SAR levels exceeding the recommended limits as well<br />
as result in non-compliance with local regulatory requirements in your<br />
country.<br />
To assure optimal phone performance and ensure human exposure to RF<br />
energy is within the guidelines set forth in the relevant standards, always use<br />
your device only in its normal-use position. Do not touch or hold the antenna<br />
area unnecessarily when placing or receiving a phone call. Contact with the<br />
antenna area may impair call quality and cause your device to operate at a<br />
higher power level than needed. Avoiding contact with the antenna area when<br />
the phone is IN USE optimizes the antenna performance and the battery life.<br />
Antenna location
General Precautions<br />
• Heed service markings<br />
Except as explained elsewhere in the Operating or Service<br />
documentation, do not service any product yourself. Service needed<br />
on components inside the device should be done by an authorized<br />
service technician or provider.<br />
• Damage requiring service<br />
Unplug the product from the electrical outlet and refer servicing to<br />
an authorized service technician or provider under the following<br />
conditions:<br />
• Liquid has been spilled or an object has fallen into the product.<br />
• The product has been exposed to rain or water.<br />
• The product has been dropped or damaged.<br />
• There are noticeable signs of overheating.<br />
• The product does not operate normally when you follow the<br />
operating instructions.<br />
• Avoid hot areas<br />
The product should be placed away from heat sources such as<br />
radiators, heat registers, stoves, or other products (including<br />
amplifiers) that produce heat.<br />
• Avoid wet areas<br />
Never use the product in a wet location.<br />
• Avoid using your device after a dramatic change in temperature<br />
When you move your device between environments with very<br />
different temperature and/or humidity ranges, condensation may<br />
form on or within the device. To avoid damaging the device, allow<br />
sufficient time for the moisture to evaporate before using the device.<br />
NOTICE: When taking the device from low-temperature conditions into a<br />
warmer environment or from high-temperature conditions into<br />
a cooler environment, allow the device to acclimate to room<br />
temperature before turning on power.<br />
11
12<br />
• Avoid pushing objects into product<br />
Never push objects of any kind into cabinet slots or other openings<br />
in the product. Slots and openings are provided for ventilation. These<br />
openings must not be blocked or covered.<br />
• Mounting accessories<br />
Do not use the product on an unstable table, cart, stand, tripod,<br />
or bracket. Any mounting of the product should follow the<br />
manufacturer’s instructions, and should use a mounting accessory<br />
recommended by the manufacturer.<br />
• Avoid unstable mounting<br />
Do not place the product with an unstable base.<br />
• Use product with approved equipment<br />
This product should be used only with personal computers and<br />
options identified as suitable for use with your equipment.<br />
• Adjust the volume<br />
Turn down the volume before using headphones or other audio<br />
devices.<br />
• Cleaning<br />
Unplug the product from the wall outlet before cleaning. Do not use<br />
liquid cleaners or aerosol cleaners. Use a damp cloth for cleaning, but<br />
NEVER use water to clean the LCD screen.<br />
• For magnetic devices<br />
Please avoid putting any media that contains magnets,<br />
e.g. magnetic card, credit cards, bank cards, audio/video<br />
tape or magnetic memory devices, directly on the device<br />
or keyboard without any distance.<br />
It is highly recommended to put the media containing<br />
magnets in a security distance of at least 5 cm. If you<br />
carry your wallet or billfold which contains magnetic<br />
cards next to the device or its keyboard, information<br />
stored on these cards could be destroyed.<br />
Please make sure that there is an adequate distance<br />
from the device or its keyboard other magnetic sensitive<br />
devices, e.g., a mechanical watch or measure instruments.
• For pacemakers<br />
The functionality of pacemakers can be interfered by the<br />
device and its keyboard. Always keep the device and its<br />
keyboard in a fair distance to your pacemaker, which at<br />
least will be 5 cm. In any case, please do not carry the<br />
device and/or its keyboard in the front pockets of your<br />
shirt or coat.<br />
For information about other medical active implants,<br />
please contact the producer or a doctor to ensure such<br />
active implants will not be interfered by magnetic field.<br />
13
14<br />
Contents<br />
Chapter 1 Getting Started 19<br />
1.1 Getting to Know Your PDA Phone and Accessories..................... 20<br />
1.2 Installing the USIM/SIM Card, Storage Card and Battery,<br />
and Charging the PDA Phone........................................................ 24<br />
1.3 Starting Up...................................................................................... 28<br />
1.4 The Start Menu............................................................................... 29<br />
1.5 Quick Menu..................................................................................... 30<br />
1.6 Finger Scrolling and Finger Panning............................................ 31<br />
1.7 Getting Started Application.......................................................... 33<br />
1.8 Status Icons..................................................................................... 34<br />
1.9 Programs......................................................................................... 36<br />
1.10 Settings......................................................................................... 40<br />
Chapter 2 Entering Text and Searching for Information 45<br />
2.1 Entering Information..................................................................... 46<br />
2.2 Using the Hardware Keyboard...................................................... 48<br />
2.3 Using the On-screen Keyboard...................................................... 49<br />
2.4 Using Block Recognizer.................................................................. 49<br />
2.5 Using Letter Recognizer................................................................. 50<br />
2.6 Using Transcriber............................................................................ 50<br />
2.7 Using Symbol Pad........................................................................... 51<br />
2.8 Searching Information................................................................... 52<br />
Chapter 3 Using Phone Features 53<br />
3.1 Using the Phone............................................................................. 54<br />
3.2 Making a Call.................................................................................. 56<br />
3.3 Receiving a Call............................................................................... 58<br />
3.4 Making a Video Call........................................................................ 59<br />
3.5 Receiving a Video Call.................................................................... 63<br />
3.6 Smart Dialing.................................................................................. 63<br />
3.7 Setting Up Bluetooth SIM Access for Car Kit Phones................... 65
3.8 Additional Dialing Information..................................................... 66<br />
Chapter 4 Setting Up Your Device 69<br />
4.1 Basic Settings.................................................................................. 70<br />
4.2 Personalizing the Today Screen.................................................... 73<br />
4.3 Connecting an External Display.................................................... 76<br />
4.4 Protecting Your Device................................................................... 78<br />
Chapter 5 Synchronizing Information With Your Computer 81<br />
5.1 About Synchronization.................................................................. 82<br />
5.2 Setting Up Windows Mobile® Device Center on<br />
Windows Vista®............................................................................... 83<br />
5.3 Setting Up ActiveSync® on Windows XP®..................................... 85<br />
5.4 Synchronizing With Your Computer.............................................. 86<br />
5.5 Synchronizing via Bluetooth......................................................... 87<br />
5.6 Synchronizing Music and Video.................................................... 88<br />
Chapter 6 Organizing Contacts, Appointments, Tasks,<br />
and Other Information 89<br />
6.1 Contacts.......................................................................................... 90<br />
6.2 SIM Manager................................................................................... 94<br />
6.3 Calendar.......................................................................................... 96<br />
6.4 Tasks................................................................................................ 99<br />
6.5 Notes............................................................................................. 100<br />
6.6 Voice Recorder.............................................................................. 102<br />
Chapter 7 Exchanging Messages 105<br />
7.1 Messaging..................................................................................... 106<br />
7.2 Text Messages............................................................................... 107<br />
7.3 MMS............................................................................................... 110<br />
7.4 Types of E-mail Accounts............................................................. 115<br />
7.5 E-mail Setup Wizard..................................................................... 116<br />
7.6 Using E-mail.................................................................................. 120<br />
15
16<br />
Chapter 8 Working With Company E-mails and<br />
Meeting Appointments 125<br />
8.1 Synchronizing with the Exchange Server................................... 126<br />
8.2 Working With Company E-mails.................................................. 127<br />
8.3 Managing Meeting Requests....................................................... 131<br />
8.4 Finding Contacts in the Company Directory.............................. 133<br />
Chapter 9 Working With Documents and Files 135<br />
9.1 Microsoft® Office Mobile.............................................................. 136<br />
9.2 Adobe® Reader® LE....................................................................... 137<br />
9.3 Copying and Managing Files....................................................... 138<br />
9.4 ZIP.................................................................................................. 139<br />
9.5 Backing Up Data........................................................................... 140<br />
Chapter 10 Getting Connected 143<br />
10.1 Comm Manager.......................................................................... 144<br />
10.2 Connection Setup....................................................................... 145<br />
10.3 Ways of Connecting to the Internet.......................................... 146<br />
10.4 Starting a Data Connection....................................................... 150<br />
10.5 Internet Explorer® Mobile.......................................................... 150<br />
10.6 Windows Live........................................................................... 153<br />
10.7 Using Your Device as a Modem (Internet Sharing).................. 157<br />
10.8 Bluetooth.................................................................................... 159<br />
Chapter 11 Using GPS 167<br />
11.1 Guidelines and Preparation for Using GPS.............................. 168<br />
11.2 Google Maps............................................................................. 170<br />
Chapter 12 Experiencing Multimedia 173<br />
12.1 Camera........................................................................................ 174<br />
12.2 Pictures & Videos........................................................................ 186<br />
12.3 Windows Media® Player Mobile................................................ 188<br />
12.4 Streaming Media........................................................................ 193<br />
12.5 Audio Manager........................................................................... 194
12.6 Audio Booster............................................................................. 199<br />
Chapter 13 Managing Your Device 201<br />
13.1 Adding and Removing Programs.............................................. 202<br />
13.2 Using Task Manager................................................................... 202<br />
13.3 Resetting Your Device................................................................ 204<br />
13.4 Managing Memory..................................................................... 206<br />
13.5 Windows Update........................................................................ 207<br />
13.6 Battery Saving Tips.................................................................... 208<br />
Chapter 14 Using Other Applications 209<br />
14.1 RSS Hub....................................................................................... 210<br />
14.2 Voice Speed Dial......................................................................... 217<br />
14.3 Java.............................................................................................. 219<br />
14.4 JETCET PRINT........................................................................... 221<br />
14.5 WorldCard Mobile...................................................................... 223<br />
Appendix 225<br />
A.1 Regulatory Notices...................................................................... 226<br />
A.2 Specifications............................................................................... 231<br />
Index 235<br />
17
Chapter 1<br />
Getting Started<br />
1.1 Getting to Know Your PDA Phone and<br />
Accessories<br />
1.2 Installing the USIM/SIM Card, Storage Card<br />
and Battery, and Charging the PDA Phone<br />
1.3 Starting Up<br />
1.4 The Start Menu<br />
1.5 Quick Menu<br />
1.6 Finger Scrolling and Finger Panning<br />
1.7 Getting Started Application<br />
1.8 Status Icons<br />
1.9 Programs<br />
1.10 Settings
V<br />
20 Getting Started<br />
1.1 Getting to Know Your PDA Phone and<br />
Accessories<br />
Front panel<br />
Notification LEDs<br />
* See description below.<br />
I D E O<br />
C A M E R A<br />
Second Camera<br />
Use this camera<br />
for video call<br />
conversations or to<br />
take a self-portrait.<br />
Microphone<br />
Touch Screen<br />
HOME/TODAY<br />
• Press to open your<br />
home page in Internet<br />
Explorer Mobile.<br />
• While in any program<br />
screen, press and hold<br />
for about 3 seconds<br />
to return to the Today<br />
screen.<br />
* Notification LED 1 (GSM): Shows green and amber lights for HSDPA/WCDMA/EDGE/<br />
GSM/GPRS standby, and network status as well as the battery<br />
charging status. Flashes red when the battery level reaches<br />
5% or below. Shows amber light for GPS status.<br />
Notification LED 2 (BT/WIFI): Shows a flashing blue light for Bluetooth system notification<br />
of powered-up and ready to transmit Bluetooth signal, or a<br />
flashing green light for Wi-Fi status. When both Bluetooth<br />
and Wi-Fi are enabled, their lights flash alternately.<br />
Notification LED 3 (ALERT): Shows a flashing amber light when you receive a new<br />
message or for other notifications.
Getting Started 21<br />
Left panel<br />
VOLUME CONTROL<br />
During a call or when<br />
playing music, slide up or<br />
down to adjust the volume.<br />
VGA/TV-Out and<br />
USB Host Port<br />
Connect the supplied<br />
multifunction cable on this<br />
port to output the device<br />
screen to an external display<br />
or to connect USB peripherals.<br />
DC IN/SYNC Port<br />
Connect the supplied<br />
USB cable to synchronize<br />
information or plug in the<br />
AC adapter to recharge the<br />
battery.<br />
Earphone/Microphone Jack<br />
Connect the supplied stereo<br />
headset to this port. You can<br />
also connect stereo speakers or<br />
a microphone with a 3.5 mm<br />
plug to this port.<br />
Speakers<br />
Right panel<br />
Stylus<br />
CAMERA<br />
Press to open the Camera<br />
program. See Chapter 12<br />
for details.<br />
POWER<br />
Press and hold for about 5<br />
seconds to turn the device<br />
on or off. Press to turn off the<br />
display temporarily. For more<br />
information, see “Starting Up”<br />
in this chapter.<br />
Bottom panel<br />
Battery Compartment<br />
Houses the battery, SIM card,<br />
and miniSD card.<br />
Keyboard Connector<br />
Connects the device to<br />
the hardware keyboard.
22 Getting Started<br />
Back panel<br />
3.0 Megapixel Camera<br />
See Chapter 12 for details.<br />
Flash Light<br />
GPS Antenna<br />
Connector<br />
Peel the rubber cover,<br />
then connect an external<br />
GPS antenna for better<br />
GPS signal reception.<br />
Note Use only the<br />
external GPS<br />
antenna with<br />
model number<br />
GA S110.<br />
RESET<br />
Keyboard<br />
Subdisplay Window<br />
View device information<br />
on this window when<br />
the keyboard covers the<br />
touch screen.<br />
QWERTY Keyboard<br />
See Chapter 2 for details<br />
on how to connect and<br />
use the keyboard.
User Manual<br />
Accessories<br />
1<br />
2<br />
3<br />
Getting Started 23<br />
5<br />
6<br />
7 8<br />
Read Me First<br />
9<br />
No. Accessory Function<br />
1 Battery Powers the device.<br />
2 AC adapter Recharges the battery. Connect the AC adapter to your device,<br />
then plug the AC adapter to an electrical outlet to charge the<br />
battery.<br />
3 USB sync cable Connects your device to a PC and synchronizes data.<br />
4 Stereo headset Lets you listen to phone calls or music. The headset provides<br />
a volume control slider and a Send/End button. Press the<br />
Send/End button to pick up a call or put a call on hold; press<br />
and hold the button to end the call.<br />
5 Carrying case Acts as a protective carrying case for your device.<br />
6 User <strong>manual</strong> and<br />
Read Me First<br />
Provide instructions for using your device.<br />
7 Multifunction cable Connects your device to an external display to output the<br />
screen contents.<br />
8 Extra stylus Use to tap items on-screen.<br />
9 Getting Started disc Sources for additional tools and programs.
24 Getting Started<br />
1.2 Installing the USIM/SIM Card, Storage Card<br />
and Battery, and Charging the PDA Phone<br />
Always turn off your device before installing or replacing the USIM/SIM card,<br />
storage card, and battery. You also need to remove the back cover before you<br />
can install these components.<br />
To remove the back cover<br />
1. Make sure your device is<br />
turned off.<br />
2. Place the device face down on<br />
a clean and stable surface.<br />
USIM/SIM card slot<br />
Battery bay<br />
3. Slide up the battery<br />
compartment cover, then flip<br />
it down to access the battery<br />
bay, USIM/SIM card slot, and miniSD card slot<br />
miniSD card slot.<br />
Note To close the battery compartment cover, flip it up and align it with the battery<br />
compartment, then slide it down until it fits into place.<br />
USIM/SIM card<br />
The 3G USIM (Universal Subscriber Identity Module) or SIM (Subscriber Identity<br />
Module) card contains your phone number, service details, and phonebook/<br />
message memory. Your device supports both 1.8V and 3V USIM/SIM cards.<br />
Note<br />
Some legacy SIM cards may not function with your device. You should consult<br />
with your service provider for a replacement SIM card. There may be fees for this<br />
service.<br />
To install the USIM/SIM card<br />
1. Make sure your device is<br />
turned off.<br />
2. Locate the USIM/SIM card<br />
slot inside the battery<br />
compartment, then flip up the<br />
USIM/SIM card slot door.<br />
USIM/SIM card<br />
slot door
3. Insert the USIM/SIM card<br />
completely into the slot with<br />
its gold contacts on top and its<br />
cut-off corner facing out the<br />
slot.<br />
Getting Started 25<br />
4. Flip down the USIM/SIM card<br />
slot door, then press it until it<br />
clicks in place.<br />
Storage card<br />
A miniSD card slot is located inside the battery compartment. To have<br />
additional storage for your images, videos, music, and files, you can purchase a<br />
miniSD card and install it into the your .<br />
To install a miniSD card<br />
Insert the miniSD card into the slot<br />
with its gold contacts facing up.<br />
Note<br />
To remove the miniSD card,<br />
press it to eject it from the slot.<br />
Battery<br />
Your device comes with a rechargeable Lithium-ion polymer battery and<br />
is designed to use only manufacturer-specified original batteries and<br />
accessories. Battery performance depends on many factors, including network<br />
configuration, signal strength, the temperature of the environment in which<br />
you operate your device, the features and/or settings you select and use, items<br />
attached to connecting ports, and your voice, data, and other program usage<br />
patterns.<br />
Note<br />
Battery life is subject to network and phone usage.
26 Getting Started<br />
Battery life estimates (approximations):<br />
• Standby time: Up to 300 hours (GSM/WCDMA)<br />
• Talk time: Up to 300 minutes for WCDMA<br />
Up to 360 minutes for GSM<br />
• Video call: Up to 120 minutes<br />
• Media playback time: Up to 8 hours for WMV<br />
Up to 12 hours for WMA<br />
Warning!<br />
To reduce risk of fire or burns:<br />
• Do not attempt to open, disassemble, or service the battery pack.<br />
• Do not crush, puncture, short external contacts, or dispose of in fire<br />
or water.<br />
• Do not expose to temperatures above 60 o C (140 o F).<br />
• Replace only with the battery pack designated for this product.<br />
• Recycle or dispose of used battery as stipulated by local<br />
regulations.<br />
To install the battery<br />
1. Pull up the battery lock.<br />
2. Insert the battery with its label side up and its copper connectors first.<br />
1<br />
2 1<br />
2<br />
3. Gently push the battery into<br />
the bay until the battery latch<br />
clicks in place.<br />
4. Press the battery lock,<br />
then close the battery<br />
compartment cover.<br />
Battery latch<br />
2 1<br />
Battery lock
To remove the battery<br />
1. Make sure your device is turned off.<br />
2. Open the battery compartment.<br />
3. Lift the battery lock, then<br />
push the battery latch inward<br />
with the stylus tip. The battery<br />
automatically ejects from the<br />
bay.<br />
4. Pull the battery out of the bay,<br />
then set it aside.<br />
2 1<br />
Getting Started 27<br />
3<br />
Charge the battery<br />
New batteries are shipped partially charged. Before you start using your<br />
device, it is recommended that you install and charge the battery. Some<br />
batteries perform best after several full charge/discharge cycles.<br />
To charge the battery<br />
• Connect the power adapter<br />
to the device’s DC IN/SYNC<br />
port.<br />
Note<br />
• Connect the device to your<br />
computer using the provided<br />
USB Sync cable.<br />
Only the AC adapter and USB<br />
sync cable provided with your<br />
device must be used to charge<br />
the device.<br />
Charging is indicated by a solid amber light on the Notification LED 1 (GSM)<br />
indicator. As the battery is being charged while the device’s power is on, a<br />
charging icon appears in the title bar of the Today screen. After the battery<br />
has been fully charged, the Notification LED 1 charging indicator becomes<br />
green and a full battery icon appears in the title bar of the Today screen.<br />
Warning!<br />
• Do not remove the battery from the device while you are charging it<br />
using the AC or car adapter.<br />
• As a safety precaution, the battery stops charging when it overheats.
28 Getting Started<br />
1.3 Starting Up<br />
After installing your SIM card and battery and charging the PDA phone, you<br />
can now power on and start using your device.<br />
Turn your device on and off<br />
To turn on the power<br />
• Press and hold the POWER button for a few seconds.<br />
When you turn on your device for the first time, a Quick Start Wizard<br />
guides you through the calibration process and the setup of date<br />
and time, and password. For more information about touch screen<br />
calibration, see “Calibrate the device” later in this chapter. After the Quick<br />
Start Wizard finishes, the device installs customization settings, then<br />
restarts.<br />
Note<br />
After the device restarts, you may be prompted to set up an e-mail<br />
account. Refer to Chapter 7 for details.<br />
To turn off the power<br />
• Press and hold the POWER button for a few seconds.<br />
Tap Yes when a message prompts you to choose whether or not to turn<br />
off the device completely.<br />
Calibrate the device<br />
Calibrating the touch screen involves tapping the center of a cross with the<br />
stylus as the cross moves around the screen. This process ensures that when<br />
you tap the screen with your stylus, the tapped item is activated.<br />
If your device does not accurately respond to screen taps, follow these steps<br />
to re-calibrate it:<br />
1. Tap Start > Settings > System tab > Screen.<br />
2. On the General tab, tap Align Screen and follow the on-screen<br />
instructions to complete the calibration.<br />
Manage screen settings<br />
The device’s display supports two orientation modes: Portrait and<br />
Landscape. Do one of the following to change the screen orientation:
Getting Started 29<br />
• Tap Start > Settings > System tab > Screen > General tab to select<br />
the screen orientation you want.<br />
To smooth the edges of screen fonts for many programs, tap Start ><br />
Settings > System tab > Screen > ClearType tab, then select the Enable<br />
ClearType check box.<br />
To increase the readability or to see more content on the screen, on the Text<br />
Size tab, adjust the text size by moving the slider.<br />
Switch your device to Sleep mode<br />
Press the POWER button shortly to turn off the display temporarily and switch<br />
your device to Sleep mode. Sleep mode suspends your device to a low power<br />
state while the display is off in order to save battery power.<br />
Your device also automatically goes into Sleep mode when you leave the<br />
device idle after a certain period of time.<br />
To specify the timeout period before your device goes into Sleep mode<br />
1. Tap Start > Settings > System tab > Power > Advanced tab.<br />
2. Under On battery power, make sure the Turn off device if not used<br />
for check box is selected.<br />
3. Select the battery timeout period, then tap OK.<br />
You will still be able to receive messages and calls while your device is in<br />
Sleep mode. Pressing the POWER button again or incoming calls/messages<br />
will wake up your device.<br />
1.4 The Start Menu<br />
The Start menu, located on the top left corner of the Today screen, displays a<br />
list of programs. You can start a program by scrolling through the programs<br />
list and then pressing the Enter key on the hardware keyboard, or by tapping a<br />
program with your finger or stylus.
30 Getting Started<br />
Open a recently-used program.<br />
Switch to the Today screen.<br />
Open a program.<br />
Access more programs.<br />
View and change settings.<br />
View Help information for<br />
the current screen.<br />
Tip The Start menu items can be customized by tapping Start > Settings ><br />
Personal tab > Menus.<br />
1.5 Quick Menu<br />
The Quick Menu, located at the top right corner of the Today screen, shows<br />
the currently running programs. You can quickly switch between running<br />
programs, stop programs, and see how much program memory is being<br />
used.<br />
Customize the Task Manager<br />
settings. (See “Using Task<br />
Manager” in Chapter 13.)<br />
Stop all<br />
currently<br />
running<br />
programs.<br />
Tap to open the<br />
Quick Menu.<br />
Total percentage of memory<br />
used by running programs.<br />
Tap to open the Memory<br />
settings.<br />
• To switch to a running<br />
program, tap the<br />
program name.<br />
• To stop a running<br />
program, tap .
1.6 Finger Scrolling and Finger Panning<br />
Getting Started 31<br />
The device’s screen supports finger scrolling and finger panning when<br />
viewing content that cannot be fit entirely on the screen, such as Web<br />
pages, documents, and messages. Finger scrolling can also be used to scroll<br />
up and down lists such as the contacts list, file list, message list, calendar<br />
appointments list, and more.<br />
Note<br />
When finger scrolling up and down,<br />
flick or slide anywhere within this area.<br />
Finger scrolling and panning works in both portrait and landscape modes.<br />
To use finger scrolling<br />
• Flick or slide your finger downward to scroll up the screen.<br />
Note<br />
• Flick or slide your finger upward to scroll down the screen.<br />
• To scroll towards the left, flick or slide your finger to the right.<br />
• To scroll towards the right, flick or slide your finger to the left.<br />
• While the screen is scrolling, you can stop the scrolling by pressing<br />
your finger on the touch screen.<br />
Scrollbars on the screen indicate that there is content that doesn’t fit on the<br />
screen. You can finger-scroll up and down only when there's a vertical scrollbar<br />
shown on the screen. Likewise, you can finger-scroll left and right only when<br />
there's a horizontal scrollbar.<br />
To use finger panning<br />
• To pan downward, touch and hold on the touch screen then drag<br />
your finger upward.
32 Getting Started<br />
Note<br />
• To pan upward, touch and hold on the touch screen then drag your<br />
finger downward.<br />
• To pan towards the right, touch and hold on the touch screen then<br />
drag your finger to the left.<br />
• To pan towards the left, touch and hold on the touch screen then<br />
drag your finger to the right.<br />
• You can also pan diagonally.<br />
Scrollbars on the screen indicate that there is content that doesn’t fit on<br />
the screen. You can only use finger panning when scrollbars appear on the<br />
screen.<br />
To continuously pan<br />
1. Drag your finger towards the boundary and hold. The Web page,<br />
document, or message that you are viewing then continuously pans.<br />
Left and right boundaries<br />
2. Release your finger to stop panning.<br />
Top and bottom boundaries<br />
To enable or mute finger scrolling and panning sound<br />
Tap Start > Settings > System tab > TouchFLO, then select or clear the<br />
Enable sound when finger scrolling and panning check box.
1.7 Getting Started Application<br />
Getting Started 33<br />
Getting Started is a list of “how to’s” that you can reference to learn basic<br />
features and settings of your device.<br />
To open Getting Started<br />
1. Tap Start > Programs > Getting Started.<br />
2. Tap one of the items onscreen to learn how to do the task.<br />
Link<br />
Tip<br />
Most of the tutorials contain the link to the actual screen you need to access to<br />
perform the task. Tap the link to go to the screen.
34 Getting Started<br />
1.8 Status Icons<br />
The following are some of the status icons that you may see on the device.<br />
Icons that appear in this area<br />
Connection Setup<br />
Multiple notifications; tap the<br />
icon to view all<br />
New text messages;<br />
SMS notification of voice mail<br />
Sending MMS<br />
Receiving MMS<br />
MMS sent<br />
Icons that appear in this area<br />
GPRS available<br />
HSDPA available<br />
WCDMA available<br />
Connection is active<br />
Connection is not active<br />
Synchronization in progress<br />
Cannot send MMS<br />
New incoming MMS<br />
New Windows Live message<br />
Missed call<br />
Roaming<br />
Alarm<br />
Bluetooth stereo headset<br />
detected<br />
ActiveSync notification<br />
Synchronization error
Getting Started 35<br />
Icons that appear in this area<br />
GPRS connecting<br />
GPRS in use<br />
Icons that appear in this area<br />
Sound on<br />
Sound off<br />
HSDPA connecting<br />
HSDPA in use<br />
WCDMA connecting<br />
WCDMA in use<br />
Maximum signal strength<br />
No signal<br />
Phone is turned off<br />
No phone service<br />
Searching for phone service<br />
Icons that appear in this area<br />
Battery charging<br />
Battery full<br />
Battery is critically low<br />
Voice call in progress<br />
Call on hold<br />
Calls are forwarded<br />
Dialing while no USIM/SIM<br />
card is inserted<br />
No USIM/SIM card inserted
36 Getting Started<br />
1.9 Programs<br />
The following are programs you can find on your device or install from the<br />
Applications disc.<br />
Programs in the Start Menu<br />
Icon<br />
Description<br />
Office Mobile Use the complete suite of Microsoft® Office applications<br />
for your mobile device.<br />
Excel Mobile Create new workbooks or view and edit Excel<br />
workbooks.<br />
OneNote Mobile Create notes with text, photos, and voice<br />
recordings.<br />
PowerPoint Mobile View PowerPoint slides and presentations.<br />
Word Mobile Create, view, and edit Word documents.<br />
Calendar Keep track of your appointments and create meeting<br />
requests.<br />
Contacts Keep track of your friends and colleagues.<br />
Internet Explorer Mobile Browse Web and WAP sites as well as<br />
download new programs and files from the Internet.<br />
Messaging Send and receive e-mail, MMS, and text messages.<br />
Phone Make and receive calls, switch between calls, and set up<br />
conference calling.<br />
Help See Help topics for the current screen or program.
Programs screen<br />
Icon<br />
Description<br />
Getting Started 37<br />
Games Play two pre-installed games: Bubble Breaker and Solitaire.<br />
ActiveSync Synchronize information between your device and a PC or<br />
the Exchange Server.<br />
Adobe Reader LE View PDF (Portable Document Format) files on your<br />
device.<br />
Audio Booster Enhances your music experience by providing you with<br />
controls for adjusting equalizer, 3D sound, treble, and bass settings.<br />
Audio Manager Browse for music files by organizing music files into<br />
categories.<br />
Bluetooth Explorer Search for other Bluetooth devices that have file<br />
sharing enabled and access their Bluetooth shared folder.<br />
Calculator Perform basic arithmetic and calculations, such as addition,<br />
subtraction, multiplication, and division.<br />
Camera Take photos or shoots video clips with accompanying audio.<br />
ClearVue Presenter Create, edit, save, and print presentations.<br />
File Explorer Organize and manage files on your device.<br />
Getting Started View a list of “how to’s” that you can reference to learn<br />
basic features and settings of your device.<br />
Google Maps View your current location, search for places of interest and<br />
addresses, seek directions, and more. See Chapter 11 for details.<br />
Internet Sharing Connect your notebook computer to the Internet using<br />
your device's data connection.<br />
Java Download and install Java applications, such as games and tools, on<br />
your device.
38 Getting Started<br />
Icon<br />
Description<br />
JETCET PRINT Print documents, image files, emails, Web pages and more<br />
from your device.<br />
Messenger Chat with your contacts using this mobile version of Windows<br />
Live Messenger.<br />
Notes Create handwritten or typed notes, drawings, and voice<br />
recordings.<br />
Opera Browser Browse the Internet with the mobile version of the awardwinning<br />
Opera browser.<br />
Pictures & Videos View, organize, and sort pictures, animated GIFs, and<br />
video files on your device or a storage card.<br />
QuickGPS Download satellite data over the Internet via ActiveSync or<br />
GPRS to speed up the time for determining your current GPS position.<br />
Remote Desktop Mobile Connect to and control your desktop computer<br />
remotely with your device.<br />
RSS Hub Download the latest news headlines and podcasts from the<br />
Internet so you stay up-to-date.<br />
Search Search contacts, data, and other information on your device.<br />
SIM Manager Manage the contacts that are stored on your SIM card. You<br />
can also use this program to copy SIM contents to Contacts on your device.<br />
Streaming Media Stream live or on-demand video.<br />
Sprite Backup Provides a quick and easy way to create backups of your<br />
data. See Chapter 9 for details. Install this program from the Applications<br />
disc.<br />
Tasks Keep track of your tasks.<br />
Voice Recorder Record your voice, play it back, then send it via e-mail,<br />
MMS or beaming. You can also set the recorded voice as your ring tone.<br />
Voice Speed Dial Record voice tags so that you can dial a phone number<br />
or launch programs by speaking a word.
Getting Started 39<br />
Icon<br />
Description<br />
Windows Live Find information on the Web using this mobile version of<br />
Windows Live. It also lets you sign into your Windows Live account so that<br />
you can access your Live Mail messages and send/receive instant messages<br />
in Live Messenger.<br />
Windows Media Player Mobile Play back audio and video files.<br />
WorldCard Mobile Capture name cards using the device camera, and<br />
export the name card information as a new contact in your Contacts list.<br />
See Chapter 14 for details.<br />
ZIP Save memory and free up storage space on your device by<br />
compressing files in the conventional ZIP format.<br />
STK (SIM Tool Kit) Service Access information and other services<br />
offered by your wireless service provider.
40 Getting Started<br />
1.10 Settings<br />
You can adjust the device settings to suit the way you work. To see all<br />
available settings, tap Start > Settings, then tap the Personal, System, and<br />
Connections tabs located at the bottom of the screen.<br />
Personal tab<br />
Icon<br />
Description<br />
Buttons Assign a program or function to a hardware button.<br />
Input Set options for each of the input methods.<br />
Lock Set a password for your device.<br />
Menus Set which programs will appear in the Start menu.<br />
Owner Information Enter your personal information on your device.<br />
Phone Customize phone settings such as ring tone, set a PIN number for<br />
your SIM card, and more.<br />
Sounds & Notifications Enable sounds for events, notifications, and<br />
more, and set the type of notification for different events.<br />
Today Customize the appearance and the information to be displayed<br />
on the Today screen.<br />
Voice Speed Dial Create voice tags for voice dialing contacts and SIM<br />
contacts as well as for launching programs.
System tab<br />
Icon<br />
Description<br />
Getting Started 41<br />
About This is where you can see basic information such as the Windows<br />
Mobile® version and type of processor used on your device. You can also<br />
specify a name for your device.<br />
Backlight Set the backlight timeout and adjust brightness.<br />
Certificates See information about certificates that are installed on your<br />
device.<br />
Clear Storage Remove all your data and files from the device memory and<br />
reset your device to factory default settings, reformat the device flash disk,<br />
or do both.<br />
Clock & Alarms Set the device clock to the date and time of your locale<br />
or to a visiting time zone when you’re traveling. Alarms can also be set at<br />
specified days and times of a week.<br />
Customer Feedback Set your device to automatically send information<br />
about how you use Windows Mobile. By default, this option is disabled.<br />
Device Information See information about the firmware version,<br />
hardware, identity, and the duration of calls made on your device.<br />
Encryption Encrypt files on your storage card. Encrypted files will only be<br />
readable on your device.<br />
Error Reporting Enable or disable the device’s error reporting function.<br />
When this function is enabled and a program error occurs, technical data<br />
about the state of the program and your computer will be logged in a text<br />
file and delivered to Microsoft’s technical support if you choose to send it.<br />
External GPS Set the appropriate GPS communication ports, if required.<br />
You may need to do this when there are programs on your device that<br />
access GPS data or you have connected a GPS receiver to your device.<br />
See Help for details.<br />
Key Lock Lock the buttons on your device except for the POWER button<br />
when the device is in Sleep mode. This ensures you will not switch the<br />
device on by accident and consume unnecessary power.
42 Getting Started<br />
Icon<br />
Description<br />
Managed Programs Download and install applications that are deployed<br />
by the System Center Mobile Device Manager. This program also lets you<br />
view applications which were installed from the System Center Mobile<br />
Device Manager.<br />
Memory Check the device memory allocation status and memory card<br />
information. You can also stop currently running programs.<br />
Microphone AGC Adjust the volume of your voice automatically when<br />
you are recording.<br />
Power Check the remaining battery power. You can also set the timeout<br />
for turning off the display (switching device to Sleep mode) to conserve<br />
battery power.<br />
Regional Settings Set the regional configuration to use, including the<br />
format for displaying numbers, currency, date, and time on your device.<br />
Remove Programs Remove programs that you installed on your device.<br />
Screen Change the screen orientation, re-calibrate the screen, and change<br />
the screen text size.<br />
Task Manager Stop running programs and set the ( ) button to end<br />
programs immediately when you tap the button. For more information, see<br />
“Using Task Manager” in Chapter 13.<br />
TouchFLO Enable or mute the finger scrolling and panning sound. See<br />
“To enable or mute finger scrolling and panning sound” in this chapter<br />
for details.<br />
TV Out Allows you to output the contents you are viewing on the device<br />
screen to an external display device.<br />
Windows Update Link to Microsoft’s Web site and update Windows<br />
Mobile® on your device with the latest security patches or fixes.
Connections tab<br />
Getting Started 43<br />
Icon<br />
Description<br />
Beam Set your device to receive incoming Bluetooth beams.<br />
Bluetooth Turn Bluetooth on, set your device to visible mode, and scan<br />
for other Bluetooth devices.<br />
Comm Manager Manage your device’s connections (including 3G/GPRS,<br />
Wi-Fi, Bluetooth, and ActiveSync), turn the phone on or off, and enable or<br />
disable the Direct Push function.<br />
Connection Setup Configure your device’s data connections, such as 3G/<br />
GPRS, WAP, and MMS, based on the detected or selected network operator.<br />
See Chapter 10 for details.<br />
Connections Set up one or more types of modem connections for your<br />
device, such as phone dial-up, 3G/GPRS, and more, so that your device can<br />
connect to the Internet or a private local network.<br />
CSD Line Type Set the line type to use when making a circuit switch<br />
data (CSD) connection. Normally, you do not need to change the setting<br />
unless you encounter a problem on establishing a connection.<br />
Domain Enroll Enrol your device with your company’s domain to access<br />
company resources.<br />
GPRS Setting Set the GPRS authentication method.<br />
SMS Service Enables sending of SMS text messages via a data<br />
connection, such as GPRS or a circuit-switched connection.<br />
USB to PC Select the type of USB connection between your device and<br />
your PC.<br />
Wi-Fi Scan for available wireless networks.<br />
WLAN Display information about the active wireless network and<br />
customize Wi-Fi settings.
44 Getting Started
Chapter 2<br />
Entering Text and Searching<br />
for Information<br />
2.1 Entering Information<br />
2.2 Using the Hardware Keyboard<br />
2.3 Using the On-screen Keyboard<br />
2.4 Using Block Recognizer<br />
2.5 Using Letter Recognizer<br />
2.6 Using Transcriber<br />
2.7 Using Symbol Pad<br />
2.8 Searching Information
46 Entering Text and Searching for Information<br />
2.1 Entering Information<br />
When you start a program or select a field that requires text or numbers, you<br />
can either use the QWERTY keyboard or one of the onscreen input methods to<br />
enter information.<br />
QWERTY keyboard<br />
Your device comes with a QWERTY keyboard, which is similar to a standard<br />
keyboard on your PC. To use the keyboard, attach it to your device via the<br />
keyboard connector. The device securely attaches itself to the keyboard<br />
through a magnet.<br />
To separate the device from the keyboard, simply pull them apart.<br />
Note<br />
Warning!<br />
Observe care when detaching the keyboard from the device.<br />
Avoid placing credit cards, diskettes, audio or video cassettes or any other<br />
form of magnetic data carriers near the device or the keyboard as this could<br />
otherwise lead to loss of data stored on such objects. Other magnetic<br />
sensitive devices like a mechanical wristwatch should also not be placed near<br />
the device or keyboard.
Entering Text and Searching for Information 47<br />
Onscreen input methods<br />
When you start a program or select a field that requires text or numbers, the<br />
Input Panel icon becomes available on the menu bar.<br />
Tap the Input Selector arrow (that appears next to the Input Panel icon)<br />
to open a menu where you can select a text input method and customize<br />
input options. After selecting a text input method, the corresponding Input<br />
Panel is displayed, which you can use to enter text.<br />
To show or hide the Input Panel, tap the Input Panel icon.<br />
Hardware keyboard<br />
indicator. Tells whether<br />
the CAPS LOCK ( )<br />
or Function ( ) key on<br />
the hardware keyboard is<br />
activated. See “Using the<br />
Hardware Keyboard” for more<br />
information.<br />
Input Panel<br />
(On-screen<br />
Keyboard)<br />
Input Selector arrow<br />
Input Panel icon<br />
Text input methods<br />
Icon Input method Icon Input method<br />
On-screen Keyboard<br />
Letter Recognizer or<br />
Block Recognizer<br />
Transcriber<br />
Symbol Pad<br />
Note<br />
Some text input methods may not be available in certain language versions of<br />
the device.
48 Entering Text and Searching for Information<br />
2.2 Using the Hardware Keyboard<br />
You can do the following with the QWERTY keyboard:<br />
• To type lowercase letters, press the keys using your thumbs or fingers.<br />
• To use all uppercase letters, press . The CAPS LOCK icon ( )<br />
appears before the Input Panel icon on the screen to indicate that<br />
CAPS LOCK is on. To change back to all lowercase letters, press<br />
again.<br />
• To use a single uppercase letter, press and then press the<br />
corresponding key.<br />
• To enter the symbol or punctuation mark, or launch the program that<br />
is printed at the upper right corner of a key, press , then press the<br />
corresponding key. When is pressed, the function key icon ( )<br />
appears before the Input Panel icon on the screen.<br />
• To type accented characters (like á, ã, ç, ê, í, ó, ü, etc), press the letter<br />
key first, press and hold , then press several times until<br />
you find the correct character you need.<br />
• To open the Symbol Pad, press .<br />
• Press to verify your data entries or exit the program in use.<br />
• Press the arrow keys / / / for directional movement.<br />
• Press to open the Messaging program.<br />
• Press to open your SMS/MMS messaging account.
Entering Text and Searching for Information 49<br />
• Press + to enable or disable the keyboard’s tactile feedback.<br />
• Press + to open the Start menu.<br />
2.3 Using the On-screen Keyboard<br />
When using Windows Mobile’s standard on-screen Keyboard, you can enter<br />
text by tapping keys on the keyboard that is displayed on the screen.<br />
To enter text using the on-screen Keyboard<br />
1. In a program, tap the Input Selector arrow, and tap Keyboard.<br />
2. Enter text by tapping keys on the on-screen Keyboard.<br />
To enlarge the on-screen Keyboard<br />
1. Tap the Input Selector arrow, then tap Options.<br />
2. In the Input method list, select Keyboard.<br />
3. Select Large keys, then tap OK.<br />
2.4 Using Block Recognizer<br />
With Block Recognizer, you use a single stroke to write letters, numbers,<br />
symbols, and punctuation, which are then converted into typed text.<br />
To use Block Recognizer<br />
1. From a program, tap the Input Selector arrow, and tap Block<br />
Recognizer.<br />
Tip<br />
2. Write characters, numbers, and symbols in the designated writing<br />
area.<br />
• Enter letters by writing in the abc (left) area of the box.<br />
• Enter numbers by writing in the 123 (right) area of the box.<br />
• Enter symbols and punctuation by tapping the left or right area of<br />
the box (a gray dot appears), then writing the desired character.<br />
For help with writing characters with Block Recognizer, tap the question<br />
mark near the writing area.
50 Entering Text and Searching for Information<br />
2.5 Using Letter Recognizer<br />
With Letter Recognizer, you can write individual letters, numbers, and<br />
punctuation marks, which are then converted into typed text.<br />
To use Letter Recognizer<br />
1. From a program, tap the Input Selector arrow, and tap Letter<br />
Recognizer.<br />
Tip<br />
2. Write characters, numbers, and symbols in the designated writing<br />
area.<br />
• Enter uppercase letters by writing in the ABC (left) area of the box.<br />
• Enter lowercase letters by writing in the abc (middle) area of the box.<br />
• Enter numbers by writing in the 123 (right) area of the box.<br />
• Enter punctuation and symbols by writing the desired character in<br />
the 123 (right) area of the box.<br />
For help with writing characters, tap the question mark near the writing area.<br />
2.6 Using Transcriber<br />
Transcriber is a handwriting recognition program that enables you to write<br />
in cursive, print, or a combination of both.<br />
To write using Transcriber<br />
1. Open a program that accepts <strong>user</strong> input, such as Word Mobile.<br />
2. Tap the Input Selector arrow, and tap Transcriber. The Transcriber<br />
introductory screen appears. Read the introduction and tap OK.<br />
3. Position the cursor where you want text to appear.<br />
4. Use the stylus to write anywhere on the screen. The handwriting will<br />
be converted to text shortly after you lift the stylus from the screen.<br />
To enter punctuation and symbols<br />
Transcriber comes with an on-screen keyboard that provides an easy way to<br />
add punctuation or a special symbol to existing text. To use this onscreen<br />
keyboard, tap on the Transcriber toolbar.<br />
The keyboard remains visible until you tap the button again.
Tips<br />
Entering Text and Searching for Information 51<br />
• To reposition the keyboard, tap and hold the title bar, then drag to the<br />
desired location.<br />
• When no text is selected, you can open the keyboard by using the<br />
gesture (draw a line straight down and then straight up). For more<br />
information about using Transcriber gestures, see Help on your device.<br />
To edit text<br />
1. In a program, draw a line from left to right across the text you want to edit.<br />
2. After you lift the stylus from the screen, the line disappears and the<br />
selected text will be highlighted.<br />
3. Do either of the following:<br />
• Rewrite the text.<br />
• Use gestures to capitalize letters, insert a space, and so on. For<br />
information about using Transcriber gestures, see Help on your<br />
device.<br />
2.7 Using Symbol Pad<br />
Symbol Pad provides a comprehensive list of common numbers and symbols<br />
such as parentheses, brackets, currency signs, punctuation marks, special<br />
characters and more.<br />
To open the Symbol Pad and select a symbol<br />
1. Create or open a document, such as a Word document.<br />
2. To open the Symbol Pad:<br />
• Tap the Input Selector arrow, then tap Symbol Pad; or<br />
• Press on the hardware keyboard.<br />
3. To browse through the pages of symbols, tap / on the Symbol<br />
Pad screen.<br />
4. Tap a symbol to select it and close the Symbol Pad. The selected symbol<br />
will then be inserted in your document.
52 Entering Text and Searching for Information<br />
Tap a symbol to insert it into your text.<br />
Indicates the current page and the total<br />
number of symbol pages. Tap to go to<br />
the next page of symbols.<br />
2.8 Searching Information<br />
Tap to display the previous page of symbols.<br />
Tap to display the next page of symbols.<br />
Tap to close the Symbol Pad<br />
without selecting a symbol.<br />
You can search for files and other items stored in My Documents folder or on an<br />
installed storage card of your device. You can search by file name or by words<br />
located in the item. For example, you can search in e-mail messages, notes,<br />
appointments, contacts, and tasks, as well as in online Help.<br />
To search for a file or an item<br />
1. Tap Start > Programs > Search.<br />
2. In Search for:<br />
• Enter the file name, word, or other information you want to search.<br />
• Tap the down arrow icon ( ), and from the list, select an item<br />
that you have previously searched for.<br />
3. In the Type field, you can tap the down arrow icon ( ) and select a<br />
data type from the list to narrow down your search.<br />
4. Tap Search. The system then starts searching for matched files in the<br />
My Documents folder and subfolders.<br />
5. In the Results list, tap the item you want to open.<br />
Note The storage card symbol ( or ) is displayed next to the names of files<br />
saved on a storage card.
Chapter 3<br />
Using Phone Features<br />
3.1 Using the Phone<br />
3.2 Making a Call<br />
3.3 Receiving a Call<br />
3.4 Making a Video Call<br />
3.5 Receiving a Video Call<br />
3.6 Smart Dialing<br />
3.7 Setting Up Bluetooth SIM Access<br />
for Car Kit Phones<br />
3.8 Additional Dialing Information
54 Using Phone Features<br />
3.1 Using the Phone<br />
Like a standard mobile phone, you can use your device to make, receive,<br />
and keep track of calls and send messages. You can also dial directly<br />
from Contacts, and easily copy phonebook entries from your SIM card to<br />
Contacts on your device.<br />
The Phone screen<br />
From the Phone screen, you can access Call History, Speed Dial, and Phone<br />
settings. To open the Phone screen, tap Start > Phone.<br />
Tip<br />
With the hardware keyboard connected to your device and while in the Today<br />
screen, tap any alphanumeric key on the hardware keyboard to open the Phone<br />
screen and begin dialing the phone number of the person you want to call.<br />
Enter your PIN<br />
Most SIM cards are preset with a PIN (personal identification number) that is<br />
provided by your wireless service provider.<br />
Note<br />
1. Enter the preset PIN assigned by your wireless service provider.<br />
2. Tap Enter.<br />
If you entered the wrong PIN three times, the SIM card will be blocked. If this<br />
happens, you can unblock it with the PUK (PIN Unblocking Key) obtained<br />
from your wireless service provider.<br />
Turn the phone function on and off<br />
In many countries, you are required by law to turn off the phone while on<br />
board an aircraft.<br />
To enable or disable the phone function<br />
1. Tap Start > Settings > Connections tab > Comm Manager.<br />
2. On the Comm Manager screen, tap the Phone button ( ) to<br />
enable or disable the phone function.
Using Phone Features 55<br />
To enable or disable Airplane Mode<br />
Another way to turn off the phone function is to switch your device to<br />
Airplane Mode.<br />
When you enable Airplane Mode, all wireless radios on your device are turned<br />
off, including the phone function, Wi-Fi, and Bluetooth.<br />
When you disable Airplane Mode, the phone function is turned back on and<br />
the previous states of Wi-Fi and Bluetooth are restored.<br />
1. Tap Start > Settings > Connections tab > Comm Manager.<br />
2. On the Comm Manager screen, tap the Airplane Mode button<br />
( ) to enable or disable Airplane Mode.<br />
Adjust the device volume<br />
Tip<br />
Note<br />
1. Tap the Speaker icon ( ) in the<br />
title bar.<br />
2. In the Volume callout, do the<br />
following:<br />
• Adjust the phone volume ( ) or<br />
device volume ( ) by moving<br />
the slider to the desired volume<br />
level.<br />
• Tap On or Off to change both the device and ringer volume settings.<br />
Use the VOLUME CONTROL slider on the device’s left panel to adjust the device<br />
volume when not in a call. When in a call, use the VOLUME CONTROL slider to<br />
adjust the phone volume.<br />
The conversation phone volume can only be adjusted during a call. Adjusting<br />
the volume at another time will only affect the ring, notification, and audio/<br />
video playback volume levels.
56 Using Phone Features<br />
3.2 Making a Call<br />
With your device, you can make a call from Phone, Contacts, Speed Dial,<br />
Call History, and SIM Manager.<br />
Make a call from Phone<br />
1. Tap Start > Phone.<br />
Tips<br />
2. Tap Keypad, then tap the keys on the<br />
keypad to enter the phone number.<br />
• If you tapped a wrong number, tap<br />
to erase each subsequent<br />
digit of a number. To erase the<br />
entire number, tap and hold .<br />
• You can also press the alphanumeric<br />
keys on the hardware keyboard to<br />
enter the phone number.<br />
3. Tap .<br />
Make a call from Contacts<br />
Tap Contacts on the Today screen or tap Start > Contacts, then do one of<br />
the following:<br />
• Tap the contact in the contacts list, then tap the phone number that you<br />
want to call.<br />
• Tap and hold the contact, and tap Call Work, Call Home, or Call<br />
Mobile on the shortcut menu.<br />
Tip<br />
You can also tap Contacts on the Phone screen to open Contacts.<br />
To choose one of the numbers of a contact to dial<br />
By default, the mobile phone number (m) of a contact is dialed when you<br />
make a call from Contacts. However, you can specify that a different phone<br />
number is dialed instead.<br />
1. Tap Start > Contacts.<br />
2. Select the contact.<br />
3. Press the left or right arrow key on the hardware keyboard. The letters<br />
representing the number will change as you press the keys.
Make a call from Call History<br />
1. On the Phone screen, tap .<br />
Using Phone Features 57<br />
2. Finger-scroll to the desired contact or phone number, then tap Call.<br />
One-touch Speed Dial<br />
Use Speed Dial to call frequently-used numbers with a single tap. For<br />
example, if you assign a contact to the location 2 in Speed Dial, you can tap<br />
and hold on the Phone screen keypad to dial the contact’s number.<br />
Before you can create a Speed Dial entry, the number must already be in the<br />
Contacts list.<br />
To create a Speed Dial entry<br />
1. On the Phone screen, tap .<br />
Note<br />
2. Tap Menu > New.<br />
3. Tap a contact, then select the phone number of the contact that you<br />
want assigned to the speed dial key.<br />
4. In Location, select an available key to use as the speed dial key.<br />
5. Tap OK.<br />
When you assign a new phone number in an occupied speed dial key, the<br />
new phone number will replace the existing one.<br />
Tips • To create a Speed Dial entry from Contacts or SIM card contacts, tap<br />
the contact, select the number you want to add to Speed Dial, then tap<br />
Menu > Add to Speed Dial.<br />
• To delete a Speed Dial entry, in the Speed Dial list, tap and hold the desired<br />
entry, then tap Delete.<br />
To call voice mail<br />
Number 1 is generally reserved for your voice mail. Tap and hold this button<br />
on the Phone screen keypad to call voice mail and retrieve your voice mail<br />
messages.
58 Using Phone Features<br />
Make a call from SIM Manager<br />
SIM Manager allows you to view the contents of your SIM card, transfer SIM<br />
phonebook entries to Contacts on your device, and make a call from your SIM<br />
card.<br />
To call a SIM contact<br />
1. Tap Start > Programs > SIM Manager.<br />
Wait for your SIM card contents to load.<br />
2. Tap and hold the name or phone number of the person you want to<br />
call, then tap Call.<br />
For more information about SIM Manager, see Chapter 6.<br />
3.3 Receiving a Call<br />
When you receive a phone call, a message will appear, giving you the option to<br />
either answer or ignore the incoming call.<br />
To answer or reject an incoming call<br />
• To answer the call, tap Answer.<br />
• To reject the call, tap Ignore.<br />
To end a call<br />
When an incoming or outgoing call is in progress, tap<br />
to hang up.<br />
To put a call on hold<br />
Your device notifies you when you have another incoming call, and gives you<br />
the option of rejecting or accepting the call. If you are already on a call and<br />
accept the new call, you can choose to switch between the two callers, or set<br />
up a conference call between all three parties.<br />
1. Tap Answer to take the second call, and put the first one on hold.<br />
2. To end the second call and return to the first call, tap .<br />
To switch between two calls<br />
• During a call, tap Swap.
Using Phone Features 59<br />
To set up a conference call<br />
1. Either put a call on hold, and dial a second number; or, accept a second<br />
incoming call when you already have one in progress.<br />
Note<br />
2. Tap Menu > Conference.<br />
Not all mobile phone networks support conference calling. Contact your<br />
wireless service provider for details.<br />
To mute a call<br />
You can turn off the microphone during a call, so that you can hear the<br />
caller but the caller cannot hear you.<br />
• During a call, tap .<br />
• When the microphone is turned off, the mute icon appears on<br />
the screen. Tap to turn the microphone back on again.<br />
To check a missed call<br />
You will see the icon in the title bar when you missed a call. To check<br />
who the caller was, do one of the following:<br />
• Tap , then tap View.<br />
• On the Phone screen, tap . You can view missed calls as well as<br />
incoming and outgoing calls in Call History.<br />
3.4 Making a Video Call<br />
Your device allows you to make video calls when you are within a 3G network<br />
coverage area. You need to use a 3G enable SIM card to make video calls.<br />
To make a video call<br />
Do any of the following:<br />
• On the Phone keypad, tap the phone number to call, then tap<br />
.<br />
• From Contacts, tap and hold the desired contact, and tap Video Call.<br />
• From Call History, tap and hold the desired phone number or contact,<br />
and tap Video Call.
60 Using Phone Features<br />
Note<br />
The other party’s image will appear on the screen about 3 to 5 seconds after<br />
a connection is established, depending on the signal strength. The signal<br />
may also influence the quality of streaming images.<br />
When the video call is unsuccessful, a message pops up asking you if you want<br />
to try again, make a voice call instead, or send an SMS or MMS message.<br />
Change video call settings<br />
While on a video call, you can change certain settings such as the size of the<br />
image, brightness of the image, the camera to use, and more.<br />
The following shows the video call screen and control buttons during an<br />
ongoing video call.<br />
1<br />
3<br />
4 5 6 7<br />
2<br />
1 Status area. Status area. Displays your<br />
service provider name and call status.<br />
2 Image display area. Displays your<br />
image and the other party’s image,<br />
depending on the selected Swap<br />
Image setting.<br />
3 Brightness. Tap to adjust the<br />
brightness level.<br />
4 Camera On/Off. Tap to toggle<br />
between turning on/off the camera.<br />
When the camera is turned off, the<br />
image displayed depends on the Video<br />
Call options you have set. See “Set up<br />
Video Call Options” for details.<br />
5 Audio Mute/Unmute. Tap to mute/<br />
unmute audio.<br />
6 Main/Second camera. Tap to switch<br />
between the Main (back) and Second<br />
(front) camera.<br />
7 Swap Image. Tap continuously to cycle<br />
through the available image display<br />
options.
Swap Image options<br />
Both parties<br />
(My video small)<br />
Both parties<br />
(My video large)<br />
Both parties (equal)<br />
Other party only<br />
Using Phone Features 61<br />
The other party's image is large while your<br />
image is small. This is the default setting.<br />
The other party's image is small while your<br />
image is large.<br />
Both your image and the other party appear<br />
the same size.<br />
Only the other party's image is displayed.<br />
To adjust the brightness<br />
1. Tap to display the brightness bar.<br />
Tip<br />
2. Tap to make the image brighter, or<br />
tap to make it dimmer.<br />
You can also adjust the brightness by<br />
tapping Menu > Brightness.<br />
Brightness bar<br />
Set up video call options<br />
On the Phone screen, or on the screen of the ongoing video call,<br />
tap Menu > Video Call Options to set the following options:<br />
General tab<br />
Services tab
62 Using Phone Features<br />
General tab<br />
• Show still image. Select the image you want to display when you turn<br />
off the camera.<br />
• Preset (female). Displays a female picture in place of your image.<br />
• Preset (male). Displays a male picture in place of your image.<br />
• Custom image. Lets you use an image from file as your display<br />
picture. When this option is selected, the File Name box and the<br />
Browse button will be enabled, allowing you to select an image file.<br />
• Last video frame. Uses the last video frame before you stopped the<br />
camera as your display image.<br />
• Video screen preference. To change how your image and the other<br />
party’s image are displayed on the screen, select your preference from<br />
the Video screen preference list or tap the Swap Image button on<br />
the Video Call screen.<br />
• Camera options:<br />
• Flip the 2nd camera video. Select this check box if you are going<br />
to show a text document to the other party using the second<br />
camera.<br />
• Switch camera off when answering video call. Select this check<br />
box if you do not want to send a video feed of yourself to the other<br />
party. Instead, the option you selected in Show still image will be<br />
displayed.<br />
• Display info:<br />
• Show call timer. Select this check box to display the call period in<br />
the status area.<br />
• Show phone number and name. Select this check box to display<br />
the other party’s phone number and name in the status area.<br />
Services tab<br />
To set up further calling options for Video Call, tap the Services tab. On the<br />
Services screen, select the desired service from the list, then tap Get Settings<br />
to access its settings.
3.5 Receiving a Video Call<br />
Using Phone Features 63<br />
To answer or reject an incoming video call<br />
• To answer the video call, tap Answer.<br />
• To reject the video call, tap Ignore.<br />
To end a video call<br />
Once an incoming or outgoing video call is in progress, tap<br />
hang up.<br />
to<br />
3.6 Smart Dialing<br />
Smart Dialing makes it easy for you to dial a phone number.<br />
When you start entering a phone number or contact name, Smart Dialing<br />
automatically searches and sorts the contact entries on the SIM card, in<br />
Contacts, and the phone numbers in Call History (including incoming,<br />
outgoing, and missed calls). You can then select the desired number or contact<br />
from the filtered list to dial.<br />
Use Smart Dialing<br />
Open the Phone screen, then tap the keys on the Phone keypad or on the<br />
hardware keyboard that correspond to the phone number or contact you want<br />
to call.<br />
When you start entering a<br />
number or letter, the Smart<br />
Dialing panel will appear<br />
automatically on the Phone<br />
screen. You can expand the<br />
panel size according to your<br />
needs by tapping .<br />
Smart<br />
Dialing<br />
panel
64 Using Phone Features<br />
To find a contact name or number<br />
You can just enter the first letter of the name or number of a contact. Smart<br />
Dialing will search for contact phone numbers and the first character of<br />
a contact name as well as from the character that appears after a space,<br />
dash, or underscore in a contact name. For example, if you tap on the<br />
phone keypad, which is associated with [a, b, and c], contact names such<br />
as the following will be considered matches: “Ben Miller”, “George Adams”,<br />
“John-Carter”, “Carter, Ellen”, “Dixon, Allan”, “Thomas_Clark”, “Jane Campbell”.<br />
If the matching list is long and you want to narrow down the search further,<br />
enter another letter. Using the same example above, if you continue to tap<br />
which is associated with [d, e, f], the matching list will be narrowed<br />
down to the following names: “Ben Miller”, “George Adams”, “Carter, Ellen”,<br />
“Dixon, Allan”.<br />
Make a call or send a text message using Smart Dialing<br />
1. Tap Start > Phone to open the Phone screen.<br />
2. Begin entering the first few numbers or characters.<br />
When you start entering a number or letter, the Smart Dialing panel will<br />
display matches found.<br />
3. In the Smart Dialing panel, browse the list by tapping or , or<br />
tapping to expand the panel size.<br />
4. When the desired contact is selected, do one of the following:<br />
• Tap to make a voice call<br />
to the selected contact.<br />
• To send a text message, tap and<br />
hold the selected contact, then<br />
tap Send Text Message from the<br />
pop up menu.
Using Phone Features 65<br />
Set up Smart Dialing<br />
1. On the Phone screen, tap Menu > Smart Dialing Options > Options<br />
tab.<br />
2. Select the Enable Smart Dialing check box, then adjust the following<br />
options based on your preference.<br />
• Select the Automatically expand selected contact check box to<br />
enable a contact’s name and phone number to be displayed when<br />
the contact is selected in the matching list.<br />
• Select the Enable drag-scroll check box to scroll in the matched list<br />
by dragging.<br />
• Select the Enable double-click for dialing check box to make a<br />
voice call by double-tapping the item in the matched list.<br />
• Select the Expand panel when using hardware keyboard check<br />
box to automatically expand the Smart Dialing panel when you are<br />
using the hardware keyboard to enter phone numbers.<br />
• In Scroll unit, you can set the amount of scrolling when tapping<br />
or .<br />
3.7 Setting Up Bluetooth SIM Access for Car Kit<br />
Phones<br />
Bluetooth car kits that support the SIM Access Profile (SAP) can connect to your<br />
device and access its SIM card via Bluetooth. Once a SAP connection has been<br />
established, you can download SIM contacts from your device to the car kit<br />
phone. You can also use the car kit phone to answer and make calls using your<br />
device’s SIM card.<br />
Note<br />
To enable downloading contacts onto the car kit, ensure that all contacts on<br />
the device are stored in the SIM card and not in the device memory. Configure<br />
the car kit to download contacts only from the SIM card.<br />
1. On your device, make sure that Bluetooth is turned on and set to visible<br />
mode. For information about turning on Bluetooth and enabling visible<br />
mode, see “Bluetooth modes” in Chapter 10.
66 Using Phone Features<br />
Note<br />
2. Tap Start > Settings > Connections tab > Bluetooth ><br />
SIM Access tab.<br />
3. Select the Remote SIM Access check box, then tap OK.<br />
4. Connect the car kit phone to your device via Bluetooth. To learn how<br />
to connect, consult your car kit phone’s <strong>manual</strong>.<br />
5. If this is the first time you are pairing the car kit phone with your<br />
device, enter the car kit’s passcode on your device.<br />
6. A pop-up message should appear on your device saying that a<br />
connection has been established between your device and car kit<br />
phone. Tap OK.<br />
7. On the Bluetooth screen, tap the SIM Access tab, then tap Connect.<br />
You will not be able to make/receive calls, send/receive messages or perform<br />
related activities on your device when the SIM Access Profile connection is<br />
active. You’ll be able to do all these from the car kit phone during this time.<br />
After the connection is disconnected, you will be able to use your device as<br />
before.<br />
3.8 Additional Dialing Information<br />
Make an emergency call<br />
Enter the international emergency number for your locale, and tap .<br />
Tip<br />
Additional emergency numbers may be included in your SIM card.<br />
Contact your wireless service provider for details.
V<br />
To make an emergency call when the device is locked<br />
1. Enter the emergency call number in the Password screen.<br />
2. Press the HOME/TODAY button to dial out.<br />
Using Phone Features 67<br />
C A M E R A<br />
I D E O<br />
3. To end the emergency call, press the RESET button at the back panel of<br />
the device.<br />
Make an international call<br />
1. Tap and hold on the Phone screen until the plus (+) sign<br />
appears.<br />
The plus (+) sign replaces the international prefix of the country that<br />
you are calling.<br />
2. Enter the full phone number you want to dial, and tap . The<br />
full phone number includes the country code, area code (without the<br />
leading zero, if any), and phone number.
68 Using Phone Features
Chapter 4<br />
Setting Up Your Device<br />
4.1 Basic Settings<br />
4.2 Personalizing the Today Screen<br />
4.3 Connecting an External Display<br />
4.4 Protecting Your Device
70 Setting Up Your Device<br />
4.1 Basic Settings<br />
Time and date<br />
To set the time and date<br />
1. Tap Start > Settings > System tab > Clock & Alarms > Time tab to<br />
set the time and date.<br />
2. Select the correct time zone and change the date or time.<br />
Note<br />
During synchronization, the time on your device is updated with the time on<br />
your computer.<br />
To set the time and date for a different location<br />
If you visit or communicate with someone in a particular time zone often,<br />
you can select it as your visiting time zone.<br />
1. Tap Start > Settings > System tab > Clock & Alarms > Time tab to<br />
set the visiting time zone.<br />
2. Tap Visiting.<br />
3. Select the correct time zone and change the time or date.<br />
Regional settings<br />
The style in which numbers, currency, dates, and times are displayed is<br />
specified in regional settings.<br />
1. Tap Start > Settings > System tab > Regional Settings.<br />
2. On the Region tab, select your region from the list.<br />
Note<br />
This does not change the language of your device’s operating system.<br />
The region you select determines which options will be available on<br />
the other tabs.<br />
3. To customize regional settings further, tap the appropriate tabs and<br />
set the desired options.
Display settings<br />
Setting Up Your Device 71<br />
To adjust the screen brightness<br />
• You can also tap Start > Settings > System tab > Backlight ><br />
Brightness tab to adjust the screen brightness.<br />
To set the backlight to dim after a time delay<br />
1. Tap Start > Settings > System tab > Backlight.<br />
2. Tap the Battery power or External power tab.<br />
3. Select the Turn off backlight if device is not used for check box,<br />
then specify the time delay.<br />
To increase or decrease the size of text on the screen<br />
1. Tap Start > Settings > System tab > Screen > Text Size tab.<br />
2. Move the slider to increase or decrease the text size.<br />
Device name<br />
The device name is used to identify your device in the following situations:<br />
• Synchronizing with a computer<br />
• Connecting to a network<br />
• Restoring information from a backup<br />
Note<br />
If you synchronize multiple devices with the same computer, each device<br />
must have a unique name.<br />
To change the device name<br />
1. Tap Start > Settings > System tab > About.<br />
2. Tap the Device ID tab.<br />
3. Enter the device name.<br />
Note<br />
The device name must begin with a letter, consist of letters from A to<br />
Z, numbers from 0 to 9, and cannot contain spaces. Use the underscore<br />
character to separate words.
72 Setting Up Your Device<br />
Ringer settings<br />
To change the ring type and ring tone<br />
1. Tap Menu > Options > Phone tab.<br />
2. In the Ring type list, choose whether to be notified of incoming calls<br />
by a ring, an increasing ring, or more.<br />
3. In the Ring tone list, tap the sound you want to use.<br />
Tips<br />
• You can use *.wav, *.mid, *.mp3, *.wma, or other types of sound files<br />
that you downloaded from the Internet or copied from your computer<br />
as ring tones. For a complete list of supported audio file formats for ring<br />
tones, see "Specifications" in the Appendix.<br />
• To use your sound files as ring tones, copy them first to the /My<br />
Documents/My Ringtones folder on your device, then select the sound<br />
from the Ring tone list of your device. For more information about<br />
copying files, see Chapter 9.<br />
Alarms and notifications<br />
To set an alarm<br />
1. Tap Start > Settings > System tab > Clock & Alarms > Alarm tab to<br />
set an alarm.<br />
2. Tap and enter a name for the alarm.<br />
3. Tap the day of the week for the alarm. Select multiple days by tapping<br />
each desired day. Tap again to deselect the day.<br />
4. Tap the time to open a clock and set the time for the alarm.<br />
Tip<br />
You can drag the hour and minute hands of the clock to set the time.<br />
5. Tap the alarm icon ( ) to specify the type of alarm you want. You<br />
can choose a flashing light, a single sound, a repeating sound, or<br />
vibration.<br />
6. If you choose to play a sound, tap the list next to the Play sound<br />
check box and tap the sound you want.<br />
To choose how to be notified about events or actions<br />
1. Tap Start > Settings > Personal tab > Sounds & Notifications.<br />
2. On the Sounds tab, choose how you want to be notified by selecting<br />
the appropriate check boxes.
Setting Up Your Device 73<br />
3. On the Notifications tab, in Event, tap an event name and choose<br />
how you want to be notified by selecting the appropriate check<br />
boxes. You can choose from several options, such as a special sound, a<br />
message, or a flashing light.<br />
Tip<br />
Turning off sounds and flashing light notifications helps conserve<br />
battery power.<br />
Phone services<br />
Your device can directly link to the mobile phone network, and enable<br />
you to access and change the settings of various phone services for your<br />
device. Phone services may include Call Forwarding, Call Waiting, Voicemail,<br />
and more. Contact your wireless service provider to find out about the<br />
availability of phone services for your device.<br />
To access and change settings of phone services<br />
1. Tap Start > Settings > Personal tab > Phone > Services tab.<br />
2. Select the service you want to use, then tap Get Settings.<br />
3. Choose your desired options, then tap OK.<br />
For more information about customizing settings of phone services, see<br />
Help on your device.<br />
4.2 Personalizing the Today Screen<br />
The Today screen shows your upcoming appointments, active tasks, and<br />
information about incoming messages. You can customize what to display<br />
on the Today screen.<br />
To customize the Today screen<br />
1. Tap Start > Settings > Personal tab > Today.<br />
2. On the Appearance tab, select the theme for the Today screen<br />
background.<br />
3. On the Items tab, select the items you want to appear on the Today<br />
screen.<br />
To use a custom background image
74 Setting Up Your Device<br />
You can use one of your own pictures as the background image on the<br />
Today screen.<br />
1. Tap Start > Settings > Personal tab > Today.<br />
2. Select the Use this picture as the background check box, and tap<br />
Browse to view a list of your picture files.<br />
3. Tap the file name of the picture you want to use.<br />
4. Tap OK.<br />
To display owner information<br />
Having owner information displayed on the Today screen makes it easier for<br />
someone to return your device if you lost it.<br />
1. Tap Start > Settings > Personal tab > Owner Information.<br />
2. On the Identification tab, enter your personal information.<br />
Tips • If owner information is not displayed on the Today screen, tap Start ><br />
Settings > Personal tab > Today. On the Items tab, select the Owner<br />
Info check box.<br />
• You can set your device to display the ‘my info’ screen when your device<br />
is turned on. This screen shows your complete personal information. To<br />
display the 'my info' screen, tap Start > Settings > Personal tab > Owner<br />
Information > Options tab, then select the Identification information<br />
check box.<br />
To set options for displaying appointments on the Today screen<br />
If you have several appointments, you can specify the type of appointments<br />
to display on the Today screen.<br />
1. Tap Start > Settings > Personal tab > Today.<br />
2. Tap the Items tab.<br />
3. Select Calendar, then tap Options.
Setting Up Your Device 75<br />
4. Do any of the following:<br />
• Select Next appointment to show only the next appointment<br />
in your schedule, or Upcoming appointments to show multiple<br />
appointments.<br />
• Clear the Display all day events check box if you do not want to<br />
display all-day events.<br />
For more information about using Calendar, see Chapters 6 and 8.<br />
To set options for displaying tasks on the Today screen<br />
If you have several tasks, you can specify the type of tasks to display on the<br />
Today screen.<br />
1. Tap Start > Settings > Personal tab > Today.<br />
2. Tap the Items tab.<br />
3. Select Tasks, then tap Options.<br />
4. Do any of the following:<br />
• In Display number of, select the type of tasks you want to appear<br />
on the Today screen.<br />
• In the Category list, select whether to display only tasks assigned<br />
to a specific category or to display all tasks.<br />
For more information about creating tasks on your device, see Chapter 6.<br />
Customize the Start menu<br />
You can choose which items appear in the Start menu.<br />
1. Tap Start > Settings > Personal tab > Menus.<br />
2. Select the check boxes of the items you want to appear in the Start<br />
menu. You can select up to seven items.<br />
Tip<br />
You can also create folders and shortcuts to appear in the Start menu<br />
Programs folder. Navigate to the /Windows/Start Menu/Programs folder of<br />
your device, then create folders and shortcuts that you want.
76 Setting Up Your Device<br />
4.3 Connecting an External Display<br />
The TV Out function lets you output the device’s screen to an external display<br />
such as a television, an LCD monitor, or projector. This feature is useful when<br />
you are doing a presentation or when you are sharing your videos or photos. A<br />
multifunction cable comes with your device for easy connection to an external<br />
display.<br />
Connect the device to an external display<br />
1. Turn off the external display and unplug its power cord from the wall<br />
socket.<br />
2. For an external display with:<br />
• VGA port, connect the VGA port of the multifunction cable to the<br />
VGA cable of the LCD monitor or projector.<br />
• S-Video or Composite video port, connect one end of the S-Video<br />
or Composite video cable to the multifunction cable, then connect<br />
the other end to the S-Video or Composite video port on the TV or<br />
monitor.<br />
Note<br />
If you are connecting the device to an external display with an S-Video or<br />
Composite video connection, it is recommended that you first contact your<br />
distributor or wireless service provider and inquire about the compatible<br />
accessory needed. An incorrect connection may damage your device.<br />
3. Connect the other end of the multifunction cable to the VGA/TV-Out<br />
and USB Host port on your device.<br />
4. Plug in and turn on the external display.
Setting Up Your Device 77<br />
Enable TV Out<br />
1. On the Today screen of your device, tap Start > Settings > System<br />
tab > TV Out.<br />
Note<br />
2. On the TV Out screen, select On in the drop-down menu.<br />
3. Choose the type of external display<br />
that you are using to output.<br />
• Select VGA-out if you will output<br />
the device’s screen to an LCD<br />
monitor or projector when doing<br />
a Powerpoint presentation.<br />
• Select Composite & S-Video<br />
if you are going to output the<br />
device’s screen to a television.<br />
4. Choose the Video standard to use when outputting the video. For<br />
example, if your video is in NTSC standard and you select PAL, TV Out will<br />
automatically convert your video to PAL before it outputs to the external<br />
display.<br />
5. Tap OK.<br />
The device does not support audio output.<br />
Disable TV Out<br />
1. On the Today screen, tap Start > Settings > System tab > TV Out.<br />
2. On the TV Out screen, select Off in the drop-down menu.<br />
3. Turn off the external display device and then unplug the power cord.<br />
4. Disconnect the multifunction cable from the device and from the<br />
external display.<br />
Play videos<br />
Since TV Out does not support audio output, it is recommended that you turn<br />
up the device’s volume when playing back video on an external display.
78 Setting Up Your Device<br />
4.4 Protecting Your Device<br />
Protect your SIM card with a PIN<br />
You can protect your SIM card from unauthorized use by assigning a PIN<br />
(personal identification number). The default SIM card PIN is provided by your<br />
wireless service provider.<br />
To change the PIN<br />
1. On the Phone screen, tap Menu > Options > Security tab.<br />
2. Select the Require PIN when phone is used check box.<br />
3. To change the PIN at any time, tap Change PIN.<br />
Tip<br />
Emergency calls can be placed at any time, without requiring a PIN.<br />
Protect your device with a password<br />
You can help keep your data more secure by requiring a password every time<br />
the device is turned on.<br />
To set a device password<br />
1. Tap Start > Settings > Personal tab > Lock.<br />
2. Select the Prompt if device unused for check box, then specify the<br />
idle time before the device requires a password.<br />
3. In the Password type box, select the type of password you would like<br />
to use.<br />
Tip<br />
If your device is configured to connect to a network, use an alphanumeric<br />
password for increased security.<br />
4. Enter the password in both the Password and Confirm boxes.<br />
5. Tap OK. The next time the device is turned on, you will be prompted<br />
to enter your password.<br />
Notes • To ensure that you can always make emergency calls, do not begin your<br />
password with the digits of your local emergency number.<br />
• If you entered a hint, the hint will be displayed after the wrong password is<br />
entered five times.<br />
• Each time a wrong password is entered, the device response time gets<br />
longer until the device appears to be not responding.
Setting Up Your Device 79<br />
• If you forget your password, you can hard reset or clear the device memory.<br />
Before you do this, make sure you back up your data and files so that you can<br />
restore them back to your device. For more information about hard resetting<br />
the device and clearing the memory, see Chapter 13.<br />
Encrypt files on your storage card<br />
You can set your device to encrypt files as they are saved on the storage<br />
card.<br />
1. Tap Start > Settings > System tab > Encryption.<br />
2. Select Encrypt files placed on storage cards.<br />
Notes • Encrypted files can only be read on the device that encrypted them.<br />
• Encrypted files are opened just like other files, provided you are using the<br />
device that encrypted them. There is no separate step for you to take to<br />
read these files.<br />
Important If Encrypt files placed on storage cards is enabled, backup all files from<br />
the storage card before using Clear Storage, hard reset, or updating the<br />
ROM system software. Otherwise you will no longer be able to access the<br />
encrypted files on the storage card. Use ActiveSync or Windows Mobile<br />
Device Center to transfer files between your storage card and computer.<br />
After the procedure, copy your files back to the storage card.
80 Setting Up Your Device
Chapter 5<br />
Synchronizing Information<br />
With Your Computer<br />
5.1 About Synchronization<br />
5.2 Setting Up Windows Mobile® Device<br />
Center on Windows Vista®<br />
5.3 Setting Up ActiveSync® on Windows XP®<br />
5.4 Synchronizing With Your Computer<br />
5.5 Synchronizing via Bluetooth<br />
5.6 Synchronizing Music and Video
82 Synchronizing Information With Your Computer<br />
5.1 About Synchronization<br />
You can take information from your computer wherever you go by<br />
synchronizing them to your device. The following types of information can<br />
be synchronized between your computer and your device:<br />
• Microsoft® Office Outlook® information, which include Office<br />
Outlook e-mail, contacts, calendar, tasks, and notes<br />
• Notes, which are created using Microsoft® Office OneNote® 2007<br />
• Media, such as pictures, music, and video<br />
• Favorites, which are the bookmarked links to your favorite web sites<br />
• Files, such as documents and other files<br />
Before you can synchronize, you need to install and set up first the<br />
synchronization software on your computer. For more information, see<br />
“Setting Up Windows Mobile Device Center on Windows Vista®” and “Setting<br />
Up ActiveSync® on Windows XP®” in this chapter.<br />
Ways to synchronize<br />
After you have installed the synchronization software on your computer,<br />
connect and synchronize your device with your computer by:<br />
• Using the supplied USB sync cable.<br />
Upon connecting the sync cable to your device and your computer,<br />
the synchronization process automatically starts.<br />
• Using Bluetooth.<br />
You must first set up a Bluetooth partnership between your device<br />
and your computer before you can synchronize information between<br />
them using Bluetooth. For more information about setting up<br />
a Bluetooth partnership, see Chapter 10. For information about<br />
synchronizing through Bluetooth, see “Synchronizing via Bluetooth”<br />
later in this chapter.<br />
Try to synchronize regularly in order to keep information up-to-date in both<br />
your device and your computer.<br />
Note<br />
You can also synchronize Outlook e-mail, contacts, calendar, and tasks on<br />
your device with the Exchange Server at your work. For more information<br />
about setting up your device to synchronize with the Exchange Server, see<br />
Chapter 8.
Synchronizing Information With Your Computer 83<br />
5.2 Setting Up Windows Mobile® Device Center on<br />
Windows Vista®<br />
Microsoft Windows Mobile® Device Center is the replacement for<br />
Microsoft® ActiveSync® on Windows Vista®.<br />
Note<br />
Some versions of Windows Vista come with Windows Mobile Device Center<br />
already installed. If Windows Mobile Device Center is not available on your<br />
Windows Vista, you can install it from the Getting Started Disc that came with<br />
your device.<br />
Set up synchronization in Windows Mobile Device Center<br />
When you connect your device to your computer and start Windows Mobile<br />
Device Center for the first time, you are asked to create a Windows Mobile<br />
partnership with your device. To create a partnership:<br />
1. Connect your device to your computer. Windows Mobile Device<br />
Center configures itself, then opens.<br />
2. On the license agreement screen, click Accept.<br />
3. On the Windows Mobile<br />
Device Center’s Home<br />
screen, click Set up your<br />
device.<br />
Note<br />
Choose Connect<br />
without setting up<br />
your device if you only<br />
want to transfer media<br />
files, check for updates,<br />
and explore your device<br />
but not synchronize<br />
Outlook information.<br />
4. Select the items you want to synchronize, then click Next.<br />
5. Enter a device name, then click Set Up.<br />
When you finish the setup wizard, Windows Mobile Device Center<br />
synchronizes your device automatically. Notice that Outlook e-mails and<br />
other information appear on your device after synchronization.
84 Synchronizing Information With Your Computer<br />
Use Windows Mobile Device Center<br />
To open Windows Mobile Device Center, click Start > All Programs ><br />
Windows Mobile Device Center on your Windows Vista computer.<br />
On Windows Mobile Device Center, you can do the following:<br />
• Click Mobile Device Settings to change synchronization settings.<br />
• When you click Pictures, Music and Video > XX new pictures/video<br />
clips are available for import, a wizard guides you to tag and transfer<br />
photos from your device to the Photo Gallery on your computer.<br />
• Click Pictures, Music and Video > Add media to your device from<br />
Windows Media Player to synchronize music and video files using<br />
Windows Media® Player. For more information, see “Windows Media®<br />
Player Mobile” in Chapter 12.<br />
• Click File Management > Browse the contents of your device to<br />
view documents and files on your device.<br />
Note<br />
See Windows Mobile Device Center Help for more information.
Synchronizing Information With Your Computer 85<br />
5.3 Setting Up ActiveSync® on Windows XP®<br />
The Getting Started disc that comes with your device contains Microsoft<br />
ActiveSync 4.5 or later. Follow the steps in this section to install and set up<br />
ActiveSync on Windows XP or other compatible Windows systems.<br />
Note<br />
For a list of compatible Windows systems, go to<br />
http://www.microsoft.com/windowsmobile/activesync/activesync45.mspx.<br />
Install ActiveSync<br />
1. Place the Getting Started disc to the disc drive of your computer.<br />
2. Click Setup and Installation.<br />
3. Select the ActiveSync check box, then click Install.<br />
4. Read the license terms, then click Accept.<br />
5. When installation is completed, click Done.<br />
6. On the Getting Started with Windows Mobile screen, click Close.<br />
Set up synchronization in ActiveSync<br />
1. Connect your device to your computer. The Synchronization Setup<br />
Wizard automatically starts and guides you to create a synchronization<br />
partnership. Click Next to proceed.<br />
2. To synchronize your device with your computer, clear the<br />
Synchronize directly with a server running Microsoft Exchange<br />
check box, then click Next.<br />
3. Select the information types that you want to synchronize, then click<br />
Next.<br />
4. Select or clear the Allow wireless data connections check box<br />
according to your preference.<br />
5. Click Finish.<br />
When you finish the wizard, ActiveSync synchronizes your device<br />
automatically. Notice that Outlook e-mails and other information appear on<br />
your device after synchronization.
86 Synchronizing Information With Your Computer<br />
5.4 Synchronizing With Your Computer<br />
Connect and synchronize your device with your computer using the USB<br />
cable or Bluetooth connection.<br />
Start and stop synchronization<br />
You can <strong>manual</strong>ly synchronize either from your device or computer.<br />
From your device<br />
• Tap Start > Programs > ActiveSync, then tap Sync.<br />
Tip<br />
To end synchronization before it completes, tap Stop.<br />
To delete a partnership with one computer completely, disconnect your<br />
device from that computer first. In ActiveSync on your device, tap Menu ><br />
Options, tap the computer name, then tap Delete.<br />
From Windows Mobile Device Center<br />
1. Click Start > All Programs > Windows Mobile Device Center.<br />
2. Click at the lower left of the Windows Mobile Device Center.<br />
To end synchronization before it completes, click .<br />
From ActiveSync on your computer<br />
When you connect your device to your computer, ActiveSync automatically<br />
opens on your computer and synchronizes.<br />
• To <strong>manual</strong>ly start synchronization, click .<br />
• To end synchronization before it completes, click .<br />
Change which information is synchronized<br />
You can change the information types and the amount of information to<br />
synchronize for each type either on your device or your computer. Follow<br />
the steps below to change synchronization settings on your device.<br />
Note<br />
Before changing synchronization settings on your device, disconnect it from<br />
your computer.<br />
1. In ActiveSync on your device, tap Menu > Options.<br />
2. Select the check box for any items you want to synchronize. If you<br />
cannot select a check box, you might have to clear the check box for<br />
the same information type elsewhere in the list.
Synchronizing Information With Your Computer 87<br />
3. To change synchronization settings for an information type, for<br />
instance, E-mail, select it and tap Settings.<br />
Notes<br />
You can then set the download size limit, specify the time period of<br />
information to download, and more.<br />
• Some information types such as Favorites, Files and Media cannot be<br />
selected in ActiveSync Options on your device. You can only select or<br />
clear these items from your computer’s Windows Mobile Device Center or<br />
ActiveSync.<br />
• A computer can have sync partnerships with many different Windows<br />
Mobile powered devices, but a device can have sync partnerships with at<br />
most two computers. To ensure that your device will synchronize properly<br />
with both computers, set up the second computer using the same<br />
synchronization settings you used on the first computer.<br />
• Outlook e-mail can be synchronized with only one computer.<br />
Troubleshoot sync connection problem<br />
In some cases, when the computer connects to the Internet or a local<br />
network, it may disconnect the connection with your device in favor of the<br />
Internet or network connection.<br />
If this happens, tap Start > Settings > Connections tab > USB to PC, then<br />
clear the Enable advanced network functionality check box. This makes<br />
your computer utilize a serial USB connection with your device.<br />
The USB to PC ( ) icon appears on the bottom right corner of the<br />
Today screen when serial USB connection is used. You can tap this icon to<br />
disconnect from the computer.<br />
5.5 Synchronizing via Bluetooth<br />
You can connect and synchronize your device with the computer using<br />
Bluetooth.<br />
Note<br />
To connect and synchronize your device with a computer via Bluetooth,<br />
your computer must have a built-in Bluetooth or installed with a Bluetooth<br />
adapter or dongle.
88 Synchronizing Information With Your Computer<br />
To synchronize with a computer via Bluetooth<br />
1. Set up Windows Mobile Device Center or ActiveSync on your<br />
computer to synchronize through Bluetooth. See the program’s Help<br />
for instructions.<br />
2. On your device, tap Start > Programs > ActiveSync.<br />
3. Make sure that Bluetooth on both your device and the computer<br />
are turned on and set to visible mode. For more information, see<br />
“Bluetooth” in Chapter 10.<br />
If this is the first time you have connected to this computer via<br />
Bluetooth, you must first complete the Bluetooth wizard on your<br />
device and set up a Bluetooth partnership between your device<br />
and the computer. For more information about creating a Bluetooth<br />
partnership, see “Bluetooth partnerships” in Chapter 10.<br />
Note<br />
4. Tap Menu > Connect via Bluetooth. Make sure the Bluetooth<br />
function of both your device and the computer are turned on and set<br />
to visible mode.<br />
To conserve battery power, turn off Bluetooth when not in use.<br />
5.6 Synchronizing Music and Video<br />
If you want to carry your music or other digital media along with you while you<br />
travel, set up Windows Media® Player on your computer to synchronize music<br />
and video with your device.<br />
Other than selecting the Media information type to be synchronized, all<br />
media synchronization settings must be set in Windows Media® Player.<br />
Before media can be synchronized, you must do the following:<br />
• Install Windows Media® Player Version 11 on your computer.<br />
(Windows Media® Player 11 works only in Windows XP or later<br />
versions).<br />
• Connect your device to the computer with a USB cable. If your device<br />
is currently connected using Bluetooth, you must end that connection<br />
before media can be synchronized.<br />
• Set up a sync partnership between your device and your computer’s<br />
Windows Media® Player.<br />
For more information about using Windows Media® Player Mobile, see<br />
Chapter 12.
Chapter 6<br />
Organizing Contacts,<br />
Appointments, Tasks, and<br />
Other Information<br />
6.1 Contacts<br />
6.2 SIM Manager<br />
6.3 Calendar<br />
6.4 Tasks<br />
6.5 Notes<br />
6.6 Voice Recorder
90 Organizing Contacts, Appointments, Tasks, and Other Information<br />
6.1 Contacts<br />
Contacts is your address book and information storage for people and<br />
businesses you communicate with. You can create the following types of<br />
contacts on your device:<br />
• Outlook contacts. Contacts that<br />
are stored on your device, which<br />
can be created on your device or<br />
synchronized with your PC or the<br />
Exchange Server.<br />
• SIM contacts. Contacts that are<br />
stored on the SIM card. Only a name<br />
and phone number can be stored for<br />
each entry.<br />
• Windows Live contacts. Contacts that you communicate with using<br />
Windows Live Messenger or MSN. Just like Outlook contacts, you can<br />
also enter complete information for a Windows Live contact. For more<br />
information, see “Add Windows Live contacts” in Chapter 10.<br />
Note<br />
Add new contacts<br />
You can only add Windows Live contacts after you have set up Windows<br />
Live on your device.<br />
To add a contact on your device<br />
1. Tap Start > Contacts.<br />
2. Tap New, select Outlook Contact, and enter the contact information.<br />
3. In the File as field, choose how you<br />
want the contact name to appear in<br />
the contact list.<br />
4. To add a photo of the contact, tap<br />
Select a picture, then select the<br />
picture file or tap Camera to take a<br />
photo of the contact.<br />
This photo appears on the Phone<br />
screen when you receive a call from<br />
the contact.
Organizing Contacts, Appointments, Tasks, and Other Information 91<br />
5. To assign a ring tone to the contact, tap the Ring tone field, scroll<br />
through the list of tones, then select a desired tone.<br />
6. When finished, tap OK.<br />
Tips • If someone who is not in your list of contacts calls you, create a contact<br />
from Call History by tapping and holding a phone number, then tapping<br />
Save to Contacts from the shortcut menu.<br />
• To save a phone number that is contained in a message, tap the phone<br />
number, then tap Menu > Save to Contacts.<br />
• To edit contact information, tap the contact name, then tap Menu > Edit.<br />
To add a contact to your SIM card<br />
1. Tap Start > Contacts.<br />
2. Tap New, then select SIM Contact.<br />
3. Enter a contact name and phone number.<br />
4. Tap OK.<br />
Tip<br />
You can also use the SIM Manager to add and edit contacts on your SIM card.<br />
For more information, see "SIM Manager" later in this chapter.<br />
View, search, and organize contacts<br />
To view contact information<br />
1. Tap Start > Contacts.<br />
2. Flick or slide your finger upward on the touch screen to scroll down<br />
the contact list.<br />
To scroll up the contact list, flick or slide your finger downward on the<br />
touch screen.<br />
Note<br />
For detailed instructions on how to use finger scrolling, see "Finger<br />
Scrolling and Finger Panning" in Chapter 1.
92 Organizing Contacts, Appointments, Tasks, and Other Information<br />
3. Touch or tap the name of a contact<br />
to open his or her contact card.<br />
On the contact card, you will see<br />
the last outgoing or incoming call<br />
as well as detailed information such<br />
as phone numbers of the contact,<br />
e-mail address, and more.<br />
To find a contact on your device<br />
There are several ways to find a contact when your contact list is long.<br />
1. Tap Start > Contacts.<br />
2. Do one of the following:<br />
• On the Quick Scroll bar on the<br />
right side of the screen, scroll<br />
to or tap a letter to go directly<br />
to the part of the Contacts list<br />
where contact names start with<br />
that letter.<br />
Note<br />
You can disable the Quick<br />
Scroll bar by tapping Menu ><br />
Options and selecting the Show<br />
alphabetical index check box.<br />
This will show the alphabetical<br />
index on top of the Contacts list.<br />
• Begin entering a contact name in the provided text box until the<br />
contact you want is displayed.<br />
• Filter the list by categories. In the contact list, tap Menu > Filter,<br />
then tap a category you’ve assigned to a contact. To show all<br />
contacts again, select Menu > Filter > All Contacts.
Organizing Contacts, Appointments, Tasks, and Other Information 93<br />
To group similar contacts<br />
For easier management, you can group similar contacts by assigning them to<br />
categories.<br />
1. Create a new Outlook contact or edit an existing Outlook contact.<br />
2. Tap Categories.<br />
3. Select a preset category such as Business or Personal, or tap New to<br />
create your own category.<br />
4. When finished, tap OK.<br />
To view contacts by category<br />
• Tap Menu > Filter, then select the desired category.<br />
Share contact information<br />
To beam a contact’s details<br />
You can quickly send contact information to another mobile phone or<br />
device through Bluetooth beaming.<br />
Note<br />
1. Tap Start > Contacts, then select a contact.<br />
2. Tap Menu > Send Contact > Beam, then select a device where to<br />
beam the contact to.<br />
Before beaming, make sure Bluetooth is turned on and set to visible mode<br />
on your device and the target mobile device. You can also beam contact<br />
information to your computer. See "Bluetooth" in Chapter 10 for details.<br />
To send contact information via text messaging<br />
1. Tap Start > Contacts, then select a contact.<br />
2. Tap Menu > Send Contact > SMS \ MMS.<br />
3. Select the contact information you want to send, then tap Done.<br />
4. In the new text message, enter the mobile phone number of the<br />
recipient, then tap Send.
94 Organizing Contacts, Appointments, Tasks, and Other Information<br />
To send contact information as a vCard<br />
A vCard (virtual business card) is a standard file format used for exchanging<br />
contact information. vCard files can be exported to Outlook on the computer.<br />
From your device, you can send a vCard containing contact information as file<br />
attachment in an MMS message.<br />
1. Tap Start > Contacts, then select a contact.<br />
2. Tap Menu > Send as vCard.<br />
3. A new MMS message is created with the vCard file attached. Enter<br />
the mobile phone number or e-mail address of the recipient, then tap<br />
Send.<br />
For more information, see “MMS” in Chapter 7.<br />
6.2 SIM Manager<br />
SIM Manager allows you to view the contents of your SIM card, transfer<br />
contacts from your SIM card to your device or vice versa, and make a call to<br />
a SIM contact.<br />
To create a contact on your SIM card<br />
1. Tap Start > Programs > SIM Manager.<br />
Tip<br />
2. Tap New and enter a contact name and phone number.<br />
3. Tap Save to save the information on your SIM card.<br />
To change contact information on your SIM card, tap a SIM contact, then tap<br />
Menu > Edit. After modifying, tap Save.<br />
To copy SIM contacts to your device<br />
If you have saved contacts on your SIM card, you can copy them into<br />
Contacts on your device.<br />
1. Tap Start > Programs > SIM Manager.<br />
2. Select the desired contact, or select all SIM contacts by tapping<br />
Menu > Select All.<br />
3. Tap Menu > Save to Contacts.
Organizing Contacts, Appointments, Tasks, and Other Information 95<br />
To copy contacts to the SIM card<br />
Only one phone number per contact name can be stored on a SIM card. When<br />
you copy a contact that has several phone numbers to your SIM card, SIM<br />
Manager saves each number under a separate name.<br />
To save each number under a different contact name on the SIM card, SIM<br />
Manager appends an indicator at the end of each name.<br />
By default, /M, /W and /H are appended to indicate mobile, work and home<br />
phone numbers respectively. You can edit this indicator first before you<br />
start copying contacts to your SIM card. Indicators of the other types of<br />
phone numbers are left empty for you to define them.<br />
1. Tap Start > Programs > SIM Manager, then tap Menu > Tools ><br />
Options.<br />
2. Select the check boxes of the types of phone numbers that you want to<br />
be added to the SIM card.<br />
3. Under the Mark column, you can<br />
change the indicator that will be<br />
appended to the SIM contact names<br />
for each phone number type. To do<br />
so, select a phone type, tap Edit,<br />
enter your desired indicator, then tap<br />
Save.<br />
4. After modifying, tap OK.<br />
5. Tap Menu > Contacts to SIM.<br />
6. Select the check boxes of the contact’s phone numbers that you want to<br />
copy to your SIM card, then tap Save.<br />
To store your SIM card’s phone number<br />
1. On the SIM Manager screen, tap Menu > Tools > List of Own<br />
Numbers.<br />
2. Tap Voice Line 1.<br />
3. Change the name, if desired, then enter your mobile phone number.<br />
4. Tap Save.
96 Organizing Contacts, Appointments, Tasks, and Other Information<br />
6.3 Calendar<br />
Use Calendar to create appointments, including meetings and other<br />
events. You can also synchronize Calendar appointments between your<br />
device and computer.<br />
Create appointments<br />
To schedule an appointment<br />
1. Tap Start > Calendar.<br />
2. Tap Menu > New Appointment.<br />
3. Enter a name for the appointment.<br />
4. Do one of the following:<br />
• If it is a special occasion such as a birthday or a whole-day event,<br />
set the All Day option to Yes.<br />
• If there is a time frame for the appointment, set the start and end<br />
dates and times.<br />
5. Specify the type of category for your appointment, so that it can be<br />
grouped with other related appointments. Tap Categories, then<br />
select a preset category (Business, Holiday, Personal, or Seasonal), or<br />
tap New to create your own category.<br />
6. When finished, tap OK to return to the calendar.<br />
Notes • All-day events do not occupy blocks of time in Calendar; instead, they<br />
appear in banners at the top of the calendar.<br />
Tip<br />
• To remove an appointment, tap Menu > Delete Appointment.<br />
To have the time entered automatically in Day view, tap and drag to select a<br />
time slot for the new appointment, and tap Menu > New Appointment.<br />
To set a default reminder for all new appointments<br />
You can have a reminder automatically turned on for all new appointments<br />
that you schedule.<br />
1. Tap Start > Calendar.<br />
2. Tap Menu > Tools > Options > Appointments tab.<br />
3. Select the Set reminders for new items check box.
Organizing Contacts, Appointments, Tasks, and Other Information 97<br />
4. Set the time when you want the reminder to alert you.<br />
5. Tap OK to return to the Calendar screen.<br />
View appointments<br />
By default, Calendar displays appointments in Agenda view. You can also<br />
look at your appointments in Day, Week, Month, and Year views.<br />
The highlighted hours<br />
here indicate the time<br />
of your appointments.<br />
Tap to view<br />
appointment<br />
details.<br />
Indicates that<br />
there is a conflict<br />
with another<br />
appointment.<br />
Tap to switch views.<br />
Agenda view<br />
• To see detailed appointment information in any view, tap the<br />
appointment.<br />
• To view appointments by category, tap Menu > Filter, then select the<br />
desired category.<br />
• To change the default view that Calendar uses to display<br />
appointments, tap Menu > Tools > Options > General tab. Tap the<br />
Start in box, then choose the calendar view.<br />
• When in Month view, you will see the following indicators:<br />
Morning appointment<br />
Afternoon or evening appointment<br />
Both morning and afternoon/evening appointments<br />
All-day event
98 Organizing Contacts, Appointments, Tasks, and Other Information<br />
Send appointments<br />
To send a meeting request<br />
Use Calendar to schedule meetings via e-mail with contacts who use<br />
Outlook or Outlook Mobile.<br />
1. Tap Start > Calendar.<br />
2. Schedule a new appointment, or open an existing one and tap<br />
Menu > Edit.<br />
3. Tap Attendees, then tap Add Required Attendee or Add Optional<br />
Attendee and add the contacts whom you want to invite.<br />
Note<br />
You can specify if an attendee is required or optional only if your<br />
device is connected to a Microsoft Exchange 2007 server. Otherwise,<br />
all attendees are designated as required. For more information, see<br />
Chapter 8.<br />
4. When you have finished adding attendees, tap Done.<br />
5. Tap OK to send.<br />
Tip<br />
To choose the e-mail account to use for sending meeting requests, tap<br />
Menu > Tools > Options > Appointments tab. Tap the Send meeting<br />
requests via box and choose to send via your Outlook E-mail, POP3/IMAP4<br />
or Windows Live account.<br />
Notes • If you’re sending the meeting request using your Outlook E-mail account,<br />
it will be sent to the attendees the next time you synchronize your device<br />
with your computer or Exchange Server.<br />
• When attendees accept your meeting request, the meeting is automatically<br />
added to their schedules. When their response is sent back to you, your<br />
calendar is updated as well.<br />
To send appointment details as a vCalendar<br />
A vCalendar is a standard file format used for exchanging scheduling<br />
and task information. vCalendar files can be exported to Outlook on the<br />
computer.<br />
After selecting the appointment to send in the Calendar screen, tap Menu ><br />
Send as vCalendar to send a vCalendar containing appointment details as<br />
a file attachment in an MMS message. For more information, see “MMS” in<br />
Chapter 7.
6.4 Tasks<br />
Organizing Contacts, Appointments, Tasks, and Other Information 99<br />
Use Tasks to keep track of things you need to do. A task can occur once<br />
or repeatedly (recurring). You can set reminders for your tasks and you can<br />
organize them using categories.<br />
Your tasks are displayed in a task list. Overdue tasks are displayed in red.<br />
To create a task<br />
1. Tap Start > Programs > Tasks.<br />
Tip<br />
2. Tap Menu > New Task, enter a subject for the task, and fill in<br />
information such as start and due dates, priority, and so on.<br />
3. Specify the type of category for your task, so that it can be grouped<br />
with other related tasks. Tap Categories, then select a preset category<br />
(Business, Holiday, Personal, or Seasonal), or tap New to create your<br />
own category.<br />
4. When finished, tap OK.<br />
You can easily create a short, to-do type task. Simply tap the Tap here to add<br />
a new task box, enter a subject, and tap the Enter button on the on-screen<br />
Keyboard, Touch Keyboard, or Touch Keypad. If the task entry box is not<br />
available, tap Menu > Options, then select the Show Tasks entry bar check<br />
box.<br />
To change the priority of a task<br />
Before you can sort tasks by priority, you need to specify a priority level for each<br />
task.<br />
Note<br />
1. Tap Start > Programs > Tasks.<br />
2. Tap the task you want to change the priority for.<br />
3. Tap Edit, and tap a priority level in the Priority box.<br />
4. Tap OK to return to the task list.<br />
All new tasks are assigned a Normal priority by default.<br />
To set the default reminder for all new tasks<br />
1. Tap Start > Programs > Tasks.<br />
2. Tap Menu > Options.<br />
3. Select the Set reminders for new items check box.
100 Organizing Contacts, Appointments, Tasks, and Other Information<br />
Note<br />
4. Tap OK to return to the task list.<br />
The new tasks must have due dates set in order for the reminder to take<br />
effect.<br />
To show start and due dates in the task list<br />
1. Tap Start > Programs > Tasks.<br />
2. Tap Menu > Options.<br />
3. Select the Show start and due dates check box, then tap OK.<br />
To locate a task<br />
When your list of tasks is long, you can display a subset of the tasks or sort<br />
the list to quickly find a specific task.<br />
Tip<br />
1. Tap Start > Programs > Tasks.<br />
2. In the task list, do one of the following:<br />
• Sort the list. Tap Menu > Sort By, and tap a sort option.<br />
• Filter the list by category. Tap Menu > Filter, and tap the category<br />
you want displayed.<br />
To filter your tasks further, tap Menu > Filter > Active Tasks or Completed<br />
Tasks.<br />
To send task information as a vCalendar<br />
After selecting the task to send in the Task screen, tap Menu > Send as<br />
vCalendar to send a vCalendar containing task details as a file attachment<br />
in an MMS message. For more information, see “MMS” in Chapter 7.<br />
6.5 Notes<br />
Using Notes, you can create handwritten and typed notes, record voice<br />
notes, convert handwritten notes to text for easy readability, and more.<br />
To create a note<br />
1. Tap Start > Programs > Notes. In the note list, tap New.<br />
2. Tap the Input Selector arrow next to the Input Panel icon on the<br />
menu bar, tap the input method you want, and enter your text.<br />
Note<br />
If the Input Selector arrow is not displayed, tap the Input Panel icon.
Organizing Contacts, Appointments, Tasks, and Other Information 101<br />
3. When finished, tap OK to return to the note list.<br />
Notes • To select handwritten text, tap and hold next to the writing. As soon as<br />
dots appear, and before they form a complete circle, quickly drag across<br />
the writing.<br />
• If a letter crosses three ruled lines, it is treated as a drawing rather than<br />
text.<br />
To draw in a note<br />
1. Tap Start > Programs > Notes.<br />
Note<br />
2. In the note list, tap New.<br />
3. To draw on the screen, use the stylus<br />
like a pen. A selection box appears<br />
around your drawing.<br />
4. When finished, tap OK to return to<br />
the note list.<br />
To select a drawing (for example, to<br />
copy or delete it), tap and hold the<br />
drawing briefly. When you lift the<br />
stylus, the drawing is selected.<br />
To record a voice note<br />
You can create a stand-alone recording (voice note) or you can add a<br />
recording to a note.<br />
1. Tap Start > Programs > Notes.<br />
2. If you do not see the Recording toolbar, tap Menu > View Recording<br />
Toolbar.<br />
3. Do one of the following:<br />
• To add a recording to a note, create or open a note.<br />
• To create a stand-alone recording, record from the note list.<br />
4. Tap the Record icon ( ) to begin recording your voice. Tap the Stop<br />
icon ( ) when you are finished recording.
102 Organizing Contacts, Appointments, Tasks, and Other Information<br />
To change recording formats<br />
1. Tap Start > Settings > Personal tab > Input.<br />
Note<br />
2. Tap the Options tab, and select the desired format you want in the<br />
Voice recording format list.<br />
3. Tap OK.<br />
You can also change recording formats from within Notes. In the note list, tap<br />
Menu > Options > Global Input Options link (at the bottom of the screen),<br />
then tap the Options tab.<br />
6.6 Voice Recorder<br />
Voice Recorder lets you record your voice and quickly send it as an MMS or<br />
e-mail attachment, beam it, or set the recorded voice as your ring tone.<br />
Note<br />
Voice Recorder saves voice recordings in AMR-NB (Adaptive Multi-Rate<br />
Narrowband) format only. This is a common speech audio format used in<br />
mobile devices.<br />
To record your voice<br />
1. Tap Start > Programs > Voice Recorder.<br />
2. Hold the device’s microphone close to your mouth.<br />
3. Tap Record or to start recording. Tap Stop or to end the<br />
recording.<br />
By default, all recordings are saved in the My Voices folder. You can choose<br />
another folder to save voice recordings by tapping the arrow beside the<br />
folder name on the top-left of the screen, then in the menu, choose the<br />
folder where you want to save future recordings.<br />
To play back a voice recording<br />
• On the Voice Recorder screen, select a voice recording, then tap .<br />
Tips • Tap to increase the volume; tap to decrease the volume.<br />
• Tap to toggle between muting and unmuting the volume.
Organizing Contacts, Appointments, Tasks, and Other Information 103<br />
To send a voice recording through MMS<br />
• Select a voice recording, then tap Menu > Send via MMS. A new MMS<br />
message is then created with the voice recording automatically inserted<br />
as an audio clip.<br />
See “MMS” in Chapter 7 to learn how to compose and send MMS<br />
messages.<br />
To send a voice recording via e-mail<br />
• Select a voice recording, then tap Menu > Send > Outlook E-mail.<br />
This creates a new Outlook e-mail message with the voice recording<br />
inserted as a file attachment.<br />
See “Using E-mail” in Chapter 7 to learn how to send e-mails.<br />
To beam a voice recording<br />
1. Select the voice recording you want to beam, then tap Menu ><br />
Beam File.<br />
Tip To select multiple recordings, tap and drag over the desired recordings<br />
or tap Menu > Select All.<br />
2. Tap the device you want to send the voice recording to.<br />
3. On the other device, accept the file transfer to receive the file.<br />
To set a voice recording as ring tone<br />
Select the voice recording, then tap Menu > Set as Ringtone.<br />
To rename or move a recording<br />
1. Select the voice recording, then tap Menu > Rename/Move.<br />
Tip To select multiple recordings, tap and drag over the desired recordings<br />
or tap Menu > Select All. Note that you can move multiple files, but you<br />
cannot rename multiple files simultaneously.<br />
2. In Name, enter the new voice recording name.<br />
3. To move the voice recording, select the new destination Folder and<br />
Location.<br />
4. Tap OK.
104 Organizing Contacts, Appointments, Tasks, and Other Information
Chapter 7<br />
Exchanging Messages<br />
7.1 Messaging<br />
7.2 Text Messages<br />
7.3 MMS<br />
7.4 Types of E-mail Accounts<br />
7.5 E-mail Setup Wizard<br />
7.6 Using E-mail
106 Exchanging Messages<br />
7.1 Messaging<br />
To select a messaging account<br />
Do one of the following:<br />
• Tap Start > Messaging. The<br />
Account Picker screen then appears<br />
where you can select an account.<br />
• While you are in a message list<br />
of a certain account, for example<br />
SMS \ MMS, tap Menu > Go To to<br />
switch to other types of messaging Account Picker screen<br />
accounts.<br />
To configure message account settings<br />
Do one of the following:<br />
• Tap Menu > Options on the Account Picker screen.<br />
• Tap Menu > Tools > Options while you’re in a message list.<br />
To automatically add a signature in outgoing messages<br />
You can automatically add your name and other information as your<br />
signature in outgoing SMS, MMS, and e-mail messages:<br />
Note<br />
You need to specify your signature for each type of messaging account.<br />
1. Tap Start > Messaging, then tap Menu > Options.<br />
2. Tap Signatures.<br />
3. Select a messaging account in which to add a signature.<br />
4. Select the Use signature with this account check box.<br />
5. In the provided text box, enter the information that will be displayed<br />
as your signature.<br />
6. If you want the signature to be added whenever you reply or forward<br />
messages, select the Use when replying and forwarding check box,<br />
then tap OK.<br />
7. Repeat the steps to add a signature to other messaging accounts.
7.2 Text Messages<br />
Exchanging Messages 107<br />
Send short text messages (SMS) up to 160 characters long to other mobile<br />
phones.<br />
Send text messages<br />
To compose and send a text message<br />
1. Tap Start > Contacts.<br />
2. Tap the contact’s name to open his or her contact card.<br />
Tip<br />
If your contact list is long, flick or slide your finger upward on the touch<br />
screen to scroll down the contact list. See “Finger Scrolling and Finger<br />
Panning” in Chapter 1 for more details on finger scrolling.<br />
3. On the contact card, tap Send text message.<br />
4. A new text message is then created.<br />
To add more recipients, enter their mobile phone numbers in the To field,<br />
separating them with a semicolon. You can also tap To if you want to add<br />
mobile phone numbers from Contacts.<br />
5. Enter your message.<br />
• To quickly add common<br />
messages, tap Menu > My Text<br />
and tap a desired message.<br />
• To check the spelling, tap Menu<br />
> Spell Check.<br />
6. Tap Send.<br />
Tips • For more information about entering text and symbols, see Chapter 2.<br />
• If you want to know when a text message is received, before sending the<br />
message that you are composing, tap Menu > Message Options, then<br />
select the Request message delivery notification check box.<br />
• To always receive a delivery notification, tap Menu > Tools > Options in<br />
the text message list, tap SMS \ MMS, then select the Request delivery<br />
notifications check box.
108 Exchanging Messages<br />
Manage text messages<br />
Text messages that are sent to and received from a contact (or number)<br />
are grouped as a single thread in your inbox. Threaded SMS lets you see<br />
exchanged messages (similar to a chat program) with a contact on the screen.
Exchanging Messages 109<br />
To reply to a text message<br />
1. In the SMS \ MMS inbox, tap a<br />
message thread to open it.<br />
2. At the bottom of the screen, type<br />
your reply message and then tap<br />
Send.<br />
Enter your reply<br />
message here.<br />
To copy a message in the thread to the SIM card<br />
1. In the SMS \ MMS inbox, tap the<br />
message to open it.<br />
2. Press the up or down arrow key on<br />
the hardware keyboard to select<br />
a message in the thread that you<br />
want to copy to the SIM card.<br />
3. Tap Menu > Copy to SIM.<br />
Note You cannot copy a sent message from<br />
the thread to the SIM card.<br />
To delete a message in the thread<br />
1. In the SMS \ MMS inbox, tap a message thread to open it.<br />
2. Press the up or down arrow key on the hardware keyboard to select a<br />
message in the thread that you want to delete.<br />
3. Tap Menu > Delete.<br />
To delete all messages in a thread<br />
1. In the SMS \ MMS inbox, select a message thread using the up or down<br />
arrow key on the hardware keyboard.<br />
2. Tap Delete.<br />
To reply to a text message with an MMS message<br />
You can reply to a text message in a thread or to a SIM text message using an<br />
MMS message.<br />
1. In the SMS \ MMS inbox, tap a message thread to open it.
110 Exchanging Messages<br />
2. Tap Menu > Insert, and then in the menu, select the item you want to<br />
insert: Picture/Video, Audio or Attachment.<br />
3. Tap Send.<br />
Tips<br />
• You can also insert a vCard or vCalendar in your MMS message.<br />
• To compose an MMS message complete with text, emoticons, media<br />
and attachments, tap Menu > Advanced Composer. For instructions<br />
on composing and sending an MMS message, see “MMS” in this chapter.<br />
To copy a text message from the SIM card to the device<br />
1. In the SMS \ MMS inbox, select the SIM message you want to copy.<br />
Note<br />
2. Tap Menu > Copy to Phone.<br />
Copying SIM text messages to your device results in duplicate messages in the<br />
Inbox folder when your SIM card is in use.<br />
7.3 MMS<br />
Sending multimedia messages (MMS) to your friends and family is fun<br />
and easy. You can include pictures, videos, and audio clips in a multimedia<br />
message.<br />
Notes • Multimedia messaging is a charged service and has to be provisioned on<br />
your mobile phone account. Contact your wireless service provider to have<br />
MMS provisioned as part of your calling plan.<br />
• Make sure the size of MMS messages that you send is within the limits<br />
allowed by your wireless service provider.<br />
Change MMS settings<br />
Check your device to see if it is configured with your wireless service<br />
provider’s MMS settings. If the MMS settings are not yet configured on your<br />
device, you can add the settings while composing an MMS message.<br />
To configure MMS message settings<br />
1. Tap Start > Messaging > SMS \ MMS.<br />
2. Tap Menu > MMS Options. The Settings screen then appears.<br />
3. In the Preferences tab, select or clear the provided check boxes<br />
according to your needs.
Exchanging Messages 111<br />
4. Tap the Servers tab and check if your device is preset with MMS server<br />
settings.<br />
If there are no preset settings, tap New and enter the following<br />
information, which you obtained from your wireless service provider:<br />
• Gateway. Location of the MMS server, which is usually in the form of<br />
an IP address.<br />
• Port number. HTTP port number used for connecting to the MMS<br />
server and for file transfer.<br />
• Server address. URL address of the server where MMS messages are<br />
stored.<br />
• Connect via. Select the connection that your device uses for MMS<br />
messages.<br />
• Send limit. Select the maximum MMS message size allowed by<br />
your wireless service provider.<br />
• WAP version. Select either WAP 1.2 or WAP 2.0, depending on<br />
which one is being used by your wireless service provider.<br />
5. Tap Done.<br />
Notes • If your device already has preset MMS settings, it is recommended that<br />
you do not change these settings. If you change the preset settings, your<br />
device may not be able to send and receive MMS messages.<br />
• If you add several MMS message service providers to the Settings screen, you<br />
can choose one as your default provider. Select the provider's name in the<br />
list, then tap Set As Default.
112 Exchanging Messages<br />
Create and send MMS messages<br />
You can compose MMS messages in a combination of slides, where each<br />
slide can consist of a photo, video or audio clip, and/or text.<br />
To compose an MMS message<br />
1. Tap Start > Messaging > SMS \ MMS, then tap Menu > New > MMS.<br />
Tip<br />
2. When you see the Choose a MMS screen, tap a preset template, or tap<br />
Custom to open a blank MMS message.<br />
Note<br />
If you prefer to start composing from a blank MMS message every time,<br />
select the Always choose custom check box.<br />
3. In To, enter the recipient’s phone number or e-mail address directly,<br />
or tap To, Cc, or Bcc to choose a phone number or an e-mail address<br />
from Contacts.<br />
Note<br />
You may need to scroll up to see Cc and Bcc.<br />
4. Enter a subject for your message.<br />
5. Tap the Insert icon ( )to select and insert a photo or video clip. When<br />
selecting a photo or video clip, you can:<br />
• Tap Select to insert the selected photo or video clip into the MMS<br />
message you are composing.<br />
• Tap to take a photo and insert it into the MMS message.<br />
• Tap to record MMS video and insert it into the MMS message.<br />
• Tap Exit ( ) to quit selection and return to the MMS message.<br />
6. Enter text and insert audio clips by tapping the respective areas. See<br />
“To add text to an MMS message” and “To add an audio clip to an<br />
MMS message” for details.<br />
7. To add more slides, tap or tap Menu > Slides > Insert Slide. Repeat<br />
steps 5 and 6 to insert photos/videos, text, and audio onto your slides.<br />
8. Tap Send to send the MMS message.<br />
You can also send an MMS message from Pictures & Videos or the Camera<br />
program.
Exchanging Messages 113<br />
To add text to an MMS message<br />
When you tap Insert text here on your MMS message, an empty screen<br />
appears where you can enter your text. You can insert the following types of<br />
information:<br />
Enter your own text<br />
Choose from common words<br />
or phrases from the My Text list<br />
Include a Favorites link<br />
Add an emoticon<br />
Insert contact<br />
information<br />
Insert calendar<br />
appointment<br />
Tip<br />
To edit or delete a phrase on the My Text list, tap and hold a string, then tap Edit<br />
or Delete from the shortcut menu. To add a new phrase, tap New.<br />
To add an audio clip to an MMS message<br />
You can add one audio clip per slide in your MMS message.<br />
1. Tap Insert audio on your MMS message.<br />
By default, My Documents will be shown. Tap My Music or another<br />
folder that contains audio files. When navigating folders, tap the<br />
down arrow ( ) to return to the upper folder.<br />
2. Select an audio file. When selected, you can:<br />
• Tap to play the audio clip, to pause, or to stop playback.<br />
• Tap Select to insert it into your MMS message.<br />
• Tap Exit ( ) to quit selection and return to your MMS message.<br />
Note To record a new audio clip and add it to your MMS message, tap . The<br />
Record pop-up window then opens. Tap Record to start recording, and Stop<br />
to end the recording. Tap Play to listen to the recorded audio clip, then tap<br />
Add. The new audio clip is then inserted into your MMS message.
114 Exchanging Messages<br />
View and reply to MMS messages<br />
To view an MMS message<br />
• Use the playback controls , , or .<br />
• Tap Contents to see a list of files included in the message.<br />
On the Message Contents screen, you can do the following:<br />
• To save a file, select it, and tap Menu > Save.<br />
• To save the contents of a text file to the My Text list, tap Menu ><br />
Save into My Text.<br />
• To associate a photo to one of your contacts, tap Menu > Assign<br />
to Contact.<br />
To reply to an MMS message<br />
On the message list, select the MMS message and tap Menu > Reply > Reply<br />
to reply to the sender of the message.<br />
To block a phone number from sending you MMS messages<br />
If you do not want to receive MMS messages from a particular sender, you<br />
can add the sender’s phone number to the MMS Blacklist.<br />
1. When you receive a new MMS message, open and view the message.<br />
2. To avoid receiving MMS messages from this sender next time, tap<br />
Menu > Show > Message Detail.<br />
3. On the MMS Detail screen, tap Menu > Show Contact Details.<br />
4. Tap Menu > Save to Blacklist.<br />
5. Tap Done.<br />
Tips • To view the MMS Blacklist, on the message list tap Menu > MMS Options ><br />
Blacklist tab.<br />
• To unblock a phone number and allow the sender to send you MMS<br />
messages, remove the number from the Blacklist. Tap and hold the phone<br />
number in the Blacklist, then tap Delete.
7.4 Types of E-mail Accounts<br />
Exchanging Messages 115<br />
You can set up the following types of e-mail accounts on your device:<br />
• Outlook e-mail that you sync with your computer or the Exchange<br />
Server.<br />
• E-mail account that you have from an Internet Service Provider (ISP).<br />
• Web-based e-mail accounts such as Gmail®, Yahoo!® Mail Plus, AOL®,<br />
and others.<br />
• Work account that you access using a VPN connection.<br />
Set up your device to synchronize Outlook e-mail with<br />
the computer<br />
If you have installed the synchronization software on your computer and<br />
created a partnership with your device, then your device is ready to send and<br />
receive Outlook e-mail.<br />
If you have not yet installed the synchronization software nor created a<br />
partnership, do so by following the procedures in Chapter 5.<br />
Tip<br />
To set up your company e-mail account so that you can access Outlook e-mail<br />
messages wirelessly, you must set up your device to synchronize via an overthe-air<br />
connection with your company’s Exchange Server. For more information<br />
about synchronizing with your company e-mail server, see Chapter 8.<br />
Add an e-mail account<br />
To add a new e-mail account, tap Start > Messaging > Setup E-mail.<br />
The E-mail Setup wizard then opens and lets you enter your e-mail account<br />
settings. See “E-mail Setup Wizard” in this chapter for details.
116 Exchanging Messages<br />
7.5 E-mail Setup Wizard<br />
Windows Mobile’s E-mail Setup wizard walks you through the process<br />
of setting up your e-mail account. It has an Auto Setup feature which can<br />
automatically set up your e-mail account based on the e-mail address and<br />
password that you enter, if your e-mail provider settings are preconfigured<br />
on your device. If the settings are not found on your device, Auto Setup then<br />
attempts to retrieve the settings online for which you may be charged when<br />
your device connects to the Internet and downloads them. If it cannot find the<br />
e-mail settings online, you need to enter them <strong>manual</strong>ly.<br />
Note<br />
For more information about setting up your company Outlook e-mail account,<br />
see Chapter 8.<br />
Set up a POP3 or IMAP4 e-mail account<br />
Set up a POP3 or IMAP4 e-mail account on your device if you have an<br />
e-mail account from an Internet service provider (ISP) or other e-mail<br />
service provider, or a web-based account such as Gmail, Yahoo! Mail Plus,<br />
or AOL. You can also add a work account that you access using a VPN server<br />
connection as a POP3/IMAP4 account.<br />
1. Add a new e-mail account. See “Add an e-mail account” for instructions.<br />
2. Enter your e-mail address and the password for your e-mail account and<br />
select the Save password option. Tap Next.<br />
3. If e-mail provider settings are found preconfigured on your device, the<br />
E-mail Setup wizard shows a successful message. Tap Next.
Note<br />
Exchanging Messages 117<br />
If the settings are not found on your device, select the Try to get e-<br />
mail settings automatically from the Internet checkbox to find and<br />
download e-mail server settings from the Internet and then tap Next.<br />
4. Enter Your name and the Account display name, then tap Next.<br />
Note<br />
If the E-mail Setup wizard was unsuccessful in finding and downloading<br />
settings from the Internet, select Internet e-mail from the Your e-mail<br />
provider list on the next screen. You will be asked to enter e-mail server<br />
settings. See “To specify e-mail server settings” for details.<br />
5. In the Automatic Send/Receive list, choose how frequent you want<br />
e‐mail messages to be automatically sent and downloaded on your<br />
device, then tap Finish.<br />
Tap Review all download settings to select download options, set the e-mail<br />
format as HTML or plain text, and more. For more information, see “To customize<br />
download and format settings”.<br />
To specify e-mail server settings<br />
If Auto Setup is unsuccessful, contact your ISP or e-mail provider for the<br />
Incoming mail server and outgoing mail server settings so you can enter<br />
them on your device.<br />
Other options that you can select include the following:<br />
• Select the Outgoing server requires authentication check box, if<br />
required by your provider.<br />
• If the outgoing e-mail server requires a different <strong>user</strong> name and<br />
password for sending e-mail, clear the Use the same <strong>user</strong> name and<br />
password for sending e-mail check box. You will be prompted to<br />
enter this information.
118 Exchanging Messages<br />
• Tap Advanced Server Settings, then select the Require SSL check<br />
boxes if your e-mail provider uses an SSL connection for more secured<br />
e-mail. From the Network connection list, select the data connection<br />
that you use for connecting to the Internet.<br />
To customize download and format settings<br />
Before you tap Finish when setting up your POP3 or IMAP4 e-mail account,<br />
you can tap the Review all download settings link at the bottom of the<br />
screen to choose download options, message format, and other settings.<br />
Options<br />
Automatic Send/Receive<br />
Download messages<br />
Send/receive when I click<br />
Send<br />
Use automatic send/<br />
receive schedule when<br />
roaming<br />
When deleting messages<br />
Message format<br />
Message download limit<br />
Description<br />
You can select a time interval for connecting to<br />
the Internet automatically to send and receive<br />
messages.<br />
Set the number of days of messages that you<br />
want to be downloaded to your device.<br />
By default, messages are immediately delivered<br />
when you tap Send. If you prefer to save<br />
outgoing messages to the Outbox folder first,<br />
clear the check box. (In this case, you will need<br />
to <strong>manual</strong>ly send messages by tapping Menu ><br />
Send/Receive).<br />
This allows your device to data roam when<br />
there is a set time interval for connecting to the<br />
Internet automatically. Since this may result in<br />
higher connection costs, you may want to leave<br />
the check box cleared.<br />
Choose whether to delete messages from the<br />
mail server when you delete them on your device.<br />
Select HTML or Plain Text.<br />
Select the e-mail download size. If you have large<br />
volumes of e-mail, use a lower size or select to<br />
download headers only.
Exchanging Messages 119<br />
Set up a custom domain e-mail<br />
When you are using an e-mail domain name that is hosted by a different e-mail<br />
provider (for example, your e-mail address may be Benjamin@startup.com<br />
but Email.com hosts the e-mail account and provides e-mail services), select<br />
the Custom Domain option in the E-mail Setup wizard to set up your e-mail<br />
account on your device.<br />
1. Add a new e-mail account. See “Add an e-mail account” for instructions.<br />
2. Enter your E-mail address and the Password for your e-mail account<br />
and select the Save password option. Tap Next.<br />
3. Clear the Try to get e-mail settings automatically from the<br />
Internet, then tap Next.<br />
4. In Your e-mail provider, select Custom domain and then tap Next.<br />
5. Enter the domain of your e-mail provider and then tap Next.<br />
6. The E-mail Setup wizard then tries to find the e-mail provider settings<br />
on your device or from the Internet. If the settings are found, it shows a<br />
successful message. Tap Next.<br />
7. Enter Your name and the Account display name, then tap Next.<br />
Note<br />
If the E-mail Setup wizard was unsuccessful in finding the settings, you will<br />
be prompted to enter e-mail server settings on the succeeding screens.<br />
See “To specify e-mail server settings” for details.<br />
8. In the Automatic Send/Receive list, choose how frequent you want e-<br />
mail messages to be automatically sent and downloaded on your device.<br />
Note<br />
9. Tap Finish.<br />
Tap Review all download settings to select download options, set the<br />
e-mail format as HTML or plain text, and more. For more information, see<br />
“To customize download and format settings.”
120 Exchanging Messages<br />
7.6 Using E-mail<br />
After setting up e-mail accounts on your device, you can start sending and<br />
receiving e-mail messages.<br />
Create and send messages<br />
To compose and send a message<br />
1. Tap Start > Contacts.<br />
Tip<br />
If your contact list is long, flick or slide your finger upward on the touch<br />
screen to scroll down the contact list. See “Finger Scrolling and Finger<br />
Panning” in Chapter 1 for more details on finger scrolling.<br />
2. Tap the contact’s name to open his or her contact card.<br />
3. On the contact card, tap the item that shows Send e-mail.<br />
4. If you have several e-mail accounts, the Account Picker screen will<br />
appear. Select an e-mail account that you want to use.<br />
5. A new e-mail message is then created.<br />
To add more recipients, enter their e-mail addresses, separating<br />
them with a semicolon. You can also tap To if you want to add e-mail<br />
addresses stored in Contacts.<br />
6. Enter a subject and compose your message.<br />
• To quickly add common messages, tap Menu > My Text and tap a<br />
desired message.<br />
• To check the spelling, tap Menu > Spell Check.<br />
7. Tap Send.<br />
Tips • For more information about entering text and symbols, see Chapter 2.<br />
• To set the message priority, tap Menu > Message Options.<br />
• If you are working offline, e-mail messages are moved to the Outbox<br />
folder and will be sent the next time you connect.<br />
To add an attachment to a message<br />
1. In the message that you are composing, tap Menu > Insert and tap<br />
the item you want to attach: Picture, Voice Note, or File.<br />
2. Select the file or picture you want to attach, or record a voice note.
Exchanging Messages 121<br />
Filter the Inbox message list<br />
When the Inbox on your device is full of messages, it may be difficult to<br />
browse and locate a desired message. You can filter your Inbox to display<br />
only the messages that contain a particular sender or subject you are<br />
searching for.<br />
To filter your Inbox<br />
Enter the sender name or e-mail subject<br />
you want to look for. As you tap characters,<br />
the message list narrows down to the<br />
conditions you have set.<br />
For example, entering “S”, then “A” narrows<br />
the list to only the e-mails that contain<br />
sender names and e-mail subjects that<br />
start with “SA”<br />
View and reply to messages<br />
To read an incoming message<br />
By default, only the first few kilobytes of a message are shown when you<br />
open an incoming message. To read the whole message do one of the<br />
following:<br />
• Finger-scroll to the end of the message and tap Get entire message<br />
and any attachments (POP3 e-mail account) or Get the rest of this<br />
message (Outlook/IMAP4 e-mail account).<br />
• Tap Menu > Download Message.<br />
The message is downloaded immediately.<br />
Note • The Fetch Mail feature, which is also available for POP3/IMAP4 e-mail<br />
accounts, downloads an entire e-mail immediately without the need for you<br />
to perform a full Send/Receive action. This limits the download to just the<br />
e-mail message that you want and helps save data cost.<br />
• If your company is running Microsoft Exchange Server 2007, the message<br />
downloads immediately without waiting until the next time you synchronize.<br />
For more information about working with company e-mails, see Chapter 8.
122 Exchanging Messages<br />
To download an attachment<br />
An attachment appears below the subject of the message. Tapping this<br />
downloads and opens the attachment immediately.<br />
Notes • For a POP3 e-mail account, all attachments are downloaded immediately<br />
when you tap Get entire message and any attachment at the end of the<br />
message.<br />
• You can configure your Outlook/IMAP4 e-mail account to download<br />
the attachment immediately without waiting until the next time you<br />
synchronise. For information about setting your device to automatically<br />
download file attachments, see “Customize e-mail settings”.<br />
To reply to or forward a message<br />
1. Open the message and tap Menu > Reply > Reply, Menu > Reply ><br />
Reply All, or Menu > Reply > Forward.<br />
Tip<br />
2. Enter your response, then tap Send.<br />
You can customize ActiveSync to exclude addresses, including your own,<br />
from being added to the recipient list. Tap Menu > Options in ActiveSync,<br />
select the E-mail item, tap Settings, then tap Advanced. In the My e-mail<br />
addresses text box, enter e-mail addresses you want to exclude.<br />
To view and reply to HTML e-mails<br />
You can receive, view and reply to HTML e-mails from any type of e-mail<br />
account. The HTML format is retained, without layout shifting or resizing.<br />
Note HTML e-mail support in Outlook Mobile is available only if your company is<br />
using Microsoft Exchange Server 2007.<br />
1. Set the message format to HTML. To find out how to set the message<br />
format, see “Customize e-mail settings”.<br />
2. Tap Start > Messaging, select your e-mail account, and open an<br />
HTML e-mail that you received.<br />
3. Tap the Tap to scroll right option to be able to scroll sideways and<br />
get a complete horizontal view of the message.<br />
• Tap Get entire message and any attachments (POP3 e-mail<br />
account) or Get the rest of this message (Outlook/IMAP4 e-mail<br />
account) at the end of the message to download and view the whole<br />
message.
Tip<br />
Exchanging Messages 123<br />
• If the e-mail does not download immediately, tap Menu ><br />
Send/Receive.<br />
• If images do not immediately appear on the message, tap<br />
Internet pictures blocked then tap Download Internet pictures.<br />
4. Tap Menu and choose whether to reply or forward the message.<br />
5. When replying, enter your response then tap Send.<br />
E -mails can contain hyperlinks to Web sites.<br />
Download messages<br />
The manner in which you download messages depends on the type of<br />
e-mail account you have.<br />
To send and receive e-mail for an Outlook account<br />
1. Connect your device to your computer using the USB cable or<br />
Bluetooth.<br />
Otherwise, connect through 3G/GPRS if you are synchronizing Outlook<br />
e-mail with the Exchange Server. For more information, see Chapter 8.<br />
2. Synchronization automatically begins, and your device sends and<br />
receives Outlook e-mail.<br />
Tip<br />
You can also <strong>manual</strong>ly synchronize anytime by tapping Sync in ActiveSync or<br />
Menu > Send/Receive in Outlook Mobile.<br />
To send and receive e-mail for a POP3/IMAP4 account<br />
If you have an e-mail account with an ISP or a work account that you access<br />
using a VPN server connection, you send and receive messages through a<br />
remote e-mail server. Before sending and downloading messages, you need<br />
to connect to the Internet or your corporate network.<br />
1. Tap Start > Messaging and tap your POP3 or IMAP4 e-mail account.<br />
2. Tap Menu > Send/Receive. Messages on your device and e-mail<br />
server are synchronized: new messages are downloaded to the device<br />
Inbox folder, messages in the Outbox folder are sent, and messages<br />
deleted from the server are removed from the device Inbox.
124 Exchanging Messages<br />
Customize e-mail settings<br />
To change the download size and format, and manage e-mail<br />
attachments for Outlook e-mail<br />
1. Disconnect your device from the computer.<br />
2. Tap Start > Programs > ActiveSync.<br />
3. Tap Menu > Options, select E-mail, then tap Settings.<br />
4. Do any of the following:<br />
• In Message format, select HTML or Plain Text.<br />
• In Download size limit, select the desired e-mail size.<br />
• Select the Include file attachments option to automatically<br />
download attachments on Outlook e-mails.<br />
5. Close ActiveSync and reconnect your device to the computer.<br />
To change the download size and format, and manage e-mail<br />
attachments for POP3/IMAP4 e-mail<br />
1. Tap Menu > Options on the Account Picker screen, or tap Menu ><br />
Tools > Options while you’re in a message list.<br />
2. Tap your POP3/IMAP4 e-mail account.<br />
3. Tap the Download Size Settings link.<br />
4. Do any of the following:<br />
• In Message format, select HTML or Plain Text.<br />
• In Message download limit, select the desired e-mail size.<br />
• In Download attachments (IMAP4 e-mail account only), select the<br />
desired setting for downloading e-mail attachments.<br />
5. Tap Done.<br />
To store attachments on a storage card<br />
1. Tap Start > Messaging.<br />
2. Tap Menu > Options > Storage tab.<br />
3. Select the When available, use this storage card to store<br />
attachments checkbox.
Chapter 8<br />
Working With Company E-mails<br />
and Meeting Appointments<br />
8.1 Synchronizing with the Exchange Server<br />
8.2 Working With Company E-mails<br />
8.3 Managing Meeting Requests<br />
8.4 Finding Contacts in the Company<br />
Directory
126 Working With Company E-mails and Meeting Appointments<br />
8.1 Synchronizing with the Exchange Server<br />
To keep up-to-date with your company e-mails and meeting schedules while<br />
you’re out of the office, you can connect your device to the Internet through<br />
3G/GPRS and synchronize with your company’s Exchange Server.<br />
Set up an Exchange Server connection<br />
Before you can synchronize or access information on the Exchange Server,<br />
you need to set up an Exchange Server connection on your device. You<br />
need to get the following information from your network administrator and<br />
enter them on your device:<br />
• Exchange Server name (must be Outlook Web Access server name)<br />
• Domain name<br />
• User name and password that you use at work<br />
If you have not synchronized your device with your computer, follow these<br />
steps to set up an Exchange Server connection.<br />
1. Tap Start > Messaging > Setup E-mail.<br />
2. Enter your e-mail address and password, select the Save password<br />
option, then tap Next.<br />
3. Clear the Try to get e-mail settings automatically from the Internet<br />
check box, then tap Next.<br />
4. Select Exchange server in the Your e-mail provider list, then tap Next.<br />
5. Tap Next again.<br />
6. In the next screen, select the Attempt to detect Exchange Server<br />
Settings automatically checkbox, then tap Next.<br />
7. In the User Information screen, enter your Exchange Server credentials<br />
including your <strong>user</strong> name, password, and domain, then tap Next.<br />
The Email Setup Wizard then connects to the Exchange Server and<br />
downloads the settings.<br />
8. When prompted, enter the server address, then tap Next.
Working With Company E-mails and Meeting Appointments 127<br />
9. Select the items that you want to sync with the Exchange Server.<br />
Note<br />
10. Tap Finish.<br />
• To change synchronization settings of an information item,<br />
for example, E-mail, select the item, then tap Settings.<br />
• To change the rules for resolving synchronization conflicts,<br />
tap Menu > Advanced.<br />
Note<br />
Tip<br />
If you synchronized e-mails with your computer before, open ActiveSync on<br />
your device, then tap Menu > Add Server Source to set up an Exchange<br />
Server connection. When prompted to select information types for<br />
synchronization, you must first clear the E-mail check box under the Windows<br />
PC item before you can select E-mail under Exchange Server.<br />
To change Exchange Server settings, open ActiveSync on your device, then<br />
tap Menu > Configure Server.<br />
Start synchronization<br />
Before you start synchronizing with the Exchange Server, make sure your<br />
device has been set up with a data connection to the Internet so that you<br />
can synchronize over the air. For more information about connections, see<br />
Chapter 10.<br />
After you finish setting up an Exchange Server connection, your device<br />
automatically starts synchronization. You can <strong>manual</strong>ly start synchronization<br />
anytime by tapping Sync in ActiveSync.<br />
Note<br />
If you connect your device to your office computer via a USB or Bluetooth<br />
connection, you can use this connection to the computer to “pass through”<br />
to the network and download Outlook e-mails and other information to your<br />
device.<br />
8.2 Working With Company E-mails<br />
Your device gives you instant access to your company e-mails and lets<br />
you manage your messages easier. Direct Push, Fetch Mail, Remote e-mail<br />
search, and e-mail flags are just some of the tools you can use to manage<br />
your e-mails.<br />
Note<br />
Some messaging features depend on the Microsoft Exchange Server version<br />
used in your company. Check with your network administrator for the<br />
availability of these features.
128 Working With Company E-mails and Meeting Appointments<br />
Automatic synchronization through Direct Push<br />
Direct Push technology (push e-mail feature) enables you to receive new e-<br />
mails on your device as soon as they arrive in your Inbox on the Exchange Server.<br />
With this feature, items such as contacts, calendar and tasks are also immediately<br />
updated onto your device when these items have been changed or new entries<br />
have been added on the Exchange Server. To make Direct Push work, you need<br />
to have a 3G/GPRS connection on your device.<br />
You need to perform a full synchronization between your device and the<br />
Exchange Server first before Direct Push can be enabled.<br />
Requirement The Direct Push feature works for your device only if your company is<br />
using Microsoft Exchange Server 2003 Service Pack 2 (SP2) with<br />
Exchange ActiveSync or higher version.<br />
To enable Direct Push via Comm Manager<br />
1. Tap Start > Settings > Connections tab > Comm Manager.<br />
2. On the Comm Manager screen, tap the Microsoft Direct Push button<br />
( ) to enable or disable Direct Push.<br />
When enabled, the Microsoft Direct Push button ( ) indicates<br />
that you will receive e-mails as they arrive. When disabled, you need to<br />
<strong>manual</strong>ly retrieve your e-mails.<br />
To enable Direct Push via ActiveSync<br />
1. In ActiveSync on your device, tap Menu > Schedule.<br />
2. Select As items arrive in the Peak times and Off-peak times boxes.<br />
Scheduled synchronization<br />
If you do not want to use Direct Push, you can set a regular schedule for<br />
synchronizing Outlook e-mail and information.<br />
1. In ActiveSync on your device, tap Menu > Schedule.<br />
2. Select a shorter time interval in the Peak times box for you to be able<br />
to receive e-mails more frequently. (Peak times usually refer to your<br />
working hours when e-mail volume is high).<br />
3. Select a longer interval in the Off-peak times box.<br />
Tip<br />
To set the days and hours that make up your peak and off-peak times,<br />
tap the Adjust peak times to fit your schedule link at the bottom of<br />
the screen.
Working With Company E-mails and Meeting Appointments 129<br />
Instant download through Fetch Mail<br />
The Fetch Mail feature downloads an entire e-mail immediately without the<br />
need for you to perform a full Send/Receive action. This limits the download<br />
to just the e-mail message that you want and helps save data cost.<br />
Requirement Fetch Mail works for your device only if your company is using<br />
Microsoft Exchange Server 2007 or higher.<br />
1. Tap Start > Messaging > Outlook E-mail.<br />
Tip<br />
Note<br />
2. Tap an e-mail message to open it.<br />
3. By default, only the first few words of the message is shown. To<br />
download the whole e-mail, finger-scroll to the end of the message,<br />
then tap Get the rest of this message.<br />
4. A “Downloading” status appears. Wait for the remainder of the<br />
message body to download.<br />
For information about changing e-mail sync options such as the initial<br />
download size limit for e-mail, see "Customize e-mail settings" in Chapter 7.<br />
When you receive an e-mail that contains a link to a document such as a PDF<br />
or Microsoft Office document located on SharePoint or an internal file server,<br />
you can tap the link to view the document on your device. You can view the<br />
document only if you have a Microsoft Outlook account that synchronizes<br />
with Microsoft Exchange Server 2007 or later. Exchange Server must also<br />
be set up to allow access to SharePoint document libraries or internal file<br />
servers.<br />
Search for e-mails on the Exchange Server<br />
You can access messages that are not available on your device by searching<br />
your Microsoft Exchange Server mailbox. The search results is downloaded<br />
and displayed in a Search Results folder.<br />
Requirement Your company must be using Microsoft Exchange Server 2007 or<br />
higher.<br />
1. Tap Start > Messaging > Outlook E-mail.<br />
2. Tap Menu > Tools > Search Server.<br />
3. In the Look for text box, enter the search keyword.<br />
4. Choose the date range of messages to search from.
130 Working With Company E-mails and Meeting Appointments<br />
5. In the Look in list, specify whether to search in your Inbox or Sent Items<br />
only, or to search in All Folders.<br />
6. Tap Search.<br />
Flag your messages<br />
Flags serve as a reminder for you to follow-up on important issues or<br />
requests contained in e-mail messages. Flagging messages, which has been<br />
a useful feature on desktop Outlook E-mail, can also be done in Outlook<br />
Mobile on your device. You can flag received e-mail messages on your<br />
device.<br />
Requirement<br />
To flag or unflag a message<br />
Flags are enabled only if e-mails are synchronized with Microsoft<br />
Exchange Server 2007 or higher. Flags are disabled or hidden<br />
if e-mails are synchronized with earlier versions of Microsoft<br />
Exchange Server.<br />
1. Tap Start > Messaging > Outlook E-mail.<br />
2. Select a message or open a message.<br />
3. Tap Menu > Follow Up and select one of the following options:<br />
• Set Flag Mark the message<br />
with a red flag to indicate that it<br />
needs follow up.<br />
• Complete Flag Mark the<br />
message with a check mark<br />
to indicate that the issue or<br />
request in the e-mail is already<br />
completed.<br />
• Clear Flag Remove the flag to<br />
unmark the message.<br />
Note E-mail message reminders are displayed on your device if the messages are<br />
flagged with reminders and synchronized from the Exchange Server.
Working With Company E-mails and Meeting Appointments 131<br />
Out-of-office auto-reply<br />
Outlook Mobile allows you to retrieve and change your out-of-office status.<br />
Just like desktop Outlook E-mail, Outlook Mobile automatically sends an autoreply<br />
message when you’re not available.<br />
To send out-of-office auto-reply messages<br />
1. Tap Start > Messaging ><br />
Outlook E-mail.<br />
2. Tap Menu > Tools > Out of Office.<br />
3. In the I am currently list, select<br />
Out of the Office.<br />
4. Enter your auto-reply message, then<br />
tap Done.<br />
8.3 Managing Meeting Requests<br />
When you schedule and send meeting requests from your device, you can<br />
invite attendees to your meeting and check their status to know about their<br />
availability.<br />
When you receive a meeting request, you can reply by accepting or declining<br />
the request. The meeting request also clearly indicates whether or not there<br />
are conflicting or adjacent meetings.<br />
Requirement<br />
Your company must be using Microsoft Exchange Server 2007 or<br />
higher.<br />
To reply to a meeting request<br />
1. When you receive a meeting request e-mail, a notification will be<br />
displayed on the Today screen. Open the e-mail.<br />
2. Tap Accept to reply and accept the meeting request, or tap Menu ><br />
Decline if you cannot attend the meeting.<br />
Tips • Before responding, you can check your availability during the time<br />
of the requested meeting by tapping View your calendar.<br />
• If the time of the meeting conflicts with your other appointments, a<br />
“Scheduling Conflict” status appears on top of the e-mail.
132 Working With Company E-mails and Meeting Appointments<br />
3. Choose whether or not to edit your response e-mail before sending,<br />
then tap OK:<br />
If you accepted the meeting request, it will automatically be added as an<br />
appointment in Calendar on your device.<br />
To view the list of meeting participants<br />
1. Tap Start > Calendar.<br />
2. Tap a meeting request that you previously sent, then tap Attendees.<br />
The list of required and optional attendees will be listed.<br />
Notes • For information about creating a meeting request, see “To send a meeting<br />
request” in Chapter 6.<br />
• If you select a meeting that you have organized, the list shows who has<br />
accepted or declined the meeting.<br />
• To view an attendee’s contact information, tap the attendee’s name. If the<br />
attendee is included in your contacts list, you will see the contact information<br />
immediately. If the attendee is not in your contacts list, tap Company<br />
Directory to view the contact information.
Working With Company E-mails and Meeting Appointments 133<br />
8.4 Finding Contacts in the Company Directory<br />
In addition to having contacts on your device, you can access contact<br />
information from your organization’s Company Directory. By having over-theair<br />
access to the Company Directory, you can easily send e-mail messages and<br />
meeting requests to anyone in your company.<br />
Requirement<br />
Access to the Company Directory is available only if your<br />
organization is running Microsoft Exchange Server 2003 SP2 or<br />
higher, and you have completed your first synchronization with the<br />
Exchange Server.<br />
To find contacts in the Company Directory<br />
1. Synchronize with the Exchange Server.<br />
2. Do any of the following:<br />
• In Contacts, tap Menu > Company Directory.<br />
• In a new e-mail message, tap the To box (or tap Menu > Add<br />
Recipient), then tap Menu > Company Directory.<br />
• In a new meeting request using Calendar, tap Attendees, then tap<br />
Company Directory on top of the list.
134 Working With Company E-mails and Meeting Appointments<br />
3. Enter a partial or full contact name and tap Search. In the search results<br />
list, tap a contact to select it.<br />
Notes • You can save a contact from the Company Directory to your device by<br />
selecting the contact, then tapping Menu > Save to Contacts.<br />
• You can search on the following information as long as that information is<br />
included in the Company Directory: First name, Last name, E-mail name,<br />
Display name, E-mail address, or Office location.
Chapter 9<br />
Working With Documents<br />
and Files<br />
9.1 Microsoft® Office Mobile<br />
9.2 Adobe® Reader® LE<br />
9.3 Copying and Managing Files<br />
9.4 ZIP<br />
9.5 Backing Up Data
136 Working With Documents and Files<br />
9.1 Microsoft® Office Mobile<br />
Microsoft® Office Mobile consists of the following applications:<br />
• Microsoft® Office Excel® Mobile lets you create and edit Excel<br />
workbooks and templates on your device.<br />
• Microsoft® Office OneNote® Mobile lets you create notes with text,<br />
photos, and voice recordings for synchronization later with Microsoft®<br />
Office OneNote® 2007 on your computer.<br />
• Microsoft® Office PowerPoint® Mobile allows you to view (not<br />
create) slide show presentations in *.ppt and *.pps formats.<br />
• Microsoft® Office Word Mobile lets you create and edit documents<br />
and templates in Word Mobile and save them as *.doc, *.rtf, *.txt,<br />
and *.dot files.<br />
To use Microsoft Office Mobile<br />
1. Tap Start > Office Mobile.<br />
2. Tap the Office Mobile application that you want to use.<br />
Word Mobile and Excel Mobile do not fully support some features of<br />
Microsoft® Office Word and Microsoft® Office Excel®. To see a complete list<br />
of features that are not supported in Word Mobile and Excel Mobile, see<br />
Help on your device.<br />
Tips • By default, Word Mobile saves documents in .docx format, while Excel<br />
Mobile saves workbooks in .xlsx format. If you want to open these types<br />
of files on a computer that uses Microsoft Office 2000, Office XP, or Office<br />
2003, you need to download and install the File Format Converter in<br />
your computer. You can find this converter at http://www.microsoft.<br />
com/downloads/details.aspx?FamilyId=941B3470-3AE9-4AEE-8F43-C6BB<br />
74CD1466&displaylang=en.<br />
• If you want Word Mobile to save documents in .doc format, tap Menu ><br />
Tools > Options (or Menu > Options when no document is opened),<br />
then change the Default template to Word 97-2003 Document (.doc).<br />
• If you want Excel Mobile to save workbooks in a format that is compatible<br />
with Microsoft Office 2000, Office XP, or Office 2003, tap Menu > Options<br />
(with no workbook opened), then change the Template for new<br />
workbook to Blank 97-2003 Workbook.
9.2 Adobe® Reader® LE<br />
Working With Documents and Files 137<br />
Adobe® Reader® LE is an application for viewing PDF (Portable Document<br />
Format) documents on your device. It supports a subset of the features<br />
found in the PC versions of Adobe Reader.<br />
To open Adobe Reader LE<br />
• Tap Start > Programs > Adobe Reader LE.<br />
To open a PDF file on your device<br />
Do one of the following:<br />
• Open a PDF file in Adobe Reader LE.<br />
• Open File Explorer, find the PDF file, then tap the file to open it.<br />
To navigate through a PDF document<br />
When you are viewing a PDF document, you can do any of the following:<br />
• Use the vertical and horizontal scroll bars (including the up, down, right<br />
and left arrow keys on the bars) to move to the desired direction of the<br />
page.<br />
• Press the up/down/right/left arrow keys on the hardware keyboard to<br />
move to the desired direction of the page.<br />
• Tap to return to the previous page; tap to move to the next page.<br />
Tap to jump to the first page; tap to jump to the last page.<br />
• Tap Tools > Go To to select the desired page to view.<br />
To search for text in the document<br />
1. Tap Tools > Find > Text or tap in the toolbar.<br />
2. Type in the text to be searched, then tap Find.<br />
The matched text in the document will be highlighted.<br />
3. To view the next occurrence of the text, tap Tools > Find > Next.<br />
Tips<br />
• Adobe Reader LE displays a bookmark pane for the PDF files that contain<br />
bookmarks. Tap the bookmarks to go to a specific section/page within the<br />
file.<br />
• Adobe Reader LE supports password-protected PDF files with up to 128‐bit<br />
encryption. When you open a password-protected PDF file, you will be<br />
prompted to enter the password before opening it.
138 Working With Documents and Files<br />
9.3 Copying and Managing Files<br />
You can copy files between your device and computer, or copy files to a<br />
storage card installed on your device. You can also efficiently manage your<br />
files and folders using File Explorer.<br />
To copy files using Windows Mobile Device Center or ActiveSync<br />
1. Connect your device to the computer.<br />
2. Click File Management > Browse the contents of your device in<br />
Windows Mobile Device Center on your computer, or click Explore in<br />
ActiveSync on your computer. This opens Windows Explorer on your<br />
computer and displays the contents of your device.<br />
3. To copy a file from your device to your computer:<br />
a. Browse the contents of your device, right-click the file you want to<br />
copy, then click Copy.<br />
b. Right-click a folder on your computer, then click Paste.<br />
4. To copy a file from your computer to your device:<br />
a. Browse the folders on your computer, right-click the file you want<br />
to copy, then click Copy.<br />
b. Right-click a folder on your device, then click Paste.<br />
To manage files on your device using File Explorer<br />
File Explorer lets you browse and manage the contents of your device. The<br />
root folder on the device is named My Device, and contains the following<br />
folders: My Documents, Program Files, Windows, and more.<br />
1. Tap Start > Programs > File Explorer.<br />
2. Tap a folder or file to open it.<br />
3. To return to an upper level folder, tap Up and select the folder.<br />
4. To quickly delete, rename, or copy a file, tap and hold the file, then<br />
choose the desired operation on the shortcut menu. To copy or delete<br />
multiple files, tap and drag over the desired files to select, tap and<br />
hold the selection, then choose the desired operation on the shortcut<br />
menu.
Working With Documents and Files 139<br />
To copy files to a storage card<br />
1. Make sure that the storage card is properly installed on your device.<br />
2. Tap Start > Programs > File Explorer and navigate to the<br />
appropriate folder.<br />
3. Tap and hold the file you want to copy, then tap Copy.<br />
4. Tap the down arrow ( ), then tap Storage Card in the list.<br />
5. Tap Menu > Edit > Paste.<br />
Tip<br />
You can configure programs such as Word Mobile and Excel Mobile to<br />
directly save edited files on your storage card. In the program's file list, tap<br />
Menu > Options, then select the storage card in the Save to box.<br />
9.4 ZIP<br />
The ZIP program increases the storage capacity of your device by allowing<br />
you to compress files in the conventional ZIP format. It also allows you to<br />
extract files from a zip file.<br />
To start ZIP on your device<br />
• Tap Start > Programs > ZIP.<br />
Each time you start ZIP, it searches for files that have the .zip file<br />
extension, and displays these files on the Archive List screen.<br />
To open a ZIP file and extract files<br />
1. Open a zip file by doing one of the following:<br />
• Select a file, then tap File > Open Archive.<br />
• Tap and hold a file, then tap Open Archive.<br />
• Double-tap a file.<br />
Note<br />
You cannot select multiple ZIP files.<br />
2. From the zip file, select files by doing one of the following:<br />
• Tap to select a file.<br />
• To select several files, tap Menu > Action and make sure Multi-<br />
Select Mode is selected. Select files by tapping each file. (Tap a<br />
selected file to deselect it).<br />
• To select all files, tap Menu > Action > Select All.
140 Working With Documents and Files<br />
3. Tap Menu > Action > Extract.<br />
4. Choose a folder where the files will be extracted to, then tap Extract.<br />
To create a zip archive<br />
1. Tap File > New Archive.<br />
2. On the Save As screen, enter the zip file name and choose a folder<br />
where you want to save it. You can also choose whether to save the<br />
zip file on the device’s main memory or storage card.<br />
3. Tap Save.<br />
4. Tap Menu > Action > Add.<br />
5. Double-tap the folder that contains the files you want to archive.<br />
6. Select files by doing one of the following:<br />
• Tap to select a file.<br />
• To select several files, tap and hold on the screen, then select<br />
Multi-Select Mode. Select files by tapping each file. (Tap a<br />
selected file to deselect it).<br />
• To select all files, tap and hold on the screen, then tap Select All.<br />
7. Tap Add.<br />
8. Tap Menu > File > Close Archive.<br />
9.5 Backing Up Data<br />
Use Sprite Backup to back up data, which includes settings, files, contacts,<br />
and all other information, to a storage card or to a designated folder on<br />
your device.<br />
To install Sprite Backup<br />
1. Make sure your device is connected to your computer via a USB cable.<br />
2. Insert the Applications disc on your computer’s CD or DVD drive, then<br />
follow the on-screen instructions to install Sprite Backup on your<br />
device.<br />
3. After installation is completed, the Setup Wizard on your computer<br />
will set up Sprite Backup on your device. Follow the on-screen<br />
instructions to complete the setup.
Working With Documents and Files 141<br />
To open Sprite Backup<br />
• On your device, tap Start > Programs > Sprite Backup.<br />
Sprite Backup operates in two modes: Basic and Advanced.<br />
Basic mode<br />
Advanced mode<br />
To back up data in Basic mode<br />
Basic mode is the default mode, and allows you to easily back up the entire<br />
content of your device with the tap of a button.<br />
Note<br />
To change backup options or location, you will need to do it in Advanced<br />
mode.<br />
1. On the Basic mode screen, tap Backup Now.<br />
2. Specify a password (between 6 to 15 characters in length) for the<br />
backup file. Enter this password twice, then tap OK.<br />
3. Follow the on-screen instructions to complete the backup.<br />
To restore data in Basic mode<br />
1. On the Basic mode screen, tap Restore Now.<br />
2. Enter the password for the backup file, then tap OK.<br />
3. Follow the on-screen instructions to complete the restoration process.
142 Working With Documents and Files<br />
To back up data in Advanced mode<br />
Advanced mode is designed for <strong>user</strong>s with more advanced backup<br />
requirements.<br />
1. Tap Options > Switch to Advanced Mode.<br />
2. In the Backup tab, you will see a tree view of the data and files on<br />
your device. Tap “+” on the left of an item to view its sub-items. Use<br />
the check boxes to select or exclude items for backup.<br />
3. Tap the Backup button and follow the on-screen instructions to<br />
complete the backup.<br />
To restore data in Advanced mode<br />
1. On the Advanced mode screen, tap the Restore tab.<br />
2. If you have recently backed up your device, the latest backup file will<br />
be displayed with its contents. Otherwise, if you want to use an older<br />
backup file, tap , then select the desired file.<br />
Note<br />
If the backup file is password protected, you need to enter the<br />
password before the backup file displays in the tree view.<br />
3. In the tree view, select the items you want to be restored.<br />
4. Tap Restore and follow the on-screen instructions to restore.<br />
In both the Basic and Advanced modes, Sprite Backup soft resets your device<br />
first before it begins the backup or restoration process. It soft resets again<br />
after the operation is completed.<br />
To change the backup location and file name<br />
1. On the Advanced mode screen, tap the Backup tab.<br />
2. Tap , then enter the backup file name and choose whether to save<br />
the file to the Storage Card or the My Documents folder on your<br />
device.<br />
3. Tap OK.<br />
To enable remote backup to a computer<br />
1. On the Advanced mode screen, tap Options > Networking.<br />
2. Select the Enable Remote Backup check box and choose whether to<br />
do the remote backup to your computer via ActiveSync or network.<br />
For more information about using Sprite Backup, see Help on your device.
Chapter 10<br />
Getting Connected<br />
10.1 Comm Manager<br />
10.2 Connection Setup<br />
10.3 Ways of Connecting to the Internet<br />
10.4 Starting a Data Connection<br />
10.5 Internet Explorer® Mobile<br />
10.6 Windows Live<br />
10.7 Using Your Device as a Modem<br />
(Internet Sharing)<br />
10.8 Bluetooth
144 Getting Connected<br />
10.1 Comm Manager<br />
Comm Manager acts like a central switch that lets you enable or disable<br />
phone features as well as manage your data connections easily.<br />
To open Comm Manager<br />
Tap Start > Settings > Connections tab > Comm Manager.<br />
4<br />
1<br />
2<br />
3<br />
5<br />
6<br />
7<br />
1 Tap to switch Airplane mode on or off. Turning on Airplane mode turns off<br />
the phone, and Bluetooth functions. For more information, see “Airplane<br />
Mode” in Chapter 3.<br />
2 Tap to switch Wi-Fi on or off. Tap Settings > Wireless LAN to configure Wi-<br />
Fi on your device. See “Wi-Fi” in this chapter for details.<br />
3 Tap to open ActiveSync and adjust the synchronisation settings of your<br />
device. This button is disabled when the device is disconnected from your<br />
computer.<br />
4 Tap to switch the phone on or off. Tap Settings > Phone to set the ring<br />
tone and other phone settings. See Chapter 4 for details.<br />
5 Tap to switch Bluetooth on or off. Tap Settings > Bluetooth to configure<br />
Bluetooth on your device. See “Bluetooth” in this chapter for details.<br />
6 Tap to disconnect active data connections (3G/GPRS, for example). You<br />
cannot reconnect a data connection in Comm Manager.<br />
7 Tap to switch between automatically receiving (as items arrive) or<br />
<strong>manual</strong>ly retrieving Outlook e-mails. See Chapter 8 for details.
10.2 Connection Setup<br />
Getting Connected 145<br />
Connection Setup configures your device’s data connections, such as 3G/<br />
GPRS, WAP, and MMS, for you so that you do not need to enter the settings<br />
<strong>manual</strong>ly onto your device. All you need to do is to select your network<br />
operator, then Connection Setup does all the configuration for you.<br />
To automatically configure the device’s data connections<br />
The first time you power on your device, or when you insert a new SIM card<br />
and then power on your device, Connection Setup will display a notification<br />
message to inform you that it will automatically configure your device’s<br />
connection settings.<br />
1. Tap Yes on the notification message.<br />
Note<br />
If your SIM card supports multiple network operator profiles, the next<br />
message that appears will display network profile choices. Select the<br />
profile you want to use and tap OK.<br />
2. When prompted to automatically configure your device to the proper<br />
network settings, tap Yes.<br />
Connection Setup configures your device’s data connection settings.<br />
3. After the Connection Setup completes the configuration, tap Restart.<br />
To <strong>manual</strong>ly select the network operator to use for data connections<br />
You can also <strong>manual</strong>ly select your network operator from Connection<br />
Setup’s settings screen. Connection Setup will then reconfigure your<br />
device’s data connections settings based on the operator that you selected.<br />
1. Tap Start > Settings > Connections tab > Connection Setup.<br />
2. Select the network Country and Operator you want to use, then tap OK.<br />
Note<br />
If you choose a Country and/or Operator that is different from the<br />
installed SIM card network operator, you may not be able to access<br />
network services.<br />
3. When prompted to confirm whether you want to configure the data<br />
connection settings based on the selected network, tap Yes.<br />
Connection Setup configures the data connection settings.<br />
4. After the Connection Setup completes the configuration, tap Restart.
146 Getting Connected<br />
10.3 Ways of Connecting to the Internet<br />
Your device’s networking capabilities allow you to access the Internet or<br />
your corporate network at work through one of the following connections:<br />
Note<br />
• 3G/GPRS<br />
• Wi-Fi<br />
• Dial-up<br />
You can also add and set up the following connections:<br />
• VPN: A VPN connection is used to access your corporate network by using<br />
an existing Internet connection.<br />
• Proxy: A Proxy connection is used to access the Internet using an existing<br />
connection to your corporate or WAP network.<br />
3G/GPRS<br />
Use 3G/GPRS (or EDGE, if available) to connect to the Internet and to send<br />
and receive e-mail and MMS messages on your device. You will need a data<br />
plan to use your wireless service provider’s 3G/GPRS network. Check with your<br />
wireless service provider to find out about 3G/GPRS rates.<br />
3G/GPRS settings are already preconfigured on your device, and your device is<br />
ready to use your wireless service provider’s 3G/GPRS services. Do not change<br />
the settings as this may cause services to stop working.<br />
To add a new GPRS connection<br />
When you need to add another 3G/GPRS connection on your device, obtain<br />
the Access point name from your wireless service provider. Also, check if the<br />
3G/GPRS network requires a <strong>user</strong> name and password.<br />
1. Tap Start > Settings ><br />
Connections tab > Connections.<br />
2. In My ISP, tap Add a new modem<br />
connection.
3. On the Make New Connection<br />
screen, enter a name for the<br />
connection.<br />
4. In the Select a modem list, select<br />
Cellular Line (GPRS, 3G), then tap<br />
Next.<br />
5. Enter the Access point name, then<br />
tap Next.<br />
6. Enter the <strong>user</strong> name and password,<br />
if required, then tap Finish.<br />
Notes • To view help information for any screen, tap the help icon ( ).<br />
Getting Connected 147<br />
• To modify your connection settings, tap Manage existing connections<br />
on the Connections screen, and complete the connection wizard.<br />
Wi-Fi<br />
Wi-Fi provides wireless Internet access over distances of up to 100 meters.<br />
To use Wi-Fi on your device, you need access to a wireless access point or<br />
“hotspot”.<br />
Note<br />
The availability and range of your device’s Wi-Fi signal depends on the number,<br />
infrastructure, and other objects through which the signal passes.<br />
To connect to an open network<br />
Connecting to an open network is fast and easy. Simply tap the network name<br />
on the pop-up message after you switch on Wi-Fi to connect to the open<br />
network. You no longer need to set additional options to connect to the open<br />
network.<br />
1. Tap Start > Settings ><br />
Connections tab > Comm<br />
Manager, then tap the Wi-Fi<br />
button ( ).<br />
2. On the pop-up message, select<br />
the open network (Unsecured)<br />
you want to connect to, then tap<br />
OK.
148 Getting Connected<br />
Note<br />
For secured (Security-enabled) wireless networks, you may be prompted to<br />
provide a <strong>user</strong>name and password.<br />
Next time you use your device to detect wireless networks, you will not see<br />
the pop-up message windows again, and you will not be prompted to enter<br />
the network key of the previously accessed open or secured wireless network<br />
(unless you perform a hard reset which will erase custom settings on your<br />
device).<br />
Note<br />
Wi-Fi networks are self-discoverable, which means no additional steps are<br />
required for your device to connect to a Wi-Fi network.<br />
To check wireless network status<br />
You can check the current wireless connection status from:<br />
• Title bar<br />
When you enable Wi-Fi, the Wi-Fi ON icon ( ) appears on the title bar.<br />
After Wi-Fi is turned on, your device scans for available wireless networks<br />
and the wireless signal icon ( ) appears on the title bar. The arrows<br />
in this icon move back and forth while your device is scanning for a<br />
wireless network signal. Once your device successfully connects to a<br />
wireless network, the arrows stop moving.<br />
• Wi-Fi Status screen<br />
Tap Start > Settings ><br />
Connections tab > WLAN > Main<br />
tab to see the name of the wireless<br />
network that your device is currently<br />
connected to.<br />
The configuration and signal quality<br />
of the wireless network are also<br />
shown.<br />
• Configure Wireless Networks screen<br />
Tap Start > Settings > Connections tab > Wi-Fi > Wireless tab.<br />
This screen displays currently available wireless networks. You can also<br />
do the following on the Condigure Wireless Network screen:
• To connect to a wireless network<br />
in the list, tap and hold on<br />
the desired network, then tap<br />
Connect.<br />
• Tap a wireless network in the list<br />
to view or change its connection<br />
settings.<br />
• You can also add new wireless<br />
networks, if available, by tapping<br />
Add New on the pop-up menu.<br />
Getting Connected 149<br />
To save battery power while connected to a wireless network<br />
Using Wi-Fi quickly consumes battery power. Turn off Wi-Fi when not in use.<br />
You can also enable power saving settings for your device’s Wi-Fi.<br />
1. Tap Start > Settings > Connections tab > WLAN.<br />
2. On the Power Mode tab, move the Power Save Mode slider to a<br />
position that optimizes performance with the least power consumption.<br />
Move the slider to the left (Best Performance) to have the optimal<br />
wireless network performance (uses more battery power) or move to the<br />
right (Best Battery) to obtain the maximum battery usage.<br />
Dial-up<br />
To set up a dial-up connection to your Internet Service Provider (ISP) on<br />
your device, you need the same settings that you normally use when you<br />
dial up from your computer. This includes the ISP server phone number,<br />
your <strong>user</strong> name and password.<br />
1. Tap Start > Settings > Connections tab > Connections.<br />
2. Under My ISP, tap Add a new modem connection.<br />
3. On the Make New Connection screen, enter a name for the<br />
connection.<br />
4. In the Select a modem list, select Cellular Line, then tap Next.<br />
5. Enter the ISP server phone number, then tap Next.<br />
6. Enter your <strong>user</strong> name, password, and any other information required<br />
by your ISP, then tap Finish.
150 Getting Connected<br />
10.4 Starting a Data Connection<br />
After setting up a data connection such as 3G/GPRS or ISP dial-up on your<br />
device, you can now connect your device to the Internet. The connection<br />
is started automatically when you begin using a program that accesses the<br />
Internet such as Internet Explorer® Mobile.<br />
To <strong>manual</strong>ly start a data connection<br />
If you have set up multiple types of data connections on your device, you can<br />
<strong>manual</strong>ly start a connection.<br />
1. Tap Start > Settings > Connections tab > Connections.<br />
2. Tap Manage existing connections.<br />
3. Tap and hold the name of the desired connection, then tap Connect.<br />
To disconnect active data connections<br />
1. Tap Start > Settings > Connections tab > Comm Manager.<br />
Note<br />
2. Tap the Data Connection button ( ).<br />
You cannot reconnect a data connection in Comm Manager.<br />
10.5 Internet Explorer® Mobile<br />
Internet Explorer® Mobile is a full-featured Internet browser, optimized for<br />
use on your device.<br />
To open Internet Explorer® Mobile<br />
• Tap Start > Internet Explorer.<br />
To go to a Web site<br />
• Enter the Web site address in the address bar, then tap .<br />
To view a Web page using finger scrolling and panning<br />
• Slide your finger upward to scroll down the Web page, or slide your<br />
finger downward to scroll up the Web page.<br />
• To pan downward, tap and hold on the screen, then drag your finger<br />
upward. To pan upward, tap and hold on the screen, then drag your<br />
finger downward.
Getting Connected 151<br />
• To pan towards the right, tap and hold on the screen, then drag your<br />
finger to the left. To pan towards the left, tap and hold on the screen,<br />
then drag your finger to the right.<br />
• To pan freely around a Web page, tap and hold on the screen, then<br />
drag your finger in the desired direction.<br />
For more information about finger scrolling and panning, see Chapter 1.<br />
Internet Explorer® Mobile menu<br />
While browsing the Web, tap Menu to choose from a list of options, such as<br />
saving Favorites and images, sending links, and more. You can also tap and<br />
hold on a Web page to choose options on the shortcut menu.<br />
Tap Menu > Add to Favorites to<br />
save the current Web page in your<br />
Favorites folder.<br />
Tap Menu > View to select the zoom<br />
level and type of view.<br />
Tap Menu > Tools and choose to<br />
send the current Web page link,<br />
view the page’s properties, or set<br />
preferences.<br />
To save an image from a Web page to<br />
your device, tap and hold the image,<br />
then tap Save Image.
152 Getting Connected<br />
To zoom in or out a Web page<br />
You can zoom in or out a Web page<br />
depending on your viewing preferences.<br />
1. Navigate to the Web page that you<br />
want to view.<br />
2. Tap Menu > View > Zoom Level,<br />
then select a zoom level on the<br />
menu.<br />
To navigate the entire Web page<br />
Use the Page Overview feature to navigate large Web pages.<br />
1. Navigate to the Web page that you want to view then tap Menu ><br />
Zoom Out.<br />
2. Use the arrow keys on the hardware keyboard to move the box to the<br />
area of the Web page that you want to view.<br />
3. Tap Zoom In or press the Enter key on the hardware keyboard to view<br />
the selected area using the Default zoom level.<br />
2<br />
3<br />
Note<br />
For more information about using Internet Explorer® Mobile, go to:<br />
http://www.microsoft.com/windowsmobile/help/pocketpc/browseinternet.<br />
mspx
10.6 Windows Live<br />
Getting Connected 153<br />
Windows Live gives you a full Internet experience on your device. Windows<br />
Live helps you to find information, pursue your interests, and get in touch<br />
with friends and family on the Internet easier.<br />
Windows Live offers the following key features:<br />
• Live Search Bar, which lets you search for information on the Web.<br />
• Live Messenger, the next generation of MSN Messenger Mobile.<br />
• Live Mail, the next generation of Hotmail.<br />
• Live Contacts, your address book for storing Live Mail, Live Messenger<br />
and Hotmail contacts.<br />
Set up Windows Live<br />
The first time you use Windows Live, sign in using your Windows Live ID,<br />
which is your Windows Live Mail or Hotmail address, and password.<br />
To set up Windows Live for the first time<br />
1. Tap Start > Programs > Windows Live.<br />
2. Tap Sign in to Windows Live.<br />
3. On the next screen, tap the links to read the Windows Live Term of Use<br />
and the Microsoft Privacy Statement. After reviewing them, tap Accept.<br />
4. Enter your Windows Live Mail or<br />
Hotmail address and password, select<br />
the Save password checkbox, then<br />
tap Next.<br />
5. Choose whether or not to show<br />
the Windows Live Search bar and<br />
applications on the Today screen,<br />
then tap Next.<br />
6. Choose what information you want to sync online with your device.
154 Getting Connected<br />
If you select Store Windows Live<br />
contacts in your mobile phone’s<br />
contact list, your Windows Live<br />
contacts will be added to the contact<br />
list and to Windows Live Messenger<br />
on your device.<br />
If you select Sync e-mail, your<br />
Windows Live Mail or Hotmail inbox<br />
messages will be downloaded to<br />
your device.<br />
7. Tap Next.<br />
8. After synchronization is complete, tap Done.<br />
The Windows Live interface<br />
On the Windows Live main screen, you will see a search bar, navigation<br />
buttons, and an area where you can show and customize your profile.<br />
1<br />
2<br />
3<br />
Tip<br />
4<br />
1 Search bar<br />
2 Navigation buttons. Tap the left<br />
or right arrow to switch between<br />
Windows Live Messenger, Windows<br />
Live Mail, and Sync status.<br />
3 Tap to change the display name,<br />
picture, or personal message.<br />
4 Tap Menu to access and change<br />
settings.<br />
If you chose to display the search bar and Windows Live applications on the<br />
Today screen when you were setting up Windows Live, you’ll also see them on<br />
the Today screen. To show or hide them from the Today screen, open Windows<br />
Live and tap Menu > Options > Today screen options.
Getting Connected 155<br />
Windows Live Messenger<br />
With this mobile version of Windows Live Messenger, you enjoy many of<br />
the same cool features that you get from the desktop version, which include<br />
the following:<br />
• Instant messaging via text and voice<br />
• Multiple conversations<br />
• Insert emoticons<br />
• Contact list with presence<br />
• Send and receive files including<br />
photos<br />
• Change status/display name<br />
• View contacts by online status,<br />
groups, and more<br />
• Send messages even when a contact is offline<br />
Note<br />
Before you can use Windows Live Messenger, your device must be connected<br />
to the Internet. For information about setting up an Internet connection, see<br />
“Ways of Connecting to the Internet” in this chapter.<br />
Launch Messenger and sign in<br />
To open Windows Live Messenger<br />
Do one of the following:<br />
• Tap Start > Programs > Messenger.<br />
• On the Windows Live main screen, or on the Windows Live plugin<br />
on the Today screen, tap the left or right arrow until you see<br />
Messenger, then tap it.<br />
To sign in and out<br />
1. Tap Sign in on the messenger screen.<br />
2. If this is your first time to sign in, a message appears to inform you<br />
that your messenger contacts will be added to the contact list on your<br />
device. Tap OK to add them.<br />
Signing in may take several minutes, depending on your connection speed.<br />
3. To sign out, tap Menu > Sign Out.
156 Getting Connected<br />
To start and end conversations<br />
1. In the contact list, select a contact, then tap Send IM to open a message<br />
screen.<br />
2. Enter your text message in the text<br />
entry area of the message screen.<br />
3. To add an emoticon, tap Menu ><br />
Add emoticon then tap an icon<br />
from the list.<br />
4. Tap Send.<br />
5. To end a conversation with the<br />
current contact, tap Menu > End<br />
conversation.<br />
Tips • To send a file, tap Menu > Send. You can choose to send a picture, voice clip<br />
or any file.<br />
• To invite one or more contacts to the conversation, tap Menu > Options ><br />
Add participant.<br />
• To send a voice message, tap Voice Clip on a message screen then start<br />
talking. After you have recorded a message, tap Send.<br />
Add Windows Live contacts<br />
You can add new Windows Live contacts in Windows Live Messenger or<br />
in Contacts.<br />
To add a Windows Live contact in Live Messenger<br />
1. Tap Menu > Add new contact.<br />
2. Enter the e-mail address of the contact, then tap OK.<br />
To add a Windows Live contact in Contacts<br />
1. Tap Start > Contacts.<br />
2. Tap New, then tap Windows Live.<br />
3. In the IM box, enter the e-mail address of the contact, which can be a<br />
Windows Live ID or any other e-mail address.<br />
Tip<br />
You can fill in other information about the contact, if desired. This is<br />
not necessary if you will communicate with the contact only through<br />
Windows Live Messenger or Live Mail.
4. Tap OK.<br />
Getting Connected 157<br />
5. Follow the remaining instructions to add the new contact to your<br />
Windows Live contact list.<br />
10.7 Using Your Device as a Modem<br />
(Internet Sharing)<br />
Internet Sharing connects your desktop or notebook computer to the<br />
Internet by using your device’s data connection (3G/GPRS or EDGE, for<br />
instance). You can choose to connect via USB or Bluetooth.<br />
Notes • Make sure your device has a SIM card installed, and your device has a GPRS or<br />
phone dial-up modem connection. If your device has not been set up with<br />
a data connection yet, tap Menu > Connection Settings on the Internet<br />
Sharing screen. For more information about setting up these connections,<br />
see “3G/GPRS” and “Dial-up” in this chapter.<br />
• If you want to use a USB cable connection, you must first install Windows<br />
Mobile Device Center or Microsoft ActiveSync version 4.5 or later on the<br />
computer.<br />
• If want to use a Bluetooth connection, make sure your computer has built-in<br />
Bluetooth capability. If your computer does not have Bluetooth, you can<br />
connect and use a Bluetooth adapter or dongle.<br />
• Before using Internet Sharing, disconnect from Windows Mobile Device<br />
Center or ActiveSync on your computer.<br />
To set up your device as a USB modem<br />
1. On your device, tap Start > Programs > Internet Sharing.<br />
2. In the PC Connection list, select<br />
USB.<br />
3. In the Network Connection list,<br />
select the name of the connection<br />
that your device uses to connect to<br />
the Internet.<br />
4. Connect your device to the<br />
computer using the USB cable.<br />
5. Tap Connect.
158 Getting Connected<br />
To use your device as a Bluetooth modem<br />
For the computer to use the Internet connection of your device, activate<br />
Internet Sharing on your device, then set up a Bluetooth Personal Area<br />
Network (PAN) between the computer and your device.<br />
1. On your device, turn on Bluetooth and set it to visible mode by<br />
following the steps in “To turn Bluetooth on and make your device<br />
visible” section later in this chapter.<br />
2. Initiate a Bluetooth partnership from your device by following the<br />
steps in “To create a Bluetooth partnership”<br />
3. Tap Start > Programs > Internet Sharing.<br />
4. Select Bluetooth PAN as the PC Connection.<br />
5. From the Network Connection list, select the name of the<br />
connection that your device uses to connect to the Internet.<br />
6. Tap Connect.<br />
7. On your computer, set up a Bluetooth Personal Area Network (PAN)<br />
with your device:<br />
For Windows Vista:<br />
a. Click Start > Control Panel > Network and Internet > Network<br />
and Sharing Center.<br />
b. Click Manage network connections and then under Personal<br />
Area Network, double-click Bluetooth Network Connection.<br />
c. In the Bluetooth Personal Area Network Devices dialog box, select<br />
your device, then click Connect.<br />
For Windows XP:<br />
a. Tap Start > Control Panel > Network Connections.<br />
b. Under Personal Area Network, click the Bluetooth Network<br />
Connection icon.<br />
c. Under Network Tasks, click View Bluetooth network devices.<br />
d. In the Bluetooth Personal Area Network Devices dialog box, select<br />
your device, then click Connect.
Note<br />
Getting Connected 159<br />
If the Bluetooth adapter or dongle on your computer was installed using<br />
a third-party provided driver, open the Bluetooth software that came with<br />
the Bluetooth adapter/dongle to connect your computer and device via<br />
Bluetooth. Refer to the Bluetooth adapter/dongle documentation for more<br />
information.<br />
8. On the Internet Sharing screen on your device, check if a connected<br />
status message is displayed, which indicates that your computer has<br />
been successfully connected to the Internet using your device as a<br />
Bluetooth modem.<br />
To end the Internet connection<br />
• On the Internet Sharing screen, tap Disconnect.<br />
10.8 Bluetooth<br />
Bluetooth is a short-range wireless communications technology. Devices<br />
with Bluetooth capabilities can exchange information over a distance of<br />
about eight meters without requiring a physical connection.<br />
Bluetooth modes<br />
Bluetooth on your device operates in three different modes:<br />
• On. Bluetooth is turned on. Your device can detect other Bluetoothenabled<br />
devices, but not vice versa.<br />
• Visible. Bluetooth is turned on, and all other Bluetooth-enabled<br />
devices can detect your device.<br />
• Off. Bluetooth is turned off. In this mode, you can neither send nor<br />
receive information using Bluetooth.<br />
Notes • By default, Bluetooth is turned off. If you turn it on, then turn off your<br />
device, Bluetooth also turns off. When you turn on your device again,<br />
Bluetooth automatically turns on.<br />
• Turn off Bluetooth when not in use to conserve battery power, or in places<br />
where using a wireless device is prohibited, such as on board an aircraft<br />
and in hospitals.<br />
To turn Bluetooth on and make your device visible<br />
1. On your device, tap Start > Settings > Connections tab ><br />
Bluetooth > Mode tab.
160 Getting Connected<br />
2. Select the Turn on Bluetooth and Make this device visible to other<br />
devices check boxes.<br />
3. Tap OK.<br />
Bluetooth partnerships<br />
A Bluetooth partnership is a relationship that you create between your<br />
device and another Bluetooth-enabled device in order to exchange<br />
information in a secure manner.<br />
To create a Bluetooth partnership<br />
1. On your device, tap Start > Settings > Connections tab > Bluetooth.<br />
2. On the Devices tab, tap Add new device. Your device displays the<br />
names of other Bluetooth devices within range.<br />
3. Tap the device name in the box, then tap Next.<br />
4. Specify a passcode to establish a secure connection. The passcode<br />
can be 1 up to 16 characters.<br />
5. Tap Next.<br />
6. Wait for the paired device to accept the partnership. The receiving<br />
party needs to enter the same passcode that you specified.<br />
7. The name of the paired device is then displayed. You may edit and<br />
enter a new name for that device.<br />
8. Select the check boxes of services that you want to use from the<br />
paired device, then tap Finish.<br />
Note<br />
Creating a Bluetooth partnership between two devices is a one-time process.<br />
Once a partnership is created, the devices can recognize the partnership and<br />
exchange information without entering a passcode again.<br />
To accept a Bluetooth partnership<br />
1. Ensure that Bluetooth is turned on and in visible mode.<br />
2. Tap Yes when prompted to establish a partnership with the other<br />
device.<br />
3. Enter a passcode (the same passcode that is entered on the device<br />
requesting the partnership) to establish a secure connection. The<br />
passcode must be between 1 and 16 characters.
4. Tap Next.<br />
Getting Connected 161<br />
5. Tap Finish. You can now exchange information with the paired<br />
device.<br />
Tips • To rename a Bluetooth partnership, tap and hold the partnership’s name on<br />
the Devices tab of the Bluetooth screen, then tap Edit.<br />
• To delete a Bluetooth partnership, tap and hold the partnership’s name on<br />
the Devices tab, then tap Delete.<br />
Connect a Bluetooth hands-free or stereo headset<br />
For hands-free phone conversations, you can use a Bluetooth hands-free<br />
headset such as a car kit with your device. Your device also supports A2DP<br />
(Advanced Audio Distribution Profile) which allows you to use a Bluetooth<br />
stereo headset for hands-free phone conversations and for listening to stereo<br />
music.<br />
To connect a Bluetooth hands-free or stereo headset<br />
1. Make sure that both your device and the Bluetooth headset are<br />
turned on and within close range, and that the headset is visible.<br />
Refer to the manufacturer’s documentation to find out how to set the<br />
headset in visible mode.<br />
2. Tap Start > Settings > Connections tab.<br />
3. Tap Bluetooth > Devices tab > Add new device. Your device displays<br />
the names of other Bluetooth devices within range.<br />
4. Tap the name of the Bluetooth<br />
headset, then tap Next. The device<br />
will automatically pair with the<br />
Bluetooth headset.<br />
Note Windows Mobile will<br />
automatically try one of the<br />
preconfigured passcodes (0000,<br />
1111, 8888, 1234) to pair the<br />
Bluetooth headset with the<br />
device. If this fails, you have to<br />
enter the passcode delivered with<br />
your headset <strong>manual</strong>ly.<br />
5. Tap Done, then tap the Bluetooth headset name in the Devices tab.
162 Getting Connected<br />
6. Select the Hands Free check box. If you have connected a Bluetooth<br />
stereo headset, also select the Wireless Stereo checkbox.<br />
7. Tap Save.<br />
While the Bluetooth stereo headset is connected, the Headset icon ( )<br />
will appear on the title bar.<br />
Note<br />
If the Bluetooth stereo headset becomes disconnected, turn the headset on<br />
and repeat steps 1 to 3 above. Tap and hold the name of the Bluetooth stereo<br />
headset and tap Set as Wireless Stereo.<br />
Beam information using Bluetooth<br />
You can beam information, such as contacts, calendar items, tasks, and files<br />
from your device to your computer or to another Bluetooth-enabled device.<br />
Note<br />
If your computer does not have built-in Bluetooth capability, you need to<br />
connect and use a Bluetooth adapter or dongle on your computer.<br />
To beam information from your device to a computer<br />
1. Turn on Bluetooth on your device, and make your device visible. For<br />
information about this, see “To turn Bluetooth on and make your<br />
device visible”.<br />
2. Set Bluetooth on your computer to visible mode, create a Bluetooth<br />
partnership, then enable your computer to receive Bluetooth beams.<br />
Note If the Bluetooth adapter or dongle on your computer was installed<br />
using a third-party provided driver, open the Bluetooth software that<br />
came with the Bluetooth adapter/dongle and enable the adapter/<br />
dongle to be discovered by other devices. Refer to the Bluetooth<br />
adapter’s documentation for more information.<br />
If your computer has Windows Vista or Windows XP SP2 and your<br />
computer’s Bluetooth adapter is supported by your Windows version, do<br />
the following steps:<br />
a. On your computer, open Bluetooth Devices from the Control<br />
Panel, then click the Options tab on the Bluetooth Devices<br />
window.<br />
b. For Windows Vista, select Allow Bluetooth devices to find this<br />
computer.<br />
For Windows XP, select Turn discovery on and Allow Bluetooth<br />
devices to connect to this computer.
Getting Connected 163<br />
c. Create a Bluetooth partnership between your device and<br />
computer. For information about creating a partnership, see<br />
“Bluetooth partnerships”.<br />
d. In the Options tab of Bluetooth Devices, select Show the<br />
Bluetooth icon in the notification area.<br />
e. To enable your computer to receive Bluetooth beams, right-click<br />
the Bluetooth icon in the notification area at the bottom-right<br />
corner of your computer screen and select Receive a File. You are<br />
now ready to beam.<br />
3. On your device, select an item to beam. The item can be an<br />
appointment in your calendar, a task, a contact card, or a file.<br />
4. To beam a contact, tap Menu > Send Contact > Beam.<br />
To beam other types of information, tap Menu > Beam [type of<br />
item].<br />
5. Tap the device name to which you want to send the item.<br />
6. If you beamed a calendar, task, or contact item to your computer and<br />
it is not automatically added to Outlook, select File > Import and<br />
Export in Outlook to import it.<br />
To beam information to a Bluetooth-enabled device such as another<br />
Windows Mobile-powered device, follow steps 1 to 5 in the above<br />
procedure.<br />
Tips • The default folder on your computer where beamed items are stored<br />
may be C:\Documents and Settings\your_<strong>user</strong>name\My Documents in<br />
Windows XP or C:\Users\your_<strong>user</strong>name\My Documents in Windows Vista.<br />
• For your device to receive Bluetooth beams, tap Start > Settings ><br />
Connections tab > Beam and make sure the Receive all incoming beams<br />
check box is selected.<br />
Bluetooth Explorer and Bluetooth file sharing<br />
Bluetooth Explorer searches for other Bluetooth devices that have file<br />
sharing enabled and lets you access their Bluetooth shared folder. You<br />
can copy files from and to their shared folder, and create subfolders in it.<br />
When you enable Bluetooth file sharing on your device, other Bluetoothenabled<br />
devices will also be able to access your Bluetooth shared folder.
164 Getting Connected<br />
To enable Bluetooth Explorer and Bluetooth file sharing on your device<br />
1. Tap Start > Settings > Connections tab > Bluetooth > FTP tab.<br />
2. Select the Enable Bluetooth Explorer check box. This makes the<br />
\Bluetooth device folder visible in the File Explorer.<br />
3. Select the Enable File Sharing check box.<br />
You can use the default Bluetooth shared folder, or tap Browse to use<br />
another folder as your shared folder.<br />
4. Tap OK.<br />
To use Bluetooth Explorer<br />
1. Bluetooth Explorer is integrated<br />
with the File Explorer program. You<br />
can open it by tapping Start ><br />
Programs > Bluetooth Explorer or<br />
by tapping the down arrow ( ) on<br />
the upper left of File Explorer screen<br />
then tapping Bluetooth.<br />
2. Bluetooth Explorer then scans for other Bluetooth devices that have file<br />
sharing enabled. From the list, tap to select a Bluetooth device you want<br />
to connect to. You may need to enter a passcode in order for you to<br />
connect to the selected device.<br />
If there are files contained in the Bluetooth shared folder on the other<br />
device, you will be able to see them on the Bluetooth Explorer screen.<br />
3. Select one or more files, then tap Menu > Edit and choose to cut or<br />
copy the files.<br />
4. Tap Up twice.<br />
5. Navigate to the folder where you want to paste the files on your<br />
device, then tap Menu > Edit > Paste.
Getting Connected 165<br />
Print files via Bluetooth<br />
Connect your device to a Bluetooth printer to print contact information,<br />
appointment details, messages, and other file types.<br />
Notes • See “JETCET PRINT” in Chapter 14 for details on how to set up a Bluetooth or<br />
network printer.<br />
• You can print files in the .txt, .jpg, .xhtml, .vcf, .vcs file formats.<br />
Before you start printing, make sure to turn on the Bluetooth printer and to<br />
turn on Bluetooth on your device. To turn on Bluetooth, tap Start > Settings ><br />
Connections tab > Comm Manager, then tap the Bluetooth button.<br />
To print contact information<br />
1. Tap Start > Contacts and then select the contact whose information<br />
you want to print.<br />
2. Tap Menu > Print via Bluetooth.<br />
3. Tap Menu > Search Devices. Your device starts to search for Bluetooth<br />
devices.<br />
4. Select the Bluetooth printer and tap Menu > Send File.<br />
5. Set the printing options you want, then tap Print.<br />
To print a calendar appointment<br />
1. Tap Start > Calendar, then select the appointment which details you<br />
want to print.<br />
2. Follow steps 2 to 5 in the “To print contact information” procedure.<br />
To print a message<br />
1. Tap Start > Messaging, then select the messaging account where the<br />
message you want to print is located.<br />
2. Select the message you want to print.<br />
3. Follow steps 2 to 5 in the “To print contact information” procedure.
166 Getting Connected<br />
To print a JPEG file<br />
1. Do one of the following:<br />
• In Pictures & Videos, tap and hold the JPEG file, then on the pop up<br />
menu, tap Print via Bluetooth.<br />
• In File Explorer, tap and hold the JPEG file, then on the pop-up<br />
menu, tap Print via Bluetooth.<br />
2. Follow steps 3 to 5 in the “To print contact information” procedure:
Chapter 11<br />
Using GPS<br />
11.1 Guidelines and Preparation<br />
for Using GPS<br />
11.2 Google Maps
168 Using GPS<br />
11.1 Guidelines and Preparation for Using GPS<br />
• Do not operate the GPS system while driving. The plotted GPS route<br />
is only for driving reference. It should not interfere with actual driving<br />
behavior.<br />
• Please use the GPS system cautiously. Users shall be liable for any<br />
damages resulting from negligent operation of the system.<br />
• The GPS signal cannot pass through solid non-transparent objects. Signal<br />
reception may be affected by obstructions such as high-rise buildings,<br />
tunnels, bridges, forests, weather (rainy or cloudy days), etc. If the<br />
vehicle’s visor contains metal, it will be difficult for the GPS signal to pass<br />
through. For better signal reception, connect your device to an external<br />
GPS antenna.<br />
External GPS<br />
antenna connector<br />
• Wireless communication products (such as mobile phones or radardetecting<br />
devices) may interfere with the satellite signal, resulting in<br />
unstable signal reception.<br />
• The Global Positioning System (GPS) is built and operated by the US<br />
Defense Department. The Department is responsible for the accuracy<br />
and maintenance of the system. Any changes that the Department<br />
makes may affect the accuracy and function of the GPS system.<br />
• Do not leave your device in a vehicle or expose the device to direct<br />
sunlight to avoid overheating the battery, which could pose damage<br />
to the device or risk to the vehicle.
Using GPS 169<br />
• When using the device inside a vehicle, use the car holder to mount the<br />
device securely in place. Avoid placing the device in the areas shown in<br />
the following diagram:<br />
1 Do not place where it will block the driver’s vision.<br />
2 Do not place where air bags could deploy.<br />
3 Do not place anywhere in the vehicle without securing the device<br />
in the holder.
170 Using GPS<br />
11.2 Google Maps<br />
Google Maps lets you track your current location, view real-time traffic<br />
situations, and receive detailed directions to your destination. It also provides a<br />
search tool where you can locate places of interest or an address on a vector or<br />
a satellite map.<br />
Open Google Maps<br />
Tap Start > Programs > Google Maps.<br />
1 2 3 4 5<br />
1 Tap to zoom out on the map.<br />
2 Tap to search for places of interest and<br />
addresses.<br />
3 Tap to zoom in on the map.<br />
4 Your current location.<br />
5 Tap to open the menu where you can<br />
view your current location, get directions,<br />
see traffic information, and more.<br />
Notes • Currently, traffic information is only available for the U.S.<br />
Tip<br />
• Tap Menu > Options > Reset Google Maps to reset the Google Map<br />
cookies, history of search terms, preferences, and image cache.<br />
Tap Menu > Help > Tips to learn more about the program and its many<br />
features<br />
Search for a place of interest<br />
You can search and locate a place of interest using Google Maps. Google Maps<br />
also shows the contact information and gives directions on how to get to the<br />
place of interest from your current location.<br />
1. On the Google Maps screen, tap Search.<br />
2. Enter the place of interest you want to go to (for example, HTC America),<br />
then tap OK.
Using GPS 171<br />
3. On the Search Results tab, tap an item to view its contact information.<br />
Note<br />
If the place of interest you are searching for is the first item, tap the<br />
Address tab to view the contact information.<br />
3<br />
4. On the Address tab you can:<br />
• Tap Go to website to open the Web site of the place of interest.<br />
Note<br />
This information only appears when the website of the place of interest is<br />
available.<br />
• Tap the [phone number] to make a call to the place of interest that<br />
you have selected.<br />
• Tap Directions to/from here to get directions on how to get to the<br />
place of interest from your current location or vice versa.<br />
• Tap Search nearby to search for other places of interest near your<br />
current location.<br />
• Tap Send as text message to send the contact information to a<br />
contact saved on your device via SMS.<br />
For more information about Google Maps, go to http://www.google.com/<br />
gmm/index.html.<br />
4
172 Using GPS
Chapter 12<br />
Experiencing Multimedia<br />
12.1 Camera<br />
12.2 Pictures & Videos<br />
12.3 Windows Media® Player Mobile<br />
12.4 Streaming Media<br />
12.5 Audio Manager<br />
12.6 Audio Booster
174 Experiencing Multimedia<br />
12.1 Camera<br />
Taking photos and recording video clips along with audio are easy with your<br />
device’s built-in cameras.<br />
To open the Camera screen<br />
Do one of the following:<br />
• Press the CAMERA button on your device.<br />
• Tap Start > Programs > Camera.<br />
• Tap Start > Programs > Pictures and Videos ><br />
Camera icon.<br />
CAMERA<br />
button<br />
To exit the Camera<br />
Tap the Exit icon (<br />
) on the Camera screen.<br />
Capture modes<br />
The camera on your device allows you to capture pictures and video clips by<br />
using various built-in modes that provide you flexibility in taking your shots.<br />
The Camera mode is set to the Photo capture mode by default. The upper left<br />
corner of the screen displays the active capture mode.<br />
Tap to change the capture mode.<br />
Current<br />
capture mode<br />
To change the capture mode<br />
• Tap the left or right arrows next to the capture mode icon.<br />
• Press the left or right arrow key on the hardware keyboard.
You can select from the following capture modes:<br />
Icon<br />
Note<br />
Capture Mode<br />
Photo Captures standard still images.<br />
Video Captures video clips, with or without accompanying<br />
audio.<br />
MMS Video Captures video clips suitable for sending with MMS<br />
messages.<br />
Contacts Picture Captures a still image and gives you the<br />
option to immediately assign it as a Photo ID for a contact.<br />
Picture Theme Captures still images and places them within<br />
frames.<br />
Panorama Captures a sequence of still images continuously in<br />
one direction, and allows stitching of all the images to create a<br />
panoramic view of a scenery.<br />
Sports Captures consecutive photo shots (3, 5, 7, or 10).<br />
Burst Captures a sequence of still images (maximum of 30) as long<br />
as you press the CAMERA button or the ENTER key of the hardware<br />
keyboard.<br />
When using the second camera to capture, you can only use Photo, Video,<br />
MMS Video, Contacts Picture, and Picture Theme modes.<br />
Supported file formats<br />
Using the available capture modes, the camera in your device captures files in<br />
the following formats:<br />
Capture mode<br />
Photo / Contacts Picture / Picture Theme /<br />
Panorama / Sports / Burst<br />
Video / MMS Video<br />
Format<br />
JPEG<br />
Experiencing Multimedia 175<br />
H.263 (.3gp) ; MPEG-4 (.mp4)
176 Experiencing Multimedia<br />
Camera controls<br />
• Press the CAMERA or the Enter key on the hardware keyboard to take a<br />
photo or contacts picture.<br />
• Press the CAMERA button halfway to activate autofocus . Once<br />
focused, the indicator changes to and you will hear two beeps. Press<br />
the CAMERA button fully to take the shot.<br />
• Press CAMERA or the Enter key on the hardware keyboard to start<br />
recording video; press it again to stop recording.<br />
• Press CAMERA or the Enter key on the hardware keyboard each time<br />
when taking photos for a picture theme or panorama.<br />
• To take consecutive shots in Sports mode, press CAMERA or the Enter<br />
key on the hardware keyboard, then move your device to follow the<br />
movement of your subject.<br />
• Press and hold the CAMERA button or the Enter key on the hardware<br />
keyboard when taking consecutive shots in Burst mode.<br />
On-screen controls and indicators<br />
The on-screen controls and indicators display momentarily, then disappear on<br />
the Camera screen. Tap the screen to display the controls and indicators again.<br />
1 2 3 4 5<br />
6<br />
7<br />
8 9 10 11 12 13 14<br />
1 Capture mode. Tapping the left/right arrow ( / ) on the screen<br />
allows you to set the capture mode.<br />
2 Camera switch. The camera icon ( / / ) indicates the<br />
current camera being used. Tap to cycle through the different cameras.
Experiencing Multimedia 177<br />
3 Resolution. The resolution icon ( / / / / / )<br />
indicates the current resolution. Tap to cycle through various resolutions.<br />
4 Storage. Tap to toggle between saving captured photos or video clips<br />
on the device’s memory ( ), on the storage card ( ), or on the flash<br />
disk ( ).<br />
5 Remaining information indicator. In Photo, Contacts Picture, Picture<br />
Theme, Panorama, Sports, and Burst modes, this shows the remaining,<br />
available shots of pictures based on current settings. In Video and MMS<br />
Video modes, this shows the remaining duration that can be recorded.<br />
While recording video, this shows the recorded duration.<br />
6 Zoom control. Tapping the up/down arrow ( / ) or tapping<br />
/ on the screen allows you to zoom in or zoom out.<br />
7 Autofocus indicator. Shows when autofocus is activated. When in<br />
Panorama or Picture Theme mode, autofocus will be used for each shot.<br />
When in Sports or Burst mode, only the first shot will use autofocus.<br />
8 Camera Settings. Tap the Tool icon ( ) to open the Camera Settings<br />
screen.<br />
9 Picture Viewer. Tap the Viewer icon ( ) to view the picture or video<br />
in Pictures & Videos.<br />
10 Brightness. Tapping the minus/plus icon ( / ) decreases or increases<br />
the brightness level.<br />
11 Metering Mode. Tap to toggle the metering mode between Center<br />
Area ( ) and Average ( ).<br />
12 Flash Light. Tap to turn on or off the flash light that is located at the<br />
back of your device. When the flash light is on, the camera gives off a<br />
flash when taking photos.<br />
13 White Balance. Tap to toggle among the different white balance<br />
settings: Auto ( ), Daylight ( ), Night ( ), Incandescent ( ),<br />
and Fluorescent ( ).<br />
14 Self-timer. Tap to set the Self-timer to 2 seconds, 10 seconds, or off<br />
when in the Photo or Contacts Picture mode. When you press the<br />
CAMERA button or the Enter key on the hardware keyboard to capture a<br />
still image, it starts to count down, and then captures a still image after<br />
the assigned time (2 seconds or 10 seconds).
178 Experiencing Multimedia<br />
15<br />
16<br />
17<br />
Video mode<br />
Picture Theme mode<br />
15 Recording indicator. This shows a red, blinking indicator while video<br />
recording is in progress.<br />
16 Progress indicator. In Picture Theme, Panorama, Sports, and Burst<br />
modes, this shows the total number of consecutive shots.<br />
17 Template Selector icon. In Picture Theme mode, tap to toggle among<br />
various templates.<br />
Zooming<br />
Before capturing a photo or a video clip, you can zoom in to make the<br />
object in focus move closer, or zoom out to make the object move farther<br />
away.<br />
Note<br />
The zoom control only appears onscreen when zooming is supported by the<br />
Resolution you have selected.<br />
To zoom in<br />
• Tap the up arrow ( ) or on the screen.<br />
• Press the up arrow key on the hardware keyboard.<br />
To zoom out<br />
• Tap the down arrow ( ) or on the screen.<br />
• Press the down arrow key on the hardware keyboard.<br />
The camera zoom range for a photo or a video clip depends on the capture<br />
mode and resolution. Refer to the table for more information.
Capture mode Resolution Zoom range<br />
Photo<br />
Video<br />
MMS Video<br />
Contacts Picture<br />
3M (2048 x 1536)<br />
2M (1600 x 1200)<br />
1M (1280 x 960)<br />
Experiencing Multimedia 179<br />
No zooming available<br />
No zooming available<br />
No zooming available<br />
Large (640 x 480) 1.0x to 4.0x<br />
Medium (320 x 240) 1.0x to 8.0x<br />
Small (160 x 120) 1.0x to 8.0x<br />
CIF (352 x 288)<br />
Large (320 x 240)<br />
No zooming available<br />
No zooming available<br />
Medium (176 x 144) 1.0x and 2.0x<br />
Small (128 x 96) 1.0x and 2.0x<br />
Medium (176 x 144) 1.0x and 2.0x<br />
Small (128 x 96) 1.0x and 2.0x<br />
Large (480 x 640)<br />
No zooming available<br />
Medium (240 x 320) 1.0x and 2.0x<br />
Small (120 x 160) 1.0x to 4.0x<br />
Picture Theme Determined by the current template<br />
Panorama<br />
Sports<br />
Burst<br />
Large (640 x 480) 1.0x to 4.0x<br />
Medium (320 x 240) 1.0x to 8.0x<br />
Small (160 x 120) 1.0x to 8.0x<br />
Depends on the size of the<br />
selected template<br />
Large (640 x 480) 1.0x and 2.0x<br />
Medium (320 x 240) 1.0x to 8.0x<br />
1M (1280 x 960)<br />
No zooming available<br />
Large (640 x 480) 1.0x and 2.0x<br />
Medium (320 x 240) 1.0x to 8.0x<br />
Note<br />
For capture size settings and zoom ranges when using the second camera,<br />
see the device Help.
180 Experiencing Multimedia<br />
The Review screen<br />
After capturing, the Review screen lets you view, send, or delete the photo<br />
or video clip by tapping an icon at the bottom of the screen.<br />
Photo / Video / MMS Video /<br />
Panorama / Picture Theme mode<br />
Contacts Picture mode<br />
Icon<br />
Function<br />
Review screen icons<br />
Back Return to the live Camera screen.<br />
Delete Delete the captured image or video.<br />
Send Send the captured image or video via e-mail or MMS.<br />
View View the captured image in the Camera Album program, or play<br />
the captured video in Windows Media® Player.<br />
Assign to Contact After capturing in Contacts Picture mode, tap this<br />
icon to assign the photo to a selected contact.<br />
Sports / Burst mode<br />
Icon<br />
Function<br />
Browse After capturing in Sports<br />
or Burst mode, the total number<br />
of consecutive shots is shown<br />
in the top right corner of the<br />
Review screen. Tap the up/down<br />
arrow to browse through the<br />
sequence of photos.
Experiencing Multimedia 181<br />
Tip You can set the Review screen duration by tapping on the Camera screen<br />
and then tapping to open the Advanced menu where you can set the<br />
Review Duration.<br />
Camera settings<br />
Tap the Tool icon ( ) to open the Camera Settings screen. The Camera<br />
Settings screen allows you to configure capture and camera settings.<br />
When you tap the icons at the bottom of the Camera Settings screen, different<br />
menus will appear. Some menus and options are only available in certain<br />
capture modes.<br />
To navigate the Camera Settings screen<br />
You can either tap on screen or press the arrow keys on the hardware keyboard<br />
to navigate through the Camera Settings screen.<br />
2<br />
1 3<br />
1 Tap an icon directly to display the desired menu. You can also tap<br />
the left/right arrow ( / ) to navigate to the icon. When using the<br />
hardware keyboard, press the down arrow key to highlight the icon bar,<br />
press the left/right arrow key to navigate to the icon. Once the desired<br />
menu is displayed, press the up arrow key.<br />
2 Tap an option on the menu to open a submenu of available settings.<br />
When using the hardware keyboard, press the up/down arrow key to<br />
select an option, then press the right arrow or Enter key to open its<br />
submenu.<br />
3 Tap to select a setting and close the submenu. When using the hardware<br />
keyboard, press the Enter key to select a setting and close the submenu.
182 Experiencing Multimedia<br />
Capture settings and menus<br />
The available options in this tab depend on the selected capture mode.<br />
Self-timer<br />
• Self-timer. Select the Self-timer option for capturing images: Off, 2<br />
seconds, or 10 seconds. Selecting 2 seconds or 10 seconds delays the<br />
capturing by the specified time after you press the CAMERA button or<br />
the Enter key on the hardware keyboard.<br />
Template (Picture Theme mode only)<br />
• Template. Select a picture theme template.<br />
Panorama Settings (Panorama mode only)<br />
• Direction. Choose in what direction images will be stitched in a<br />
panorama.<br />
• Stitch Count. Select the desired number of snapshots to be taken and<br />
stitched into a panorama.<br />
• Auto Stitch. When Auto Stitch is On, the camera automatically stitches<br />
snapshots into one single file. If Auto Stitch is Off, the snapshots are<br />
saved as separate files.<br />
Sports Settings (Sports mode only)<br />
• Snapshots. Select the number of consecutive shots to capture.<br />
Flash Light<br />
• Flash Light. Set this option to On to turn on the flash light (located at<br />
the back panel of your device) so that you can capture photos or video<br />
clips in a dark-lit environment. This also allows the camera to give off a<br />
flash when taking photos. The flash flight is available for use in all capture<br />
modes except in Sports and Burst modes.<br />
Ambience<br />
• White Balance. Select a white balance setting type such as<br />
Fluorescent, Night, and more to suit your lighting environment.<br />
• Effect. Choose a special effect such as Grayscale, Sepia, and more to<br />
apply to your photos or video clips.
Capture Settings<br />
• Resolution. Select the desired image or video size.<br />
Experiencing Multimedia 183<br />
• Camera. Select which camera to use. You can choose from Main<br />
Camera, 2nd Camera or 2nd Camera (Flip).<br />
• Quality. Select the JPEG image quality level for all captured still images.<br />
You can choose from Basic, Normal, Fine, and Super Fine.<br />
• Storage. Select where you want to save your files. You can either save<br />
the files to the main memory, flash disk or to a storage card.<br />
• Metering Mode. Select a metering mode to allow the camera to<br />
measure the amount of light in the centre and around the image and<br />
calculate the best-fit exposure value before capturing. Choose either<br />
Center Area to measure light using the centre area of the image or<br />
Average to measure light using the area all around the image.<br />
• Snapshots. Select the number of consecutive shots to capture.<br />
Capture Mode<br />
• Mode. Switch between different capture modes such as Photo, Video,<br />
Contacts Picture, and more. For more information about these modes,<br />
see “Capture modes” earlier in this chapter.<br />
Advanced<br />
• Capture Format. Select the desired file format.<br />
Tap the left/right icon to<br />
switch between the menu<br />
pages in the Advanced menu.<br />
When using the hardware<br />
keyboard, press the down<br />
arrow to highlight this bar,<br />
then press the left/right arrow<br />
keys to navigate the menu<br />
pages.<br />
• Shutter Sound. Choose whether or not you want the camera to make<br />
a shutter sound when you press the CAMERA button or the Enter key on<br />
the hardware keyboard to take photos or record video clips.
184 Experiencing Multimedia<br />
• Shoot Option. The autofocus feature is activated when the CAMERA<br />
button is pressed. Selecting <strong>Full</strong> Press requires you to fully press the<br />
CAMERA button to take the shot after autofocus is set. Selecting Half<br />
Press automatically takes the shot after autofocus is set.<br />
Note<br />
This option only applies to the CAMERA button. Pressing the Enter key on<br />
the hardware keyboard automatically takes the shot.<br />
• Grid (Photo mode). Choose<br />
whether or not to show a grid on<br />
the Camera screen. Showing a<br />
grid helps you frame and center<br />
your subject easily and accurately.<br />
• Keep Backlight. Choose whether<br />
to turn the backlight on or off<br />
when using the camera. This<br />
overrides your device backlight<br />
settings while you are using the<br />
camera.<br />
Grid marks<br />
• Review Duration. Set a time length for displaying the captured image/<br />
video on the Review screen before automatically saving it and returning<br />
to the live Camera screen. Select No Limit if you do not want to impose<br />
a time limit. Select No Review to immediately return to the live Camera<br />
screen after capturing.<br />
• Flicker Adjustment. When taking indoor shots, flicker on the camera<br />
screen may be caused by inconsistencies between the vertical scan<br />
rate of the camera display and the flicker frequency of fluorescent<br />
lighting. To reduce flicker, you can change the flicker adjustment<br />
setting to Auto or to the proper frequency (50Hz or 60Hz) of the power<br />
in the country where your device is being used.<br />
• Record with Audio (Video and MMS Video modes only). Select On<br />
(default) to record audio with the captured video clips, or select Off to<br />
capture video without audio.<br />
• Prefix. When Default is selected as the prefix, the file name of each<br />
new captured file is set to “IMAGE” or “VIDEO” followed by a sequential<br />
number, for example: IMAGE_001.jpg. You may also choose to name<br />
files using either the current Date or Date & Time as the prefix.
Note<br />
Experiencing Multimedia 185<br />
If you set the Camera to save captured photos to a storage card, the<br />
prefix cannot be selected. Captured photos will be named using the<br />
convention IMAGnnnn.jpg (where 'nnnn' is the counter) which is the<br />
DCIM (Digital Camera Images) naming standard, and will be saved to<br />
the \DCIM\100MEDIA folder on the storage card.<br />
• Counter. To reset the file naming counter back to 1, tap this option, then<br />
select Reset.<br />
• Recording Limit (Video mode). Set the maximum duration or file size<br />
for recording video.<br />
• Template Folder (Picture Theme mode only). By default, templates are<br />
stored in the \My Documents\Templates folder on the device’s Main<br />
Memory. If you transferred some templates to a storage card (via File<br />
Explorer), set this option to Main + Card to specify that templates are<br />
located in both the main memory and the storage card.<br />
• Adjust. This option lets you<br />
adjust the capture properties,<br />
such as Contrast, Saturation,<br />
Hue, and Sharpness.<br />
1. In the submenu, tap one<br />
of the properties to adjust.<br />
Alternatively, press the<br />
up/down arrow key on the<br />
hardware keyboard to select a<br />
property.<br />
2. Tap to save the settings and close the submenu.<br />
3. Tap to reset all properties to their default values.<br />
4. Tap to close the submenu without applying and saving the changes.<br />
5. To increase/decrease the value of the property, tap the plus/minus<br />
icon or press the left/right arrow key on the hardware keyboard. The<br />
live Camera screen on the background immediately displays the<br />
effect of the changes you made.<br />
• Help. Tap to open the Camera program help file.<br />
5<br />
1<br />
2<br />
3<br />
4
186 Experiencing Multimedia<br />
12.2 Pictures & Videos<br />
Pictures & Videos allows you to manage the following types of media files<br />
on your device:<br />
File Type<br />
Image<br />
GIF animation<br />
Video<br />
File Extensions<br />
*.bmp, *.jpg, *.gif, *.png<br />
*.gif<br />
*.avi, *.wmv, *.mp4, *.3gp<br />
To open Pictures & Videos<br />
• Tap Start > Programs > Pictures & Videos.<br />
To copy media files to your device<br />
• Copy pictures and GIF animation files from your computer or a<br />
storage card to the My Pictures folder on your device.<br />
• Copy video files to the My Videos folder.<br />
For more information about copying and managing files on your device,<br />
see Chapter 9.<br />
To view pictures<br />
The images in the My Pictures folder appear as thumbnails by default.<br />
Select a picture and tap View. If you cannot find a picture in the default My<br />
Pictures folder, go to another folder by tapping the down arrow ( ).<br />
Down arrow<br />
Tap to view the<br />
selected image<br />
or play back the<br />
video file.<br />
GIF animation<br />
icon
Experiencing Multimedia 187<br />
To play GIF animation files<br />
Select a GIF animation file (marked with a icon) and tap View. The GIF<br />
animation plays back on the screen. Tap OK when finished to return to the<br />
previous screen.<br />
To play videos<br />
By default, the contents of the My Pictures folder are shown.<br />
1. Tap the down arrow ( ) next to the My Pictures folder and tap My<br />
Documents > My Videos. By default, video clips are displayed as<br />
thumbnails and are tagged with a media icon ( ).<br />
2. Tap to select a video and play it in Windows Media® Player Mobile.<br />
Pictures & Videos menu<br />
Select a media file, then tap Menu to choose from a list of options that you can<br />
do with the selected media file.<br />
You can send the selected media file via<br />
one of your messaging accounts or beam it<br />
to another device. If you selected a picture,<br />
you can associate it to a contact, set it as<br />
your Today screen background, send it to<br />
your Windows Live Space account, and<br />
more. You can also view the images in the<br />
My Pictures folder as a slide show.<br />
Note<br />
The available menu options depend on the selected media file.<br />
To edit a picture<br />
You can rotate, crop, and adjust the brightness and color contrast of your<br />
pictures.<br />
1. On the Pictures & Videos screen, tap the picture you want to edit.<br />
2. Tap Menu > Edit, and do any of the following:<br />
• To rotate a picture 90 degrees clockwise, tap Rotate.<br />
• To crop a picture, tap Menu > Crop, then tap and drag to select the<br />
area to crop. Tap inside the box to crop, or tap outside the box to<br />
cancel cropping.
188 Experiencing Multimedia<br />
• To adjust the picture brightness and contrast levels, tap Menu ><br />
Auto Correct.<br />
Note<br />
To undo an edit, tap Menu > Undo. To cancel all unsaved edits you made to the<br />
picture, tap Menu > Revert to Saved.<br />
12.3 Windows Media® Player Mobile<br />
Windows Media® Player Mobile plays digital audio and video files that are<br />
stored on your device or on a network, such as on a Web site.<br />
Video File Formats Supported<br />
Windows Media Video<br />
MPEG4 Simple Profile<br />
H.263<br />
Motion JPEG<br />
Audio File Formats Supported<br />
Windows Media Audio<br />
WAV<br />
MP3<br />
MIDI<br />
AMR Narrow Band<br />
AMR Wide Band<br />
AAC, AAC+, and eAAC+<br />
MPEG4 audio<br />
File Extensions<br />
.wmv, .asf<br />
.mp4<br />
.mp4, .3gp, .m4v<br />
.avi<br />
File Extensions<br />
.wma<br />
.wav<br />
.mp3<br />
.mid, .midi, .rmi<br />
.amr<br />
.awb<br />
.aac, .mp4, .m4a<br />
.mp4, .m4a<br />
To open Windows Media® Player Mobile<br />
• Tap Start > Programs > Windows Media.
Controls<br />
Experiencing Multimedia 189<br />
Tap and drag to<br />
jump to any part of<br />
the video or audio<br />
Mute/Unmute<br />
<strong>Full</strong> screen<br />
Increase volume<br />
Visit WindowsMedia.com<br />
Skip to the beginning of<br />
the current file or to the<br />
previous file<br />
Screens and menus<br />
Decrease volume<br />
Skip to the next file<br />
Play/Pause<br />
Windows Media® Player Mobile has three primary screens:<br />
• Playback screen. The screen that displays the playback controls (such<br />
as Play, Pause, Next, Previous, and Volume) and the video window.<br />
You can change the appearance of this screen by choosing a different<br />
skin.<br />
• Now Playing screen. The screen that displays the Now Playing<br />
playlist. This special playlist indicates the current file being played and<br />
any files that are “queued up” to play next.<br />
• Library screen. The screen that lets you quickly find your audio files,<br />
video files, and playlists. It contains categories such as My Music, My<br />
Videos, My TV, and My Playlists.<br />
At the bottom of each screen, you can open a Menu. The commands on<br />
this menu vary, depending on which screen you are viewing. For more<br />
information about the commands in these menus, see Help on your device.<br />
Synchronize video and audio files<br />
Use the latest version of Windows Media® Player on your computer to<br />
synchronize digital media files from your computer to your device. This ensures<br />
that protected files and album art (for skins) are copied to your device correctly.
190 Experiencing Multimedia<br />
To synchronize content to your device automatically<br />
1. On your computer, open Windows Media® Player, then connect your<br />
device to your computer.<br />
2. In the Device Setup Wizard, select Yes, search my computer now.<br />
Note If you have previously opened Windows Media® Player and searched<br />
for media on your computer, you will not be prompted to search your<br />
computer in Step 2.<br />
3. When you see the name of your device (or “Storage Card” if you have<br />
inserted one on your device), click Finish.<br />
4. On the left panel of Windows Media® Player, right-click the name of<br />
your device, then click Set Up Sync.<br />
Note To set up media synchronization on a storage card, right-click Storage<br />
Card in the left panel of Windows Media® Player, then click Set Up Sync.<br />
5. On the Device Setup dialog box, select Sync this device<br />
automatically.<br />
6. Select the playlist(s) that you want to sync between your computer<br />
and device, then click Add.<br />
7. Click Finish.<br />
The files will begin synchronizing to your device. The next time you connect<br />
your device to your computer while Windows Media® Player is running,<br />
synchronization will start automatically.<br />
To synchronize content <strong>manual</strong>ly to your device<br />
1. If you have not set up media synchronization between your device<br />
and computer, follow steps 1 to 3 in “To synchronize content to your<br />
device automatically”.<br />
2. Click the Sync tab on the Windows Media® Player of your computer.<br />
Select a Playlist or a Library on the left panel of the Windows Media®<br />
Player.<br />
3. From the Content List, drag the media files that you want to sync to<br />
your device and drop them to the Sync List.
Playlists and Library List<br />
Content List<br />
Experiencing Multimedia 191<br />
Sync List<br />
4. Click Start Sync to start synchronizing the selected files to your<br />
device.<br />
Notes<br />
• Use Windows Media® Player 11 or higher on your computer to synchronize<br />
media files to your device.<br />
• Audio files copy faster if Windows Media® Player is configured to<br />
automatically set the quality level for audio files copied to your device. For<br />
more information, see the Windows Media® Player Help.<br />
Play media<br />
Use the Library to find and play songs, videos, and playlists that are stored<br />
on your device or removable storage card.<br />
To update the Library<br />
1. If you are not on the Library screen, tap Menu > Library.<br />
2. On the Library screen, tap the Library arrow (near the top of the<br />
screen), then tap the media storage that you want use, for example,<br />
Storage Card.<br />
3. In most cases, Windows Media® Player Mobile automatically updates<br />
the library. However, you can <strong>manual</strong>ly update the library to ensure that<br />
it contains new files that you recently copied to your device or storage<br />
card. Tap Menu > Update Library to <strong>manual</strong>ly update the library list.
192 Experiencing Multimedia<br />
To play video and audio files on your device<br />
1. Select a category (for example, My Music or My Playlists).<br />
Tips<br />
2. Tap and hold the item that you want to play (such as a song, album, or<br />
artist name), then tap Play.<br />
• To play a media file that is stored on your device but is not in a library, on<br />
the Library screen, tap Menu > Open File. Tap and hold the item that you<br />
want to play (such as a file or a folder), then tap Play.<br />
• To play a media file from the Internet or a network server, tap Menu ><br />
Library then tap Menu > Open URL.<br />
Playlists<br />
In Windows Media® Player Mobile, you can create a new playlist by saving<br />
the current Now Playing playlist and giving it a new name.<br />
To save a new playlist<br />
1. If you are not on the Library screen, tap Menu > Library.<br />
2. Tap to select a category (for example, My Music or My Playlists).<br />
3. Select a media file that you want, then tap Menu > Queue Up. This<br />
adds the file to the Now Playing list.<br />
Repeat this step until you have added all desired media files to the<br />
Now Playing list.<br />
Note<br />
You cannot select multiple files simultaneously.<br />
4. After adding the media files, tap Menu > Now Playing.<br />
5. On the Now Playing screen, tap Menu > Save Playlist.<br />
6. Enter the playlist name, then tap Done.<br />
7. To play back the playlist you created, tap My Playlists in the Library,<br />
select your playlist, then tap Play.<br />
Troubleshooting<br />
If you encounter a problem while using the Windows Media® Player Mobile,<br />
a number of resources are available to help you troubleshoot the issue.<br />
For more information, see the Troubleshooting Windows Media® Player<br />
Mobile page at the Microsoft Web site (http://www.microsoft.com/<br />
windows/windowsmedia/player/windowsmobile/troubleshooting.aspx).
12.4 Streaming Media<br />
Experiencing Multimedia 193<br />
Streaming Media lets you stream live broadcasts or on-demand media<br />
content from the Web. The media is sent in a continuous stream to your device<br />
and is played as it arrives, along with the audio.<br />
Streaming Media allows you to play 3GP and MPEG-4 files. It also supports<br />
playback of SDP (Session Description Protocol) files.<br />
Controls<br />
Jog bar<br />
Zoom out<br />
Increase volume<br />
Zoom in<br />
Stop Mute/Unmute<br />
Play/Pause<br />
Decrease volume<br />
To access streaming content via Internet Explorer<br />
In Internet Explorer, you can open a Web page containing RTSP (Real Time<br />
Streaming Protocol) links to streaming media content then play the content in<br />
the Streaming Media program.<br />
1. Tap Start > Programs > Internet Explorer.<br />
2. In the address bar, enter the URL address of the Web page that contains<br />
the RTSP link to the desired *.3gp, *.mp4, or *.sdp file.<br />
3. On the Web page, tap the RTSP link.<br />
4. Streaming Media then automatically opens and starts playing the file.<br />
During playback, use the on-screen controls to play/pause, zoom in or<br />
out, adjust the sound volume, and more.
194 Experiencing Multimedia<br />
To stream media files directly on the Streaming Media Player<br />
Streaming Media only supports RTSP links when you stream *.3gp and *.mp4<br />
files directly on the program.<br />
Note Before you launch the Streaming Media program, make sure that you are<br />
connected to the Internet.<br />
1. Tap Start > Programs > Streaming Media, then tap Connect.<br />
2. Enter the Web site’s URL (rtsp://) and the file name, then tap Connect.<br />
3. Streaming Media then starts playing the file. During playback, use the<br />
on-screen controls to play/pause, zoom in or out, adjust the sound<br />
volume, and more.<br />
To view streaming video information<br />
You can view the properties and general information of a streaming video<br />
clip, such as video codec, audio codec, dimension, frames, and duration of the<br />
video.<br />
Tap Menu > Properties from the program.<br />
To configure streaming video connection settings<br />
Tap Menu > Options to configure the following settings:<br />
• Connect via. Choose whether you want to connect to the Internet or<br />
corporate network (intranet) to locate a streaming video clip.<br />
• UDP port range. Specify a range of port numbers to use for streaming.<br />
• Media buffer. Specify the memory space (in terms of duration) to allot for<br />
storing video and audio data while streaming media.<br />
12.5 Audio Manager<br />
Audio Manager is a music browser and player in one. It gives you access<br />
to all the music files on your device, and allows you to easily browse for the<br />
music that you want to play by organizing music into categories such as<br />
title, artist, album, and more. You can also create playlists of your favorite songs<br />
and use the integrated Music Player to play them back.<br />
To launch Audio Manager<br />
• Tap Start > Programs > Audio Manager.
Notes<br />
Experiencing Multimedia 195<br />
• Audio Manager searches for all music files stored on your device memory<br />
and memory card that have the following audio formats: MP3 (.mp3),<br />
WMA (.wma), and AAC/AAC+ (.aac). It will search in the following<br />
locations:<br />
Device: \My Music (including all subfolders)<br />
\My Documents (including all subfolders)<br />
Storage card: \Storage Card (including all subfolders)<br />
• Music files are categorized under Artists, Album, Genre, or others if such<br />
metadata is found in the files.<br />
Library<br />
On the Audio Manager’s Library screen, an arrow that appears in an item<br />
indicates that there is a submenu available. Tap the item name to open the<br />
submenu.<br />
Library: Main screen<br />
Library: All Songs screen<br />
When you tap a category on the Library’s Main screen, you will see more<br />
submenus which may have deeper levels of menus. For example, when you<br />
tap Artists, another level of submenus will be listed showing artist names.<br />
When you tap an artist name, more submenus showing album names will be<br />
displayed. Keep opening the submenus until you reach the level where song<br />
titles can be selected for playback.<br />
Music files that are protected by Digital Rights Management (DRM) will be<br />
listed under the Protected category. A lock icon shown before song titles<br />
indicates that the music files are protected. Select a file, then tap Info if you<br />
want to view file information. A cross-marked lock icon shown before song<br />
titles indicates that the rights for the music files have expired, and you will not<br />
be able to play them. Tap Delete if you want to delete these files.
196 Experiencing Multimedia<br />
Note<br />
Audio Manager keeps track of the last submenu that you accessed. When<br />
you exit Audio Manager and open it again, it will display the last submenu<br />
that you were in. Keep tapping the submenu name at the top of the screen<br />
until you reach the Library's main screen.<br />
Music Player<br />
When you select a music in the Library, Music Player opens and<br />
automatically plays it. Use the available buttons to control the playback.<br />
Repeat<br />
Shuffle<br />
Drag the slider to<br />
move forward or<br />
backward in a song.<br />
Volume level<br />
Increase/Decrease<br />
volume<br />
Playback time<br />
Go to the next song<br />
Return to the previous song<br />
Return to the<br />
Library screen<br />
Play/Pause<br />
Open a menu where you can choose<br />
to add the current song to a playlist,<br />
set the song as ring tone, and more.<br />
Playlists<br />
The Playlists screen shows the current playlists that are found on the device<br />
memory and memory card.<br />
There are two types of playlists that will be shown on the Playlist screen:<br />
• Windows Media® Player playlists.<br />
These are playlists that are in<br />
Windows Media® Player Mobile’s<br />
Library (which is synchronized with<br />
Windows Media® Player on your<br />
computer), and these are indicated<br />
by the Windows Media® Player icon<br />
( ). These can be played in Audio<br />
Manager’s Music Player but cannot<br />
be edited.
Experiencing Multimedia 197<br />
• Custom playlists. These are playlists that are created in Audio Manager<br />
and can be edited.<br />
Notes<br />
• Audio Manager will search for playlists in the following locations:<br />
Device: \Playlists<br />
\Application Data\HTC\AudioManager\playlists<br />
Storage card: \Storage Card\Playlists<br />
• If a Windows Media® Player playlist contains a combination of music,<br />
video and image files, Audio Manager accesses the music files only and<br />
filters out the other media types.<br />
To create a playlist<br />
1. On the Library’s Main screen, tap Playlists.<br />
2. On the Playlists screen, tap Menu > New.<br />
3. Enter a Playlist name, then tap OK.<br />
4. On the Playlists screen, tap the playlist you have just created,<br />
then tap Edit.<br />
5. Tap Menu > Add.<br />
6. Tap the check boxes to select the songs you want to add to the<br />
playlist, or tap Menu > Select All to choose all the songs.<br />
7. Tap OK three times to return to the Playlists screen.<br />
To play back a playlist<br />
1. On the Playlists screen, tap to select a playlist.<br />
Note<br />
2. Tap the first song in the selected playlist. Music Player automatically<br />
opens and starts playing the first song. After each song, the next one<br />
in the playlist will be played.<br />
The playlists’ contents are not automatically updated when music files have<br />
been deleted from the device memory or storage card. Music Player will<br />
display a notification message when music files in a playlist cannot be found.
198 Experiencing Multimedia<br />
Set music as ring tone<br />
You can set your favorite music as a ring tone for your device.<br />
Play/Stop<br />
1. Use the arrow keys on the hardware keyboard to select a song in the<br />
Library or tap a song to play it in Music Player, then tap Menu ><br />
Set as Ring Tone.<br />
2. If the selected music is an MP3 file, tap Trim if you want to trim the file<br />
first to make it shorter.<br />
Confirm trimming<br />
the ring tone.<br />
3. Tap Set as Default Ring Tone.<br />
Tip<br />
Mark the part of the music that<br />
will be used as the ring tone.<br />
Drag the left handle to mark the<br />
start time (mark-in point), then<br />
drag the right handle to mark the<br />
end time (mark-out point).<br />
For more precise marking, you<br />
can also tap these controls to<br />
step backward/forward one step<br />
and mark it.<br />
Cancel trimming.<br />
If you only want to save the song to the ring tone folder for future use,<br />
tap Save to Ring Tone Folder. Later on, you can tap Start > Settings ><br />
Personal tab > Phone to set it as your ring tone.<br />
4. Tap OK when a confirmation message appears.
12.6 Audio Booster<br />
Experiencing Multimedia 199<br />
Audio Booster enhances your music experience by providing you with<br />
controls for adjusting sound settings while you are listening to music. It adds<br />
3D sound, treble and bass effects, and provides controls for adjusting them.<br />
It even has an equalizer with presets as well as a control panel for fine tuning<br />
sound.<br />
Note<br />
You need to connect a headset to the device to open Audio Booster.<br />
To open Audio Booster<br />
Tap Start > Programs > Audio Booster.<br />
1<br />
2<br />
3<br />
4<br />
5<br />
1<br />
6<br />
Control Function<br />
1 Equalizer Enables or disables the equalizer. Select the check box to enable the<br />
equalizer and to fine tune its settings, if desired. See “Equalizer” for<br />
more information.<br />
2 3D Sound Adds a three-dimensional effect to sound. Drag the slider to increase or<br />
decrease the effect. To disable the 3D effect, adjust the setting to 0%.<br />
3 Treble Adds a treble effect to increase the high tones in sound. Drag the<br />
slider to increase or decrease the effect. To disable the treble effect,<br />
adjust the setting to 0%.<br />
4 Bass Adds a bass effect to increase the low tones in sound. Drag the slider<br />
to increase or decrease the effect. To disable the bass effect, adjust the<br />
setting to 0%.<br />
5 Done Tap to apply the modified settings.<br />
6 Menu • Tap Menu > Cancel to exit Audio Booster without applying the<br />
modified settings:<br />
• Tap Menu > Reset to revert all settings to default.
200 Experiencing Multimedia<br />
Equalizer<br />
The Equalizer optimizes sound for a better listening experience. It provides<br />
preset moods, such as hip hop, jazz, rock, and several enhancement presets<br />
that suit different types of music. It also has a 10-band graphic equalizer that<br />
lets you adjust the loudness of sound by frequency.<br />
To apply a preset<br />
1. Select the Equalizer check box to enable the equalizer.<br />
2. Tap the Equalizer drop-down menu, then select a desired preset.<br />
To create a custom equalizer preset<br />
1. Select the Equalizer check box to enable the equalizer.<br />
2. Tap .<br />
3. Adjust the frequency bands to<br />
your desired values by dragging<br />
the equalizer controls. The selected<br />
values are indicated on top of the<br />
sliders.<br />
4. Save your equalizer settings as a<br />
preset by tapping Menu ><br />
Save as Preset.<br />
5. Enter a preset name then tap Done.<br />
The preset you created will be added to the list box<br />
To delete a custom equalizer preset<br />
1. Select the Equalizer check box then tap .<br />
Note<br />
2. Tap the Equalizer drop-down menu, then select the preset that you want<br />
to delete.<br />
3. Tap Menu > Delete Preset.<br />
You can only delete custom equalizer presets. Equalizer presets that are preinstalled<br />
cannot be deleted.
Chapter 13<br />
Managing Your Device<br />
13.1 Adding and Removing Programs<br />
13.2 Using Task Manager<br />
13.3 Resetting Your Device<br />
13.4 Managing Memory<br />
13.5 Windows Update<br />
13.6 Battery Saving Tips
202 Managing Your Device<br />
13.1 Adding and Removing Programs<br />
Before you purchase additional programs for your device, make sure that<br />
they are compatible with your device.<br />
To add programs<br />
1. Download the program to your computer (or insert the CD or disk<br />
that contains the program into your computer).<br />
You may see a single *.exe file, a *.zip file, a Setup.exe file, or several<br />
versions of files for different device types and processors. Be sure to<br />
select only the programs designed for your device.<br />
2. Read any installation instructions or documentation that comes with<br />
the program. Many programs provide special installation instructions.<br />
3. Connect your device to the computer.<br />
4. Double-click the installation setup file.<br />
To remove programs<br />
1. Tap Start > Settings > System tab > Remove Programs.<br />
2. In the Programs in storage memory list, select the program you<br />
want to remove, then tap Remove.<br />
13.2 Using Task Manager<br />
Task Manager lets you view and stop running programs, configure the<br />
button, and enable the Quick Menu on the Today screen.<br />
To open Task Manager<br />
• Tap the Quick Menu button on the top right corner of the Today<br />
screen to open the Quick Menu, then tap .<br />
• Tap Start > Settings > System tab > Task Manager.<br />
To switch back to a running program<br />
• Tap the program name in the Quick Menu.<br />
• On the Task Manager screen, tap and hold the program name in the<br />
Running tab, then tap Activate.
Managing Your Device 203<br />
To configure the Exit ( ) button<br />
You can configure the Exit button to shut down running programs when<br />
the button is tapped, or to just temporarily close the program screen but<br />
keep the program running.<br />
1. On the Task Manager screen, tap the Button tab.<br />
2. Select the Enable the “X” button to end running programs check<br />
box.<br />
Note<br />
When the Enable the “X” button to end running programs check box<br />
is not selected, tapping the Exit button will only close a program screen.<br />
The program is not ended and continues to run in the background.<br />
3. Choose the action for shutting down programs (by tapping the<br />
button, or by tapping and holding the button).<br />
4. Tap OK.<br />
To close running programs from the Task Manager<br />
1. On the Task Manager screen, tap the Running tab.<br />
Tip<br />
2. Do one of the following:<br />
• Select the check box of the programs that you want to close, then<br />
tap Stop Selected.<br />
• Tap Stop All to close all programs in the list.<br />
• Tap Menu > Stop All but Selected to close all programs except<br />
those which check boxes are selected.<br />
You can also close running programs from the Quick Menu on the Today<br />
screen. See “Quick Menu” in Chapter 1 for details.<br />
To add a running program to the exclusive list<br />
If you add a running program to the Exclusive Programs List, it will not be<br />
closed when you tap Stop Selected or Stop All and will not be listed in the<br />
Quick Menu on the Today Screen.<br />
Tip<br />
1. On the Task Manager screen, tap the Running tab.<br />
2. Tap and hold the program name, then tap Add Exclusive.<br />
To remove a program from the exclusive list, tap the Exclusive tab, select the<br />
check box of the program, then tap Remove.
204 Managing Your Device<br />
To set the sorting preference for running programs in the Quick Menu<br />
1. On the Task Manager screen, tap the Advanced tab.<br />
2. Choose whether to sort according to Program name or Memory<br />
usage. The list will be sorted in ascending order.<br />
13.3 Resetting Your Device<br />
Soft reset<br />
Occasionally, you may need to reset your device. A soft (or normal) reset<br />
of your device clears all active program memory and shuts down all active<br />
programs. This can be useful when your device is running slower than normal,<br />
or a program is not performing properly. A soft reset is also necessary after the<br />
installation of some programs. If a soft reset is performed when programs are<br />
running, unsaved work will be lost.<br />
To perform a soft reset<br />
Press the RESET button at the back panel of your device. Your device restarts<br />
and displays the Today screen.<br />
RESET<br />
button<br />
Hard reset<br />
You can also perform a hard reset (also known as a full reset). A hard<br />
reset should be performed only if a normal reset does not solve a system<br />
problem. After a hard reset, the device is restored to its default settings—<br />
the way it was when you first purchased it and turned it on. Any programs<br />
you installed, data you entered, and settings you customized on your<br />
device will be lost. Only Windows Mobile® software and other pre-installed<br />
programs will remain.
Warning!<br />
Managing Your Device 205<br />
Your device will be set back to factory default settings. Make sure that<br />
any additional installed programs and/or <strong>user</strong> data have been backed up<br />
before you perform a hard reset.<br />
Important If Encrypt files placed on storage cards is or was enabled before, then<br />
backup all files from the storage card before using Clear Storage, performing<br />
a hard reset, or updating the ROM system software. Otherwise you will<br />
no longer be able to access the encrypted files on the storage card. Use<br />
ActiveSync or Windows Mobile Device Center to transfer files between your<br />
storage card and computer. After the procedure, copy your files back to the<br />
storage card.<br />
To perform a hard reset<br />
1. Slide down VOLUME CONTROL and press the RESET button<br />
simultaneously.<br />
2. Release the RESET button, but keep holding down the VOLUME<br />
CONTROL slider until you see this message on the screen:<br />
Press POWER to restore factory default.<br />
Press Camera Key to exit.<br />
3. Press the POWER button to proceed with the hard reset;<br />
otherwise, press the CAMERA button to exit.<br />
Clear Storage<br />
Another way of clearing the device storage and reset all settings back to<br />
factory default settings is to use the Clear Storage feature. You can also use<br />
Clear Storage to reformat the device’s flash disk.You will lose all your data and<br />
files on the device storage and/or flash disk when you use Clear Storage, so<br />
make sure to do a backup first.<br />
Important If Encrypt files placed on storage cards is or was enabled before, then<br />
backup all files from the storage card before using Clear Storage, hard<br />
reset or updating the ROM system software. Otherwise you will no longer<br />
be able to access the encrypted files on the storage card. Use ActiveSync<br />
or Windows Mobile Device Center to transfer files between your storage<br />
card and computer. After the procedure, copy your files back to the<br />
storage card.<br />
To clear the storage, reformat the flash disk, or both<br />
1. Tap Start > Settings > System tab > Clear Storage.
206 Managing Your Device<br />
2. Tap the options box, then select:<br />
• Clear storage only to clear the device storage.<br />
• Format Flash Disk only to format the device flash disk.<br />
• Clear storage and format Flash Disk to clear the device storage<br />
and format the device flash disk.<br />
3. Enter “1234” in the box, then tap Yes.<br />
4. If you selected the Clear storage only or the Clear storage and<br />
format Flash Disk option, the device restarts and displays the Quick<br />
Setup Wizard.<br />
13.4 Managing Memory<br />
To see how much memory is available for use, tap Start > Settings > System<br />
tab > Memory. On the Main tab, the amount of memory allocated to data<br />
storage versus program storage is displayed, as well as the amount of memory<br />
in use versus the available memory.<br />
To see available storage card memory, tap Start > Settings > System tab ><br />
Memory > Storage Card tab.<br />
If your device is running low on memory, try the following to free memory<br />
on your device:<br />
• Close or remove programs which are not in use.<br />
• Move e-mail attachments to a storage card.<br />
• Move files to a storage card. Tap Start > Programs > File Explorer.<br />
Tap and hold the file, and tap Cut. Navigate to the storage card folder<br />
and tap Menu > Edit > Paste.<br />
• Delete unnecessary files. Tap Start > Programs > File Explorer.<br />
Tap and hold the file, and tap Delete.<br />
• Delete large files. To find large files on your device, tap Start > Programs ><br />
Search. In the Type list, tap Larger than 64 KB, and tap Search.<br />
• In Internet Explorer Mobile, delete temporary Internet files and clear<br />
history information. For more information, see “Internet Explorer®<br />
Mobile” in Chapter 10.<br />
• Reset your device.
13.5 Windows Update<br />
Managing Your Device 207<br />
You can update Windows Mobile® on your device with the latest updates,<br />
security patches or fixes, if these are available.<br />
To set up Windows Update<br />
The first time you run Windows Update, you need to set up how you want<br />
Windows Update to check for patches on the Microsoft Web site.<br />
1. Tap Start > Settings > System tab > Windows Update.<br />
2. On the Update Setup screen, tap Next.<br />
3. Choose how you want to check for updates, Manual or Automatic,<br />
then tap Next.<br />
Note<br />
4. Tap Finish.<br />
If you select Automatic, you will be asked if you want to use your<br />
current data plan to check for updates. Select or clear the Use my data<br />
plan to check for and download updates check box and tap Next.<br />
To check for updates<br />
1. Tap Start > Settings > System tab > Windows Update.<br />
Note<br />
2. Tap Check Now.<br />
Windows Mobile® updates may not be available at all times. Check the<br />
Windows Mobile® Web site for update information.<br />
To change Windows Update options<br />
1. Tap Start > Settings > System tab > Windows Update.<br />
2. Tap Menu and select the option you<br />
want to change.<br />
• Tap Connections to change<br />
how the device connects to<br />
the Internet when checking for<br />
updates.<br />
• Tap Change Schedule to<br />
change how Windows Update<br />
checks for Windows Mobile®<br />
updates.
208 Managing Your Device<br />
13.6 Battery Saving Tips<br />
How long your battery power lasts depends on the battery type and how you<br />
use your device. Try the following to help conserve battery life:<br />
• When the device is not in use, press POWER to switch off the display.<br />
• Tap Start > Settings > System tab > Power to open the Power<br />
settings screen. On the Advanced tab of the Power settings screen,<br />
you can specify the time before your device automatically turns off<br />
the display to conserve battery power. For optimum conservation,<br />
specify 3 minutes or less.<br />
• Use the AC adapter to plug your device into an external power outlet<br />
whenever possible, especially when using a storage card or when<br />
using a modem or other peripherals.<br />
• Adjust the backlight settings. For more information, see “To set the<br />
backlight to dim after a time delay” in Chapter 4.<br />
• Turn Bluetooth off when you are not using it. Make your device visible<br />
to other devices only when you are trying to establish a Bluetooth<br />
partnership. For more information about Bluetooth, see Chapter 10.<br />
• Turn Wi-Fi off when not in use. For more information about Wi-Fi, see<br />
Chapter 10.<br />
• Lower the volume.<br />
• Close battery-intensive programs, such as the Camera, when you are<br />
done using them. Make sure the programs are ended and are not<br />
continuously running in the background. Refer to “Using Task Manager”<br />
in this chapter for information on closing programs.
Chapter 14<br />
Using Other Applications<br />
14.1 RSS Hub<br />
14.2 Voice Speed Dial<br />
14.3 Java<br />
14.4 JETCET PRINT<br />
14.5 WorldCard Mobile
210 Using Other Applications<br />
14.1 RSS Hub<br />
RSS Hub is a Really Simple Syndication (RSS) reader that keeps you up-to-date<br />
with the latest news from the Internet. It monitors Internet news channels and<br />
downloads the most current news updates and podcasts so you are instantly<br />
informed of breaking news and events.<br />
For more information and tips on using RSS Hub, see Help on your device.<br />
Note<br />
Make sure you have an active Internet connection (such as Wi-Fi or 3G/GPRS)<br />
before using RSS Hub.<br />
Subscribe to and organize news channels<br />
You must subscribe to news channels before you can receive RSS feeds.<br />
To subscribe to news channels<br />
1. Tap Start > Programs > RSS Hub, then tap Continue.<br />
2. In the New Channel Wizard screen, select the Choose from a list<br />
of known Channels option, then tap Next. A list of RSS channels is<br />
displayed.<br />
Channel category<br />
Tap to load pre-selected<br />
RSS channels.<br />
Channels<br />
Note<br />
If the RSS channel you want to subscribe to is not in the list of known<br />
channels, tap Back, then select another option on the New Channel Wizard<br />
screen. For more information on these other options, see the Help on your<br />
device.
Using Other Applications 211<br />
3. Select the checkboxes of the RSS channels you want to subscribe to,<br />
then tap Finish.<br />
Tip<br />
Channels are grouped by categories. If you want to select all channels in<br />
a category, select the category check box.<br />
4. The channel list appears. Tap Refresh to update the channels.<br />
Tap to select the<br />
channel category<br />
to display<br />
Channel list<br />
Channel is updating.<br />
Headline<br />
count<br />
Tap to update<br />
the channels.<br />
Tap to cancel<br />
channel updating.<br />
Channel is updated. Tap it<br />
to view the headlines.<br />
To add new channels<br />
1. In the channel list, tap Menu > Channel > New to open the<br />
New Channel Wizard screen.<br />
2. Select an option, then follow screen instructions to add new channels.<br />
For more information on New Channel Wizard options, see Help on<br />
your device.<br />
To filter the channels in the display<br />
In the channel list, tap Menu > View, then select:<br />
• Updated to display only those channels with unread headlines.<br />
• All to display all subscribed channels.
212 Using Other Applications<br />
Manage channel categories<br />
To view all the channels in a particular category, tap All Categories in the<br />
upper left area of the channel list, then tap the category you want to display.<br />
To add a new category, tap Menu > Categories in the channel list to display<br />
all categories, then tap Menu > New.<br />
To rename or delete a category, tap Menu > Categories in the channel list<br />
to display all categories, select a category, then tap Menu > Rename or<br />
Menu > Delete.<br />
If you want to change the channel category, tap and hold the channel in the<br />
channel list, then tap Change Category. Select a new category and tap OK.<br />
View and organize headlines<br />
Tap a channel in the channel list to display the headlines for that channel.<br />
Headline or news<br />
summary contains<br />
a keyword.<br />
Headline has<br />
been read.<br />
New or unread<br />
headline.<br />
Tap to return to<br />
the channel list.<br />
Tap a headline to open the<br />
news summary screen.<br />
Posting date and time<br />
Tap to download audio/<br />
video file attachment.<br />
Audio/Video/Image<br />
file attachment is<br />
downloading.<br />
Tap to play back or view<br />
the file attachment.<br />
Indicates the progress<br />
of audio/video/image<br />
file download.<br />
New or unread headlines display in bold and are marked with<br />
that have been read are marked with .<br />
A headline with the keyword icon indicates that the headline or news<br />
summary contains a keyword that you have specified.<br />
To set a keyword, see “Configure RSS Hub” later in this chapter.<br />
. Headlines
To filter the headline list<br />
In the headline list, tap Menu > View, then select:<br />
• New Headlines Only to display only<br />
unread headlines.<br />
• Keyword Matches Only to display<br />
only those headlines with matching<br />
keywords.<br />
To refresh the headline list<br />
• In the headline list, tap<br />
Menu > Refresh.<br />
Using Other Applications 213<br />
To display the headline lists of other channels<br />
• Press the left or right arrow key on the hardware keyboard.<br />
View the news summary<br />
Tap a headline in the headline list to display the news summary.<br />
Channel icon<br />
and name<br />
Headline and<br />
read status<br />
News summary<br />
Audio/Video/Image<br />
file attachment. Tap<br />
to download the file.<br />
Tap to return to the headline list<br />
To change view options<br />
In the news summary screen, tap Menu to change the text size, fit the text to<br />
the screen (text wrap), or enable ClearType for better viewing.
214 Using Other Applications<br />
To download, play, or save podcasts<br />
1. When you see an audio or video file attachment in the news summary,<br />
do one of the following to download the file:<br />
• Tap Menu > Podcasts > Start<br />
Download.<br />
• Tap the Download audio/<br />
Download video link below the<br />
audio/video file icon.<br />
Tip To cancel the file download, tap<br />
Menu > Podcasts > Cancel<br />
Download, or tap Cancel<br />
download below the audio/video<br />
file icon.<br />
2. After downloading the file, do one of the following:<br />
• Tap Menu > Podcasts > Play or tap Play audio/Play video below<br />
the audio/video file icon to play back the file.<br />
• Tap Menu > Podcast > Save to save a copy of the file to the device<br />
main memory, flash disk, or storage card.<br />
To send the headline link via e-mail<br />
1. In the news summary screen, tap Menu > Send Link via Email.<br />
2. Messaging opens and displays the Account Picker screen. Tap the<br />
e‐mail account you want to use to send the headline link.<br />
A new e-mail message is then created with the headline link.<br />
3. Specify the e-mail recipients, then send it.<br />
Note<br />
For more information on how to compose e-mails, see “Using E-mail” in<br />
Chapter 7.<br />
To view the next or previous news summary<br />
In the news summary screen, tap Menu > Next or Menu > Previous, or press<br />
the left or right arrow key on the hardware keyboard.
Using Other Applications 215<br />
Configure RSS Hub<br />
You can configure RSS Hub to store a list of keywords, download feeds<br />
automatically, notify you when new headlines arrive, and more.<br />
To create a list of keywords<br />
You can create a list of keywords to search<br />
for in headlines and news summaries.<br />
1. In the channel list, tap Menu ><br />
Options > Keyword tab.<br />
2. Tap New, then enter a keyword.<br />
3. Tap New to add another keyword, or<br />
tap OK to close the Options screen.<br />
After you have created your keyword list, RSS Hub scans new channel<br />
headlines and news summaries and checks for matches to the keywords<br />
which you specified. When a headline or news summary contains a keyword or<br />
keywords, the icon you assigned to the keyword appears before the headline<br />
in the headline list.<br />
The Keyword tab also allows you to rename or delete keywords, arrange them<br />
in priority order, and assign an icon for each keyword.<br />
To auto update news channels<br />
You can set the RSS Hub to automatically and regularly update your news<br />
channels.<br />
1. In the channel list, tap Menu > Options > Update tab.<br />
2. In the Auto Update Mode list, select:<br />
• No auto update to disable auto update. You can update the<br />
channels <strong>manual</strong>ly by tapping Refresh in the channel list.<br />
• When ActiveSync available to update your channels only when<br />
your device is connected to your computer via ActiveSync.<br />
• When network available to update your channels when your<br />
device is connected to the Internet.<br />
• Connect automatically to connect to the Internet and update your<br />
channels whenever the auto update period expires.
216 Using Other Applications<br />
Note<br />
Connecting to the Internet using your wireless service provider’s 3G/GPRS,<br />
EDGE, or dial-up network may incur connection charges. Contact your<br />
wireless service provider for details.<br />
3. In the Don’t update more than once every option, set the time for<br />
RSS Hub to wait between updates.<br />
4. Tap OK.<br />
To set notifications when new headlines arrive<br />
You can set RSS Hub to notify you when new headlines arrive.<br />
Note<br />
1. In the channel list, tap Menu > Options > Notify tab.<br />
2. Select Notify when new items are received to receive notification<br />
everytime new headlines arrive, or select Notify when items<br />
matching keywords are received to receive notification everytime a<br />
new headline containing a specified keyword arrives.<br />
3. Tap OK.<br />
4. Tap Start > Settings > Sounds & Notifications > Notifications tab.<br />
5. In Event, select RSS Hub: New Items Received.<br />
6. Select how you want to be notified by setting the notification options.<br />
You may set the device to play a sound, display a message on screen, or<br />
flash a notification LED when new headlines arrive.<br />
7. Tap OK.<br />
You will be notified of new headlines only when RSS Hub is not the current<br />
screen on your device.
14.2 Voice Speed Dial<br />
Using Other Applications 217<br />
You can record voice tags so that you can dial a phone number or launch<br />
programs simply by speaking a word.<br />
Create a voice tag for a phone number<br />
1. Tap Start > Contacts to open the Contacts list.<br />
2. Do one of the following:<br />
• Tap and hold the desired contact, then tap Add Voice Tag.<br />
• Select the desired contact, then tap Menu > Add Voice Tag.<br />
• Tap the desired contact to open the contact’s detailed screen,<br />
then tap Menu > Add Voice Tag.<br />
3. Select the phone number that you want to create a voice tag for, then<br />
tap the Record button .<br />
Tip<br />
To ensure voice recognition accuracy, record your voice in a quiet place.<br />
4. When completed, a Voice Tag icon is displayed on the right of the<br />
phone number.<br />
Select the desired<br />
Tap to start recording. phone number.<br />
5. When you create a voice tag for the item, you can do one of the<br />
following:<br />
• Tap the Record button to rebuild the voice tag.<br />
• Tap the Play button to play the voice tag.<br />
• Tap the Delete button to delete the voice tag.
218 Using Other Applications<br />
Create a voice tag for a program<br />
Tap Start > Settings > Personal tab > Voice Speed Dial > Application tab.<br />
The Application tab displays a list of all installed programs on your device. The<br />
procedure for creating a voice tag for a program is the same as the procedure<br />
for creating a voice tag for a phone number.<br />
Make a call or launch programs using a voice tag<br />
1. Tap Start > Programs > Voice Speed Dial.<br />
Note<br />
2. After the beep, say the recorded voice tag that you have assigned to the<br />
phone number that you want to call or the program that you want to<br />
launch. The system will repeat the voice tag, then dial out or launch the<br />
program automatically.<br />
If the system cannot recognize your voice tag, move to a quiet place, then try<br />
again while speaking clearly.<br />
To view and test the voice tags you have created<br />
1. Tap Start > Settings > Personal tab > Voice Speed Dial.<br />
2. The Voice Tag tab displays a list that contains all the voice tags you<br />
have created. Select an item in the list, then do one of the following.<br />
• Tap the Record button ( ) to rebuild the voice tag.<br />
• Tap the Play button ( ) to play the voice tag.<br />
• Tap the Delete button ( ) to delete the voice tag.
14.3 Java<br />
Using Other Applications 219<br />
MIDlets are Java applications such as games and tools that can run on<br />
mobile devices, while a MIDlet suite is a collection of one or more MIDlets.<br />
The Java program lets you download, install and manage MIDlets or MIDlet<br />
suites on your device. Your device supports Java 2 Micro Edition, J2ME.<br />
To open the Java program<br />
• Tap Start > Programs > Java.<br />
Install and launch MIDlets/MIDlet suites<br />
There are several ways to install a MIDlet/MIDlet suite.<br />
To download and install from the Internet<br />
1. Tap Menu > Install > Browser to open Internet Explorer Mobile.<br />
2. Locate the MIDlet/MIDlet suite while connected to the Internet.<br />
3. Select the MIDlet/MIDlet suite to download.<br />
4. Information about the MIDlet/MIDlet suite is then displayed.<br />
Tap Continue.<br />
5. Confirm to start downloading.<br />
6. Select or a folder where to install the MIDlet suite, then tap OK.<br />
To install from your device<br />
You can copy MIDlets/MIDlet suites from the computer to your device using<br />
the USB sync cable or Bluetooth connection. Copy them to the root folder<br />
or any subfolder on your device.<br />
1. Tap Menu > Install > Local Files. The program then searches for<br />
MIDlets/MIDlet suites on your device and displays them on a list.<br />
2. On the list, tap the MIDlet/MIDlet suite that you want to install.<br />
3. Confirm to start the installation.<br />
4. Select or a folder where to install the MIDlet suite, then tap OK.
220 Using Other Applications<br />
To run a MIDlet/MIDlet suite<br />
Do one of the following:<br />
• After installation of the MIDlet/MIDlet suite is complete, tap Yes.<br />
• On the Java screen, open the folder that contains the MIDlet/MIDlet<br />
suite. Select the MIDlet/MIDlet suite, then tap Launch.<br />
To stop a running MIDlet/MIDlet suite<br />
• Tap Exit or Quit on the MIDlet/MIDlet suite’s screen or menu.<br />
Manage MIDlets/MIDlet suites<br />
You can organize MIDlets/MIDlet suites into folders for easy identification,<br />
renaming, updating, and more. If the device memory is full, uninstall some<br />
MIDlets/MIDlet suites to free up memory space.<br />
To create folders<br />
1. On the Java screen, tap Menu > New Folder.<br />
2. Enter the folder name, then tap Create.<br />
To rename a MIDlet or folder<br />
1. Tap and hold a MIDlet/MIDlet suite or folder, then tap Rename.<br />
Alternatively, you can tap Menu > Actions > Rename.<br />
2. Enter a new name, then tap Save.<br />
To update a MIDlet/MIDlet suite<br />
Tap and hold a MIDlet/MIDlet suite, then tap Update. Alternatively, you can<br />
tap Menu > Actions > Update.<br />
Java will search updates for the selected MIDlet/MIDlet suite where it was<br />
installed from before.<br />
To uninstall MIDlets<br />
Before you uninstall a MIDlet, make sure that it is not running.<br />
Note<br />
1. Tap and hold the MIDlet, then tap Uninstall.<br />
2. Tap OK to confirm.<br />
To uninstall all MIDlets and folders from the current folder, tap<br />
Menu > Uninstall All.
14.4 JETCET PRINT<br />
Using Other Applications 221<br />
JETCET PRINT lets you print image files or documents from your device<br />
straight to a Bluetooth or network printer. You can also print e-mails, e-mail<br />
attachments, Web pages, appointments, contacts, and tasks.<br />
Tip<br />
For more information about JETCET PRINT, consult the JETCET PRINT help in<br />
your device by tapping Menu > Help > Contents in the JETCET PRINT screen.<br />
Open JETCET PRINT<br />
Tap Start > Programs > JETCET PRINT.<br />
Tap to select a document to print.<br />
Tap to select an<br />
image to print.<br />
Tap to select an e-mail,<br />
e-mail attachment,<br />
appointment, calendar,<br />
or task to print.<br />
Tap to set up a printer<br />
or change the printer<br />
settings.<br />
Tap to view and select<br />
additional tools or options.<br />
Set up a printer<br />
You must configure your device to connect to a printer before you can start<br />
printing.<br />
Note<br />
1. Tap Start > Programs > JETCET PRINT.<br />
2. If you are not in the Settings tab, tap the settings button ( ), then:<br />
• Tap Add Network Printer to set up and connect to a shared<br />
network printer.<br />
Note The device will wait continuously if you have entered an incorrect IP address<br />
while setting up a network printer.<br />
• Tap Add Bluetooth Printer to set up and connect to a Bluetooth<br />
printer.<br />
To learn how to set up a printer, refer to the JETCET PRINT help on your device.
222 Using Other Applications<br />
Print a file<br />
1. Tap Start > Programs > JETCET PRINT.<br />
Tip<br />
2. Locate and select the type of file that you want to print (document,<br />
image, or e-mail/PIM) by tapping the corresponding tabs on the left side<br />
of the screen.<br />
3. Tap and hold the file that you want to print, then tap Print on the menu.<br />
4. Select a printer in the Choose a Printer list box, select the paper size,<br />
then tap Next.<br />
5. Choose the page layout in the list, then tap Next to print the file.<br />
You can also print document and image files from File Explorer. To print, use File<br />
Explorer to locate the file you want to print. Tap and hold the file, then tap Print<br />
on the pop up menu.<br />
Print a Web page<br />
1. Open your Web browser and go to the Web page that you want to print.<br />
2. Tap and hold the screen, then tap Print on the menu.<br />
3. Select a printer in the Choose a Printer list box, select the paper size,<br />
then tap Next to print the Web page.
14.5 WorldCard Mobile<br />
Using Other Applications 223<br />
WorldCard Mobile lets you take a photo of a business card and easily export<br />
the contact information on the card into your Contacts.<br />
To open WorldCard Mobile<br />
Tap Start > Programs > WorldCard Mobile.<br />
Tap to open the Camera program<br />
and take a photo of a business card.<br />
Tap to open the<br />
WorldCard Mobile help.<br />
Tap to view the<br />
WorldCard Mobile<br />
copyright information.<br />
Tap to exit WorldCard<br />
Mobile.<br />
Capture and export business card information<br />
Capture a business card and export the card information as a new contact in<br />
your Contacts list.<br />
To capture a business card and export its information to Contacts<br />
1. Tap on the WorldCard Mobile screen.<br />
2. Press the CAMERA button or tap the camera icon on the screen to take a<br />
photo of the business card. Refer to Chapter 12 for details on how to use<br />
the camera.<br />
Tip Make sure that the business card is displayed completely in the Camera<br />
screen before you take the photo, and that lighting is adequate.<br />
3. On the WorldCard Mobile screen, tap Recognize.<br />
Tips<br />
• If you want to retake the shot, tap Re-Capture.<br />
• For better recognition, choose the Language and Region based on the<br />
language used in the business card.
224 Using Other Applications<br />
4. The screen shows various contact information from the business card.<br />
Use the on-screen keyboard to edit the contact information, if needed.<br />
Clear this box if you do<br />
not want to include the<br />
particular information<br />
for the contact when<br />
exported to the<br />
Contacts list.<br />
Tap the down arrow to<br />
change the field name.<br />
Tap to open the onscreen<br />
keyboard and<br />
edit the contact details.<br />
5. Tap Export, then go to your Contacts list to view the exported contact.<br />
For more information about using WorldCard Mobile, see Help on your device.
Appendix<br />
A.1 Regulatory Notices<br />
A.2 Specifications
226 Appendix<br />
A.1 Regulatory Notices<br />
Regulatory Agency Identifications<br />
For regulatory identification purposes, your product is assigned a model<br />
number of ATHE400.<br />
To ensure continued reliable and safe operation of your device, use only the<br />
accessories listed below with your ATHE400.<br />
The Battery Pack has been assigned a model number of ATHE160.<br />
Note<br />
This product is intended for use with a certified Class 2 or Class 3 Limited Power<br />
Source, rated 5 Volts DC, maximum 2 Amp power supply unit.<br />
European Union Notice<br />
Products with CE marking comply with the R&TTE Directive (99/5/EC), the EMC<br />
Directive (89/336/EEC), and the Low Voltage Directive (73/23/EEC) & (2006/95/<br />
EC) issued by the Commission of the European Community.<br />
Compliance with these directives implies conformity to the following European<br />
Norms (in parentheses are the equivalent international standards).<br />
• EN 60950-1 (IEC 60950-1)<br />
Safety of Information Technology Equipment.<br />
• ETSI EN 301 511<br />
Global system for mobile communications (GSM); Harmonised EN for<br />
mobile stations in the GSM 900 and GSM 1800 bands, covering essential<br />
requirements of article 3.2 of the R&TTE directive (1995/5/EC).<br />
• ETSI EN 301 489-1<br />
Electromagnetic compatibility and Radio spectrum Matters (ERM);<br />
ElectroMagnetic Compatibility (EMC) standard for radio equipment and<br />
services; Part 1: Common technical requirements.<br />
• ETSI EN 301 489-7<br />
Electromagnetic compatibility and Radio spectrum Matters (ERM);<br />
ElectroMagnetic Compatibility (EMC) standard for radio equipment and<br />
services; Part 7: Specific conditions for mobile and portable radio and<br />
ancillary equipment of digital cellular radio telecommunications systems<br />
(GSM and DCS).
Appendix 227<br />
• ETSI EN 301 489-17<br />
Electromagnetic compatibility and Radio spectrum Matters (ERM);<br />
ElectroMagnetic Compatibility (EMC) standard for radio equipment and<br />
services; Part 17: Specific conditions for 2.4 GHz wideband transmission<br />
systems and 5 GHz high performance RLAN equipment.<br />
• EN 301 489-24<br />
Electromagnetic compatibility and radio spectrum matters (ERM);<br />
ElectroMagnetic Compatibility (EMC) standard for radio equipment and<br />
services; Part 24: Specific conditions for IMT-2000 CDMA direct spread<br />
(UTRA) for mobile and portable (UE) radio and ancillary equipment.<br />
• EN 301 908<br />
Electromagnetic compatibility and Radio spectrum Matters (ERM); Base<br />
Stations (BS) and User Equipment (UE) for IMT-2000 third generation<br />
cellular networks.<br />
• ETSI EN 300 328<br />
Electromagnetic compatibility and Radio spectrum Matters (ERM);<br />
Wideband Transmission systems; data transmission equipment operating<br />
in the 2.4 GHz ISM band and using spread spectrum modulation<br />
techniques.<br />
• EN 50360<br />
Product standard to demonstrate the compliance of mobile phones with<br />
the basic restrictions related to human exposure to electromagnetic<br />
fields (300 MHz - 3 GHz).<br />
• EN 50392<br />
Generic standard to demonstrate the compliance of low power<br />
electronic and electrical apparatus with the basic restrictions related to<br />
human exposure to electromagnetic fields (10 MHz - 300 GHz) - General<br />
public.<br />
• EN 300 440-1&-2<br />
Electromagnetic compatibility and Radio spectrum Matters (ERM); Short<br />
range devices; Radio equipment to be used in the 1 GHz to 40 GHz<br />
frequency range; Part1: Technical characteristics and test methods. Part 2:<br />
Harmonized EN under article 3.2 of the R&TTE Directive.
228 Appendix<br />
• EN60601-1-2<br />
Medical electrical equipment - Part 1-2: General requirements for basic<br />
safety and essential performance - Collateral standard: Electromagnetic<br />
compatibility - Requirements and tests<br />
This equipment may be operated in:<br />
AT BE BG CH CY CZ DE DK<br />
EE ES FI FR GB GR HU IE<br />
IT IS LI LT LU LV MT NL<br />
NO PL PT RO SE SI SK TR<br />
Safety precautions for RF exposure<br />
• Use only original manufacturer-approved accessories, or accessories<br />
that do not contain any metal.<br />
• Use of non-original manufacturer-approved accessories may violate<br />
your local RF exposure guidelines and should be avoided.<br />
Exposure to Radio Frequency (RF) Signals<br />
The wireless phone is a radio transmitter and receiver. It is designed and<br />
manufactured not to exceed the emission limits for exposure to radio<br />
frequency (RF) energy.<br />
The exposure standard for wireless mobile phones employs a unit of<br />
measurement known as the Specific Absorption Rate, or SAR.<br />
The standard incorporates a substantial margin of safety to give additional<br />
protection for the public and to account for any variations in usage.<br />
Normal conditions only ensure the radiative performance and safety of the<br />
interference. As with other mobile radio transmitting equipment, <strong>user</strong>s are<br />
advised that for satisfactory operation of the equipment and for the safety of<br />
personnel, it is recommended that no part of the human body be allowed to<br />
come too close to the antenna during operation of the equipment.
Appendix 229<br />
This phone has been tested and meets the CE RF exposure guidelines when<br />
used with an accessory that contains no metal and that positions the handset<br />
at a minimum distance of 1.5cm from the body.<br />
SAR Information<br />
0.354 W/kg@10g (Body)<br />
Telecommunications & Internet Association (TIA) safety<br />
information<br />
Pacemakers<br />
The Health Industry Manufacturers Association recommends that a<br />
minimum separation of six inches be maintained between a handheld<br />
wireless phone and a pacemaker to avoid potential interference with the<br />
pacemaker. These recommendations are consistent with the independent<br />
research by and recommendations of Wireless Technology Research.<br />
Persons with pacemakers:<br />
• Should ALWAYS keep the phone more than six inches from their<br />
pacemaker when the phone is turned ON.<br />
• Should not carry the phone in a breast pocket.<br />
• Should use the ear opposite the pacemaker to minimize the potential<br />
for interference. If you have any reason to suspect that interference is<br />
taking place, turn the phone OFF immediately.<br />
Hearing Aids<br />
Some digital wireless phones may interfere with some hearing aids. In the<br />
event of such interference, you may want to consult your service provider,<br />
or call the customer service line to discuss alternatives.<br />
Other Medical Devices<br />
If you use any other personal medical device, consult the manufacturer<br />
of your device to determine if they are adequately shielded from external<br />
RF energy. Your physician may be able to assist you in obtaining this<br />
information.<br />
Turn the phone OFF in health care facilities when any regulations posted in<br />
these areas instruct you to do so. Hospitals or health care facilities may be<br />
using equipment that could be sensitive to external RF energy.
230 Appendix<br />
WEEE Notice<br />
The Directive on Waste Electrical and Electronic Equipment (WEEE), which<br />
entered into force as European law on 13th February 2003, resulted in a<br />
major change in the treatment of electrical equipment at end-of-life.<br />
The purpose of this Directive is, as a first priority, the prevention of WEEE,<br />
and in addition, to promote the reuse, recycling and other forms of recovery<br />
of such wastes so as to reduce disposal.<br />
The WEEE logo (shown at the left) on the product or on its box<br />
indicates that this product must not be disposed of or dumped<br />
with your other household waste. You are liable to dispose of all<br />
your electronic or electrical waste equipment by relocating over<br />
to the specified collection point for recycling of such hazardous<br />
waste. Isolated collection and proper recovery of your electronic<br />
and electrical waste equipment at the time of disposal will<br />
allow us to help conserving natural resources. Moreover, proper<br />
recycling of the electronic and electrical waste equipment will<br />
ensure safety of human health and environment. For more<br />
information about electronic and electrical waste equipment<br />
disposal, recovery, and collection points, please contact your<br />
local city center, household waste disposal service, shop from<br />
where you purchased the equipment, or manufacturer of the<br />
equipment.<br />
RoHS Compliance<br />
This product is in compliance with Directive 2002/95/EC of the European<br />
Parliament and of the Council of 27 January 2003, on the restriction of the<br />
use of certain hazardous substances in electrical and electronic equipment<br />
(RoHS) and its amendments.
A.2 Specifications<br />
Appendix 231<br />
System Information<br />
Processor<br />
Memory<br />
Operating System<br />
Power<br />
Battery<br />
Charging Time<br />
Battery Life<br />
(estimates)<br />
Marvell® PXA270 624 MHz with ATi Graphic Chip W2284<br />
- ROM : 256MB<br />
- RAM : 128MB SDRAM<br />
(Figures are the total ROM and RAM memory available for use and<br />
storage. Since the memory is shared by the operating system,<br />
applications, and data, the actual available memory is less than what<br />
is specified).<br />
- Flash : 16GB<br />
Windows Mobile® 6.1 Professional<br />
Rechargeable Lithium-ion polymer battery<br />
Capacity: 2100 mAh<br />
3 hours<br />
Standby time: Up to 300 hours for GSM/WCDMA<br />
Talk time<br />
(Screen off):<br />
Video call:<br />
Media playback<br />
time:<br />
WCDMA: Up to 5 hours<br />
GSM: Up to 6 hours<br />
Up to 2 hours<br />
Up to 8 hours (WMV)<br />
Up to 12 hours (WMA)<br />
AC Adapter<br />
Voltage range/frequency: 100 - 240V AC, 50/60 Hz<br />
DC output: 5V and 1A<br />
Display<br />
LCD Type<br />
5-inch TFT-LCD with backlight LEDs, touch-sensitive screen<br />
Resolution<br />
640x480 VGA with 65,536 colors<br />
Orientation<br />
Portrait and Landscape<br />
Phone<br />
Network HSDPA/WCDMA: 2100 MHz for Europe and 850/1900<br />
MHz for USA, with up to 384 kbps upload and 1.8 Mbps<br />
download speeds<br />
GSM/GPRS/EDGE: Quad-band 850, 900, 1800, 1900 Mhz<br />
(The device will operate on frequencies available from the<br />
cellular network.)<br />
Internal Antenna Yes
232 Appendix<br />
Physical<br />
Dimensions<br />
Weight<br />
Camera Module<br />
Type<br />
Resolution<br />
Digital Zoom<br />
Connections<br />
I/O Port<br />
Wireless<br />
Car Antenna<br />
Connector<br />
GPS<br />
Chipset<br />
GPS Antenna<br />
Connector<br />
Expansion Slot<br />
Card Slot<br />
Controls and Lights<br />
Device Control<br />
133.5 mm (L) x 98 mm (W) x 16 mm (T)<br />
Thickness with keyboard: 20 mm<br />
375 g (with battery)<br />
Main Camera: 3.0 megapixel color camera with autofocus<br />
and flash light<br />
Second Camera: VGA CMOS color camera<br />
Photo: 2048x1536 (QXGA), 1600 x1200 (UXGA), 1280 x<br />
960 (SXGA), 640 x 480 (VGA), 320 x 240 (QVGA), 160 x120<br />
(QQVGA)<br />
Video: 352x288 (CIF), 320 x 240 (QVGA),<br />
176 x 144 (QCIF), 128 x 96<br />
Up to 8X<br />
HTC ExtUSB : 11-pin mini-USB 2.0 and audio jack in one<br />
HTC proprietary 16-pin combined port (USB 1.1 host/VGA<br />
and TV Out)<br />
3.5mm stereo audio jack with microphone<br />
Wi-Fi®: IEEE 802.11 b/g<br />
Bluetooth® 2.0<br />
External connector for WCDMA/GSM/CDMA<br />
Standalone GPS<br />
Yes. Please use only the external GPS antenna with model<br />
number GA S110.<br />
miniSD (Hot-swap and SD 2.0 compatible)<br />
• VOLUME CONTROL slider<br />
• CAMERA button<br />
• POWER button<br />
• RESET button<br />
• HOME/TODAY button
Appendix 233<br />
Hardware Keyboard<br />
LEDs<br />
Audio<br />
Audio I/O<br />
Ring tone<br />
Supported<br />
Playback Formats<br />
• Dual-usage QWERTY keyboard for text input and<br />
display protection<br />
• Delete/Back key<br />
• Messaging key<br />
• SMS/MMS key<br />
• Notification LED 1 (GSM): Shows green and amber lights<br />
for HSDPA/WCDMA/EDGE/GSM/GPRS standby, and<br />
network status as well as the battery charging status.<br />
Flashes red when the battery level reaches 5% or below.<br />
Shows amber light for GPS status.<br />
• Notification LED 2 (BT/WIFI): Shows a flashing blue light<br />
for Bluetooth system notification of powered-up and<br />
ready to transmit Bluetooth signal, or a flashing green<br />
light for Wi-Fi status. When both Bluetooth and Wi-Fi are<br />
enabled, their lights flash alternately.<br />
• Notification LED 3 (ALERT): Shows a flashing amber<br />
light when you receive a new message or for other<br />
notifications.<br />
Built-in microphone and dual speakers<br />
• MP3, AAC, AAC+, WMA, WAV, AMR-NB/WB<br />
• 40 polyphonic and Standard MIDI format 0 and 1 (SMF) /<br />
SP MIDI<br />
• Windows Media® Player: AAC, AAC+, eAAC+ WMA, WAV,<br />
MP3, AMR-NB/WB, MP4, M4A, MIDI<br />
• Audio Manager: MP3, AAC, AAC+, WMA
234 Appendix
Index<br />
A<br />
A2DP 161<br />
ActiveSync<br />
- set up 85<br />
- synchronize 86, 127<br />
Add and remove programs 202<br />
Adobe Reader LE 37, 137<br />
Airplane mode 55<br />
Alarm 72<br />
Answer/end a call 58<br />
Appointment search 52<br />
Attachment<br />
- add to e-mail 120<br />
- download 122<br />
Audio Booster 199<br />
Audio Manager 37, 194<br />
B<br />
Back cover<br />
- remove 24<br />
- replace 24<br />
Backlight 71<br />
Back up data 140<br />
Basic settings 70<br />
Battery<br />
- battery information 24<br />
- charge battery 27<br />
- install 26<br />
- save battery power 208<br />
Beam<br />
- via Bluetooth 162<br />
Block Recognizer 49<br />
Bluetooth<br />
- Bluetooth Explorer 37, 163<br />
- Bluetooth file sharing 163<br />
- Bluetooth shared folder 163<br />
- hands-free headset 161<br />
- modem 158<br />
- modes 159<br />
- overview 159<br />
- partnership (pairing) 160<br />
- SIM Access Profile (SAP) 65<br />
- stereo headset 161<br />
- synchronize 88<br />
- turn on and off 144<br />
- visible 159<br />
Bluetooth Explorer 37<br />
Burst capture mode 175<br />
C<br />
Calculator 37<br />
Calendar 36<br />
- create appointment 96<br />
- send appointment 98<br />
- view appointment 97<br />
Calendar search 52<br />
Calibration 28<br />
Camera<br />
- capture modes 174, 175<br />
- controls 176<br />
- file formats 175<br />
- icons 176<br />
- overview 37<br />
- specifications 232
236 Index<br />
Car kit phones 65<br />
Clear Storage 205<br />
Clock & Alarms 41, 70, 72<br />
Comm Manager 43, 144<br />
Company Directory 133<br />
Conference call 59<br />
Connect device to Internet<br />
- Dial-up 149<br />
- GPRS 146<br />
- start a connection 150<br />
- ways of connecting 146<br />
- Wi-Fi 147<br />
Connection Setup 145<br />
Contacts 36, 90<br />
Contacts Picture capture mode 175<br />
Contacts search 52<br />
Copy<br />
- contacts to SIM card 95<br />
- copy and manage files 138<br />
- media files from PC to device 189<br />
- SIM contacts to device 94<br />
Customize<br />
- Start menu 75<br />
- Today screen 73<br />
D<br />
Device ID 71<br />
Device name 71<br />
Dial-up 149<br />
Dimensions and weight 232<br />
Direct Push 128, 144<br />
Disconnect data connection 144<br />
Download e-mail 123<br />
Draw 101<br />
E<br />
E-mail<br />
- IMAP4 116<br />
- mail server settings 117<br />
- POP3 116<br />
- search 52<br />
- send 120<br />
- settings (POP3/IMAP4) 118<br />
- setup wizard 116<br />
- types of e-mail accounts 115<br />
Edit picture 187<br />
Emergency call 66<br />
Emoticon 113<br />
Excel Mobile 36, 136<br />
Exchange Server 126<br />
F<br />
File Explorer 37, 138<br />
Find contact<br />
- Company Directory 133<br />
- on device 92<br />
Finger panning<br />
- how to 31<br />
Finger scrolling<br />
- enable/mute sound 31<br />
- how to 31<br />
Forward e-mail 122<br />
G<br />
Games 37<br />
GIF animation 187<br />
GPS 38, 168<br />
H<br />
Hard reset 204, 205<br />
Help 36<br />
Help search 52<br />
I<br />
IMAP4 116<br />
Input methods<br />
- Block Recognizer 49<br />
- Keyboard 49
- Letter Recognizer 50<br />
- Transcriber 50<br />
Input Panel 47<br />
Input Selector arrow 47<br />
International call 67<br />
Internet 146<br />
Internet Explorer Mobile 36, 150<br />
Internet Sharing 37, 157<br />
J<br />
Java<br />
- create folders 220<br />
- install MIDlets/MIDlet suites from<br />
device 219<br />
- install MIDlets/MIDlet suites from<br />
Internet 219<br />
- manage MIDlets/MIDlet suites 220<br />
- overview 37<br />
- rename MIDlet or folder 220<br />
- uninstall MIDlets 220<br />
- update a MIDlet/MIDlet suite 220<br />
K<br />
Keyboard<br />
- on-screen 49<br />
L<br />
Landscape 28<br />
Letter Recognizer 50<br />
Library screen (Windows Media Player<br />
Mobile) 189<br />
Live Messenger 155<br />
M<br />
Mail search 52<br />
Make call<br />
- from Call History 57<br />
- from Contacts 56<br />
- from Phone program 56<br />
- from SIM Manager 58<br />
- from Speed Dial 57<br />
Memory 206, 231<br />
Messaging<br />
- about 106<br />
- e-mail 115, 116, 120<br />
- multimedia (MMS) 110<br />
- overview 36<br />
- text (SMS) 107<br />
Messenger 38, 155<br />
microSD card<br />
- install 25<br />
Microsoft Office Mobile 136<br />
MIDlet/MIDlet suite 219<br />
MMS 110<br />
- add audio clip 113<br />
- add photo/video 112<br />
- add text 113<br />
- blacklist 114<br />
- create MMS message 112<br />
- MMS settings 110<br />
- reply message 114<br />
- view message 114<br />
MMS Video capture mode 175<br />
Modem<br />
- Bluetooth 158<br />
- USB 157<br />
Multimedia 110, 188<br />
Music playback<br />
- Audio Manager 194<br />
- Windows Media Player Mobile 191<br />
Music Player (Audio Manager) 196<br />
Mute 59<br />
N<br />
Network Wizard 34<br />
News channels<br />
- add new 211<br />
- filter 211<br />
Index 237
238 Index<br />
- manage 212<br />
- subscribe to 210<br />
Notes 38, 100<br />
Notes search 52<br />
Now Playing screen (Windows Media<br />
Player Mobile) 189<br />
O<br />
Office Mobile 36, 136<br />
OneNote Mobile 36<br />
Open PDF file 137<br />
Owner information 74<br />
P<br />
Panning<br />
- finger panning 31<br />
Password 78<br />
Phone 36, 54, 56<br />
Phone services 73<br />
Photo capture mode 175<br />
Pictures & Videos<br />
- edit picture 187<br />
- file formats 186<br />
- overview 38<br />
- play GIF animation 187<br />
- play videos 187<br />
- view pictures 186<br />
Picture Theme capture mode 175<br />
PIN 54, 78<br />
Playback screen (Windows Media Player<br />
Mobile) 189<br />
Play GIF animation 187<br />
Playlists<br />
- Audio Manager 196<br />
- Windows Media Player Mobile 192<br />
Play media 191<br />
Play music<br />
- Audio Manager 194<br />
- Windows Media Player Mobile 191<br />
Play videos 187<br />
Podcasts<br />
- download 214<br />
POP3 116<br />
Portrait 28<br />
PowerPoint Mobile 36, 136<br />
Programs<br />
- QuickGPS 38<br />
Put call on hold 58<br />
Q<br />
QuickGPS 38<br />
Quick menu 30<br />
Quick Scroll 92<br />
R<br />
Receive call 58<br />
Record<br />
- voice note 101<br />
- voice recording 102<br />
Regional settings 70<br />
Regulatory notices 226<br />
Reply<br />
- e-mail 122<br />
- MMS 114<br />
Reset<br />
- clear storage 205<br />
- hard reset 204<br />
- soft reset 204<br />
Review screen (Camera) 180<br />
Ring tone 72, 198<br />
Ring type 72<br />
RSS Hub<br />
- configure settings 215<br />
- Headline List 212<br />
- introduction 210<br />
- news channels 210<br />
- podcasts 214<br />
- set notifications 216
- Summary View 213<br />
S<br />
Screen text size 71<br />
Search 38, 52<br />
Send<br />
- e-mail 120<br />
- MMS message 112<br />
- text message (SMS) 107<br />
Set music as ring tone 198<br />
Settings 70<br />
Settings (Connections tab)<br />
- Beam 43<br />
- Bluetooth 43, 159<br />
- Comm Manager 144<br />
- Connections 43, 149<br />
- CSD Line Type 43<br />
- GPRS Setting 43<br />
- Network Wizard 43, 145<br />
- SMS Service 43<br />
- USB to PC 43, 87<br />
Settings (Personal tab)<br />
- Buttons 40<br />
- Input 40<br />
- Lock 40, 78<br />
- Menus 40, 75<br />
- Owner Information 40, 74<br />
- Phone 40, 72, 73<br />
- Sounds & Notifications 40, 73<br />
- Today 40, 73, 74<br />
- Voice Speed Dial 40<br />
Settings (System tab)<br />
- About 41, 71<br />
- Backlight 41, 71<br />
- Certificates 41<br />
- Clear Storage 41, 205<br />
- Clock & Alarms 41, 70, 72<br />
- Device Information 41<br />
- Encryption 41, 79<br />
- Error Reporting 41<br />
- GPS 41<br />
- Key Lock 41<br />
- Memory 42, 206<br />
- Microphone AGC 42<br />
- Power 42, 208<br />
- Regional Settings 42, 70<br />
- Remove Programs 42, 202<br />
- Screen 28, 42, 71<br />
- Task Manager 42, 202<br />
- TouchFLO 32, 42<br />
SIM Access Profile (SAP) 65<br />
SIM card<br />
- install 24<br />
- PIN 78<br />
SIM Manager 94<br />
- copy contacts to SIM card 95<br />
- copy SIM contacts to device 94<br />
- create SIM contact 94<br />
- make call 58<br />
- overview 38<br />
Sleep mode 29<br />
Smart Dialing 63<br />
SMS 107, 120<br />
Soft reset 204<br />
Sounds & Notifications 73<br />
Specifications 231<br />
Speed Dial 57<br />
Sports capture mode 175<br />
Sprite Backup 38, 140<br />
Start menu 29, 75<br />
STK (SIM Tool Kit) Service 39<br />
Storage card<br />
- check available space 206<br />
- copy files 139<br />
- encrypt 79<br />
- install 25<br />
Swap/switch calls 58<br />
Synchronize<br />
Index 239
240 Index<br />
- ActiveSync 86<br />
- change information types 86<br />
- music and videos 88<br />
- via Bluetooth 87<br />
- Windows Media Player 189<br />
- Windows Mobile Device Center 83<br />
- with computer 86<br />
- with Exchange Server 126<br />
System information 231<br />
T<br />
Task Manager 202<br />
Tasks 38, 99<br />
Tasks search 52<br />
Text messages<br />
- send 107<br />
Text size (screen) 71<br />
Threaded SMS 108<br />
Today screen 73<br />
Transcriber 50<br />
Troubleshoot<br />
- sync connection 87<br />
- Windows Media Player Mobile 192<br />
Turn device on and off 28<br />
Turn phone function on and off 54, 144<br />
U<br />
USB modem 157<br />
USB to PC 87<br />
V<br />
Video capture mode 175<br />
View<br />
- MMS 114<br />
- pictures 186<br />
View Web page 150<br />
Voice call 56<br />
Voicemail 57<br />
Voice Recorder 38, 101, 102<br />
Voice Speed Dial<br />
- create<br />
- voice tag for phone number 217<br />
- voice tag for program 218<br />
- make call or launch program 218<br />
- overview 38, 217<br />
Voice tag<br />
- create<br />
- for phone number 217<br />
- for program 218<br />
- make call or launch program 218<br />
Volume 55<br />
W<br />
Wi-Fi 147<br />
- switch on or off 144<br />
Windows Live 39, 153<br />
Windows Live Messenger 38, 155<br />
Windows Media Player Mobile<br />
- file formats 188<br />
- menus 189<br />
- overview 39<br />
- playlists 192<br />
- troubleshoot 192<br />
Windows Mobile Device Center 83<br />
Windows Update 42, 207<br />
Wireless LAN 147<br />
Word Mobile 36, 136<br />
WorldCard Mobile 39, 223<br />
Z<br />
ZIP<br />
- create archive 140<br />
- open zip file and extract files 139<br />
- overview 39, 139<br />
Zoom (Camera) 178
o2.co.uk<br />
Telefónica O2 UK Limited, 260 Bath Road, Slough, Berks, SL1 4DX.<br />
Registered in England No.1743099. Registered office as above.<br />
© Telefónica O2 UK Limited 2008. Correct at time of going to press (10/08).<br />
O2CN657N 5571VCCP10/08 10/09