Maintenance Guide - Sloan Valve Company
Maintenance Guide - Sloan Valve Company
Maintenance Guide - Sloan Valve Company

Create successful ePaper yourself
Turn your PDF publications into a flip-book with our unique Google optimized e-Paper software.
EAF-100/150 I.I. — Rev. 0a (11/02)<br />
Code No. 0816542<br />
INSTALLATION INSTRUCTIONS<br />
ELECTRONIC, SENSOR OPERATED<br />
LAVATORY FAUCETS<br />
8<br />
1A<br />
1B<br />
EAF-150 Seriess<br />
Battery Powered<br />
Sensor Operated<br />
Lavatory Faucets<br />
10<br />
7<br />
2<br />
EAF-100 Series<br />
Plug-in Transformer Powered<br />
Sensor Operated<br />
Lavatory Faucets<br />
3<br />
Thhe neww Optiimma faauceet<br />
— Bringiing inteelllliiggeennccee ttoo watterr<br />
4<br />
9<br />
6B<br />
6A<br />
ADA Compliant<br />
<strong>Sloan</strong>’s new Optima EAF-100/150 Series electronic hand<br />
washing faucets operate by means of a dual infrared sensor and<br />
microprocessor based logic. The modular design of the faucet<br />
simplifies installation and maintenance by incorporating all of the<br />
operating components above the sink within the die-cast metal<br />
spout.<br />
ISM models feature an integral temperature control lever to allow the<br />
user to adjust water temperature. The faucet can also be adjusted to<br />
a fixed setting. Faucets ordered without the ISM variation must be<br />
connected to a single, pre-tempered water supply.<br />
The faucet is also available with the - Click feature. This feature<br />
allows the user to set faucet modes, including “continuous run” and<br />
“temporary off” simply by pressing a button on the spout. This<br />
feature is recommended only in installations where users have a<br />
regular familiarity with the faucet (i.e., executive and non-public rest<br />
rooms). Models furnished with the - Click feature are also<br />
available with a Drain Pop Up.<br />
Optima EAF-150 series faucets include a 6 VDC lithium battery.<br />
Battery life is approximately three (3) years. EAF-100 series faucets<br />
are hard wired and include a plug-in transformer.<br />
5<br />
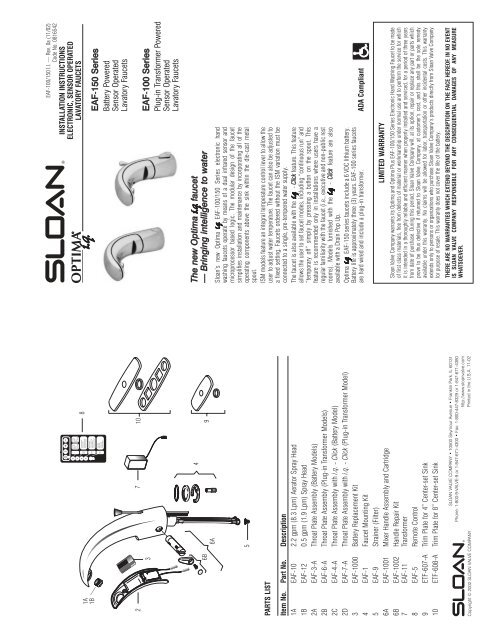
PARTS LIST<br />
LIMITED WARRANTY<br />
<strong>Sloan</strong> <strong>Valve</strong> <strong>Company</strong> warrants its Optima and Optima Plus EAF-100/150 Series Electronic Hand Washing Faucet to be made<br />
of first class materials, free from defects of material or workmanship under normal use and to perform the service for which<br />
it is intended in a thoroughly reliable and efficient manner when properly installed and serviced, for a period of three years<br />
from date of purchase. During this period, <strong>Sloan</strong> <strong>Valve</strong> <strong>Company</strong> will, at its option, repair or replace any part or parts which<br />
prove to be thus defective if returned to <strong>Sloan</strong> <strong>Valve</strong> <strong>Company</strong>, at customer’s cost, and this shall be the sole remedy<br />
available under this warranty. No claims will be allowed for labor, transportation or other incidental costs. This warranty<br />
extends only to persons or organizations who purchase <strong>Sloan</strong> <strong>Valve</strong> <strong>Company</strong>’s products directly from <strong>Sloan</strong> <strong>Valve</strong> <strong>Company</strong><br />
for purpose of resale. This warranty does not cover the life of the battery.<br />
Item No. Part No. Description<br />
1A EAF-10 2.2 gpm (8.3 Lpm) Aerator Spray Head<br />
1B EAF-12 0.5 gpm (1.9 Lpm) Spray Head<br />
2A EAF-3-A Throat Plate Assembly (Battery Models)<br />
2B EAF-6-A Throat Plate Assembly (Plug-in Transformer Models)<br />
2C EAF-4-A Throat Plate Assembly with i.q. - Click (Battery Model)<br />
2D EAF-7-A Throat Plate Assembly with i.q. - Click (Plug-in Transformer Model)<br />
3 EAF-1000 Battery Replacement Kit<br />
4 EAF-1 Faucet Mounting Kit<br />
5 EAF-9 Strainer (Filter)<br />
6A EAF-1001 Mixer Handle Assembly and Cartridge<br />
6B EAF-1002 Handle Repair Kit<br />
7 EAF-11 Transformer<br />
8 EAF-5 Remote Control<br />
9 ETF-607-A Trim Plate for 4” Center-set Sink<br />
10 ETF-608-A Trim Plate for 8” Center-set Sink<br />
THERE ARE NO WARRANTIES WHICH EXTEND BEYOND THE DESCRIPTION ON THE FACE HEREOF. IN NO EVENT<br />
IS SLOAN VALVE COMPANY RESPONSIBLE FOR ANY CONSEQUENTIAL DAMAGES OF ANY MEASURE<br />
WHATSOEVER.<br />
SLOAN VALVE COMPANY • 10500 Seymour Avenue • Franklin Park, IL 60131<br />
Phone: 1-800-9-VALVE-9 or 1-847-671-4300 • Fax: 1-800-447-8329 or 1-847-671-4380<br />
http://www.sloanvalve.com<br />
Printed in the U.S.A. 11-02<br />
Copyright © 2002 SLOAN VALVE COMPANY
ROUGH-IN — Figure 1<br />
MODELS EAF-100/150<br />
2.2 gpm (8.3 Lpm) Max. Flow Aerator<br />
Faucets with Single Line Water Supply<br />
O-RING<br />
GASKET<br />
RETAINER<br />
NUT<br />
SPOUT<br />
FAUCET SPOUT DIMENSIONS AND POP UP DETAILS<br />
5-9/16”<br />
(142 mm)<br />
24º<br />
6-7/8”<br />
(175 mm)<br />
1-3/16” (30 mm)<br />
MIN. DIA. HOLE<br />
REQUIRED<br />
1-1/2” (38 mm)<br />
MAX. DECK<br />
THICKNESS<br />
2-3/8<br />
(60 mm)<br />
2-3/4<br />
(70 mm)<br />
2<br />
MODELS EAF-100/150-ISM<br />
MODELS EAF-100/150-ISM-DPU-IC<br />
2.2 gpm (8.3 Lpm) Max. Flow Aerator<br />
Faucets with Hot and Cold Water Supply<br />
O-RING<br />
GASKET<br />
RETAINER<br />
TEMPERED<br />
SUPPLY<br />
If connection to separate hot and<br />
cold water supplies is desired, back<br />
checks (not supplied) must be used<br />
HOT<br />
SUPPLY<br />
Figure 1A<br />
prior to connecting to the faucet.<br />
Figure 1B<br />
POP UP —<br />
MODELS EAF-100/150-ISM-DPU-IC ONLY<br />
2-3/8<br />
(60 mm)<br />
Figure 1C<br />
12” (300 mm)<br />
LONG FLEX HOSE<br />
When the EAF faucet is installed on a sink that has three (3) hole<br />
punchings, a trim plate should be used.<br />
Trim Plates must be specified and ordered separately:<br />
ETF-607-A<br />
Trim Plate for 4” (102 mm) Center-set Sink<br />
ETF-608-A<br />
Trim Plate for 8” (204 mm) Center-set Sink<br />
When installing the faucet on a three (3) hole sink make sure that the<br />
center hole is large enough to accommodate the faucet shank.<br />
A 1-3/16" (30 mm) minimum diameter hole is required. (A 1-7/32”<br />
(31 mm) Diameter hole is required if the deck is greater than 1/2”<br />
(13 mm) thick.)<br />
NUT<br />
SPOUT<br />
12” (300 mm)<br />
LONG FLEX HOSES<br />
MIXING VALVE<br />
1-3/16” (30 mm)<br />
MIN. DIA. HOLE<br />
REQUIRED<br />
1-1/2” (38 mm)<br />
MAX. DECK<br />
THICKNESS<br />
COLD<br />
SUPPLY<br />
FAUCET VARIATIONS<br />
-ISM Integral Spout Mixer<br />
-IC -Click Feature<br />
-DPU Drain Pop Up<br />
-P Plug-in Transformer (EAF-100 Series only)<br />
PRIOR TO INSTALLATION<br />
Prior to installing the <strong>Sloan</strong> Optima or Optima Plus EAF-100/150 Series<br />
faucet, install the items listed below. Also, refer to Figures 1A thru 1C.<br />
• Lavatory/sink<br />
• Drain line<br />
• Hot and cold water supply lines or pre-tempered water supply line<br />
IMPORTANT:<br />
• ALL PLUMBING IS TO BE INSTALLED IN ACCORDANCE WITH<br />
APPLICABLE CODES AND REGULATIONS.<br />
• FLUSH ALL WATER LINES PRIOR TO MAKING CONNECTIONS.<br />
Trim Plates<br />
When the EAF faucet is installed on a sink that has three (3) hole<br />
punchings, a Trim Plate should be used. Trim Plates must be specified<br />
and ordered separately.<br />
ETF-607-A Trim Plate for 4” (102 mm) Center-set Sink<br />
ETF-608-A Trim Plate for 8” (204 mm) Center-set Sink<br />
TOOLS REQUIRED FOR INSTALLATION<br />
• 13 mm open end wrench for male end of flex hose<br />
• 13 mm open end wrench or nut driver for faucet retainer nut<br />
• 3/4” open end wrench for female end of flex hose
FAUCET INSTALLATION<br />
Step 1<br />
Remove all<br />
Mounting Hardware:<br />
• Nut<br />
• Faucet Retainer<br />
• Gasket<br />
Do Not remove the<br />
O-ring from base of<br />
faucet.<br />
Step 2<br />
Install Faucet with O-ring<br />
into the center hole in<br />
deck or lavatory —<br />
1-3/16" (30 mm) min.<br />
hole required.<br />
Note: If installing the<br />
faucet on a three (3)<br />
hole sink, a Trim Plate<br />
should be installed at<br />
this time.<br />
FAUCET<br />
O-RING<br />
GASKET<br />
FAUCET RETAINER<br />
NUT<br />
FLEX HOSE<br />
O-RING —<br />
DO NOT REMOVE<br />
GASKET<br />
FAUCET RETAINER<br />
NUT<br />
O-RING<br />
Step 3<br />
FAUCET<br />
CENTER HOLE IN<br />
DECK OR LAVATORY<br />
Slide Gasket over Flex<br />
Hose(s).<br />
Secure Faucet to deck<br />
or lavatory with Faucet<br />
Retainer and Nut.<br />
MODELS POWERED BY<br />
PLUG-IN<br />
TRANSFORMER ONLY<br />
DO NOT pull or crimp<br />
AC Power Line.<br />
3<br />
Step 4<br />
IMPORTANT:<br />
Flush dirt, debris, and<br />
sediment from Supply<br />
Line(s) before<br />
Connecting Flex Hoses.<br />
Install Strainer and Flex<br />
Hose onto Supply Stop.<br />
Tighten the Flex Hose<br />
(with Strainer in place)<br />
securely to the Supply.<br />
Step 5<br />
Open Supply Stops.<br />
Step 6<br />
Remove sticker<br />
from sensor.<br />
For EAF 100<br />
Models, Plug<br />
Transformer<br />
into receptacle.<br />
Step 7<br />
Press button one (1)<br />
time.<br />
Step away from faucet.<br />
Faucet is ready to use.<br />
If faucet does not<br />
function, refer to the<br />
Troubleshooting section<br />
of this instruction<br />
manual.<br />
SUPPLY LINE/STOP<br />
Transformer must be within 24” of faucet.<br />
FLEX HOSE<br />
STRAINER<br />
IC MODELS<br />
STANDARD MODELS
Step 8<br />
Activate Faucet and<br />
check for leaks.<br />
If range is<br />
unsatisfactory, refer<br />
to the section<br />
entitled “Range<br />
Adjustment” on this<br />
page.<br />
Step 9<br />
SET TEMPERATURE<br />
ISM Models Only<br />
Adjust Lever<br />
TO FIX TEMPERATURE<br />
Set to desired position<br />
Remove Handle<br />
Use cap to plug hole<br />
CARE AND CLEANING OF CHROME AND<br />
SPECIAL FINISHES<br />
DO NOT use abrasive or chemical<br />
cleaners (including chlorine bleach)<br />
to clean faucets that may dull the<br />
luster and attack the chrome or<br />
special decorative finishes. Use<br />
ONLY soap and water, then wipe dry<br />
with clean cloth or towel.<br />
While cleaning the bathroom tile,<br />
protect the faucet from any<br />
splattering of cleaner. Acids and<br />
cleaning fluids will discolor or<br />
remove chrome plating.<br />
4<br />
OPERATION<br />
As the user’s hands enter the<br />
beam’s effective range, the<br />
beam is reflected back into the<br />
sensor receiver and activates<br />
the solenoid valve allowing<br />
water to flow from the faucet.<br />
Water will flow until the hands<br />
are removed or until the faucet<br />
reaches its automatic time out<br />
limit setting.<br />
RANGE ADJUSTMENT<br />
If sensor range is unsatisfactory, refer to the following<br />
procedure:<br />
Press button 1 time for<br />
12 seconds. (Faucet will<br />
blink 2 times after 6<br />
seconds and again after<br />
12 seconds.)<br />
Step away from faucet.<br />
Faucet automatically<br />
sets its range. (Water<br />
turns on and off several<br />
times.)<br />
If this does not occur,<br />
refer to the<br />
Troubleshooting section<br />
of this instruction<br />
manual.<br />
If sensor range is still unsatisfactory, continue with the<br />
following procedure:<br />
Press button 1 time for<br />
12 seconds. (Faucet<br />
will blink 2 times after<br />
6 seconds and again<br />
after 12 seconds.)<br />
When faucet begins<br />
cycling on and off,<br />
place a white towel or white piece<br />
of paper at the desired range location. Keep the towel or<br />
paper in the same location until the faucet stops cycling.
-Click FEATURE<br />
The -Click feature is a button on the underside of the<br />
faucet spout that allows the user to place the faucet into the<br />
following function modes: Continuous Run, Temporary Off,<br />
Permanent Off and Auto Set Range Adjustment.<br />
These functions are only applicable to faucets ordered with<br />
the -Click (IC) variation (with the exception of the Auto<br />
Set Range Adjustment). Pressing the button on a standard<br />
faucet will not activate these functions.<br />
-Click SETTINGS<br />
Function<br />
Press Button<br />
2 minute Continuous Run 1 time for 2 seconds<br />
reset: 1 time or will reset<br />
automatically after 2 minutes<br />
Temporary Off<br />
2 times (double click)<br />
reset: 1 time or will reset<br />
automatically after 3 minutes<br />
Permanent Off 2 times (double click) and then<br />
1 time for 5 seconds<br />
reset:<br />
1 time<br />
Auto Set Range Adjustment 1 time for 12 seconds<br />
LED Signal<br />
5 short flashes<br />
periodic flashing<br />
periodic flashing and then 2<br />
long flashes<br />
5 short flashes<br />
2 flashes after 6 and 12<br />
seconds<br />
Continuous Run<br />
Water flows max. 2 minutes constantly — for easy filling of sink, pail,<br />
etc.<br />
Temporary OFF<br />
Water flow is deactivated up to 3 minutes — for convenient cleaning of<br />
sink and faucet.<br />
Permanent OFF<br />
The faucet is totally deactivated for safety and energy saving reasons<br />
during long absence.<br />
Auto Set Range Adjustment<br />
All faucets feature the Auto set function.<br />
The detection area is automatically adapted to the sink where the faucet<br />
is installed. Thus reflection is prevented and a maximum of user<br />
convenience provided.<br />
5<br />
EAF-5 REMOTE CONTROL<br />
The EAF-5 Remote Control may be used<br />
with all EAF faucet models. The Remote<br />
Control may be used to adjust or reset:<br />
• Sensor Range<br />
• Time Out Delay<br />
• Continuous Run/Temporary Off<br />
• Auto Set Range Adjustment<br />
Adjustment Instructions<br />
1. Sensor Range<br />
Aim Remote at faucet sensor<br />
Press ON twice. LED next to Auto Set should be on<br />
Press to increase range<br />
Press to decrease range<br />
LED in faucet sensor will flash<br />
Each time the or is pressed, the range changes incrementally<br />
2. Time of Water Flow (after hands are removed)<br />
Can be set between 0 and 3 seconds<br />
Aim Remote at faucet sensor<br />
Press ON three times. LED next to Reset should be on<br />
Press to increase range<br />
Press to decrease range<br />
3. Reset (to factory set functions)<br />
Aim Remote at faucet sensor<br />
Press ON three times. LED next to Reset should be on<br />
Press one time<br />
LED in faucet sensor will flash for 60 seconds<br />
4. Continuous On<br />
Aim Remote at faucet sensor<br />
Press ON one time. Top LED should be on.<br />
Press . Faucet will run for 2 minutes<br />
5. Temporary OFF<br />
Aim Remote at faucet sensor<br />
Press ON one time. Top LED should be on.<br />
Press . Faucet will remain off for 3 minutes<br />
6. Auto Set Range Adjustment<br />
Aim Remote at faucet sensor<br />
Press ON twice. LED next to Auto Set should be on<br />
Press one time<br />
LED in faucet sensor will flash for up to 2 minutes while the faucet automatically sets the range
BATTERY REPLACEMENT<br />
Replace the battery when the red LED indicator flashes<br />
each time the faucet is in use or when the faucet stops<br />
functioning.<br />
Step 1<br />
Close Supply Stop(s).<br />
Step 2<br />
Loosen Screw with hex<br />
wrench.<br />
Remove Throat Plate.<br />
Disconnect electrical<br />
lead at connector if<br />
required.<br />
Step 3<br />
Remove Battery Cover<br />
using a No. 1 Phillip’s<br />
head screwdriver.<br />
Remove old Battery.<br />
Dispose of properly.<br />
Replace with 6 Volt Type<br />
2CR5 Lithium Battery.<br />
Step 4<br />
Wait three (3) minutes before<br />
inserting new battery.<br />
Step 5<br />
Insert a new battery. The red<br />
LED will flash for one (1)<br />
minute.<br />
Reinstall Battery Cover.<br />
Reconnect electrical lead at<br />
connector if previously<br />
disconnected. Reinstall<br />
Throat Plate.<br />
If LED doesn't flash or if it just<br />
lights up, remove the battery<br />
and reinsert it after a few<br />
minutes.<br />
If water flows continuously after inserting the new battery,<br />
adjust the faucet’s RANGE as instructed on Page 4.<br />
Step 6<br />
Open Supply Stops.<br />
3 min<br />
6<br />
TROUBLESHOOTING GUIDE<br />
1. Problem: Faucet does not function.<br />
Cause: Adhesive packaging label affixed over sensor eye<br />
Solution: Remove adhesive label from sensor eye<br />
Cause: "Permanent Off" activated<br />
Solution: Press button on faucet throat one time<br />
2. Problem: Faucet delivers water in an uncontrolled manner.<br />
Cause: Sensor is picking up reflections from fixture or other object.<br />
Solution: Start "Auto set" (refer to Range Adjustment on Page 4)<br />
3. Problem: Faucet does not deliver any water when Sensor is activated.<br />
Indicator: Solenoid valve produces an audible “CLICK.”<br />
Cause: Water supply stop(s) closed<br />
Solution: Open water supply stop(s)<br />
Cause: Water supply stop strainer(s) clogged<br />
Solution: Clean water supply stop strainer(s)<br />
Indicator: Solenoid valve DOES NOT produce an audible “CLICK.”<br />
Cause: Battery low (EAF-150 Models)<br />
Solution: Replace battery (refer to Battery Replacement on this page)<br />
Cause: Power failure (EAF-100 Models)<br />
Solution: Check power supply<br />
4. Problem: Faucet delivers only a slow flow or dribble when Sensor is<br />
activated.<br />
Cause: Water supply stop(s) are partially closed<br />
Solution: Completely open water supply stop(s)<br />
Cause: Water supply stop strainer(s) clogged<br />
Solution: Remove, clean, and reinstall water supply stop strainer(s).<br />
Replace strainer(s) if required.<br />
Cause: Aerator is clogged<br />
Solution: Remove, clean, and reinstall Aerator. Replace Aerator if<br />
required.<br />
Cause: <strong>Valve</strong> is defective.<br />
Solution: Contact the <strong>Sloan</strong> <strong>Valve</strong> <strong>Company</strong> Installation Engineering<br />
Department at 1-888-SLOAN-14 (1-888-756-2614).<br />
5. Problem: Faucet does not stop delivering water or continues to drip<br />
after user is no longer detected.<br />
Cause: <strong>Valve</strong> is defective.<br />
Solution: Contact the <strong>Sloan</strong> <strong>Valve</strong> <strong>Company</strong> Installation Engineering<br />
Department at 1-888-SLOAN-14 (1-888-756-2614).<br />
6. Problem: LED indicator blinks when faucet is in use.<br />
Cause: Battery low<br />
Solution: Replace battery (refer to Battery Replacement on this page)<br />
7. Problem: - Click doesn't function (-IC models only)<br />
Cause: Button is defective<br />
Solution: Contact the <strong>Sloan</strong> <strong>Valve</strong> <strong>Company</strong> Installation Engineering<br />
Department at 1-888-SLOAN-14 (1-888-756-2614).<br />
8. Problem: The water temperature is too hot or too cold on a faucet<br />
connected to hot and cold supply lines.<br />
CAUSE: Supply Stops are not adjusted properly.<br />
SOLUTION: Adjust Supply Stops.<br />
CAUSE: For models with integral mixing valve — Mixing valve is set<br />
improperly for the water temperature desired.<br />
SOLUTION: Rotate mixing valve handle clockwise to decrease water<br />
temperature or counterclockwise to increase water<br />
temperature.<br />
If further assistance is required, please contact the <strong>Sloan</strong> <strong>Valve</strong><br />
<strong>Company</strong> Installation Engineering Department at 1-888-SLOAN-14<br />
(1-888-756-2614).