LEYBOLD DIDACTIC GMBH Gebrauchsanweisung 389 521 ...
LEYBOLD DIDACTIC GMBH Gebrauchsanweisung 389 521 ...
LEYBOLD DIDACTIC GMBH Gebrauchsanweisung 389 521 ...

You also want an ePaper? Increase the reach of your titles
YUMPU automatically turns print PDFs into web optimized ePapers that Google loves.
3 Bedienung<br />
Zusätzlich erforderliche Geräte:<br />
Zur Temperaturmessung:<br />
Thermometer, Bereich 0 °C....50 °C, z.B.<br />
2 Temperaturfühler (666 193) mit digitalem Temperaturmeßgerät<br />
mit 4 Eingängen (666 210) , s. Fig. 3.1 oder<br />
2 Glasthermometer -10 °C....+50 °C (382 35)<br />
Zur qualitativen Temperaturanzeige: Satz Flüssigkristallfolien<br />
(382 93)<br />
Zur Messung der Kompressorleistung oder der aufgewandten<br />
elektrischen Arbeit:<br />
Entweder<br />
1 Wechselstromzähler (560 331)<br />
oder (s. Fig. 3.1)<br />
1 Leistungs- und Energiemesser (531 83) mit Meßanschlußkasten<br />
(502 05) und Sicherheitsexperimentierkabeln (500 610 ff)<br />
oder<br />
1 Spannungs- und 1 Strommesser (z.B. 2 x 531 911) mit<br />
Meßanschlußkasten (502 05) und Sicherheits-Experimentierkabeln<br />
(500 610 ff)<br />
1 Stoppuhr (z.B. 313 05)<br />
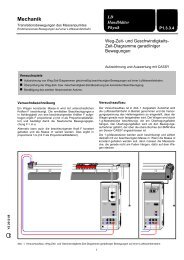
3.1 Versuchsaufbau<br />
Erforderliche Schlauchverbindungen zwischen Wasserbehälter<br />
und externem Wasserkreislauf herstellen, sonst jeweils obere<br />
und untere Schlaucholive jedes Behälters durch Schlauchstücke<br />
miteinander verbinden.<br />
Behälter bis zur 4-l-Markierung mit Wasser füllen, Stellflächen<br />
� und � ausschwenken, Wasserbehälter in Versuchsposition<br />
bringen und auf den wieder zurückgeschwenkten Stellflächen<br />
abstellen.<br />
Thermometerhalter an den Kupferrohren oberhalb des Verflüssigers<br />
� und des Verdampfers � festklemmen und Temperaturfühler<br />
in die Kunststoffröhrchen der Thermometerhalter einsetzen.<br />
Bei Benutzung eines Glasthermometers dieses anstelle<br />
des Kunststoffröhrchens in die Klammer vorsichtig(!) einschieben,<br />
nachdem die Klammer an das Kupferrohr angeklemmt<br />
wurde.<br />
W<br />
Ws<br />
10V<br />
30V<br />
1A 10² s<br />
3V<br />
100V 0,3A 3A 10s<br />
10³ s<br />
W<br />
1V<br />
300V 0,1A 10A 1s<br />
10 4 s<br />
Ws τ<br />
z<br />
Run<br />
10.00^=10V<br />
Stop<br />
U I<br />
Reset Output<br />
53183<br />
50205<br />
4 5<br />
3 6<br />
2<br />
7<br />
1<br />
8<br />
0<br />
9<br />
-1 10<br />
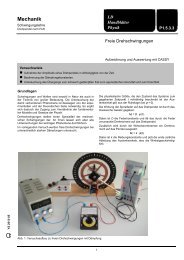
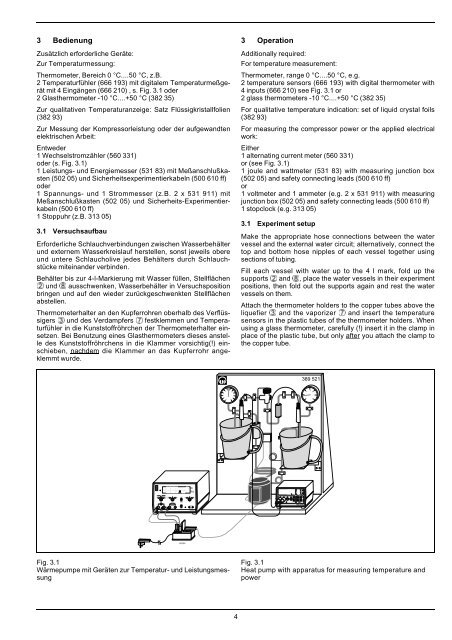
Fig. 3.1<br />
Wärmepumpe mit Geräten zur Temperatur- und Leistungsmessung<br />
4<br />
3 Operation<br />
Additionally required:<br />
For temperature measurement:<br />
Thermometer, range 0 °C....50 °C, e.g.<br />
2 temperature sensors (666 193) with digital thermometer with<br />
4 inputs (666 210) see Fig. 3.1 or<br />
2 glass thermometers -10 °C....+50 °C (382 35)<br />
For qualitative temperature indication: set of liquid crystal foils<br />
(382 93)<br />
For measuring the compressor power or the applied electrical<br />
work:<br />
Either<br />
1 alternating current meter (560 331)<br />
or (see Fig. 3.1)<br />
1 joule and wattmeter (531 83) with measuring junction box<br />
(502 05) and safety connecting leads (500 610 ff)<br />
or<br />
1 voltmeter and 1 ammeter (e.g. 2 x 531 911) with measuring<br />
junction box (502 05) and safety connecting leads (500 610 ff)<br />
1 stopclock (e.g. 313 05)<br />
3.1 Experiment setup<br />
Make the appropriate hose connections between the water<br />
vessel and the external water circuit; alternatively, connect the<br />
top and bottom hose nipples of each vessel together using<br />
sections of tubing.<br />
Fill each vessel with water up to the 4 l mark, fold up the<br />
supports � and �, place the water vessels in their experiment<br />
positions, then fold out the supports again and rest the water<br />
vessels on them.<br />
Attach the thermometer holders to the copper tubes above the<br />
liquefier � and the vaporizer � and insert the temperature<br />
sensors in the plastic tubes of the thermometer holders. When<br />
using a glass thermometer, carefully (!) insert it in the clamp in<br />
place of the plastic tube, but only after you attach the clamp to<br />
the copper tube.<br />
MIN MAX<br />
+<br />
U<br />
a<br />
-<br />
MAN<br />
COM<br />
T1-T2 MIN/MAX<br />
5s<br />
10s<br />
T1 2 T3 T4<br />
30s<br />
Ni Cr-Ni (-200...+1200°C) NTC (-20...+120°C) T1...T4 °C/°F/ K AUTOM.<br />
<strong>389</strong> <strong>521</strong><br />
15<br />
10 20<br />
5<br />
25<br />
0 30<br />
Fig. 3.1<br />
Heat pump with apparatus for measuring temperature and<br />
power
![[667 359] Labor-Refraktometer - LD DIDACTIC](https://img.yumpu.com/24788329/1/184x260/667-359-labor-refraktometer-ld-didactic.jpg?quality=85)