ABO-CENTER v/Henriksens ELEKTRONIK
ABO-CENTER v/Henriksens ELEKTRONIK
ABO-CENTER v/Henriksens ELEKTRONIK

You also want an ePaper? Increase the reach of your titles
YUMPU automatically turns print PDFs into web optimized ePapers that Google loves.
5<br />
Get started<br />
Once you have connected and installed BeoSound 2 to your computer,<br />
you can begin using it. To find out how BeoSound 2 works with your<br />
computer and music player, simply proceed to the section on the<br />
following pages, describing the setup you have. Available options are<br />
listed below.<br />
BeoPlayer or BeoLink PC 2 (PC use only)<br />
We recommend using BeoSound 2 with Bang & Olufsen’s own music players:<br />
BeoPlayer or BeoLink PC 2. This Guide describes the basic use on the<br />
following pages. To learn more about advanced use of BeoSound 2 with<br />
BeoPlayer or BeoLink PC 2, refer to the On-screen Guide located at the<br />
bottom of the on-screen control bar in both of these players. Find out for<br />
example how to:<br />
– Move or rename tracks and playlists in BeoSound 2.<br />
– View and edit track INFO.<br />
– Find out more about CDDB music information.<br />
– Alter Configuration settings for a personalised touch.<br />
– Format a memory card.<br />
All future reference to BeoPlayer includes BeoLink PC 2 use, as these two<br />
players work similarly regarding Beosound 2.<br />
iTunes (Macintosh use only)<br />
To learn more about using iTunes, refer to ‘BeoSound 2 with iTunes’ in this<br />
Guide. For further information on iTunes, refer to the iTunes help function.<br />
Other players<br />
It is possible to use other players than the above mentioned with BeoSound 2.<br />
Examples can be found in ‘other players and options’ on the last page of this<br />
Guide.<br />
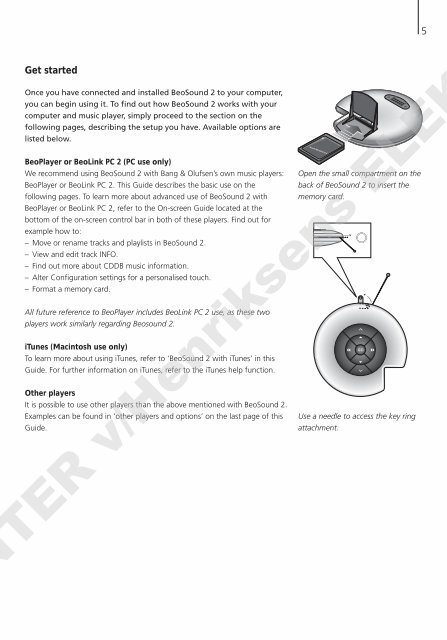
Open the small compartment on the<br />
back of BeoSound 2 to insert the<br />
memory card.<br />
Use a needle to access the key ring<br />
attachment.<br />
TER v/<strong>Henriksens</strong> ELE<br />
GO