DIGIPRO F2 - GOSSEN Foto
DIGIPRO F2 - GOSSEN Foto
DIGIPRO F2 - GOSSEN Foto

Sie wollen auch ein ePaper? Erhöhen Sie die Reichweite Ihrer Titel.
YUMPU macht aus Druck-PDFs automatisch weboptimierte ePaper, die Google liebt.
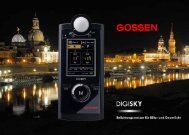
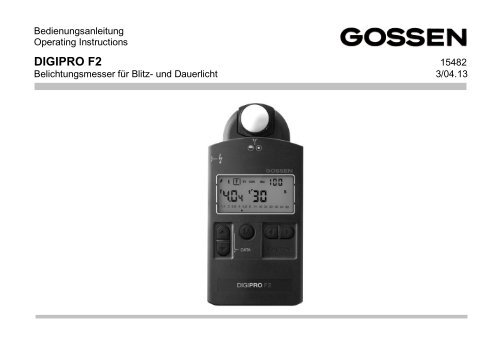
Bedienungsanleitung<br />
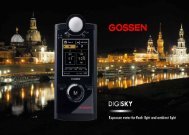
Operating Instructions<br />
<strong>DIGIPRO</strong> <strong>F2</strong> 15482<br />
Belichtungsmesser für Blitz- und Dauerlicht 3/04.13
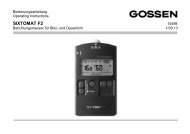
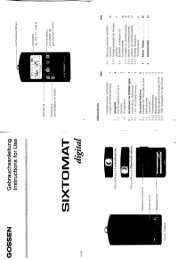
Schwenkkopf<br />
Anschlussbuchse<br />
für Blitz-<br />
Synchronkabel<br />
Messtaste<br />
Display<br />
Wertetasten<br />
Funktionstasten<br />
Batteriefach mit -deckel<br />
2 <strong>GOSSEN</strong> <strong>Foto</strong>- und Lichtmesstechnik GmbH
Inhalt<br />
Seite<br />
Inhalt<br />
Seite<br />
1 Anzeigefeld ........................................... 9<br />
1.1 Das Anzeigefeld und seine Elemente ..... 9<br />
1.2 Anzeigedauer ....................................... 10<br />
2 So funktioniert der <strong>DIGIPRO</strong> <strong>F2</strong> ......... 10<br />
2.1 Vorbereitung ......................................... 10<br />
2.2 Licht- und Objektmessung .................... 11<br />
3 Die einzelnen Funktionen .................. 13<br />
3.1.1 Einstellen der Filmempfindlichkeit ......... 13<br />
3.1.2 Vorwahl der Blenden- und Zeitenreihe .. 13<br />
3.2 Messfunktionen – Dauerlichtmessung .. 14<br />
3.2.1 Blitzlichtmessung .................................. 15<br />
3.2.2 Mehrfachblitzen .................................... 15<br />
3.2.3 Zeitvorwahl - Dauerlichtmessung .......... 16<br />
3.2.4 Kontrastmessung ................................. 16<br />
3.2.5 Blendenvorwahl .................................... 17<br />
3.2.6 Belichtungswert (Lichtwert) LW/EV ....... 17<br />
3.2.7 CINE (Gangzahlen für das Filmen) ....... 18<br />
3.3 Messung außerhalb des Messbereiches..............................................<br />
19<br />
3.3.1 Anzeige außerhalb des Anzeigebereiches..............................................<br />
19<br />
3.4 Einstellen und Messen von Korrekturwerten<br />
.................................................. 20<br />
3.4.1 Einstellen von Korrekturwerten ............. 20<br />
3.4.2 Messen von Korrekturwerten ................ 20<br />
3.4.3 Löschen von Korrekturwerten ............... 21<br />
3.4.4 Wichtige Hinweise zu „Korrekturwerten“22<br />
4 Service-Hinweis .................................. 23<br />
5 Technische Daten ............................... 24<br />
Kurzbedienungsanleitung .................. 25<br />
Konformitätserklärung ....................... 27<br />
<strong>GOSSEN</strong> <strong>Foto</strong>- und Lichtmesstechnik GmbH 3
Ihr <strong>DIGIPRO</strong> <strong>F2</strong> ist ein digital anzeigender Belichtungsmesser von <strong>GOSSEN</strong> für Dauerlicht- und<br />
Blitzlichtmessungen mit großem Messumfang und hoher Genauigkeit.<br />
Lichttechnisches Wissen auf der Basis jahrzehntelanger Erfahrung im Belichtungsmesserbau<br />
wird durch die Mikroprozessortechnik dem Anwender auf einfache Weise nutzbar gemacht.<br />
Aufgrund seiner präzisen Kalibrierung misst der <strong>DIGIPRO</strong> <strong>F2</strong> sehr genau. Seine Handhabung<br />
ist bequem und einfach.<br />
Folgende Schlagworte charakterisieren den <strong>DIGIPRO</strong> <strong>F2</strong>:<br />
Schwenkkopf für Licht- und Objektmessung<br />
Blitzlichtmessung (Cord/Noncord), Anzeige des Umgebungslichtanteils<br />
Messwertauflösung in 1/1-, 1/2- und 1/3-EV-Stufen<br />
Digitale LCD-Anzeige in Zehntelstufen<br />
Analoge Kontrastanzeige in halben Blendenwerten<br />
Einstellwerte- und Messwertspeicherung<br />
Programmierbare Belichtungskorrektur<br />
Abrufen aller für einen Messwert möglichen Wertepaare<br />
Blenden- oder Zeitvorwahl möglich<br />
Alle Filmgangzahlen, einschließlich 25 und 30 für Video<br />
Klassische Tasten erlauben Einhandbedienung<br />
Betrieb mittels einer handelsüblichen und preiswerten Mignonbatterie (AA)<br />
Automatische Batteriekontrolle und Abschaltung<br />
Geeignet für analoge und digitale <strong>Foto</strong>grafie<br />
4 <strong>GOSSEN</strong> <strong>Foto</strong>- und Lichtmesstechnik GmbH
Sicher ist sicher<br />
Vor einmaligen Situationen, wie sie typischerweise bei Festen, Reportagen oder auf Reisen vorkommen, sollten Sie<br />
sich rechtzeitig mit Probeaufnahmen von der einwandfreien Funktion des Belichtungsmessers überzeugen.<br />
<strong>GOSSEN</strong> übernimmt keine Haftung für Kosten oder entgangene Profite, die durch eine Fehlfunktion des<br />
Belichtungsmessers entstehen.<br />
Urheberrechte<br />
<strong>GOSSEN</strong> ist eine Marke der <strong>GOSSEN</strong> <strong>Foto</strong>- und Lichtmesstechnik GmbH<br />
Sicherheitshinweise<br />
Bitte lesen Sie diese Sicherheitshinweise aufmerksam durch, bevor Sie den Belichtungsmesser verwenden.<br />
Sie vermeiden Schäden am Produkt und beugen möglichen Verletzungen vor.<br />
Dieses Symbol kennzeichnet wichtige Warnhinweise, die Sie unbedingt vor Inbetriebnahme Ihres<br />
<strong>GOSSEN</strong> Produktes lesen sollten<br />
<strong>GOSSEN</strong> <strong>Foto</strong>- und Lichtmesstechnik GmbH 5
Warnhinweise<br />
Schalten Sie den Belichtungsmesser bei einer Fehlfunktion sofort aus<br />
Bei Rauch- oder ungewöhnlicher Geruchsentwicklung, für die das Messgerät die Ursache ist, sollten Sie<br />
die Batterie aus dem Messgerät entnehmen, um einem möglichen Brand vorzubeugen. Der weitere<br />
Betrieb des Messgerätes kann bei den genannten Störungen zu ernsthaften Verletzungen führen. Bitte<br />
wenden Sie sich, zur Beseitigung der Störung an Ihren Fachhändler oder an den <strong>GOSSEN</strong> Service. Wenn<br />
Sie das Messgerät zur Reparatur geben oder einsenden, sollten Sie sich vorher vergewissern, dass die<br />
Batterie aus dem Messgerät entnommen wurde.<br />
Benutzen Sie das Messgerät nicht in der Nähe von brennbaren Gasen<br />
Sie sollten niemals in der Nähe von brennbaren Gasen ein elektronisches Gerät in Betrieb nehmen.<br />
Es besteht Explosions- und Brandgefahr.<br />
Hängen Sie den Trageriemen niemals Kindern um<br />
Wird der Trageriemen um den Hals eines Kindes gelegt besteht die Gefahr einer Strangulierung.<br />
Bewahren Sie das Messgerät an einem Ort auf, an dem das Erreichen durch kleine Kinder nicht<br />
möglich ist<br />
Messgerät und Zubehör enthalten verschluckbare Teile, Achten Sie darauf, dass diese Teile (z.B.<br />
Gehäuseabdeckungen, Batterien usw.) nicht in die Hände von Kindern gelangen und verschluckt<br />
werden. Die Gefahr von Ersticken besteht.<br />
Nehmen Sie das Messgerät nicht auseinander<br />
Berühren Sie niemals Teile im Gehäuseinneren. Sie könnten sich verletzen. Nehmen Sie Reparaturen<br />
nicht selbst vor. Reparaturen dürfen nur von Fachkundigen durchgeführt werden. Falls das Gehäuse des<br />
Messgeräts einmal durch einen Sturz oder andere äußere Einwirkungen beschädigt sein sollte entfernen<br />
Sie die Batterie und wenden sich zur Reparatur an Ihren Fachhändler oder an den <strong>GOSSEN</strong> Service.<br />
Vermeiden Sie jeden Kontakt mit den Flüssigkristallen<br />
Bei einer Beschädigung des Displays (z.B. Bruch) besteht die Gefahr, dass Sie sich an den Glasscherben<br />
verletzen oder Flüssigkristalle austreten. Achten Sie darauf, dass Haut, Augen und Mund nicht mit den<br />
Flüssigkristallen in Berührung kommen.<br />
6 <strong>GOSSEN</strong> <strong>Foto</strong>- und Lichtmesstechnik GmbH
Vorsicht im Umgang mit Batterien<br />
Batterien können bei unsachgemäßer Handhabung auslaufen oder explodieren. Bitte beachten Sie die<br />
folgenden Warnhinweise:<br />
Vergewissern Sie sich, dass das Messgerät ausgeschaltet ist, bevor Sie die Batterie aus dem Messgerät<br />
entnehmen bzw. einsetzen.<br />
Verwenden Sie nur Batterien, die für dieses Messgerät empfohlen werden.<br />
Achten Sie darauf, die Batterie richtig einzusetzen.<br />
Schließen Sie Batterien nie kurz und versuchen Sie niemals, eine Batterie zu öffnen.<br />
Setzen Sie Batterien keiner großen Hitze oder offenem Feuer aus.<br />
Setzen Sie Batterien keiner Feuchtigkeit aus und tauchen Sie Batterien niemals in Wasser ein.<br />
Verschließen Sie nach Entnahme der Batterie das Batteriefach mit der Fachabdeckung (z.B. bei längerer<br />
Nichtnutzung des Messgeräts).<br />
Bewahren Sie Batterie niemals mit metallischen Gegenständen auf, die einen Kurzschluss verursachen könnten.<br />
Auslaufgefahr besteht insbesondere bei leeren Batterien. Um Beschädigungen am Messgerät zu vermeiden,<br />
sollten Sie Batterien bei längerem Nichtgebrauch oder bei völliger Entladung aus dem Messgerät nehmen.<br />
Wenn die Batterie nicht benutzt wird, sollten Sie diesen an einem kühlen Ort lagern.<br />
Batterien erwärmen sich im Betrieb und können heiß werden. Achten Sie bei der Entnahme der Batterie darauf,<br />
dass Sie sich nicht verbrennen. Schalten Sie das Messgerät aus, oder warten Sie, bis das Messgerät sich<br />
ausgeschaltet hat und warten Sie weiterhin einen Moment, bis sich die Batterie abgekühlt hat.<br />
Verwenden Sie keine Batterien, die durch Verfärbung oder Verformung des Gehäuses auf eine Beschädigung<br />
hinweisen.<br />
<strong>GOSSEN</strong> <strong>Foto</strong>- und Lichtmesstechnik GmbH 7
Hinweise<br />
Die Reproduktion der Dokumentationen, auch das auszugsweise Vervielfältigen, bedarf der ausdrücklichen<br />
Genehmigung durch <strong>GOSSEN</strong> <strong>Foto</strong>- und Lichtmesstechnik GmbH. Dies gilt auch für die elektronische Erfassung<br />
und die Übersetzung in eine andere Sprache.<br />
Änderungen jeglicher Art bleiben der Firma <strong>GOSSEN</strong> ohne Vorankündigung vorbehalten.<br />
<strong>GOSSEN</strong> übernimmt keine Haftung für Schäden, die durch unsachgemäßen Gebrauch des Produkts entstehen.<br />
Die Dokumentationen zu Ihrem <strong>GOSSEN</strong> Messgerät wurden mit größter Sorgfalt erstellt. Sollten Sie jedoch Fehler<br />
in den Dokumentationen entdecken oder Verbesserungsvorschläge machen können, ist <strong>GOSSEN</strong> für einen<br />
entsprechenden Hinweis sehr dankbar.<br />
Symbol für getrennte Wertstoff-/Schadstoffsammlung in europäischen Ländern<br />
Dieses Symbol zeigt an, dass dieses Produkt separat entsorgt werden muss.<br />
Folgendes müssen Verbraucher in europäischen Ländern beachten:<br />
Dieses Produkt darf nur separat an einer geeigneten Sammelstelle entsorgt werden. Eine Entsorgung im<br />
Hausmüll ist unzulässig. Wenden Sie sich für weitere Informationen an Ihren Fachhändler oder an die örtlich<br />
für Abfallentsorgung zuständigen Behörden.<br />
8 <strong>GOSSEN</strong> <strong>Foto</strong>- und Lichtmesstechnik GmbH
1 Anzeigefeld<br />
1.1 Das Anzeigefeld und seine Elemente<br />
1 Funktionen<br />
Blitzlichtmessung<br />
Dauerlichtmessung bei Zeitvorwahl<br />
Dauerlichtmessung bei Blendenvorwahl<br />
Dauerlichtmessung bei Belichtungswertanzeige<br />
(LW/EV)<br />
Korrekturwerteingabe<br />
Filmempfindlichkeitseinstellung<br />
2 digitale Anzeige Filmempfindlichkeit DIN/ISO<br />
3 Anzeigekennung f Blende<br />
4 Anzeigekennung EV Lichtwert (LW)<br />
5 Analoge Blendenskala<br />
6 Linke Digitalanzeige<br />
Blende f<br />
Lichtwert EV<br />
Korrekturwertstufen<br />
Mehrfachblitzen<br />
Filmempfindlichkeit in DIN<br />
7 Anzeigekennung t Belichtungszeit<br />
8 Warnmarke BAT Batteriekontrolle<br />
9 Anzeigekennung „´“ Sekundenbruchteile<br />
10 Rechte Digitalanzeige<br />
Belichtungszeit t<br />
Verlängerungsfaktor<br />
CINE (Filmgangzahlen; Symbol )<br />
Filmempfindlichkeit in ISO<br />
11 Einheitenzeichen m = Minuten<br />
12 Einheitenzeichen s = Sekunden<br />
<strong>GOSSEN</strong> <strong>Foto</strong>- und Lichtmesstechnik GmbH 9
1.2 Anzeigedauer<br />
Falls für ca. 2 Minuten keine Bedientaste des <strong>DIGIPRO</strong> <strong>F2</strong> gedrückt wird, schaltet das Anzeigefeld<br />
automatisch ab, d.h. keinerlei Anzeige, jedoch bleiben Mess- und individuelle Einstellwerte gespeichert.<br />
Abrufen der gespeicherten Werte durch Druck auf Funktions- oder Wertetasten<br />
Sofortige neue Messung durch Druck auf die Messtaste.<br />
Die Werte des letzten Messvorganges sind so lange gespeichert, bis eine neue Messung durchgeführt<br />
wird. Der <strong>DIGIPRO</strong> <strong>F2</strong> hat getrennte Speicher für Dauer- und Blitzlichtmessung.<br />
2 So funktioniert der <strong>DIGIPRO</strong> <strong>F2</strong><br />
2.1 Vorbereitung<br />
Batterie<br />
Der <strong>DIGIPRO</strong> <strong>F2</strong> arbeitet mit einer 1,5 V Mignon-Batterie (Alkali-Mangan-Zelle). Aufgrund des<br />
geringen Strombedarfes hält die Batterie über einen längeren Zeitraum. Ist die Kapazität der Batterie<br />
erschöpft, wird der Benutzer durch die Anzeige BAT gewarnt. Die Batterie ist nun möglichst bald zu<br />
wechseln. Erscheint auf dem Anzeigefeld nur BAT, ist keine Messung mehr möglich. Batterie sofort<br />
wechseln.<br />
Zum Batteriewechsel Batteriefach des <strong>DIGIPRO</strong> <strong>F2</strong> öffnen. Die alte Batterie herausnehmen und die<br />
neue ins Batteriefach einlegen. Auf Polung „+“ und „–“ achten! Batteriedeckel einschnappen. Ein<br />
Batteriewechsel führt zur Löschung aller individuell gespeicherten Werte.<br />
VORSICHT: Explosionsgefahr bei unsachgemäßem Austausch der Batterie. Entsorgung gebrauchter<br />
Batterien nach Anleitung.<br />
10 <strong>GOSSEN</strong> <strong>Foto</strong>- und Lichtmesstechnik GmbH
Selbsttest<br />
Nach dem Einlegen der Batterie führt der Mikrocomputer einen<br />
Selbsttest durch. Es erscheint dabei jedes mögliche Anzeigesegment<br />
des Anzeigefeldes. Der Selbsttest dauert ca. 10 s, kann<br />
aber vorher durch beliebigen Tastendruck abgebrochen werden.<br />
Nach dem Selbsttest stellen sich immer die ab Werk vorprogrammierten<br />
Grundwerte ein.<br />
Grundwerte<br />
ISO: 100/21° f: 5,6 LW/EV: 12 COR: 0/1,0 t: 1/125 Blitz: F 1/60<br />
Messwertauflösung: dEu 1.0<br />
2.2 Licht- und Objektmessung<br />
Ihr <strong>DIGIPRO</strong> <strong>F2</strong> wurde für den engagierten Amateur und für den<br />
professionellen Einsatz konzipiert. Der Schwenkkopf lässt sich um<br />
180° drehen. Dies ermöglicht das direkte Ablesen der Messwerte,<br />
während der Messkopf auf das Motiv oder Licht ausgerichtet ist.<br />
Aufgrund seiner abnehmbaren Diffusorkalotte kann das Gerät in<br />
der Praxis für alle Messmethoden bequem eingesetzt werden.<br />
Besonders die Messung nach der Lichtmessmethode führt zu exakt belichteten Aufnahmen. Da der<br />
<strong>DIGIPRO</strong> <strong>F2</strong> bei der Lichtmessmethode mit seinem Diffusor vom Objekt aus in Richtung Kamera das<br />
einfallende Licht misst, ist eine dem Motiv entsprechende tonwertrichtige Wiedergabe in der Aufnahme<br />
gewährleistet. Dies ist vor allem bei in sich hellen oder in sich dunklen Motiven wichtig.<br />
<strong>GOSSEN</strong> <strong>Foto</strong>- und Lichtmesstechnik GmbH 11
Auch in schwierigen Aufnahmesituationen, wie z.B. bei kontrastreichen Motiven, führt die<br />
Lichtmessmethode mit dem Diffusor wesentlich sicherer zu gut belichteten Aufnahmen professionellen<br />
Anspruchs.<br />
Auch ist die Erfassung der Belichtung nach der Lichtmessmethode exakter und sicherer als die z.B.<br />
mit Ihrer Kamera durchgeführte, objektabhängige Mittelwertbildung, weil jene stets vom Kontrastumfang<br />
des Motivs abhängt und dieser nicht immer eine gleichmäßige Verteilung von gleichwertigen<br />
helleren und dunkleren Motivflächen aufweist.<br />
Bei schwer zugänglichen Objekten führen Sie die Lichtmessung am beleuchtungsgleichen Ort durch.<br />
Suchen Sie dazu z.B. bei Aufnahmen in der Landschaft eine Stelle auf, die die gleiche Beleuchtung<br />
erhält wie das Objekt und messen Sie parallel zur gedachten Verbindungslinie Objekt – Kamera. Diese<br />
bequeme Methode der Lichtmessung am beleuchtungsgleichen Ort ist bei Außenaufnahmen sehr zu<br />
empfehlen. Sie messen einfach „mit Kehrtwendung“ von der Kamera aus und zwar entgegen der<br />
Aufnahmerichtung. Nach der Lichtmessmethode, also mit Diffusor, wird auch der Kontrastumfang der<br />
Beleuchtung ermittelt.Beide Lichtarten, sowohl Blitzlicht als auch Dauerlicht, werden nach der<br />
Lichtmessmethode mit dem Diffusor einwandfrei und präzise erfasst.<br />
Ihr <strong>DIGIPRO</strong> <strong>F2</strong> bietet parallel dazu die Messmöglichkeit nach der Objektmessmethode. In diesem<br />
Fall nehmen Sie den Diffusor ab, messen zum Objekt hin. Jetzt wird ausschließlich das vom Objekt<br />
reflektierte Licht erfasst. Nach der Objektmessmethode ist das Messergebnis immer von der<br />
Eigenhelligkeit des Motivs abhängig! Das heißt, dass z.B. in sich helle Motive dunkler - und somit nicht<br />
exakt belichtet - wiedergegeben werden.<br />
Soll und kann die Belichtungsmessung ausschließlich nach der Objektmessmethode durchgeführt<br />
werden, so ist die Verwendung einer Graukarte (18 % Remissionsvermögen) für den Profi von Vorteil.<br />
Der Motiv-(Objekt-)kontrast wird anhand der Objektmessmethode ermittelt und vom <strong>DIGIPRO</strong> <strong>F2</strong> auf<br />
seiner Analogskala angezeigt (vgl. Kap. 3.2.4 Kontrastmessung).<br />
12 <strong>GOSSEN</strong> <strong>Foto</strong>- und Lichtmesstechnik GmbH
3 Die einzelnen Funktionen<br />
3.1.1 Einstellen der Filmempfindlichkeit<br />
Mit Funktionstasten ISO anwählen.<br />
Mit Wertetasten gewünschten ISO-Wert einstellen<br />
(Anzeige links DIN-Wert, rechts ISO-Wert).<br />
Die eingestellte Empfindlichkeit wird beim Weiterschalten in jede<br />
andere Bedienfunktion in den Speicher des <strong>DIGIPRO</strong> <strong>F2</strong> übernommen<br />
und bleibt in der Digitalanzeige rechts oben sichtbar.<br />
Eine Veränderung des Filmempfindlichkeitswertes beeinflusst direkt die gespeicherten Zeit-Blenden-<br />
Kombinationen. Die gewählte Filmempfindlichkeit bleibt so lange gespeichert, bis sie auf die eben<br />
beschriebene Weise geändert wird.<br />
3.1.2 Vorwahl der Blenden- und Zeitenreihe<br />
Es ist möglich die Blendenwerte und Belichtungszeiten<br />
in 1/1-, 1/2- oder 1/3- Werten vorzuwählen. Dazu drücken<br />
Sie in der Funktion ISO (s.u.) gleichzeitig beide Funktionstasten<br />
„“, danach können Sie durch Betätigung<br />
der Wertetasten zwischen „dEu 0.3“ (1/3), „dEu 0.5“ (1/2)<br />
und „dEu 1.0“ (1/1) umschalten.<br />
<strong>GOSSEN</strong> <strong>Foto</strong>- und Lichtmesstechnik GmbH 13
3.2 Messfunktionen – Dauerlichtmessung<br />
Mit den Funktionstasten wählen Sie die gewünschte Dauerlichtfunktion vor.<br />
Zeitvorwahl, in Funktion t: die zugehörige Blende wird gemessen<br />
(vgl. Kap. 3.2.3 Zeitvorwahl – Dauerlichtmessung)<br />
Kontrastmessung in Funktion t: (vgl. Kap. 3.2.4 Kontrastmessung)<br />
Blendenvorwahl in Funktion f: die Belichtungszeit wird gemessen<br />
(vgl. Kap. 3.2.5 Blendenvorwahl)<br />
Belichtungswertmessung in Funktion EV: Belichtungszeit vorwählbar,<br />
Blende als analoger Wert (vgl. Kap. 3.2.6 Belichtungswert (Lichtwert)LW/EV)<br />
CINE (Gangzahlen für das Filmen) in Funktion t:<br />
(vgl. Kap. 3.2.7 CINE (Gangzahlen für das Filmen))<br />
14 <strong>GOSSEN</strong> <strong>Foto</strong>- und Lichtmesstechnik GmbH
3.2.1 Blitzlichtmessung<br />
Messen mit und ohne Synchronkabel ist möglich. Bei Verwendung<br />
des Synchronkabels wird der Blitz durch Drücken der Messtaste M<br />
automatisch ausgelöst und gemessen.<br />
Mit Funktionstasten anwählen<br />
<br />
<br />
<br />
Mit Wertetasten gewünschte Synchronzeit einstellen.<br />
Synchronzeiten-Bereich von 1 s bis 1/1000 s einschließlich 1/90 s)<br />
Messtaste M drücken. Der <strong>DIGIPRO</strong> <strong>F2</strong> ist für 45 s messbereit<br />
(Messbereitschaft besteht solange F im Anzeigefeld sichtbar ist).<br />
Blitz auslösen<br />
Der gemessene Blendenwert (Summe aus Blitz- und Dauerlicht)<br />
erscheint in der linken Digitalanzeige und als blinkende Marke<br />
auf der analogen Blendenskala. Zusätzlich erfolgt die Anzeige<br />
des Blendenwertes für den Dauerlichtanteil auf der Blendenskala (hier Blende 8)<br />
9<br />
3.2.2 Mehrfachblitzen<br />
Zeigt die Messung, dass mit nur einem Blitz die benötigte Blende nicht<br />
erreicht wird, so kann man mit der oberen Wertetaste die gewünschte<br />
Arbeitsblende einstellen. Die digitale Zeitanzeige verschwindet und<br />
wird durch die Information über die Anzahl der Blitze ersetzt, die<br />
auszulösen sind, um die gewünschte Blende zu erhalten<br />
(z.B.: F4 = 4 x blitzen).<br />
Der <strong>DIGIPRO</strong> <strong>F2</strong> kalkuliert bis zu maximal 10 Blitzfolgen.<br />
<strong>GOSSEN</strong> <strong>Foto</strong>- und Lichtmesstechnik GmbH 15
3.2.3 Zeitvorwahl – Dauerlichtmessung<br />
<br />
<br />
<br />
Mit Funktionstasten t anwählen (zuletzt gespeicherter Wert<br />
erscheint)<br />
Mit Wertetasten gewünschte Belichtungszeit einstellen<br />
Messen durch Drücken der Messtaste M<br />
Der gemessene Blendenwert erscheint in der linken<br />
Digitalanzeige (Auflösung 1/10 Stufen) und zusätzlich als<br />
Marke in der analogen Blendenskala gerundet. Auswahl anderer Blenden-Zeit-Wertepaare<br />
durch die Wertetasten.<br />
3.2.4 Kontrastmessung<br />
Mit Funktionstasten t anwählen<br />
<br />
Zu messende Motivteile anvisieren. Messtaste M gedrückt halten<br />
In der analogen Blendenskala ist die Balkenreihe zwischen den<br />
Extremwerten zu sehen, wobei der aktuelle Messwert blinkt. In der<br />
linken Digitalanzeige erscheint der erste gemessene Blendenwert.<br />
Dieser bleibt während der gesamten Messung als Bezugswert<br />
(z.B. einer Graukarte) stehen. Nach Loslassen der Messtaste ist der gemessene Gesamt-<br />
Kontrastumfang auf der analogen Blendenskala sichtbar. Der aktuelle Messwert blinkt nicht mehr.<br />
16 <strong>GOSSEN</strong> <strong>Foto</strong>- und Lichtmesstechnik GmbH
3.2.5 Blendenvorwahl<br />
Mit Funktionstasten f anwählen<br />
<br />
<br />
<br />
Mit Wertetasten gewünschte Blende einstellen.<br />
Beim Vorwählen von Blenden erscheinen die von der letzten<br />
Messung gespeicherten 1/10 Stufenwerte. Diese sind nicht<br />
maßgebend, da bei der nächsten Messung auch hier die<br />
neue Feinanzeige für die präzise Belichtung erfolgt.<br />
Messen durch Drücken der Messtaste M<br />
Die gemessene Belichtungszeit erscheint in der rechten Digitalanzeige – Automatische<br />
Anpassung der Blende in 1/10 Stufen an den festen Zeitwert<br />
Auswahl anderer Blenden-Zeit-Wertepaare durch die Wertetasten.<br />
3.2.6 Belichtungswert (Lichtwert) LW/EV<br />
Mit Funktionstasten EV anwählen<br />
<br />
<br />
Messen durch Drücken der Messtaste M<br />
Der gemessene Belichtungswert erscheint in der linken<br />
Digitalanzeige (Auflösung 1/10 Stufen) und der Blendenwert<br />
als Marke in der analogen Blendenskala gerundet<br />
Auswahl anderer zum Belichtungswert gehörender Blenden-Zeit-<br />
Wertepaare durch die Wertetasten.<br />
<strong>GOSSEN</strong> <strong>Foto</strong>- und Lichtmesstechnik GmbH 17
3.2.7 CINE (Gangzahlen für das Filmen)<br />
Mit Funktionstasten t anwählen<br />
<br />
<br />
Mit Wertetasten die gewünschte Gangzahl vorwählen. Dazu<br />
über 1/8000 s hinausgehen. Nach ca. 1 Sekunde erfolgt die<br />
Umschaltung in den Gangzahlen-Bereich. Im Anzeigefeld<br />
erscheint das Symbol . Die Gangzahl ist im Bereich von<br />
8 Bilder/s bis 64 Bilder/s voreinstellbar.<br />
Messen durch Drücken der Messtaste M<br />
Der gemessene Blendenwert erscheint in der linken Digitalanzeige (Auflösung 1/10 Stufen) und<br />
zusätzlich als Marke in der analogen Blendenskala gerundet<br />
Die angezeigte Blende gilt für einen 180 ° Sektor. Für andere Sektoren muss ein COR-Wert in der<br />
Funktion eingegeben werden und zwar als Verlängerungsfaktor. V = 180°/ Offenblendenwinkel<br />
18 <strong>GOSSEN</strong> <strong>Foto</strong>- und Lichtmesstechnik GmbH
3.3 Messung außerhalb des Messbereiches<br />
Außerhalb des Messbereiches des <strong>DIGIPRO</strong> <strong>F2</strong> gibt es kein<br />
brauchbares Messergebnis<br />
Ist es bei einer Messung zu dunkel oder zu hell, so erscheint<br />
auf der linken Digitalanzeige ein E (= Error = Fehler) und<br />
daneben( = zu dunkel) oder ( = zu hell).<br />
3.3.1 Anzeige außerhalb des Anzeigebereiches<br />
Wenn bei der rechten oder linken Digitalanzeige das Symbol<br />
oder erscheint, ist zwar die Messung erfolgt, aber die Anzeige<br />
außerhalb des Anzeigebereiches.<br />
Bei Wertetaste betätigen, um in den Anzeigebereich<br />
zu kommen.<br />
Bei Wertetaste betätigen, um in den Anzeigebereich<br />
zu kommen.<br />
<strong>GOSSEN</strong> <strong>Foto</strong>- und Lichtmesstechnik GmbH 19
3.4 Einstellen und Messen von Korrekturwerten<br />
(vgl. Kap. 3.4.4 Wichtige Hinweise zu „Korrekturwerten“)<br />
3.4.1 Einstellen von Korrekturwerten<br />
Mit Funktionstasten COR anwählen<br />
(der zuletzt gültige Korrekturwert erscheint im Anzeigefeld)<br />
Eingabe bzw. Änderung des Korrekturwertes mit den Wertetasten. In der rechten<br />
Digitalanzeige wird der Verlängerungsfaktor und in der linken der Korrekturwert in Stufen<br />
angezeigt. Eingabe in 1/10 Stufen (kleine Ziffer) im Bereich von ± 7,9 Belichtungswertstufen.<br />
Bei belichtungsverlängernden Korrekturwerten steht ein – vor der Zahl.<br />
Beispiel: –3,1 Stufen, entspricht Faktor 8,6.<br />
Bei belichtungsverkürzender Korrektur erscheint nur die linke Anzeige als Lichtwertdifferenz in Stufen.<br />
3.4.2 Messen von Korrekturwerten<br />
Korrekturwerte können auch direkt gemessen werden. Für die<br />
Messung ist konstantes Licht und eine gleichmäßig ausgeleuchtete<br />
Fläche Voraussetzung. Gemessen wird mit Objektmessung.<br />
<br />
<br />
Durch Druck auf die Messtaste M wird eine Referenzmessung<br />
durchgeführt. Kennzeichnung rF-- in der digitalen Anzeige.<br />
Anschließend das Schwächungsmittel (z.B. Graufilter) in den<br />
Strahlengang bringen und die Messtaste M drücken.<br />
20 <strong>GOSSEN</strong> <strong>Foto</strong>- und Lichtmesstechnik GmbH
Die Schwächung in Stufen und der Verlängerungsfaktor erscheinen<br />
automatisch im Anzeigefeld.<br />
Durch Weiterschalten mit den Funktionstasten werden die<br />
Korrekturwerte in den Speicher des <strong>DIGIPRO</strong> <strong>F2</strong> übernommen.<br />
Ist nun ein Korrekturwert eingegeben, bleibt als Kennzeichnung<br />
der Rahmen um COR stehen.<br />
Der COR-Wert wird automatisch bei allen Messfunktionen<br />
berücksichtigt.<br />
3.4.3 Löschen von Korrekturwerten<br />
Mit Funktionstasten COR anwählen<br />
Messtaste M drücken (Anzeige rF --)<br />
<br />
<br />
Mit Funktionstasten beliebige andere Funktion anwählen<br />
Korrekturwert ist gelöscht;<br />
der Rahmen um COR ist verschwunden<br />
<strong>GOSSEN</strong> <strong>Foto</strong>- und Lichtmesstechnik GmbH 21
3.4.4 Wichtige Hinweise zu „Korrekturwerten“<br />
Der <strong>DIGIPRO</strong> <strong>F2</strong> ist präzise kalibriert und ermittelt Ihnen exakte Belichtungsdaten. Falls Sie mit Ihren<br />
Ergebnissen trotzdem nicht zufrieden sind, dann bedenken Sie, dass es davon unabhängige<br />
Einflussgrößen gibt, die das Gelingen Ihrer Aufnahmen beeinflussen können.<br />
Zum Beispiel:<br />
<br />
<br />
die „wahre“ Empfindlichkeit des Sensors bzw. Films kann sich von der angegebenen<br />
unterscheiden<br />
die „wahren“ Verschlusszeiten und Blendenöffnungen Ihrer Kamera können von den Nennwerten<br />
abweichen<br />
bei der Entwicklung des Films bzw. Weiterbearbeitung der RAW-Datei können Abweichungen<br />
auftreten<br />
Dazu kommen die rein subjektiven Momente und Geschmacksfragen bei der Beurteilung der fertigen<br />
Aufnahmen. Sie können Ihren <strong>DIGIPRO</strong> <strong>F2</strong> aber auf die Eigenheiten Ihrer Kamera und Ihres<br />
Workflows abstimmen.<br />
Wir empfehlen folgende Methode:<br />
Sie messen einige Normalmotive sorgfältig nach der Licht- und Objektmessmethode aus und machen<br />
davon jeweils fünf Aufnahmen. Die erste Aufnahme wird mit den vom <strong>DIGIPRO</strong> <strong>F2</strong> angezeigten<br />
Belichtungsdaten belichtet, bei den weiteren werden diese Belichtungsdaten um eine halbe und eine<br />
ganze Stufe verringert und erhöht. Die Aufnahmeverhältnisse, die Sie sich notieren, dürfen sich während<br />
dieser fünf Aufnahmen nicht ändern.<br />
Von den Bildern suchen Sie die für Ihre Anforderungen optimalen Aufnahmen heraus und vergleichen<br />
deren Belichtungswerte mit den Messungen. Sollte sich dabei herausstellen, dass die Aufnahmen Ihnen<br />
22 <strong>GOSSEN</strong> <strong>Foto</strong>- und Lichtmesstechnik GmbH
esser zusagen, die mit einem veränderten Wert gemacht wurden, so können Sie diesen Wert in Ihren<br />
<strong>DIGIPRO</strong> <strong>F2</strong> einprogrammieren. Nun ermittelt der <strong>DIGIPRO</strong> <strong>F2</strong>, unter Berücksichtigung der Eigenheiten<br />
Ihres Workflows, präzise Belichtungsdaten, die optimale Aufnahmeergebnisse liefern.<br />
4. Service-Hinweis<br />
Das Gerät benötigt bei vorschriftsmäßigem Gebrauch keine besondere Wartung. Sollte das Gerät<br />
durch den Gebrauch außen verschmutzt worden sein, reinigen Sie die Gehäuseoberfläche mit einem<br />
leicht angefeuchteten Tuch. Vermeiden Sie den Einsatz von Putz-, Scheuer- oder Lösungsmitteln.<br />
Sollte Ihr <strong>DIGIPRO</strong> <strong>F2</strong> einmal nicht zu Ihrer Zufriedenheit arbeiten, senden Sie ihn an:<br />
<strong>GOSSEN</strong> <strong>Foto</strong>- und Lichtmesstechnik GmbH I Lina-Ammon-Str.22 I D-90471 Nürnberg I Germany<br />
Telefon: +49 911 8602-181 I Fax: +49 911 8602-142 I E-Mail: info@gossen-photo.de<br />
www.gossen-photo.de<br />
Außerhalb Deutschlands wenden Sie sich bitte an den zuständigen Distributor – die Adressen finden<br />
Sie auf unserer Website unter www.gossen-photo.de.<br />
<strong>GOSSEN</strong> <strong>Foto</strong>- und Lichtmesstechnik GmbH 23
5 Technische Daten<br />
Messmöglichkeiten<br />
Lichtmessmethode / Objektmessmethode / Kontrastmessung<br />
Blitzlichtmessung (Cord/Noncord)<br />
Anzeige des Umgebungslichtanteils<br />
Silizium-<strong>Foto</strong>diode<br />
Messsensor<br />
Messumfang LW –2,5 bis +18 (bei ISO 100/21°)<br />
Wiederholgenauigkeit<br />
0,1 LW<br />
Messwertauflösung<br />
1/1-, 1/2- und 1/3-EV-Stufen<br />
Belichtungszeiten<br />
1/8000 s bis 60 min<br />
Blenden f/1 bis f/90 9/10<br />
Messumfang Blitzlicht f/1 bis f/90 (bei ISO 100/21°)<br />
Blitz-Synchronzeiten<br />
1 s bis 1/1000 s einschl. 1/90 s (Messzeit)<br />
Cine-Werte<br />
8 bis 64 einschl. 25 und 30 (Video)<br />
Einstellbare u. messbare Korrekturwerte -7,9 bis +7,9<br />
Verlängerungsfaktoren 1,0 bis 240<br />
Empfindlichkeiten ISO 3,2/6° bis 8000/40°<br />
Messwinkel bei Objektmessung 30°<br />
Batterie<br />
1x 1,5V Mignon (Typ AA) max. 15VA, geeignete Li möglich,<br />
Batteriekontrollanzeige<br />
Arbeitstemperatur -10 °C bis 50 °C<br />
Zubehör<br />
Tasche, Tragegurt, Batterie und Bedienungsanleitung<br />
Abmessungen<br />
65 x 118 x 19 mm<br />
Gewicht<br />
ca. 125 g (inkl. Batterie)<br />
24 <strong>GOSSEN</strong> <strong>Foto</strong>- und Lichtmesstechnik GmbH
CINE (Gangzahlen für das Filmen)<br />
Mit Funktionstasten t anwählen –<br />
Über 1/8000 hinausgehen und mit<br />
Wertetasten die Gangzahl vorwählen<br />
Messen durch Drücken der Messtaste M<br />
Blendenwert erscheint in linker Anzeige<br />
Mehrfachblitzen<br />
Wird mit einem Blitz die benötigte Arbeitsblende<br />
nicht erreicht, kann der <strong>DIGIPRO</strong> F automatisch die<br />
notwendige Anzahl von Blitzen kalkulieren<br />
Wertetaste drücken<br />
Batterie<br />
1,5 V Mignon Typ AA (Alkali-Mangan-Zelle)<br />
Auf Warnsignal BAT achten - Batteriewechsel<br />
Buchse zum<br />
Anschluss des Blitz-<br />
Synchronkabels<br />
Messtaste M<br />
Wertetasten<br />
Einstellen der Werte<br />
<strong>DIGIPRO</strong> <strong>F2</strong><br />
Kurzbedienungsanleitung<br />
Schwenkkopf<br />
Display<br />
Funktionstasten<br />
Auswahl der<br />
Funktionen<br />
<strong>GOSSEN</strong> <strong>Foto</strong>- und Lichtmesstechnik GmbH 25
Filmempfindlichkeit einstellen<br />
Mit Funktionstaste ISO anwählen<br />
und mit Wertetaste gewünschten ISO-Wert<br />
einstellen<br />
Messfunktionen<br />
Blitzlichtmessung<br />
Messen mit und ohne Synchronkabel möglich<br />
Mit Funktionstasten anwählen<br />
Mit Wertetaste gewünschte Synchron-zeit<br />
einstellen<br />
1 s bis 1/1000 s; inklusive 1/90 s<br />
Messtaste M drücken und Blitz auslösen<br />
Blendenwert erscheint digital links im Display<br />
und als blinkende Marke auf der analogen<br />
Blendenskala. Zusätzlich erfolgt die Anzeige<br />
des Blendenwertes für den Dauerlichtanteil auf<br />
der Blendenskala<br />
Dauerlichtmessung<br />
Zeitvorwahl<br />
Mit Funktionstasten t anwählen und mit<br />
Wertetasten gewünschte Belichtungszeit<br />
einstellen<br />
Messen durch Drücken der Messtaste M<br />
Blendenwert erscheint<br />
Kontrastmessung<br />
Mit Funktionstasten t anwählen<br />
Zu messende Motivteile anvisieren und<br />
Messtaste M gedrückt halten<br />
Nach Loslassen wird der Gesamtkontrast<br />
auf der Blendenskala angezeigt<br />
Blendenvorwahl<br />
Mit Funktionstaste f anwählen und mit<br />
Wertetaste gewünschte Blende einstellen<br />
Messen durch Drücken der Messtaste M<br />
Belichtungszeit erscheint in rechter<br />
Anzeige<br />
Belichtungswertmessung<br />
Mit Funktionstaste EV anwählen<br />
Messen durch Drücken der Messtaste M<br />
Belichtungswert erscheint in linker Anzeige<br />
26 <strong>GOSSEN</strong> <strong>Foto</strong>- und Lichtmesstechnik GmbH
EG - KONFORMITÄTSERKLÄRUNG<br />
DECLARATION OF CONFORMITY<br />
Dokument-Nr./ Document. No.: 108/2013<br />
Hersteller/ Manufacturer:<br />
<strong>GOSSEN</strong> <strong>Foto</strong>- und Lichtmesstechnik GmbH<br />
Anschrift / Address:<br />
Lina-Ammon-Str.22<br />
D-90471 Nürnberg<br />
Produktbezeichnung/ Product name:<br />
Belichtungsmesser / Exposure Meter<br />
Typ / Type:<br />
<strong>DIGIPRO</strong> <strong>F2</strong><br />
Bestell-Nr. / Order No.:<br />
H261A<br />
Das bezeichnete Produkt stimmt mit den Vorschriften folgender Europäischer<br />
Richtlinien überein, nachgewiesen durch die vollständige Einhaltung folgender<br />
Normen:<br />
The above mentioned product has been manufactured according to the<br />
regulations of the following European directives proven through complete<br />
compliance with the following standards:<br />
Nr. / No. Richtlinie Directive<br />
2006/95/EG<br />
2006/95/EC<br />
Elektr. Betriebsmittel zur Verwendung innerhalb bestimmter Spannungsgrenzen<br />
- Niederspannungsrichtlinie<br />
- Anbringung der CE-Kennzeichnung : 2011<br />
Electrical equipment for use within certain voltage limits<br />
- Low Voltage Directive<br />
- Attachment of CE mark : 2011<br />
EN/Norm/Standard: EN 60950-1 : 2006 + A11:2009 + A1:2010 + A12:2011 + AC:2011<br />
Nr. / No. Richtlinie Directive<br />
2004/108/EG<br />
2004/108/EC<br />
Elektromagnetische Verträglichkeit<br />
- EMV - Richtlinie<br />
Electromagnetic compatibility<br />
-EMC directive<br />
EN/Norm/Standard: ETSI EN 301 489-1 ; V1.9.2 ; 2011-09, ETSI EN 301 489-3 ; V1.4.1 ; 2002-08<br />
Nürnberg, 10. Januar 2013<br />
___________________________________________________<br />
Ort, Datum / Place, Date<br />
Diese Erklärung bescheinigt die Übereinstimmung mit den genannten Richtlinien,<br />
beinhaltet jedoch keine Zusicherung von Eigenschaften. Die Sicherheitshinweise<br />
der mitgelieferten Produktdokumentationen sind zu beachten.<br />
_____________________________________<br />
Geschäftsführer / Managing Director<br />
This declaration certifies compliance with the above mentioned directives but<br />
does not include a property assurance. The safety notes given in the product<br />
documentations which are part of the supply must be observed.<br />
<strong>GOSSEN</strong> <strong>Foto</strong>- und Lichtmesstechnik GmbH 27
Gedruckt in Deutschland – Änderungen vorbehalten<br />
<strong>GOSSEN</strong> <strong>Foto</strong>- und Lichtmesstechnik GmbH I Lina-Ammon-Str.22 I D-90471 Nürnberg I Germany<br />
Telefon: +49 911 8602-181 I Fax: +49 911 8602-142 I E-Mail: info@gossen-photo.de<br />
www.gossen-photo.de<br />
28 <strong>GOSSEN</strong> <strong>Foto</strong>- und Lichtmesstechnik GmbH
Operating Instructions<br />
<strong>DIGIPRO</strong> <strong>F2</strong> 15482<br />
Exposure Meter for Flash and Ambient Light 3/04.13
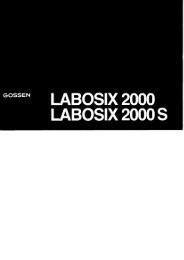
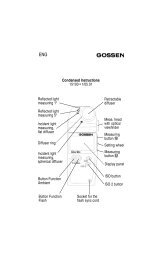
Swivel head<br />
Socket to connect<br />
the synchronising<br />
cable<br />
Measuring<br />
button M<br />
Buttons to adjust<br />
the values<br />
Display<br />
Buttons to<br />
select the<br />
required<br />
functions<br />
Battery compartment<br />
and cover<br />
2 <strong>GOSSEN</strong> <strong>Foto</strong>- und Lichtmesstechnik GmbH
Contents<br />
Page<br />
Contents<br />
Page<br />
1 Display .................................................. 9<br />
1.1 The display and its elements .................. 9<br />
1.2 Duration of display ................................ 10<br />
2 <strong>DIGIPRO</strong> <strong>F2</strong> functionality ................... 10<br />
2.1 Preparations ......................................... 10<br />
2.2 Incident and reflected light<br />
measurement ....................................... 11<br />
3 The individual functions .................... 13<br />
3.1.1 Setting the film speed ........................... 13<br />
3.1.2 Pre-selection of f-stop series and<br />
time series ............................................ 13<br />
3.2 Measuring functions – Ambient light<br />
measurement ....................................... 14<br />
3.2.1 Flash readings ...................................... 15<br />
3.2.2 Multiple flash ........................................ 15<br />
3.2.3 Shutter priority mode ............................ 16<br />
3.2.4 Contrast measurement ......................... 16<br />
3.2.5 Aperture priority mode .......................... 17<br />
3.2.6 Exposure value EV ............................... 17<br />
3.2.7 CINE scale (frames per second) ........... 18<br />
3.3 Measurement outside the measuring<br />
range .................................................... 19<br />
3.3.1 Display outside the display range ........ 19<br />
3.4 Setting and measuring correction<br />
values ................................................... 20<br />
3.4.1 Setting correction values ...................... 20<br />
3.4.2 Measuring correction values ................. 20<br />
3.4.3 Cancelling correction values ................. 21<br />
3.4.4 Important remarks concerning<br />
correction values .................................. 22<br />
4 Service and repairs ............................ 23<br />
5 Technical data .................................... 24<br />
Condensed Instructions ..................... 25<br />
Declaration of conformity .................. 27<br />
<strong>GOSSEN</strong> <strong>Foto</strong>- und Lichtmesstechnik GmbH 3
Your <strong>DIGIPRO</strong> <strong>F2</strong> is an exposure meter with digital display from <strong>GOSSEN</strong>. It measures continuous<br />
light and flash, and it covers a wide measuring range with great accuracy. A wealth of knowledge in<br />
the area of light metering, based on many decades of experience in the manufacture of exposure<br />
meters, is now being made available to the user, in the simplest manner possible, through<br />
microprocessor technology. As a result of its precise calibration, the <strong>DIGIPRO</strong> <strong>F2</strong> measures with the<br />
greatest accuracy, and operation is exceptionally simple and convenient.<br />
These features characterize the <strong>DIGIPRO</strong> <strong>F2</strong>:<br />
Swivel head for incident and reflected light measurements<br />
Measuring flash (cord/noncord) with indication of the level of ambient light<br />
Measuring resolution in 1/1, 1/2 and 1/3 EV steps<br />
Digital LCD display in tenths of stops<br />
Analog contrast display in half stops<br />
Storage of settings and readings<br />
Programmable exposure correction combinations of a given reading<br />
Recall of all possible shutter speed/aperture combinations of a given reading<br />
Aperture or shutter priority<br />
Covers the entire CINE scale (frames per second), including the video standards 25 and 30 fps<br />
Warning when range is exceeded<br />
Well-proven push button control allows one hand operation<br />
Powered by one standard AA battery<br />
Automatic battery check and auto off<br />
Suitable for analog and digital photography
Preparation for use<br />
Please ensure that you are familiar with the operation of your meter and that it is providing consistent, accurate<br />
exposures before you commit to photographing any unrepeatable material. We recommend you always carry<br />
out test exposures prior to final image capture. <strong>GOSSEN</strong> assumes no liability for consequential damages.<br />
Copyrights<br />
<strong>GOSSEN</strong> is a trademark of <strong>GOSSEN</strong> <strong>Foto</strong>- und Lichtmesstechnik GmbH.<br />
Safety Precautions<br />
Please read these safety precautions carefully before using your exposure meter. This will help you to<br />
avoid damaging the product and prevent personal injury.<br />
This icon identifies important warnings which should be read in any case before the initial<br />
start-up of your <strong>GOSSEN</strong> product.<br />
<strong>GOSSEN</strong> <strong>Foto</strong>- und Lichtmesstechnik GmbH 5
Warnings<br />
In the event of malfunction, switch off the exposure meter immediately.<br />
If the event that smoke develops or unusual odors become apparent, which are caused by either the<br />
exposure meter, remove the battery from the meter in order to prevent possible fire. Continuing to<br />
operate the exposure meter after such malfunctions have occurred may result in severe injury.<br />
Please contact your local dealer or <strong>GOSSEN</strong> Service in order to eliminate malfunctioning. If you bring<br />
or send the meter in for repairs, make sure that the battery has been removed first.<br />
Never use the exposure meter in proximity to flammable gases.<br />
Electronic devices must not be used near flammable gases. Otherwise there would be danger of<br />
explosion and fire.<br />
Never hang the meter and/or the carrying strap around the head or neck of a child.<br />
Danger of strangulation exists if the carrying strap is hung around the head or neck of a child.<br />
Store the exposure meter at a location which cannot be accessed by children.<br />
The exposure meter and its accessories include parts which can be swallowed. Make sure that these<br />
parts (e.g. housing covers, battery etc.) do not fall into the hands of children who might swallow them.<br />
Otherwise, danger of suffocation prevails.<br />
Do not dismantle the exposure meter.<br />
Never touch any parts located inside of the housing - injury may result. Never attempt to repair the<br />
meter yourself or try to open the meter. Repairs may only be made by qualified personnel. If the<br />
meter’s housing is damaged due to dropping or other external influences, remove the rechargeable<br />
battery or power supply and contact your local dealer or <strong>GOSSEN</strong> Service for repair.<br />
Avoid any and all contact with liquid crystals.<br />
If the display is damaged (e.g. broken), danger of injury due to contact with glass shards or discharge<br />
of liquid crystals exists. Make sure that skin, eyes and mouth do not come into contact with the liquid<br />
crystals.<br />
6 <strong>GOSSEN</strong> <strong>Foto</strong>- und Lichtmesstechnik GmbH
Handle batteries with care.<br />
Rechargeable and normal batteries may leak or explode if handled incorrectly.<br />
Please adhere to the following safety precautions:<br />
Make sure that the exposure meter is switched off before removing or inserting batteries. Only use the<br />
batteries which are recommended for this meter.<br />
Make sure that the battery is inserted correctly.<br />
Never short-circuit batteries, and never attempt to open a rechargeable or a normal battery.<br />
Do not expose the batteries to excessive heat or open flames.<br />
Do not expose the batteries to moisture; never immerse batteries in water.<br />
If the meter is not used regularly, remove the battery and close the battery compartment cover<br />
Never store batteries together with metallic objects which might cause short-circuiting.<br />
Danger of leakage exists, especially in the case of empty batteries. In order to prevent damage to the<br />
exposure meter, batteries should be removed when fully depleted or in case of lengthy periods of non-use.<br />
When not in use, batteries should be stored in a cool place.<br />
Batteries heat up during use and may become hot. Be careful not to burn yourself when removing batteries.<br />
Switch the exposure meter off or wait until it has shut itself down, and then wait a bit longer until the battery<br />
has cooled down.<br />
Do not use batteries which show any signs of damage such as discoloration or deformation of the housing.<br />
<strong>GOSSEN</strong> <strong>Foto</strong>- und Lichtmesstechnik GmbH 7
Notes<br />
Reproduction of product documentation or duplication of any excerpts from the same requires the express<br />
consent of <strong>GOSSEN</strong> <strong>Foto</strong>- und Lichtmesstechnik GmbH. This also applies to duplication in any electronic<br />
format and translation into other languages.<br />
Documentation is subject to change without notice.<br />
<strong>GOSSEN</strong> assumes no liability for damages resulting from incorrect use of the product.<br />
Documentation for your <strong>GOSSEN</strong> exposure meter was prepared with the greatest of care. If you should<br />
nevertheless discover errors, or if you would like to suggest any improvements, <strong>GOSSEN</strong> would be very<br />
pleased to hear from you. (The address of your local <strong>GOSSEN</strong> representative is listed separately.)<br />
Icon for separate collection of recyclable materials / hazardous waste in European countries<br />
This icon indicates that this product must be disposed of separately.<br />
The following must be observed by users in European countries:<br />
This product may only be disposed of separately at a designated collection point. It may not be disposed<br />
of with household trash. For further information contact your local dealer or waste disposal authorities.<br />
8 <strong>GOSSEN</strong> <strong>Foto</strong>- und Lichtmesstechnik GmbH
–<br />
1 Display<br />
1.1 The display and its elements<br />
1 Functions<br />
Flash measurement<br />
Ambient light measurement with shutter<br />
priority<br />
Ambient light measurement with aperture<br />
priority<br />
Ambient light measurement<br />
with read-out of exposure values (EV)<br />
Entering the correction values<br />
Setting the film speed<br />
2 Digital display of film speed DIN/ISO<br />
3 Display identification f for aperture<br />
4 Display identification EV for<br />
exposure value<br />
5 Analog aperture scale<br />
6 Left-hand digital display<br />
Aperture f<br />
Exposure value EV<br />
Correction values<br />
Multiple flash<br />
Film speed in DIN<br />
7 Display identification t for exposure time<br />
8 Warning sign BAT for battery check<br />
9 Display identification „/“ for fractions of a<br />
second<br />
10 Right-hand digital display<br />
Exposure time t<br />
Exposure extension factor<br />
CINE (frames per second); symbol<br />
Film speed in ASA<br />
11 Unit symbol m = minutes<br />
12 Unit symbol s = seconds<br />
<br />
<strong>GOSSEN</strong> <strong>Foto</strong>- und Lichtmesstechnik GmbH 9
1.2 Duration of display<br />
If for approx. 2 minutes none of the buttons of the <strong>DIGIPRO</strong> <strong>F2</strong> is pressed, the meter will be switched<br />
off automatically. The measuring and setting values stored in the memory will be maintained.<br />
<br />
<br />
The stored values can be recalled by depressing the function or value buttons<br />
New measurement is instantly possible when the metering button is depressed.<br />
The values of the last meter reading are stored until a new meter reading is taken.<br />
The <strong>DIGIPRO</strong> <strong>F2</strong> is fitted with separate memories for ambient light and flash measurement.<br />
2 <strong>DIGIPRO</strong> <strong>F2</strong> functionality<br />
2.1 Preparations<br />
Battery<br />
The <strong>DIGIPRO</strong> <strong>F2</strong> operates with a 1.5 V AA-type battery (alkaline-manganese battery). Since the<br />
meter’s power consumption is minimal, the battery will last for a long time. When the battery’s capacity<br />
becomes exhausted, the BAT symbol appears on the display as a warning that the battery has to be<br />
replaced at the earliest possible opportunity. Measurements cease to be possible if the display only<br />
indicates BAT. The battery must be immediately replaced.<br />
To change the battery, open the battery compartment of the <strong>DIGIPRO</strong> <strong>F2</strong>. Remove the exhausted<br />
battery and insert the new one. Ensure correct polarity „+“ and „–“! Push back the battery compartment<br />
cover. Battery changing deletes all stored values.<br />
10 <strong>GOSSEN</strong> <strong>Foto</strong>- und Lichtmesstechnik GmbH
Self-Checking routine<br />
The microcomputer performs a self-checking routine as soon as the<br />
battery has been inserted. Every possible display segment appears<br />
on the display during this routine. The duration of the self-checking<br />
routine is approximately 10 seconds, but it can be interrupted by<br />
pressing any button. The factory programmed basic settings are<br />
automatically displayed as soon as the self-checking routine has been completed.<br />
Basic values<br />
ISO: 100/21 ° f: 5.6 COR: 0/ 1.0 EV: 12 t: 1/125 Flash: f 5.6 1/60<br />
Measuring resolution. dEu 1.0<br />
2.2 Incident and reflected light measurement<br />
The features and measuring capabilities provided with the <strong>DIGIPRO</strong> <strong>F2</strong><br />
are ideally suited for the dedicated amateur and the professional photographer.<br />
The swivel head will rotate through 180 degrees. This feature<br />
allows the photographer to read the values measured in the display,<br />
while the measuring head is directed towards the subject or light source.<br />
When you remove the diffuser dome, reflected light and contrast measurements<br />
can easily be taken.<br />
Measurement by the incident method is far more accurate and reliable to establish the correct<br />
exposure setting than the calculating of a mean value obtained with the reflected light measurement in<br />
your camera. In the latter case, the reading depends upon the range of contrasts of the subject.<br />
<strong>GOSSEN</strong> <strong>Foto</strong>- und Lichtmesstechnik GmbH 11
However, there is not always a uniform distribution of bright and dark areas of equal importance within<br />
the subject.<br />
Incident light measurement is also imperative with inaccessible subjects. For this purpose it is<br />
necessary to select a point that has the same lighting level as the subject. And then a meter reading is<br />
taken that lies parallel with the projected connecting line between the actual subject and the camera.<br />
This very convenient method of light metering at a point with the same lighting level is highly<br />
recommended for outdoor shots. The measurement is performed with a complete „180°“ turn in front of<br />
the camera so that the reading is taken with the meter pointing towards the camera, i.e. opposite the<br />
actual picture shooting direction.<br />
Incident light measurement, i.e. with diffuser, also gives a precise reading of the brightness range of the<br />
lighting. Both kinds of lighting – flash and ambient light – are measured with great accuracy by the<br />
incident light method with diffuser.<br />
In addition to this, the <strong>DIGIPRO</strong> <strong>F2</strong> also offers the reflected light measuring method. In this mode the<br />
diffuser dome must be taken off and the meter is pointed from the camera towards the subject. The<br />
meter now only measures with an angle of 30 degrees the light reflected by the subject. Consequently,<br />
the reading always depends upon the inherent brightness of the subject!! This means that inherently<br />
brighter subjects are not precisely measured and therefore rendered darker. If readings are to be taken<br />
exclusively by the reflected light measuring method, then it is advantageous for the professional to use<br />
a grey card (18 % reflection) in this mode. The reflected light method is used to measure the subject<br />
contrast which is displayed by the <strong>DIGIPRO</strong> <strong>F2</strong> on its analog scale (see Section 3.2.4 Contrast<br />
measurement).<br />
12 <strong>GOSSEN</strong> <strong>Foto</strong>- und Lichtmesstechnik GmbH
3 The individual functions<br />
3.1.1 Setting the film speed<br />
<br />
<br />
Select ISO with the function buttons<br />
Adjust the required ISO value with the value buttons<br />
(display left: DlN value, right: ISO value)<br />
Once the film speed has been set, it is transferred to the memory<br />
of the <strong>DIGIPRO</strong> <strong>F2</strong> and maintained when the meter is set to any operation function. It remains visible<br />
on the top right-hand side in the digital display.<br />
Any change of the film speed directly influences the stored paired aperture and shutter speed values.<br />
The selected film speed is retained in the memory until it is changed in the described manner.<br />
3.1.2 Pre-selection of f-stop series and time series<br />
It is possible to pre-select the f-stop settings and the exposure<br />
times in 1/1, 1/2 or 1/3 values. First press the function ISO (see<br />
below) and simultaneously both function keys “”, then use the<br />
value key to switch between „dEv 0.3“ (1/3), „dEv 0.5“ (1/2) and<br />
„dEv 1.0“ (1/1).<br />
<strong>GOSSEN</strong> <strong>Foto</strong>- und Lichtmesstechnik GmbH 13
3.2 Measuring functions – Ambient light measurement<br />
Select the required ambient light function with the corresponding function buttons<br />
<br />
<br />
Shutter priority in function t: a reading is taken for the corresponding aperture<br />
(see Section 3.2.3 Shutter priority mode – Ambient light measurement)<br />
Contrast measurement in function t: (see Section 3.2.4 Contrast measurement)<br />
Aperture priority in function f: a reading is taken for the corresponding shutter speed<br />
(see Section 3.2.5 Aperture priority mode)<br />
Exposure value measurement in function EV: preselect the shutter speed and the<br />
aperture is given as an analog value (see Section 3.2.6 Exposure value EV)<br />
CINE (frames per second) in function t:<br />
(see Section 3.2.7 CINE scale (frames per second))<br />
14 <strong>GOSSEN</strong> <strong>Foto</strong>- und Lichtmesstechnik GmbH
3.2.1 Flash readings<br />
Readings can be taken with or without synchronizing cable. When<br />
used in conjunction with a synchronizing cable the flash is triggered<br />
9<br />
by pressing the M button - the flash is automatically triggered and<br />
measured.<br />
Select with the function buttons<br />
Adjust the desired synchronizing speed with the value buttons.<br />
Synch range from 1 s to 1/1000 s (including 1/90 s)<br />
Press the measuring button M.<br />
<strong>DIGIPRO</strong> <strong>F2</strong> is operable for metering for a period of 45 s (meter<br />
readiness prevails as long as F remains visible in the display)<br />
Trigger the flash<br />
The measured aperture (total of flash and ambient light) appears<br />
in the left digital display, and as a flashing mark on the analog aperture scale. The aperture for the<br />
share of ambient light is additionally indicated on the aperture scale (in our example f/8).<br />
3.2.2 Multiple flash<br />
Occasionally the light output from a single flash may not be sufficient to<br />
enable you to work at the aperture desired. In that case, simply push<br />
the top value button until the desired f/number appears in the display.<br />
The digital display of the time t disappears and the number of flashes<br />
required is indicated (e.g.: F4 = 4 flashes).<br />
The <strong>DIGIPRO</strong> <strong>F2</strong> will calculate up to maximum of 10 flash sequences.<br />
<strong>GOSSEN</strong> <strong>Foto</strong>- und Lichtmesstechnik GmbH 15
3.2.3 Shutter priority mode – Ambient light measurement<br />
<br />
<br />
<br />
<br />
Select with the function buttons (the last stored value appears<br />
in the display)<br />
Adjust the desired shutter speed with the value buttons<br />
Measure by pressing the measuring button M<br />
The measured aperture appears in the left-hand digital display<br />
(accuracy: 1/10 stops), also as a rounded mark in the analog aperture scale<br />
Select alternative aperture/shutter speed combinations with the value buttons.<br />
3.2.4 Contrast measurement<br />
<br />
<br />
<br />
Select t with the function buttons<br />
Keep the measuring button M pressed while aiming the meter at<br />
various areas of the subject. The analog aperture scale displays<br />
the f-stop series between the two extreme values, and with the<br />
actual measured value flashing. The first measured f-stop is<br />
displayed in the left-hand side of the display. It remains displayed<br />
as a reference value (e.g. of a grey card).<br />
After the measuring button is released, the entire measured contrast range is displayed on the<br />
analog aperture scale, and the last measured value will cease to flash.<br />
16 <strong>GOSSEN</strong> <strong>Foto</strong>- und Lichtmesstechnik GmbH
3.2.5 Aperture priority mode<br />
Select f with the function buttons<br />
<br />
<br />
<br />
<br />
Set the desired aperture with the value buttons. The intermediate<br />
1/10 stop values stored from the last measurement appear when<br />
the aperture is preset. These are not valid because the valid and<br />
actual 1/10 th stops will only appear after the next meter reading is<br />
taken.<br />
Measure by pressing the measuring button M<br />
The measured shutter speed appears in the right-hand digital display<br />
Automatic adaptation of the aperture in 1/10 stops to the measured shutter speed<br />
Select other paired aperture/shutter values with the value buttons.<br />
3.2.6 Exposure value EV<br />
<br />
<br />
<br />
Select EV with the function buttons<br />
Measure by pressing the measuring button M<br />
The measured exposure value appears in the left-hand digital<br />
display (accuracy: 1/10 stops), and the aperture as a rounded-off<br />
mark on the analog aperture scale<br />
Select with the value buttons other paired aperture/shutter speed<br />
values corresponding with this exposure value.<br />
<strong>GOSSEN</strong> <strong>Foto</strong>- und Lichtmesstechnik GmbH 17
3.2.7 CINE scale (frames per second)<br />
Select t with the function buttons<br />
<br />
<br />
<br />
Select the desired Cine speed (f.p.s.) by increasing the<br />
shutter speed setting beyond 1/8000 sec. After approx.<br />
1 second the meter switches over to CINE speeds.<br />
The symbol appears on the display. The CINE speeds<br />
can be preset between 8 and 64 frames/second.<br />
Measure by pressing the measuring button M<br />
The measured aperture appears on the left-hand digital display (accuracy: 1/10th stops), and<br />
additionally as a rounded-off mark on the analog aperture scale<br />
The displayed aperture applies to a 180 degrees shutter blade. Enter a COR value in the<br />
function for other shutter blades as an extension factor. V = 180 degrees / open aperture angle.<br />
18 <strong>GOSSEN</strong> <strong>Foto</strong>- und Lichtmesstechnik GmbH
3.3 Measurements outside the measuring range<br />
The <strong>DIGIPRO</strong> <strong>F2</strong> will not produce any useful readings outside<br />
its measuring range.<br />
If it is too dark or too bright, an E (= Error) appears in the<br />
left-hand digital display, and alongside it for too dark, or for<br />
too bright.<br />
3.3.1 Display outside the display range<br />
If the symbol or appears in the right or left digital display<br />
it indicates that the taken reading is outside the meter’s display<br />
range.<br />
With<br />
actuate value button to enter the display range.<br />
With<br />
acuate value button to enter the display range.<br />
<strong>GOSSEN</strong> <strong>Foto</strong>- und Lichtmesstechnik GmbH 19
3.4 Setting and measuring correction values<br />
(see Section 3.4.4 Important remarks concerning correction values)<br />
3.4.1 Setting correction values<br />
<br />
<br />
Select COR with the function buttons (the last valid correction<br />
value appears in the display)<br />
Enter or change the correction value with the value buttons<br />
The extension factor is shown in the right-hand digital display,<br />
and the correction value in stops in the left-hand section.<br />
Enter in 1/10th stops (small figure) within a range of ±7.9 exposure<br />
value stops.<br />
A figure preceded by „–“ indicates an exposure extending correction.<br />
Example: –3.1 stops equal factor 8.6.<br />
In the event of an exposure shortening correction, only the left-hand display appears as an exposure<br />
value difference in stops.<br />
3.4.2 Measuring correction values<br />
Correction values can also be directly measured. An evenly illuminated<br />
surface and constant light level are required. Measure in the reflected<br />
mode.<br />
<br />
Press measuring button M and get a reference reading:<br />
displayed as rF--.<br />
20 <strong>GOSSEN</strong> <strong>Foto</strong>- und Lichtmesstechnik GmbH
Weaken light by holding e.g. a grey filter in front of the measuring<br />
aperture. Press the measuring button M.<br />
The light reducing factor will be displayed automatically in stops<br />
at the right, as extension factor at the left.<br />
Pressing one of the function buttons will transfers the correction value<br />
to the memory of the <strong>DIGIPRO</strong> <strong>F2</strong>. The COR value is now<br />
automatically taken into account in all subsequent measuring<br />
functions. The frame around COR is retained as a reminder that a<br />
correction value was entered.<br />
3.4.3 Cancelling correction values<br />
<br />
Select COR with the function buttons<br />
Press measuring button (display rF --)<br />
<br />
<br />
Select any other function with a function button<br />
Correction value is cancelled, and the box around COR<br />
disappears.<br />
<strong>GOSSEN</strong> <strong>Foto</strong>- und Lichtmesstechnik GmbH 21
3.4.4 Important remarks concerning correction values<br />
The <strong>DIGIPRO</strong> <strong>F2</strong> is a precision meter calibrated with great accuracy to provide exact exposure data.<br />
Should you still not be satisfied with the results, then you should remember that there are independent<br />
variables that can influence the success of your exposures.<br />
For example:<br />
<br />
<br />
<br />
the „true“ sensitivity of the sensor or film may differ from the one listed<br />
the „true“ shutter speeds and f-stops of your camera may deviate from the rated values<br />
Deviances may develop during film development or RAW data processing.<br />
Additionally, there is the purely subjective matter of personal taste when evaluating finished pictures.<br />
However, you can attune your <strong>DIGIPRO</strong> <strong>F2</strong> to the special characteristics of your camera and<br />
workflow.<br />
We recommend the following method:<br />
Measure several normal motifs according to the light metering and object metering methods and take five<br />
exposures each. The first exposure must be lit with the exposure data indicated by the <strong>DIGIPRO</strong> <strong>F2</strong> then<br />
increase and decrease the exposure data for each following exposure by ½ step and then a full step.<br />
The exposure conditions you note must not change during any of these exposures. Now select the<br />
optimum exposures from these pictures according to your requirements and compare their exposure<br />
values with the metered values. Should you discover that you prefer pictures taken with changed values,<br />
you can program these values into your <strong>DIGIPRO</strong> <strong>F2</strong>. The <strong>DIGIPRO</strong> <strong>F2</strong> now calculates precise<br />
exposure data resulting in optimum pictures while also taking the characteristics of your workflow into<br />
consideration.<br />
22 <strong>GOSSEN</strong> <strong>Foto</strong>- und Lichtmesstechnik GmbH
4 Service and repairs<br />
No special maintenance is required, if the <strong>DIGIPRO</strong> <strong>F2</strong> is handled correctly.<br />
Keep the outside surface clean. Use a slightly dampened cloth for cleaning. Do not use cleansers,<br />
abrasives or solvents.<br />
Should the meter nevertheless not work to your satisfaction, please send the <strong>DIGIPRO</strong> <strong>F2</strong> to:<br />
<strong>GOSSEN</strong> <strong>Foto</strong>- und Lichtmesstechnik GmbH I Lina-Ammon-Str.22 I D-90471 Nürnberg I Germany<br />
Phone: +49 911 8602-181 I Fax: +49 911 8602-142 I E-Mail: info@gossen-photo.de<br />
www.gossen-photo.de<br />
or to the <strong>GOSSEN</strong> distributor in your country. You can find the address of the local <strong>GOSSEN</strong><br />
distributor on our website under www.gossen-photo.de.<br />
<strong>GOSSEN</strong> <strong>Foto</strong>- und Lichtmesstechnik GmbH 23
5 Technical data<br />
Measuring methods<br />
Incident light / Reflected light / Contrast measurement<br />
Flash (cord/cordless)<br />
Indication of ambient light share<br />
Silicon blue cell photodiode<br />
Sensor<br />
Measuring range LW –2.5 to +18 (with ISO 100/21 °)<br />
Repeatable accuracy<br />
±0.1 EV<br />
Measuring resolution<br />
1/1, 1/2 and 1/3 EV steps<br />
Exposure times<br />
1/8000 s to 60 min<br />
Aperture stops f/1 to f/90 9/10<br />
Measuring range flash f/1 to f/90 (with ISO 100/21°)<br />
Flash synch speeds<br />
1 s to 1/1000 s including 1/90 s (meas. time)<br />
CINE values<br />
8 to 64 including 25 and 30 (TV)<br />
Adjustable and measurable<br />
correction values –7.9 to +7.9<br />
Extension factors 1.0 to 240<br />
Film speeds ISO 3.2/6° to 8000/40°<br />
Acceptance angle for reflected light 30°<br />
Battery<br />
1 x 1.5 V AA-type max. 15VA, suitable Li battery also possible,<br />
battery condition indication<br />
Operating temperature -10 °C to 50 °C<br />
Accessories<br />
Case, neck strap, battery and operating instructions<br />
Dimensions<br />
approx. 65 x 118 x 19 mm<br />
Weight<br />
approx. 125 g (incl. battery)<br />
24 <strong>GOSSEN</strong> <strong>Foto</strong>- und Lichtmesstechnik GmbH
CINE scale (frames per second)<br />
Select t with the function buttons – increasing<br />
the shutter speed setting beyond 1/8000 and<br />
preset the CINE speeds with the value buttons<br />
Measure by pressing the M button<br />
The measured aperture appears in the<br />
left-hand digital display<br />
Multiple flash<br />
When the light output from a single flash is not<br />
sufficient you to work at the aperture desired, the<br />
<strong>DIGIPRO</strong> <strong>F2</strong> is able to automatically calculate the<br />
necessary number of flashes:<br />
(desired aperture e.g.: F4 = 4 flashes)<br />
Press value button <br />
Battery<br />
1.5 V Mignon Type AA (alkali-manganese)<br />
Attention to warning BAT – change battery<br />
Socket to connect<br />
the synchronizing<br />
cable<br />
Measuring button M<br />
Buttons to adjust the<br />
values<br />
<strong>DIGIPRO</strong> <strong>F2</strong><br />
Condensed Instructions<br />
Swivel head<br />
Display<br />
Buttons to select<br />
the required<br />
function<br />
<strong>GOSSEN</strong> <strong>Foto</strong>- und Lichtmesstechnik GmbH 25
Setting the film speed<br />
Select ISO with the function buttons and adjust<br />
the required ISO value with the value buttons<br />
Measuring function<br />
Flash readings<br />
Readings can be taken with or without<br />
synchronizing cable<br />
Select with the function buttons<br />
Adjust the desired synchronizing speed with<br />
the value buttons<br />
(1 s to 1/1000 s; including 1/90)<br />
Press the measuring button M and trigger the<br />
flash<br />
The measured aperture stop appears in the left<br />
digital display and as a flashing mark on the<br />
analog aperture scale. The aperture stop for<br />
the level of ambient light is additionally<br />
indicated on the analog aperture scale<br />
Ambient light measurement<br />
Shutter priority mode<br />
Select t with function buttons and set desired<br />
shutter speed with value buttons<br />
Measure by pressing the M button<br />
The measured aperture appears<br />
Contrast measurement<br />
Select t with the function buttons<br />
Keep the M button depressed while aiming the<br />
meter at various areas of the subject<br />
After the measuring button is released, the<br />
entire measured contrast range is displayed on<br />
the analog aperture scale<br />
Aperture priority mode<br />
Select f with the function buttons and set the<br />
desired aperture with the value buttons<br />
Measure by pressing the M button<br />
The measured shutter speed appears in the<br />
right-hand digital display<br />
Exposure value<br />
Select EV with the function buttons<br />
Measure by pressing the M button<br />
The measured exposure value appears in the<br />
left-hand digital display<br />
26 <strong>GOSSEN</strong> <strong>Foto</strong>- und Lichtmesstechnik GmbH
EG - KONFORMITÄTSERKLÄRUNG<br />
DECLARATION OF CONFORMITY<br />
Dokument-Nr./ Document. No.: 108/2013<br />
Hersteller/ Manufacturer:<br />
<strong>GOSSEN</strong> <strong>Foto</strong>- und Lichtmesstechnik GmbH<br />
Anschrift / Address:<br />
Lina-Ammon-Str.22<br />
D-90471 Nürnberg<br />
Produktbezeichnung/ Product name:<br />
Belichtungsmesser / Exposure Meter<br />
Typ / Type:<br />
<strong>DIGIPRO</strong> <strong>F2</strong><br />
Bestell-Nr. / Order No.:<br />
H261A<br />
Das bezeichnete Produkt stimmt mit den Vorschriften folgender Europäischer<br />
Richtlinien überein, nachgewiesen durch die vollständige Einhaltung folgender<br />
Normen:<br />
The above mentioned product has been manufactured according to the<br />
regulations of the following European directives proven through complete<br />
compliance with the following standards:<br />
Nr. / No. Richtlinie Directive<br />
2006/95/EG<br />
2006/95/EC<br />
Elektr. Betriebsmittel zur Verwendung innerhalb bestimmter Spannungsgrenzen<br />
- Niederspannungsrichtlinie<br />
- Anbringung der CE-Kennzeichnung : 2011<br />
Electrical equipment for use within certain voltage limits<br />
- Low Voltage Directive<br />
- Attachment of CE mark : 2011<br />
EN/Norm/Standard: EN 60950-1 : 2006 + A11:2009 + A1:2010 + A12:2011 + AC:2011<br />
Nr. / No. Richtlinie Directive<br />
2004/108/EG<br />
2004/108/EC<br />
Elektromagnetische Verträglichkeit<br />
- EMV - Richtlinie<br />
Electromagnetic compatibility<br />
- EMC directive<br />
EN/Norm/Standard: ETSI EN 301 489-1 ; V1.9.2 ; 2011-09, ETSI EN 301 489-3 ; V1.4.1 ; 2002-08<br />
Nürnberg, 10. Januar 2013<br />
___________________________________________________<br />
Ort, Datum / Place, Date<br />
Diese Erklärung bescheinigt die Übereinstimmung mit den genannten Richtlinien,<br />
beinhaltet jedoch keine Zusicherung von Eigenschaften. Die Sicherheitshinweise<br />
der mitgelieferten Produktdokumentationen sind zu beachten.<br />
_____________________________________<br />
Geschäftsführer / Managing Director<br />
This declaration certifies compliance with the above mentioned directives but<br />
does not include a property assurance. The safety notes given in the product<br />
documentations which are part of the supply must be observed.<br />
<strong>GOSSEN</strong> <strong>Foto</strong>- und Lichtmesstechnik GmbH 27
Printed in Germany – Subject to change without notice<br />
<strong>GOSSEN</strong> <strong>Foto</strong>- und Lichtmesstechnik GmbH I Lina-Ammon-Str.22 I D-90471 Nürnberg I Germany<br />
Phone: +49 911 8602-181 I Fax: +49 911 8602-142 I E-Mail: info@gossen-photo.de<br />
www.gossen-photo.de<br />
28 <strong>GOSSEN</strong> <strong>Foto</strong>- und Lichtmesstechnik GmbH