warning - Hitachi
warning - Hitachi
warning - Hitachi

Erfolgreiche ePaper selbst erstellen
Machen Sie aus Ihren PDF Publikationen ein blätterbares Flipbook mit unserer einzigartigen Google optimierten e-Paper Software.
G<br />
B<br />
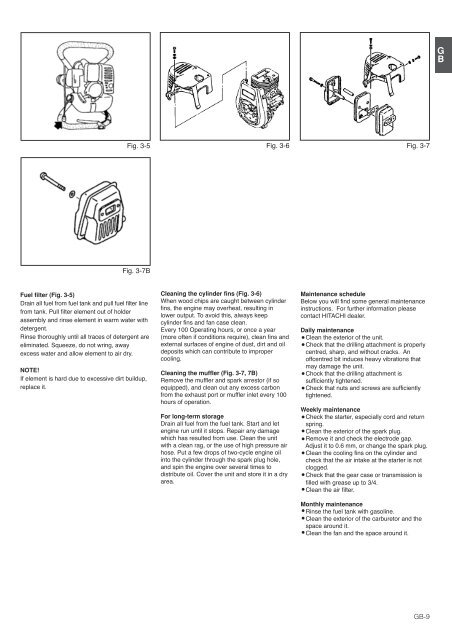
Fig. 3-5<br />
Fig. 3-6<br />
Fig. 3-7<br />
Fig. 3-7B<br />
Fuel filter (Fig. 3-5)<br />
Drain all fuel from fuel tank and pull fuel filter line<br />
from tank. Pull filter element out of holder<br />
assembly and rinse element in warm water with<br />
detergent.<br />
Rinse thoroughly until all traces of detergent are<br />
eliminated. Squeeze, do not wring, away<br />
excess water and allow element to air dry.<br />
NOTE!<br />
If element is hard due to excessive dirt buildup,<br />
replace it.<br />
Cleaning the cylinder fins (Fig. 3-6)<br />
When wood chips are caught between cylinder<br />
fins, the engine may overheat, resulting in<br />
lower output. To avoid this, always keep<br />
cylinder fins and fan case clean.<br />
Every 100 Operating hours, or once a year<br />
(more often if conditions require), clean fins and<br />
external surfaces of engine of dust, dirt and oil<br />
deposits which can contribute to improper<br />
cooling.<br />
Cleaning the muffler (Fig. 3-7, 7B)<br />
Remove the muffler and spark arrestor (if so<br />
equipped), and clean out any excess carbon<br />
from the exhaust port or muffler inlet every 100<br />
hours of operation.<br />
For long-term storage<br />
Drain all fuel from the fuel tank. Start and let<br />
engine run until it stops. Repair any damage<br />
which has resulted from use. Clean the unit<br />
with a clean rag, or the use of high pressure air<br />
hose. Put a few drops of two-cycle engine oil<br />
into the cylinder through the spark plug hole,<br />
and spin the engine over several times to<br />
distribute oil. Cover the unit and store it in a dry<br />
area.<br />
Maintenance schedule<br />
Below you will find some general maintenance<br />
instructions. For further information please<br />
contact HITACHI dealer.<br />
Daily maintenance<br />
Clean the exterior of the unit.<br />
Check that the drilling attachment is properly<br />
centred, sharp, and without cracks. An<br />
offcentred bit induces heavy vibrations that<br />
may damage the unit.<br />
Chock that the drilling attachment is<br />
sufficiently tightened.<br />
Check that nuts and screws are sufficiently<br />
tightened.<br />
Weekly maintenance<br />
Check the starter, especially cord and return<br />
spring.<br />
Clean the exterior of the spark plug.<br />
Remove it and check the electrode gap.<br />
Adjust it to 0.6 mm, or change the spark plug.<br />
Clean the cooling fins on the cylinder and<br />
check that the air intake at the starter is not<br />
clogged.<br />
Check that the gear case or transmission is<br />
filled with grease up to 3/4.<br />
Clean the air filter.<br />
Monthly maintenance<br />
Rinse the fuel tank with gasoline.<br />
Clean the exterior of the carburetor and the<br />
space around it.<br />
Clean the fan and the space around it.<br />
GB-9