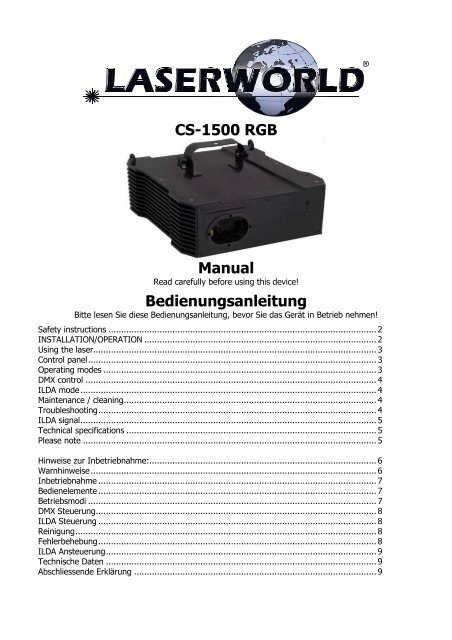
CS-1500 RGB Manual Bedienungsanleitung - SOH
CS-1500 RGB Manual Bedienungsanleitung - SOH
CS-1500 RGB Manual Bedienungsanleitung - SOH

Sie wollen auch ein ePaper? Erhöhen Sie die Reichweite Ihrer Titel.
YUMPU macht aus Druck-PDFs automatisch weboptimierte ePaper, die Google liebt.
<strong>CS</strong>-<strong>1500</strong> <strong>RGB</strong><br />
<strong>Manual</strong><br />
Read carefully before using this device!<br />
<strong>Bedienungsanleitung</strong><br />
Bitte lesen Sie diese <strong>Bedienungsanleitung</strong>, bevor Sie das Gerät in Betrieb nehmen!<br />
Safety instructions ......................................................................................................... 2<br />
INSTALLATION/OPERATION ........................................................................................... 2<br />
Using the laser ............................................................................................................... 3<br />
Control panel ................................................................................................................. 3<br />
Operating modes ........................................................................................................... 3<br />
DMX control .................................................................................................................. 4<br />
ILDA mode .................................................................................................................... 4<br />
Maintenance / cleaning ................................................................................................... 4<br />
Troubleshooting ............................................................................................................. 4<br />
ILDA signal .................................................................................................................... 5<br />
Technical specifications .................................................................................................. 5<br />
Please note ................................................................................................................... 5<br />
Hinweise zur Inbetriebnahme:......................................................................................... 6<br />
Warnhinweise ................................................................................................................ 6<br />
Inbetriebnahme ............................................................................................................. 7<br />
Bedienelemente ............................................................................................................. 7<br />
Betriebsmodi ................................................................................................................. 7<br />
DMX Steuerung .............................................................................................................. 8<br />
ILDA Steuerung ............................................................................................................. 8<br />
Reinigung ...................................................................................................................... 8<br />
Fehlerbehebung ............................................................................................................. 8<br />
ILDA Ansteuerung .......................................................................................................... 9<br />
Technische Daten .......................................................................................................... 9<br />
Abschliessende Erklärung ............................................................................................... 9
Checking parts<br />
Please check if all listed parts are included, and are not damaged. Included:<br />
1 x Laser projector<br />
1 x Power cable<br />
1 x 9-pin plug<br />
1 x manual<br />
Safety instructions<br />
If the device has been exposed to great temperature changes, do not switch it on immediately. Condensation<br />
water may damage your device. Leave the device switched off until it has reached room temperature. The laser<br />
must only be used for shows. Any operation has to be attended and supervised by a skilled and well trained<br />
operator.<br />
Never leave this device running unattended and keep it away from children and unauthorized persons.<br />
Keep away from heaters and other heat sources. In order to safeguard sufficient ventilation, leave 50 cm of<br />
free space around the device.<br />
Never direct the laser beam to people or animals.<br />
CAUTION LASER DIODE: If you open the device for cleaning, always disconnect from mains!<br />
HEALTH HAZARD! Never look directly into the light source, as sensitive persons may suffer an epileptic<br />
shock!<br />
These lasers are considered a definite eye hazard, particularly at the higher power levels, which WILL cause<br />
eye damage. So these laser series models supplied with a key switch to prevent unauthorized use, warning<br />
labels and aperture labels affixed to the laser.<br />
Installation safety<br />
Prior to installation and operation of the laser, the paths of the beams and effects should be considered,<br />
particularly with respect to how they will reach the audience. If direct audience scanning is desired, then the<br />
laser energy in the effects needs to be considered to decide if the effects are safe for direct viewing. Always<br />
ensure, that the maximum permissible exposure (MPE) is not exceeded in the area accesible to the public. So<br />
install the laser in such a way, that minimum distances and heights ensure the MPE is never exceeded in the<br />
public area.<br />
When setting up the laser, make sure the laser is affixed firmly, to avoid vibrations.<br />
Warning labels on the device<br />
Laser radiation<br />
Read manual<br />
before use<br />
Avoid exposure<br />
Operation by qualified<br />
To the beam<br />
personal only<br />
Laser class 4<br />
Never direct laser<br />
Beam at people<br />
Caution of radiation<br />
Never look directly<br />
If cover is removed<br />
into beam<br />
Indoor use only<br />
At front opening: Avoid exposure – laser radiation is emitted.<br />
INSTALLATION/OPERATION<br />
Don’t remove the warranty/serial number label - removal voids warranty<br />
The operator has to make sure that laser radiation – for laser class 4 also reflected laser radiation – higher than<br />
the maximum permissible level is avoided by technical or organisational measures. (Especially with respect to<br />
the MPE, see above.)<br />
Make sure to use the correct voltage. Use a power socket with earth/ground. Don’t use dimmer, RC, or other<br />
electronically switched sockets. Whenever possible, don’t use the laser together with large appliances,<br />
especially fog machines, on the same mains!<br />
If the device is used in a flying installation, the mounting brackets and an appropriate safety-rope must be<br />
used.<br />
In some countries, the operator must notify the accidence insurance and the authority for industrial safety,<br />
before operating a laser. For more information, contact the relevant authorities.<br />
Please consider that unauthorized modifications on the device are strictly forbidden due to safety reasons! If<br />
this device will be operated in any way differently than described in this manual, the product may suffer<br />
damages and the guarantee becomes void. Furthermore, any other operation may lead to dangers like<br />
shortcircuit, burns, electric shock, etc.<br />
Keep surrounding dry and clean. This unit should be keep dry, do not use in the rain or damp and dusty<br />
environment, don’t put liquid filled containers on the device. Projector should be put in a water-proof housing<br />
when operated outside.
<strong>Manual</strong> / <strong>Bedienungsanleitung</strong>: <strong>CS</strong>-<strong>1500</strong> <strong>RGB</strong><br />
3 / 10<br />
Regularly open the device (see “cleaning” further down) to check for dust inside, or if fog fluid condenses in the<br />
housing (if so rearrange hazer and/or laser position).<br />
Operating temperature is 10~35°C . In a new installation, check after some 15-30 minutes whether the outlet<br />
air gets too warm. Regularly check the inside for dust deposits, especially around the fans. Let laser cool off 10<br />
minutes after 2 hours of operation, to ensure maximum lifetime for the diode.<br />
Distance between laser aperture and projection screen should be not less than 1 meter.<br />
Do not turn device on and immediately off again frequently.<br />
Do not look into the laser beam directly, especially not with optical instruments.<br />
Do not touch the device with wet hands.<br />
When the laser diode becomes dim or broken, please contact your dealer.<br />
When returning laser to dealer/manufacturer always use original packaging.<br />
Maintenance should be performed every 15-day period. See “cleaning” further down.<br />
To ensure maximum lifetime of the laser:<br />
Don’t overheat the laser:<br />
• Always ensure good ventilation<br />
• Don’t have stage lights (especially moving heads) directed towards the laser<br />
• Regularly clean the fans and the interior from dust<br />
• In a new installation check the temperature after 30 minutes of operation<br />
Keep the laser dry<br />
• Make sure fog/hazer fluid doesn’t condensate inside the laser - fog has to be in front of the laser – not<br />
inside<br />
• A few days after (each new) installation, open the cover to check if fluids condensate inside<br />
• If fluids condensate inside, reposition the laser or fogger/hazer<br />
Turn the device off, when not used. The diode is on, when the device is on. Even if it is not lit.<br />
If the laser is equipped with a remote connector, connect an emergency switch to the Remote lock connector<br />
on the backside, the switch has to interrupt the connection between pins 1 and 2 to turn off the laser. If no<br />
emergency switch is used, insert the 9 pin dongle instead. If the laser has no remote lock, or the 9 pin dongle<br />
is used, use an emergency switch in the mains connection.<br />
Using the laser<br />
Caution – use of controls or adjustments or performance of procedures other than those specified<br />
herein may result in hazardous radiation exposure.<br />
Rigidly mount projector. Projector can be mounted in any position.<br />
Make sure the correct voltage is used. Connect mains. Connect an emergency switch to the 9-pin connector<br />
(Interlock connector) on the backside (pins 1 and 2). If you do not wish to connect an emergency switch,<br />
connect the 9-pin plug instead, and use an emergency switch in the mains connection.<br />
Open shutter and turn key to on position, the laser beam will now exit through the front opening – be careful.<br />
Control panel<br />
1 Main switch<br />
2 Remote lock, connect emergency switch<br />
3 Dip switch, mode/DMX address selection<br />
(see below)<br />
4 DMX 512 in/out<br />
5 Microphone sensitivity<br />
6 Mains connection<br />
7 ILDA in/out<br />
Operating modes<br />
The following operating modes can be selected from the DIP switch on the back side of the device:<br />
Dip switch Mode 1,0,0,0,0,0,0,0,0,1 Automatic<br />
0,0,0,0,0,0,0,0,0,1 Music active X,X,X,X,X,X,X,X,X,1 DMX<br />
“Music active”: patterns are changed/animated to the beat of the music. Sensitivity can be adjusted at the back panel.<br />
“Automatic mode”: patterns are changed automatically<br />
“DMX“: DMX512 Mode. Use the first 9 switches to select the address:<br />
x x x x x x x x x<br />
1 2 4 8 16 32 64 128 256<br />
e.g. 1000 0000 01, DMX mode address 1 (1+0+0+0+0+0+0+0+0+0)<br />
0010 0100 01, DMX mode address 36 (0+0+4+0+0+32+0+0+0)<br />
In music active mode the speed can be set with switches 3 and 4:<br />
Off, off Auto speed Off, on Mid<br />
On, off Slow On, on Fast speed<br />
Version Sep-10
<strong>Manual</strong> / <strong>Bedienungsanleitung</strong>: <strong>CS</strong>-<strong>1500</strong> <strong>RGB</strong><br />
4 / 10<br />
DMX control<br />
channel<br />
Function<br />
1 Mode: 0-63 laser off; 64-127 sound mode; 128-191 animated<br />
sound mode (see above); 210-255 DMX mode<br />
2 Pattern, 0-82 static patterns, 83-92 characters, 93-95 dancing<br />
anim., 96-98 heart anim., 99-255 dynamic patterns<br />
3 Effect channel: Strobe (8 levels)<br />
4 Horizontal movement: 0 no effect; 1-167 (fixed) movement; 168-<br />
188 animated movement left to right with increasing speed; 189-<br />
209 dto. Right to left; 210-255 dto. left to right and back<br />
5 Vertical movement: analogous to hor. movem.<br />
6 Zoom: 0-10 no effect; 11-109 increasing size; 110-154 growing<br />
with increasing speed; 155-204 dto. shrinking; 205-255 dto.<br />
growing/shrinking<br />
7 Width (rotation about y): 0-150 fixed rotation; 151-255 automatic<br />
rotation with incr. speed<br />
8 Height (rot. About X): analogous to width<br />
9 Rotation: 0-180 fixed rotation; 181-217 automatic with incr.<br />
speed clockwise; 218-255 do. counter clockwise<br />
10 Blanking: 0-63 no effect; 64-127 points are brighter; 128-191<br />
dashed lines; 192-255 points only<br />
11 Wave0-10 no effect, 11-200 frequency, 201-255 amplitude<br />
12 Colour: 0-19: white; etc. 6 colours 139-188 rainbow static;<br />
189-248 rainbow moving; 249-255 colour change<br />
Please note that not all effect channels are available for all patterns. E.g. you can’t zoom dynamic patterns, etc.<br />
Channel 3 (strobe) is also available in soundmode (channel 1 64-191).<br />
ILDA mode<br />
When an ILDA compatible interface is connected to the laser, the laser is automatically switched to ILDA mode.<br />
Output is then controlled by a PC running laser control software. The scanners are set for ca. 10000 PPS at 20-<br />
25° optical. When running faster, reduce image size/scan angle.<br />
Maintenance / cleaning<br />
Always disconnect from the mains when the device is not in use or before cleaning it.<br />
Open the device by removing top cover, remove 4 screws, 2 upper on front and back panel each. Remove any<br />
deposits of dust, especially at the fan. Check for condensed fog fluid inside. If so, clean and rearrange the<br />
position of laser and or hazer. Mirrors need cleaning when a “halo” is noticeable around the beam or an<br />
unusual high amount of diffuse light can be seen inside the device. Clean the mirrors with window cleaner and<br />
a paper towel.<br />
Never look directly into the light source. Always disconnect from the mains when the device is not<br />
in use or before cleaning it.<br />
Troubleshooting<br />
Problem<br />
Possible cause<br />
No function / fan not working<br />
Check mains connection<br />
Effects don’t change to the beat of the music<br />
Adjust sensitivity with the dial on the back.<br />
Check if device isn’t in DMX or autom. mode<br />
Problems with DMX control<br />
Check DMX address selection<br />
Device not working, but fan working<br />
Turn device off for ca. 1 minute.<br />
Laser does not switch to ILDA mode:<br />
• The interface does not connect pins 4 and 17 (Interlock) of the IDLA signal. See interface manual<br />
• The cable does not connect pins 4 and 17. Use a cable that connects pins 4 and 17.<br />
• Use an adapter that connects pins 4 and 17.<br />
Version Sep-10
<strong>Manual</strong> / <strong>Bedienungsanleitung</strong>: <strong>CS</strong>-<strong>1500</strong> <strong>RGB</strong><br />
5 / 10<br />
ILDA signal<br />
Pin out of the standard ILDA signal:<br />
1 Scanner X+ -5V..+5V 14 X- +5V..-5V<br />
2 Scanner Y+ -5V..+5V 15 Y- +5V..-5V<br />
3 Intensity/Blanking+ 0V..+2.5V 16 Intensity/Blanking- 0..-2.5V<br />
4 Interlock A 17 Interlock B<br />
5 Red+ 0..2.5V 18 Red- 0..-2.5V<br />
6 Green+ 0..2.5V 19 Green- 0..-2.5V<br />
7 Blue+ 0..2.5V 20 Blue- 0..-2.5V<br />
8 – 12 Not used 23-24 Not used<br />
13 Shutter +5V, max. 20 mA 25 GND Signal ground<br />
Technical specifications<br />
• Power supply: AC 85V-250V<br />
• Ambient temperature: +10°C … +35°C<br />
• Power consumption: 50 W<br />
• Operation modes: DMX 512, automatic, music mode, ILDA<br />
• Lasersources: aircooled DPSS laser (green), diode laser (red, blue)<br />
• Optical power (at the laser): min. 1100mW, max <strong>1500</strong>mW;<br />
>150mW 532nm green, >500mW 655nm red, > 450mW 445nm blue<br />
• Beam: green ca. 2mm/1.5mrad, red ca. 5mm/2.5mrad, blue ca. 3x0.5mm/2x4mrad<br />
• Laser class: 4<br />
• Scanning system: Galvo system, 30.000 PPS at 4°<br />
• Scanangle: max 40°<br />
• Weight: 7 kg<br />
• Dimensions: 33 x 31 x 17 cm (W x D x H)<br />
• Loudness:
<strong>Manual</strong> / <strong>Bedienungsanleitung</strong>: <strong>CS</strong>-<strong>1500</strong> <strong>RGB</strong><br />
6 / 10<br />
Lieferumfang<br />
Bitte prüfen Sie, ob Sie wirklich alle Teile erhalten haben und ob diese von der Lieferung unbeschädigt sind.<br />
Zum Lieferumfang gehören:<br />
1 x Laser Projektor<br />
1 x Kaltgerätekabel zur Stromversorgung<br />
1 x 9-poliger Blindstecker<br />
1 x <strong>Bedienungsanleitung</strong><br />
Hinweise zur Inbetriebnahme:<br />
Bitte stellen Sie sicher, dass die auf dem Gerät angegebene Spannung der entspricht, mit der Sie es betreiben<br />
wollen, bevor Sie den Laser in Betrieb nehmen.<br />
Der Laser darf nur von technisch versiertem Fachpersonal gemäss den im jeweiligen Land geltenden<br />
Sicherheitsbestimmungen installiert werden. Insbesondere die darin geforderten Sicherheitsabstände zwischen<br />
Gerät und Publikum, bzw. maximal zulässige Bestrahlungswerte, müssen immer eingehalten werden.<br />
In bestimmten Ländern kann zusätzlich eine Abnahme durch ein technisches<br />
Überwachungsinstitut erforderlich sein!<br />
Wenn ein Remote Anschluss am Gerät vorhanden ist, verbinden Sie einen Not-Ausschalter mit dem Remote<br />
Lock Anschlusses auf der Gehäuserückseite. Falls Sie keinen Not-Ausschalter benutzen, stecken Sie den<br />
beigefügten 9-poligen Blindstecker in die Remote Buchse. Falls kein Remote Anschluss vorhanden ist, benutzen<br />
Sie einen Notaus Schalter in der Stromzuführung.<br />
Halten Sie bei der Installation einen Mindestabstand von 15 cm zur Wand und 1 m zu feuergefährlichen<br />
Materialien, Dekoration oder sonstigen Installationen ein.<br />
Bringen Sie zur sicheren Installation ein Sicherheitsfangseil an. Das Fangseil sollte mindestens dem 10-fachen<br />
Gewicht des Geräts standhalten können.<br />
Wenn das Gerät grossen Temperaturschwankungen ausgesetzt war, nicht sofort anschalten. Gefahr der<br />
Kondenswasserbildung.<br />
Benutzen Sie immer eine Steckdose mit Schutz-/Erdleiter. Benutzen Sie niemals Dimmer-, Funk- oder andere<br />
elektronisch gesteuerten Steckdosen! Falls möglich benutzen Sie den Laser nicht zusammen mit anderen<br />
grossen elektrischen Verbraucher (insbesondere Nebelmaschinen) zusammen auf derselben Leitung!<br />
Sorgen Sie immer für eine ausreichende Belüftung. Insbesondere dürfen die Belüftungsöffnungen nicht<br />
verdeckt sein.<br />
Netzstecker/Kaltgerätebuchse zugänglich halten.<br />
Stellen Sie sicher, dass das Gerät nicht zu heiss wird. Überprüfen Sie nach einer Installation an einem neuen<br />
Platz nach ca. 15-30 Minuten, ob die Abluft sehr warm wird. Stellen Sie sicher, dass das Gerät nicht dem Strahl<br />
von Scheinwerfern ausgesetzt werden (insbesondere bei beweglichen Scheinwerfern!), diese können in kurzer<br />
Zeit zur Überhitzung führen.<br />
Stellen Sie sicher, dass der Netzstecker gezogen ist, wenn Sie am Gerät hantieren bzw. es installieren, oder es<br />
(zum Reinigen) öffnen.<br />
Das Gerät nicht schnell hintereinander Ein- und Ausstecken, da dies die Lebensdauer der Laserdiode erheblich<br />
verkürzen kann!<br />
Das Gerät sollte sich nach einer Stunde Dauerbetrieb für ca. 15 Minuten abkühlen.<br />
Stellen Sie sicher, dass das Gerät fest montiert wird, um Vibrationen zu vermeiden.<br />
Warnhinweise<br />
Beim Entfernen des Garantielabels erlischt sofort jeder Anspruch auf Gewährleistung<br />
Betreiben Sie das Gerät nur gemäss dieser Betriebsanleitung<br />
Benutzen Sie das Gerät nicht, wenn sichtbare Beschädigungen am Gehäuse, den Anschlussfeldern und vor<br />
allem an den Stromversorgungsbuchsen oder -kabel vorliegen.<br />
Niemals direkt in den Strahl des austretenden Lasers blicken. Erblindungsgefahr!<br />
Gerät nicht bei hoher Luftfeuchtigkeit, Regen oder in staubiger Umgebung betreiben. Vor Tropf-/Spritzwasser<br />
schützen, keine mit Flüssigkeit gefüllten Gefässe auf dem Gerät abstellen. Öffnen Sie das Gerät in<br />
regelmässigen Abständen, insbesondere nach Installation an einem neuen Platz, und überprüfen Sie, ob sich<br />
Nebelfluid im Inneren absetzt. Falls ja, reinigen Sie das Gerät, und ändern Sie die Position von Gerät und/oder<br />
Nebelmaschine. Überprüfen Sie ebenfalls, ob sich Staub, insbesondere im Bereich der Laser und Lüfter<br />
ansammelt. Falls ja, Gerät reinigen, sonst droht Gefahr des Überhitzens. Feuchtigkeit und Hitze können die<br />
Lebensdauer stark verkürzen, und führen zum Erlöschen der Garantie!<br />
Das Gerät bzw. das Stromkabel nie mit nassen Händen anfassen!<br />
Sollten Störungen am Gerät oder der Diode auftreten, setzen Sie sich bitte mit Ihrem Händler in Verbindung<br />
Version Sep-10
<strong>Manual</strong> / <strong>Bedienungsanleitung</strong>: <strong>CS</strong>-<strong>1500</strong> <strong>RGB</strong><br />
7 / 10<br />
Um die Lebensdauer Ihres Lasers zu erhöhen:<br />
Schützen Sie das Gerät vor Überhitzung:<br />
• Immer für ausreichende Ventilation sorgen.<br />
• Keine Scheinwerfer (insbesondere kopfbewegte) auf das Gerät richten.<br />
• Regelmässig das Innere und besonders die Lüfter von Staub reinigen.<br />
• Nach jeder Neuinstallation nach ca. 30 Minuten die Temperatur prüfen und gegebenenfalls das Gerät an<br />
einen kühleren/besser belüfteten Standort bringen.<br />
Gerät trocken halten:<br />
• Stellen Sie sicher, dass kein Nebelfluid im Inneren kondensiert. Nebel sollte vor dem Gerät sein, nicht darin.<br />
• Einige Tage nach jeder Neuinstallation Gehäuse öffnen und nachprüfen ob sich Kondensat bildet.<br />
Gegebenenfalls Position von Laser/Nebelmaschine ändern.<br />
Gerät ausschalten wenn es nicht benutzt wird. Auch wenn die Diode nicht leuchtet, sie ist an, solange das Gerät<br />
an ist.<br />
Warnhinweise am Gerät:<br />
Laser Strahlung<br />
Nicht dem Strahl<br />
aussetzen<br />
Laserklasse 4<br />
Laserstrahlung bei<br />
geöffnetem Gehäuse<br />
Nur in geschlossenen Räumen betreiben<br />
Am Strahlaustritt:<br />
Inbetriebnahme<br />
Bestrahlung vermeiden - Austritt von Laserstrahlung.<br />
Vor Benutzung<br />
Anleitung durchlesen<br />
Betrieb nur durch<br />
qualifiziertes Personal<br />
Laserstrahl nie<br />
auf Menschen richten<br />
Nie in den<br />
Laserstrahl schauen<br />
Verbinden Sie das Gerät mit dem Stromnetz, schliessen Sie einen Notaus Schalter mit dem remote lock<br />
Anschluss an, öffnen Sie den Shutter und drehen Sie den Schlüssel auf „on“. Der Laserstrahl tritt nun aus der<br />
vorderen Öffnung - Vorsicht.<br />
Bedienelemente<br />
1 Ein-/Ausschalter<br />
2 Remote lock, Anschluss für Notaus Schalter<br />
3 Dip switch, Modus/DMX Adresseinstellung<br />
4 DMX 512 in/out<br />
5 Mikrofon Empfindlichkeit<br />
6 Netzanschluss<br />
7 ILDA in/out<br />
Betriebsmodi<br />
Am dip switch an der Gehäuserückseite können Sie folgende Betriebsmodi eistellen:<br />
Dip switch Modus 1,0,0,0,0,0,0,0,0,1 Automatisch<br />
0,0,0,0,0,0,0,0,0,1 Musiksteuerung X,X,X,X,X,X,X,X,X,1 DMX<br />
“Musiksteuerung”: Muster werde im Rhythmus geädert/animiert. Empfindlichkeit kann an der Gehäuserückseite<br />
eingestellt werden.<br />
“Automatisch”: Muster werden automatisch durchgewechselt.<br />
“DMX“: DMX512 Modus - Adresseinstellung über die ersten 9 Schalter:<br />
x x x x x x x x x<br />
1 2 4 8 16 32 64 128 256<br />
Z.B. 1000 0000 01, DMX Modus Adresse 1 (1+0+0+0+0+0+0+0+0+0)<br />
0010 0100 01, DMX Modus Adresse 36 (0+0+4+0+0+32+0+0+0)<br />
Im Musikmodus kann die Geschwindigkeit über die Schalter 3 und 4 gesteuert werden<br />
Off, off Automatisch Off, on Mittel<br />
On, off Langsam On, on Schnell<br />
Version Sep-10
<strong>Manual</strong> / <strong>Bedienungsanleitung</strong>: <strong>CS</strong>-<strong>1500</strong> <strong>RGB</strong><br />
8 / 10<br />
DMX Steuerung<br />
Kanal<br />
Belegung<br />
1 Betriebsmodi: 0-63 Laser aus; 64-127 Soundmodus; 128-191<br />
animierter Soundmodus; 192-255 DMX Modus<br />
2 Muster / Animation<br />
3 Effektkanal: Strobe (Blinken mit zunehmender Geschwindigkeit, 8<br />
Werte)<br />
4 Horizontale Bewegung 0 kein Effekt, 1-167 feste Auslenkung;<br />
168-188 Bewegung von links nach rechts mit zunehmender<br />
Geschwindigkeit; 189-209 dto. Rechts nach links; 210-255 dto.<br />
Hin- und her<br />
5 Vertikale Bewegung: analog Kanal 4<br />
6 Zoom/Größe: 0-10 kein Effekt; 11-109 zunehmende Größe; 110-<br />
154 automatisch größer werdend mit zunehmender<br />
Geschwindigkeit; 155-204 dto. Kleiner; 205-255 dto.<br />
größer/kleiner<br />
7 Breite (Rotation um Y): 0-150 feste Rotation; 151-255<br />
automatisch mit zunehmender Geschwindigkeit<br />
8 Höhe (Rotation um X) analog Kanal 7<br />
9 Drehung: 0-180 feste Drehung; 181-217 automatisch mit<br />
zunehmender Geschwindigkeit im Uhrzeigersinn; 218-255 dto.<br />
gegen den Uhrzeigersinn<br />
10 Blanking: 0-70 kein Effekt; 71-139 Punkte werden betont; 140-<br />
209 Linienstücke werden gestrichelt gezeichnet; 210-255 nur<br />
Punkte werden gezeichnet.<br />
11 Welle, 0-10 lein Effekt, 11-200 Frequenz, 201-255 Amplitude<br />
12 Farbe: 0-19: weiss; etc. 6 Farben 139-188 Regenbogen statisch;<br />
189-248 Regenbogen dynamisch; 249-255 Farbwechsel<br />
Bitte beachten Sie, dass nicht jeder Effektkanal bei allen Mustern aktiv ist. Z.B. kann bei<br />
dynamischen Mustern die Größe nicht geändert werden etc.<br />
Kanal 3 (Strobe) ist auch im Soundmodus (Kanal 1 64-191) verfügbar.<br />
ILDA Steuerung<br />
Wenn ein ILDA kompatibles Interface angeschlossen wird schaltet das Gerät in den ILDA Modus. Die Steuerung<br />
erfolgt über geeignete PC Software. Die Scanner sind für ca. 10000 PPS bei 20-25° optisch eingestellt. Wenn<br />
Sie die Scanner schneller betreiben, verkleinern Sie bitte die Auslenkung.<br />
Reinigung<br />
Reinigen Sie das Gerät regelmässig, um seine lange Lebensdauer zu erhalten. Trennen Sie dazu das Gerät<br />
unbedingt zuvor vom Netz! Schauen Sie niemals direkt in den Laserstrahl!<br />
Zum Öffnen entfernen Sie die Schrauben an den Seitenteilen und der Rückseite, entfernen Sie 2 Füsse auf einer<br />
Seite, ziehen Sie den Stecker zur Frontplatte und schieben Sie die Grundplatte heraus – achten Sie auf die<br />
Kabel. Entfernen Sie eventuelle Staubansammlungen, insbesondere im Bereich der Lüfter und Laser. Sollten<br />
sich Spuren von Nebelfluid absetzen, Gerät reinigen und Position von Gerät und/oder Nebelmaschine ändern.<br />
Verwenden Sie zur Reinigung klares Leitungswasser oder Alkohol und ein weiches Tuch. Für eine optimale<br />
Lichtausbeute sollten die Spiegel sauber und ohne Kratzer sein. Bereits kleinste Kratzer können die<br />
Geräteleistung erheblich beeinträchtigen! Sie sollten die Spiegel reinigen wenn ein deutlicher „Halo“ um den<br />
Laserstrahl zu erkennen oder ungewöhnlich viel Streulicht im Gerät zu sehen ist. Spiegel idealerweise mit<br />
Aceton und Linsenpapier, alternativ mit Fensterreiniger und Papierwischtuch, reinigen. Immer in eine Richtung<br />
wischen um die Auswirkung möglicher Kratzer zu minimieren.<br />
Fehlerbehebung<br />
Fehlfunktion<br />
Keine Funktion / kein Lüftergeräusch<br />
Die Lasereffekte wechseln nicht in Abhängigkeit<br />
von der Musik<br />
Behebung / Ursache<br />
Stromversorgung überprüfen<br />
Erhöhen Sie die Lautstärke der Musik oder erhöhen Sie die<br />
Empfindlichkeit mithilfe des Reglers an der Rückseite des<br />
Lasers<br />
Überprüfen Sie, dass sich das Gerät nicht im DMX- oder<br />
Automatikmodus befindet<br />
Version Sep-10
<strong>Manual</strong> / <strong>Bedienungsanleitung</strong>: <strong>CS</strong>-<strong>1500</strong> <strong>RGB</strong><br />
9 / 10<br />
Es treten Probleme bei der DMX-Steuerung auf<br />
Keine Funktion aber Lüftergeräusch vorhanden<br />
Überprüfen Sie die korrekte Einstellung der Adressen<br />
Gerät ausschalten und nach ca. 1 Minute wieder einschalten<br />
Gerät lässt sich nicht über ILDA ansteuern:<br />
• Die Interfacekarte hat die Pins 4 und 17 nicht verbunden, vergewissern Sie sich im <strong>Manual</strong> der<br />
Interfacekarte.<br />
• Das verwendete Anschlusskabel verbindet diese Pins nicht. Verwenden Sie ein Kabel, das diese Pins<br />
verbindet.<br />
• Benutzen Sie einen Adapter, der die Pins 4 und 17 verbindet.<br />
ILDA Ansteuerung<br />
Belegung des Standard ILDA Signals:<br />
1 Scanner X+ -5V..+5V 14 X- +5V..-5V<br />
2 Scanner Y+ -5V..+5V 15 Y- +5V..-5V<br />
3 Intensity/Blanking+ 0V..+2.5V 16 Intensity/Blanking- 0..-2.5V<br />
4 Interlock A 17 Interlock B<br />
5 Red+ 0..2.5V 18 Red- 0..-2.5V<br />
6 Green+ 0..2.5V 19 Green- 0..-2.5V<br />
7 Blue+ 0..2.5V 20 Blue- 0..-2.5V<br />
8 – 12 Not used 23-24 Not used<br />
13 Shutter +5V, max. 20 mA 25 GND Signal ground / Masse<br />
Technische Daten<br />
• Laserquellen: luftgekühlter DPSS Laser (grün), Diodenlaser (rot, blau)<br />
• Laserleistung (am Laser): min. 1100mW, max <strong>1500</strong>mW;<br />
>150mW 532nm grün, >500mW 655nm rot, >450mW 445nm blau<br />
• Laserklasse: 4<br />
• Betriebsmodi: DMX 512, Automatik Modus, Musik Modus, ILDA<br />
• Scannnersystem: Galvos, 30000pps bei 4°<br />
• Scanwinkel: max 40°<br />
• DMX 512: 12 Kanäle<br />
• Strahldaten: grün 2mm/1.5mrad, rot ca. 5mm/2.5mrad, blau ca. 3x0.5mm/2x4mrad<br />
• Stromversorgung: 85~250V AC<br />
• Stromaufnahme: 50W<br />
• Abmessungen: 330 x 310 x 170 mm (B x T x H)<br />
• Gewicht: 7 kg<br />
• Betriebstemperatur: 10°-35°C<br />
• Lautstärke:
<strong>Manual</strong> / <strong>Bedienungsanleitung</strong>: <strong>CS</strong>-<strong>1500</strong> <strong>RGB</strong><br />
10 / 10<br />
Laserworld (Switzerland) AG<br />
Kreuzlingerstrasse 5<br />
8574 Lengwil-Oberhofen<br />
SWITZERLAND<br />
Authorized person:<br />
Supervisory board Mr Martin Werner<br />
place of business: 8574 Lengwil-Oberhofen / SWITZERLAND<br />
company number: CH-440.3.020.548-6<br />
Commercial Registry Kanton Thurgau<br />
www.laserworld.com<br />
info@laserworld.com<br />
representative according to EMVG:<br />
Cleantech Europe GmbH<br />
Managing Director: Thomas Schulze<br />
Fürkhofstr. 5<br />
81927 München / DE<br />
Version Sep-10