MB200 MR200 - Acumo
MB200 MR200 - Acumo
MB200 MR200 - Acumo

Erfolgreiche ePaper selbst erstellen
Machen Sie aus Ihren PDF Publikationen ein blätterbares Flipbook mit unserer einzigartigen Google optimierten e-Paper Software.
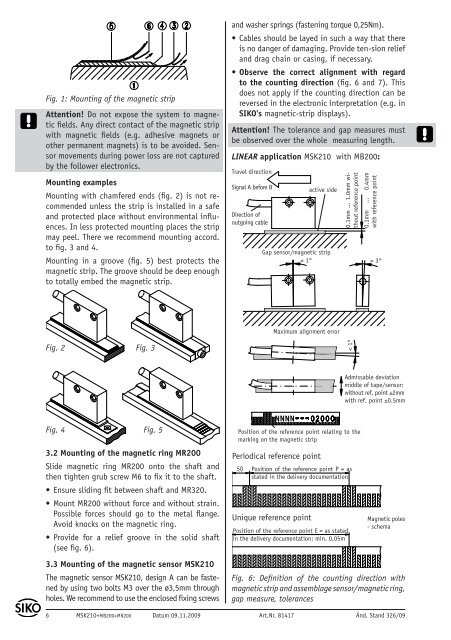
Fig. 1: Mounting of the magnetic strip<br />
Attention! Do not expose the system to magnetic<br />
fields. Any direct contact of the magnetic strip<br />
with magnetic fields (e.g. adhesive magnets or<br />
other permanent magnets) is to be avoided. Sensor<br />
movements during power loss are not captured<br />
by the follower electronics.<br />
Mounting examples<br />
Mounting with chamfered ends (fig. 2) is not recommended<br />
unless the strip is installed in a safe<br />
and protected place without environmental influences.<br />
In less protected mounting places the strip<br />
may peel. There we recommend mounting accord.<br />
to fig. 3 and 4.<br />
Mounting in a groove (fig. 5) best protects the<br />
magnetic strip. The groove should be deep enough<br />
to totally embed the magnetic strip.<br />
and washer springs (fastening torque 0,25Nm).<br />
• Cables should be layed in such a way that there<br />
is no danger of damaging. Provide ten-sion relief<br />
and drag chain or casing, if necessary.<br />
• Observe the correct alignment with regard<br />
to the counting direction (fig. 6 and 7). This<br />
does not apply if the counting direction can be<br />
reversed in the electronic interpretation (e.g. in<br />
SIKO's magnetic-strip displays).<br />
Attention! The tolerance and gap measures must<br />
be observed over the whole measuring length.<br />
LINEAR application MSK210 with <strong>MB200</strong>:<br />
Travel direction<br />
Signal A before B<br />
Direction of<br />
outgoing cable<br />
active side<br />
0.1mm ... 1.0mm without<br />
reference point<br />
0.1mm ... 0.4mm<br />
with reference point<br />
Gap sensor/magnetic strip<br />
< 1° < 3°<br />
Maximum alignment error<br />
Fig. 2 Fig. 3<br />
< 1°<br />
Admissable deviation<br />
middle of tape/sensor:<br />
without ref. point ±2mm<br />
with ref. point ±0.5mm<br />
Fig. 4 Fig. 5<br />
3.2 Mounting of the magnetic ring <strong>MR200</strong><br />
Slide magnetic ring <strong>MR200</strong> onto the shaft and<br />
then tighten grub screw M6 to fix it to the shaft.<br />
• Ensure sliding fit between shaft and MR320.<br />
• Mount <strong>MR200</strong> without force and without strain.<br />
Possible forces should go to the metal flange.<br />
Avoid knocks on the magnetic ring.<br />
• Provide for a relief groove in the solid shaft<br />
(see fig. 6).<br />
3.3 Mounting of the magnetic sensor MSK210<br />
The magnetic sensor MSK210, design A can be fastened<br />
by using two bolts M3 over the ø3,5mm through<br />
holes. We recommend to use the enclosed fixing screws<br />
Position of the reference point relating to the<br />
marking on the magnetic strip<br />
Periodical reference point<br />
50<br />
Position of the reference point P = as<br />
stated in the delivery documentation<br />
Unique reference point<br />
Position of the reference point E = as stated<br />
in the delivery documentation; min. 0,05m<br />
Magnetic poles<br />
- schema<br />
Fig. 6: Definition of the counting direction with<br />
magnetic strip and assemblage sensor/magnetic ring,<br />
gap measure, tolerances<br />
6 MSK210+<strong>MB200</strong>+<strong>MR200</strong> Datum 09.11.2009 Art.Nr. 81417 Änd. Stand 326/09