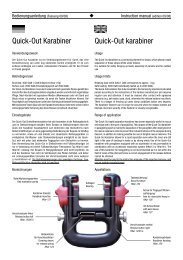
Quick-Out Karabiner Quick-Out karabiner
Quick-Out Karabiner Quick-Out karabiner
Quick-Out Karabiner Quick-Out karabiner

Erfolgreiche ePaper selbst erstellen
Machen Sie aus Ihren PDF Publikationen ein blätterbares Flipbook mit unserer einzigartigen Google optimierten e-Paper Software.
Bedienungsanleitung (Fassung 09/08) Instruction manual (edition 09/08)<br />
Montage am Gurtzeug Mounting on the harness<br />
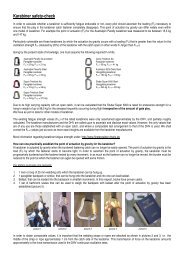
Gehäusebefestigung<br />
Um das <strong>Quick</strong>-<strong>Out</strong> Gehäuse am Gurtzeug zu<br />
befestigen, muss die linke Verschlusstaste mit<br />
einem Philips Kreuzschlitz Schraubendreher<br />
(Schaftdurchmesser max. 5 mm passend für 4 mm<br />
Schrauben) demontiert werden (Fig. 1).<br />
Achtung: Die Verwendung eines falschen<br />
Schraubendrehers kann eine Beschädigung der<br />
Schraube und der Verschlusstaste zur Folge<br />
haben. Die rechte Verschlusstaste ist nicht<br />
demontabel (dadurch wird verhindert, dass die<br />
Verschlusstasten vertauscht werden). Das Gehäuse<br />
soll so montiert werden, dass am fertigen Gurt<br />
der Einsatz des <strong>Quick</strong>-<strong>Out</strong> zur Bedienperson<br />
hinweist. Das <strong>Quick</strong>-<strong>Out</strong> Gehäuse darf nur an<br />
Gurten verwendet werden, die keinen Druck auf<br />
die Abdeckhülse der Verschlussfeder ausüben.<br />
Funktion der Tasten ist nur gewährleistet, sofern<br />
die original Verschlussschrauben (Art. Nr. 4/8KV)<br />
verwendet werden. Die Verschlussschrauben sind<br />
fest anzuziehen. Bei Verwendung in motorisierten<br />
Fluggeräten ist die Schraube mit demontierbarer<br />
Schraubensicherung (z.B. Loctite 243) zu<br />
sichern. Eine zuverlässige Auslösung ist nur dann<br />
gewährleistet, wenn der <strong>Quick</strong>-<strong>Out</strong> vollkommen<br />
frei hängt, und das Herauskippen des Einsatzes<br />
nicht behindert wird.<br />
Befestigung des <strong>Quick</strong>-<strong>Out</strong> Einsatzes<br />
Der Einsatz darf nur an Gurten mit 25 mm Breite<br />
und max 10 mm Dicke verwendet werden. Zur<br />
Montage muß die Achse des Einsatzes mittels<br />
eines 5 mm Sechskant-Schraubendrehers entfernt<br />
werden (Fig. 2). Bei der Montage darauf achten,<br />
dass die Achsenhülse nicht vergessen wird. Es<br />
wird empfohlen, das Gewinde der Achse mit<br />
lösbarer Schaubensicherung (z.B. Loctite 243) zu<br />
sichern. Die Achse darf am Einsatz seitlich nicht<br />
überstehen, da sonst die Auslösung behindert<br />
wird. Nach Montage der Gurte sollte ein Auslösetest<br />
durchgeführt werden.<br />
Verwendung eines <strong>Quick</strong>-<strong>Out</strong> Gehäuses mit unterschiedlichen<br />
<strong>Quick</strong>-<strong>Out</strong> Einsätzen<br />
Zuverlässige Funktion des <strong>Quick</strong>-<strong>Out</strong> wird nur gewährleistet, wenn die<br />
Kombination Gehäuse/Einsatz werksseitig geprüft wurde. Sofern mehrere Einsätze<br />
mit einem Gehäuse kombiniert werden sollen, so sind diese entsprechend zu<br />
bestellen. Beim Nachbestellen von Einsätzen muss das Gehäuse an den Hersteller<br />
eingeschickt werden.<br />
Verwendung des <strong>Quick</strong>-<strong>Out</strong> an Gleitschirmgurtzeugen<br />
Das <strong>Quick</strong>-<strong>Out</strong> Gehäuse wird am Gleitschirmgurtzeug, der Einsatz wird an den<br />
Tragegurten des Gleitschirms montiert. Der Einsatz soll so montiert werden, dass<br />
die Tragegute nach dem Zusammenfügen des <strong>Quick</strong>-<strong>Out</strong> nicht verdreht sind.<br />
Manche Gleitschirmgurte haben zu eng genähte Schlaufen, so dass eine Montage<br />
des <strong>Quick</strong>-<strong>Out</strong> Gehäuses nicht möglich ist. Unsere Gurtnäherei in Seeg führt die<br />
erforderlichen Änderungen am Gurtzeug fachgerecht und preiswert durch.<br />
Fig. 1<br />
Attaching the housing<br />
Tragegurt/Pilotenaufhängung/<br />
Hang loop<br />
Achse/<br />
Axle<br />
Fig. 2<br />
Achsenhülse/<br />
Axle sleeve<br />
In order to mount the <strong>Quick</strong>-<strong>Out</strong> housing<br />
on the harness, the left-hand release<br />
button must be removed with a Philips<br />
cross slot screw driver (diameter of<br />
shank max. 5 mm proper for 4 mm screws)<br />
(Fig. 1).<br />
Attention: The use of a wrong screw driver may<br />
damage screw and release button.<br />
The right-hand release button cannot be removed<br />
(thus preventing the possibility of swopping<br />
the release buttons). The housing should be<br />
mounted so that when sitting in the harness, the<br />
inserts face the pilot. The <strong>Quick</strong>-<strong>Out</strong> housing may<br />
only be used on harnesses that do not cause<br />
pressure to be exerted on the covering sleeve<br />
for the release spring. The release buttons can<br />
only be guaranteed to function when the original<br />
release screws are used (Art. No. 4/8KV). The<br />
release screws must be screwed down tight.<br />
If used in motorised aircraft the bolt has to be<br />
secured with removable screw retension (e.g.<br />
Loctite 243).<br />
A dependable release can only be<br />
guaranteed if the <strong>Quick</strong>-<strong>Out</strong> hangs completely<br />
free and the tipping out of the insert is unhindered.<br />
Attachment of the <strong>Quick</strong>-<strong>Out</strong> insert<br />
The insert may only be used on harness straps<br />
with a width of 25 mm and a thickness of<br />
maximum 10 mm. To mount, the axle of the insert<br />
must be removed with a 5 mm hexagon wrench<br />
key (Fig. 2). When mounting, attention must be<br />
paid that the covering sleeve of the axle is not<br />
forgotten. We recommend securing the thread of the<br />
axle with removable screw retension (e.g. Loctite<br />
243). The axle must not protrude from the side<br />
of the insert, otherwise release will be hindered.<br />
After mounting the straps, a test release should<br />
be carried out.<br />
Use of a <strong>Quick</strong>-<strong>Out</strong> housing with various <strong>Quick</strong>-<strong>Out</strong><br />
inserts<br />
Dependable functioning of the <strong>Quick</strong>-<strong>Out</strong> can only be guaranteed when the<br />
combination of housing and insert have been tested in our factory. If it is planned<br />
to combine the use of several inserts with one housing, then these should be<br />
ordered accordingly. If inserts are ordered subsequently, then the housing must<br />
be sent to the manufacturer.<br />
Use of the <strong>Quick</strong>-<strong>Out</strong> on paraglider harnesses<br />
The <strong>Quick</strong>-<strong>Out</strong> housing is mounted to the harness, the inserts are mounted to the<br />
paraglider risers. The insert should be mounted in such a way that the risers are<br />
not twisted after the housing and inserts have been joined together. The loops<br />
on some harnesses have been sewn too small to accommodate the <strong>Quick</strong>-<strong>Out</strong><br />
housing. Our harness sewing department in Seeg can carry out the necessary<br />
alterations to the harness professionally and inexpensively.