Quick-Out Karabiner Quick-Out karabiner
Quick-Out Karabiner Quick-Out karabiner
Quick-Out Karabiner Quick-Out karabiner

Sie wollen auch ein ePaper? Erhöhen Sie die Reichweite Ihrer Titel.
YUMPU macht aus Druck-PDFs automatisch weboptimierte ePaper, die Google liebt.
Bedienungsanleitung (Fassung 09/08) Instruction manual (edition 09/08)<br />
<strong>Quick</strong>-<strong>Out</strong> <strong>Karabiner</strong> <strong>Quick</strong>-<strong>Out</strong> <strong>karabiner</strong><br />
Verwendungszweck<br />
Der <strong>Quick</strong>-<strong>Out</strong> <strong>Karabiner</strong> ist ein Verbindungselement für Gurte, das eine<br />
Schnelltrennung von unter Zug stehenden Gurten ermöglicht. Er ist zum<br />
sicheren Anhängen von Lasten, insbesondere Personen und für den Einsatz<br />
im Freien geeignet.<br />
Betriebsgrenzen<br />
Bruchlast: 4000 DaN (1 DaN entspricht etwa 1 Kg).<br />
Sichere Last: 2000 DaN (Einzelstückgeprüft auf 2000 DaN).<br />
Der <strong>Quick</strong>-<strong>Out</strong> <strong>Karabiner</strong> muss durch eine technisch geschulte Person gemäß den<br />
Vorschriften des Gurtzeugherstellers eingebaut werden und erfordert regelmäßige<br />
Pflege. Nach Kontakt mit agressiven Medien (Meerwasser) oder mit Sand und<br />
Staub muss er gereinigt werden, da sonst die Tasten blockieren können. Bei<br />
Feuchtigkeit und Temperaturen unter dem Gefrierpunkt besteht Vereisungsgefahr.<br />
Mit blockierten Tasten lässt sich der <strong>Karabiner</strong>verschluss nicht mehr sichern. Nicht<br />
ordnungsgemäße Sicherung des Verschlusses ist optisch erkennbar.<br />
Einsatzgebiete<br />
Der <strong>Quick</strong>-<strong>Out</strong> Schnelltrenn<strong>karabiner</strong> hat sich besonders in der Rettungstechnik<br />
und im Gleitschirmsport bewährt. Beim Einsatz im Gleitschirmsport dient der<br />
<strong>Quick</strong>-<strong>Out</strong> <strong>Karabiner</strong> hauptsächlich zum Abtrennen des Gleitschirms nach<br />
Notschirmöffnungen um eine gegenseitige Behinderung der Kappen im Sinkflug<br />
zu vermeiden, sowie um den Einsatz von steuerbaren Rettungsgeräten zu<br />
ermöglichen. Bei Wasser- oder Starkwindlandungen ermöglicht es der <strong>Quick</strong>-<br />
<strong>Out</strong>, sich mit unter Last stehenden Tragegurten vom Gleitschirm zu trennen.<br />
Eine Verwendung des <strong>Quick</strong>-<strong>Out</strong> in Gleitschirmen mit Fußbeschleuniger ist<br />
nur in Verbindung mit einem Fußbeschleuniger-Trennsystem Typ HKar13 oder<br />
HKar141 zulässig. Der Einsatz im Hängegleitersport wird nicht empfohlen, da<br />
sich der <strong>Karabiner</strong> hier nicht im Sichtbereich des Piloten befindet, und daher<br />
ein ordnungsgemäßes Einrasten der Verschlusstasten nicht ohne weiteres<br />
zu kontrollieren ist. Die Betriebsanweisungen des jeweiligen Gurtzeug- bzw.<br />
Rettungsfallschirm-Herstellers sind zu beachten!<br />
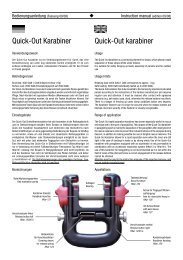
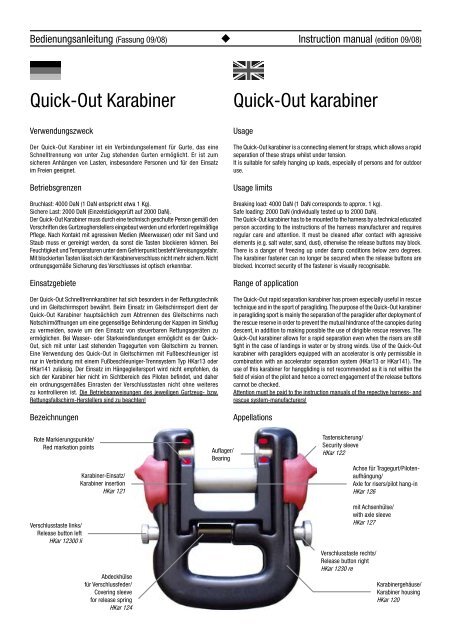
Bezeichnungen<br />
Rote Markierungspunkte/<br />
Red markation points<br />
Verschlusstaste links/<br />
Release button left<br />
HKar 12300 li<br />
<strong>Karabiner</strong>-Einsatz/<br />
<strong>Karabiner</strong> insertion<br />
HKar 121<br />
Abdeckhülse<br />
für Verschlussfeder/<br />
Covering sleeve<br />
for release spring<br />
HKar 124<br />
Auflager/<br />
Bearing<br />
Usage<br />
The <strong>Quick</strong>-<strong>Out</strong> <strong>karabiner</strong> is a connecting element for straps, which allows a rapid<br />
separation of these straps whilst under tension.<br />
It is suitable for safely hanging up loads, especially of persons and for outdoor<br />
use.<br />
Usage limits<br />
Breaking load: 4000 DaN (1 DaN corresponds to approx. 1 kg).<br />
Safe loading: 2000 DaN (individually tested up to 2000 DaN).<br />
The <strong>Quick</strong>-<strong>Out</strong> <strong>karabiner</strong> has to be mounted to the harness by a technical educated<br />
person according to the instructions of the harness manufacturer and requires<br />
regular care and attention. It must be cleaned after contact with agressive<br />
elements (e.g. salt water, sand, dust), otherwise the release buttons may block.<br />
There is a danger of freezing up under damp conditions below zero degrees.<br />
The <strong>karabiner</strong> fastener can no longer be secured when the release buttons are<br />
blocked. Incorrect security of the fastener is visually recognisable.<br />
Range of application<br />
The <strong>Quick</strong>-<strong>Out</strong> rapid separation <strong>karabiner</strong> has proven especially useful in rescue<br />
technique and in the sport of paragliding. The purpose of the <strong>Quick</strong>-<strong>Out</strong> <strong>karabiner</strong><br />
in paragliding sport is mainly the separation of the paraglider after deployment of<br />
the rescue reserve in order to prevent the mutual hindrance of the canopies during<br />
descent, in addition to making possible the use of dirigible rescue reserves. The<br />
<strong>Quick</strong>-<strong>Out</strong> <strong>karabiner</strong> allows for a rapid separation even when the risers are still<br />
tight in the case of landings in water or by strong winds. Use of the <strong>Quick</strong>-<strong>Out</strong><br />
<strong>karabiner</strong> with paragliders equipped with an accelerator is only permissible in<br />
combination with an accelerator separation system (HKar13 or HKar141). The<br />
use of this <strong>karabiner</strong> for hanggliding is not recommended as it is not within the<br />
field of vision of the pilot and hence a correct engagement of the release buttons<br />
cannot be checked.<br />
Attention must be paid to the instruction manuals of the repective harness- and<br />
rescue system-manufacturers!<br />
Appellations<br />
Tastensicherung/<br />
Security sleeve<br />
HKar 122<br />
Achse für Tragegurt/Pilotenaufhängung/<br />
Axle for risers/pilot hang-in<br />
HKar 126<br />
mit Achsenhülse/<br />
with axle sleeve<br />
HKar 127<br />
Verschlusstaste rechts/<br />
Release button right<br />
HKar 1230 re<br />
<strong>Karabiner</strong>gehäuse/<br />
<strong>Karabiner</strong> housing<br />
HKar 120
Bedienungsanleitung (Fassung 09/08) Instruction manual (edition 09/08)<br />
Montage am Gurtzeug Mounting on the harness<br />
Gehäusebefestigung<br />
Um das <strong>Quick</strong>-<strong>Out</strong> Gehäuse am Gurtzeug zu<br />
befestigen, muss die linke Verschlusstaste mit<br />
einem Philips Kreuzschlitz Schraubendreher<br />
(Schaftdurchmesser max. 5 mm passend für 4 mm<br />
Schrauben) demontiert werden (Fig. 1).<br />
Achtung: Die Verwendung eines falschen<br />
Schraubendrehers kann eine Beschädigung der<br />
Schraube und der Verschlusstaste zur Folge<br />
haben. Die rechte Verschlusstaste ist nicht<br />
demontabel (dadurch wird verhindert, dass die<br />
Verschlusstasten vertauscht werden). Das Gehäuse<br />
soll so montiert werden, dass am fertigen Gurt<br />
der Einsatz des <strong>Quick</strong>-<strong>Out</strong> zur Bedienperson<br />
hinweist. Das <strong>Quick</strong>-<strong>Out</strong> Gehäuse darf nur an<br />
Gurten verwendet werden, die keinen Druck auf<br />
die Abdeckhülse der Verschlussfeder ausüben.<br />
Funktion der Tasten ist nur gewährleistet, sofern<br />
die original Verschlussschrauben (Art. Nr. 4/8KV)<br />
verwendet werden. Die Verschlussschrauben sind<br />
fest anzuziehen. Bei Verwendung in motorisierten<br />
Fluggeräten ist die Schraube mit demontierbarer<br />
Schraubensicherung (z.B. Loctite 243) zu<br />
sichern. Eine zuverlässige Auslösung ist nur dann<br />
gewährleistet, wenn der <strong>Quick</strong>-<strong>Out</strong> vollkommen<br />
frei hängt, und das Herauskippen des Einsatzes<br />
nicht behindert wird.<br />
Befestigung des <strong>Quick</strong>-<strong>Out</strong> Einsatzes<br />
Der Einsatz darf nur an Gurten mit 25 mm Breite<br />
und max 10 mm Dicke verwendet werden. Zur<br />
Montage muß die Achse des Einsatzes mittels<br />
eines 5 mm Sechskant-Schraubendrehers entfernt<br />
werden (Fig. 2). Bei der Montage darauf achten,<br />
dass die Achsenhülse nicht vergessen wird. Es<br />
wird empfohlen, das Gewinde der Achse mit<br />
lösbarer Schaubensicherung (z.B. Loctite 243) zu<br />
sichern. Die Achse darf am Einsatz seitlich nicht<br />
überstehen, da sonst die Auslösung behindert<br />
wird. Nach Montage der Gurte sollte ein Auslösetest<br />
durchgeführt werden.<br />
Verwendung eines <strong>Quick</strong>-<strong>Out</strong> Gehäuses mit unterschiedlichen<br />
<strong>Quick</strong>-<strong>Out</strong> Einsätzen<br />
Zuverlässige Funktion des <strong>Quick</strong>-<strong>Out</strong> wird nur gewährleistet, wenn die<br />
Kombination Gehäuse/Einsatz werksseitig geprüft wurde. Sofern mehrere Einsätze<br />
mit einem Gehäuse kombiniert werden sollen, so sind diese entsprechend zu<br />
bestellen. Beim Nachbestellen von Einsätzen muss das Gehäuse an den Hersteller<br />
eingeschickt werden.<br />
Verwendung des <strong>Quick</strong>-<strong>Out</strong> an Gleitschirmgurtzeugen<br />
Das <strong>Quick</strong>-<strong>Out</strong> Gehäuse wird am Gleitschirmgurtzeug, der Einsatz wird an den<br />
Tragegurten des Gleitschirms montiert. Der Einsatz soll so montiert werden, dass<br />
die Tragegute nach dem Zusammenfügen des <strong>Quick</strong>-<strong>Out</strong> nicht verdreht sind.<br />
Manche Gleitschirmgurte haben zu eng genähte Schlaufen, so dass eine Montage<br />
des <strong>Quick</strong>-<strong>Out</strong> Gehäuses nicht möglich ist. Unsere Gurtnäherei in Seeg führt die<br />
erforderlichen Änderungen am Gurtzeug fachgerecht und preiswert durch.<br />
Fig. 1<br />
Attaching the housing<br />
Tragegurt/Pilotenaufhängung/<br />
Hang loop<br />
Achse/<br />
Axle<br />
Fig. 2<br />
Achsenhülse/<br />
Axle sleeve<br />
In order to mount the <strong>Quick</strong>-<strong>Out</strong> housing<br />
on the harness, the left-hand release<br />
button must be removed with a Philips<br />
cross slot screw driver (diameter of<br />
shank max. 5 mm proper for 4 mm screws)<br />
(Fig. 1).<br />
Attention: The use of a wrong screw driver may<br />
damage screw and release button.<br />
The right-hand release button cannot be removed<br />
(thus preventing the possibility of swopping<br />
the release buttons). The housing should be<br />
mounted so that when sitting in the harness, the<br />
inserts face the pilot. The <strong>Quick</strong>-<strong>Out</strong> housing may<br />
only be used on harnesses that do not cause<br />
pressure to be exerted on the covering sleeve<br />
for the release spring. The release buttons can<br />
only be guaranteed to function when the original<br />
release screws are used (Art. No. 4/8KV). The<br />
release screws must be screwed down tight.<br />
If used in motorised aircraft the bolt has to be<br />
secured with removable screw retension (e.g.<br />
Loctite 243).<br />
A dependable release can only be<br />
guaranteed if the <strong>Quick</strong>-<strong>Out</strong> hangs completely<br />
free and the tipping out of the insert is unhindered.<br />
Attachment of the <strong>Quick</strong>-<strong>Out</strong> insert<br />
The insert may only be used on harness straps<br />
with a width of 25 mm and a thickness of<br />
maximum 10 mm. To mount, the axle of the insert<br />
must be removed with a 5 mm hexagon wrench<br />
key (Fig. 2). When mounting, attention must be<br />
paid that the covering sleeve of the axle is not<br />
forgotten. We recommend securing the thread of the<br />
axle with removable screw retension (e.g. Loctite<br />
243). The axle must not protrude from the side<br />
of the insert, otherwise release will be hindered.<br />
After mounting the straps, a test release should<br />
be carried out.<br />
Use of a <strong>Quick</strong>-<strong>Out</strong> housing with various <strong>Quick</strong>-<strong>Out</strong><br />
inserts<br />
Dependable functioning of the <strong>Quick</strong>-<strong>Out</strong> can only be guaranteed when the<br />
combination of housing and insert have been tested in our factory. If it is planned<br />
to combine the use of several inserts with one housing, then these should be<br />
ordered accordingly. If inserts are ordered subsequently, then the housing must<br />
be sent to the manufacturer.<br />
Use of the <strong>Quick</strong>-<strong>Out</strong> on paraglider harnesses<br />
The <strong>Quick</strong>-<strong>Out</strong> housing is mounted to the harness, the inserts are mounted to the<br />
paraglider risers. The insert should be mounted in such a way that the risers are<br />
not twisted after the housing and inserts have been joined together. The loops<br />
on some harnesses have been sewn too small to accommodate the <strong>Quick</strong>-<strong>Out</strong><br />
housing. Our harness sewing department in Seeg can carry out the necessary<br />
alterations to the harness professionally and inexpensively.
Bedienungsanleitung (Fassung 09/08) Instruction manual (edition 09/08)<br />
Verwendung des <strong>Quick</strong>-<strong>Out</strong> in Verbidung<br />
mit Gleitschirm-Fußbeschleunigern<br />
Eine Verwendung des <strong>Quick</strong>-<strong>Out</strong> in Verbindung<br />
mit Fußbeschleunigern für den Gleitschirm<br />
ist nur mit Fußbeschleuniger Trennsystem<br />
zulässig. Zwei Fußbeschleuniger Trennsysteme<br />
stehen zur Verfügung: Das zuletzt entwickelte<br />
Brummelhaken Trennsystem Art. Nr. HKar 141<br />
wird verwendet, wenn Gurtzeug und Gleitschirm<br />
mittels Brummelhaken miteinander verbunden<br />
sind. Dieses System funktioniert auch problemlos,<br />
wenn die Abtrennung des Gleitschirms im<br />
beschleunigten Flug erfolgt. Verbreiteter ist jedoch<br />
das Patentschäkel System Art. Nr. HKar14.<br />
Dieses System sollte nicht mit unter Zug stehendem<br />
Fußbeschleuniger betätigt werden, da ansonsten<br />
der Patentschäkel beschädigt wird.<br />
Einbau der Trennsysteme gemäß den Skizzen.<br />
Achtung: Der Patentschäkel von HKar 14 funktioniert<br />
nur, wenn er in einen Metallring eingehängt<br />
wird! Wie der Metallring in die Schlaufe des<br />
Beschleunigersystens eingeschlauft wird, zeigt<br />
Fig. 3.<br />
Brummelhaken Fußbeschleuniger<br />
Trennsystem<br />
Für die Montage am Gurtzeug werden die<br />
vorhandenen Brummelhaken durch die speziellen<br />
Trennsystem Brummelhaken (Art. Nr. HKar 141)<br />
ersetzt. Sofern die Fußbeschleunigerseile (1)<br />
an der Fußraste abtrennbar sind, werden sie<br />
gegen die im Lieferumfang des Trennsystems<br />
enthaltenen Beschleunigerseile mit eingenähter<br />
Schlaufe ausgetauscht. Sind sie nicht ohne weiteres<br />
austauschbar, entfernt man den Brummelhaken<br />
am Ende des vorhandenen Beschleunigerseils (1)<br />
und knotet eine 3 cm lange Schlaufe an dessen<br />
Ende. Die Schlaufe verbindet man wie die Bilder<br />
zeigen mittels Splint und Gummisicherung mit<br />
dem Trennsystem Brummelhaken. Das freie Ende<br />
des Trennsystem Seils (2) wird an der Gurtkammer<br />
des <strong>Quick</strong>-<strong>Out</strong> <strong>Karabiner</strong>s angeknotet.<br />
Längeneinstellung des Beschleunigerseils<br />
(1) und des Trennsystemseils (2)<br />
Man legt das Gurtzeug an, verbindet es mit den<br />
Tragegurten des Gleitschirms und setzt sich auf<br />
den Boden. Während eine Hilfsperson die Tragegurte<br />
hochhält, ermittelt man zuerst die richtige Länge des<br />
Beschleunigerseils (1) am Gurtzeug. Anschließend<br />
wird das Trennsystemseil (2) so kurz eingestellt,<br />
dass es bei voller Beschleunigung gerade noch<br />
nicht unter Spannung steht.<br />
Bei einem anschließend durchgeführten<br />
Auslösetest des <strong>Quick</strong>-<strong>Out</strong> <strong>Karabiner</strong>s muss sich<br />
bei unter Spannung stehenden Tragegurten das<br />
Trennsystemseil straffen, den Splint abziehen,<br />
und somit die Trennung des Beschleunigerseils<br />
bewirken.<br />
Patentschäkel Trennsystem/<br />
Snap shackle separation system<br />
HKar14<br />
Fig. 3<br />
(1)<br />
(1)<br />
(2)<br />
(2)<br />
Usage of the <strong>Quick</strong>-<strong>Out</strong> in combination<br />
with a paraglider accelera-<br />
tor<br />
Usage of the <strong>Quick</strong>-<strong>Out</strong> in combination with a<br />
paraglider accelerator is only permissible when an<br />
accelerator separation system is used. Two possible<br />
accelerator separation systems are available: The<br />
lastly developed speed system hook separation<br />
system (Art. No. HKar 141) is used when harness<br />
and paraglider are connected with speed system<br />
hooks. This system also works perfectly when the<br />
separation takes place whilst still flying accelerated.<br />
However, the more commonly used system is that<br />
with a snap shackle (Art. No. HKar 14).<br />
This system should not be operated whilst flying<br />
accelerated, otherwise the snap shackles will<br />
be damaged.<br />
Assembly of the separation system as shown in<br />
the sketches.<br />
Attention: The snap shackle seperation<br />
system only works when the shackle is<br />
hooked in a metal ring! See Fig. 3 how to<br />
attach the metal ring to the loop of the speed<br />
system.<br />
Speed System hook separation<br />
system<br />
For mounting on the harness, the brummel hooks<br />
present on the harness are exchanged for the<br />
special separation system brummel hooks (Art.<br />
Nr. HKar 141). If the speed system cords (1) on the<br />
footrest are removable, then they can be exchanged<br />
for the speed system cords with sewn in loops<br />
(delivered with the speed system). If the speed<br />
system cords cannot be removed, the brummel<br />
hooks on the ends of the existing speed system<br />
cords have to be removed. The loop at the end<br />
of the speed system cord (1) is connected to the<br />
separation system brummel hooks by means of the<br />
curved parachute pin and rubber band as shown in<br />
the pictures. The free end of the separation system<br />
cord (2) must be tied to the harness chamber of the<br />
<strong>Quick</strong>-<strong>Out</strong> <strong>karabiner</strong>.<br />
Length adjustment of the speed- (1)<br />
and the separation system cord (2)<br />
The pilot must put the harness on, connect it to the<br />
risers, and sit down on the ground. An assistant<br />
must hold up the risers, whilst the correct length<br />
of the speed system cord (1) on the harness is first<br />
ascertained. Subsequently the separation system<br />
cord (2) should be adjusted short enough so that<br />
it is not quite under tension when the footrest is<br />
fully operational.<br />
By a subsequent release test of the <strong>Quick</strong>-<br />
<strong>Out</strong> kabiner, the separation system cord<br />
must tension, pulling out the curved parachute<br />
pin, and resulting in a separation of the<br />
speed system when the risers are under<br />
tension.
Bedienungsanleitung (Fassung 09/08) Instruction manual (edition 09/08)<br />
Handhabung des<br />
<strong>Quick</strong>-<strong>Out</strong> <strong>Karabiner</strong>s<br />
Verriegeln des <strong>Quick</strong>-<strong>Out</strong> Verschlusses<br />
1. Tastensicherung öffnen.<br />
2. <strong>Karabiner</strong>einsatz gemäß Fig. 4 so auf die Auflager<br />
des Gehäuses legen, dass sich die roten<br />
Markierungspunkte von Gehäuse und Einsatz<br />
einander gegenüber befinden.<br />
3. Herunterdrücken des Einsatzes gemäß Fig. 4,<br />
bis dieser hörbar einrastet.<br />
4. Verschieben der Tastensicherung in Richtung<br />
Tasten bis zum Anschlag.<br />
5. Verschlusskontrolle: Die Tasten müssen nach<br />
dem Einrasten des Einsatzes aus dem Gehäuse<br />
hervorstehen. Nach dem Sichern der<br />
Tasten müssen sich beide Tastensicherungen<br />
auf gleicher Höhe befinden. Sofern der Verschluss<br />
nicht ordnungsgemäß eingerastet ist,<br />
lässt sich die linke Tastensicherung nicht bis<br />
zur Endstellung schieben.<br />
Warnung: Durch starke Verschmutzung, Korrosion<br />
oder durch Vereisung können die Tasten<br />
des <strong>Quick</strong>-<strong>Out</strong> blockieren. Ein ordnungsgemäßes Einrasten des Verschlusses<br />
ist dann nicht gewährleistet. Vereisung tritt insbsondere auf, wenn der warme<br />
<strong>Karabiner</strong> mit kaltem Schnee in Berührung kommt. Die Verschlusskontrolle<br />
muss daher immer sorgfältig durchgeführt werden!<br />
Auslösen des <strong>Quick</strong>-<strong>Out</strong> Verschlusses<br />
1. Beide Tastensicherungen zurückschieben. Wenn in Gefahrensituationen ein<br />
schnelles Auslösen des <strong>Quick</strong>-<strong>Out</strong> erforderlich ist, empfiehlt es sich, eine<br />
oder beide Tasten rechtzeitig zu entsichern.<br />
2. Auslösen des Einsatzes durch gleichzeitiges vollständiges Drücken beider<br />
Verschlusstasten.<br />
Funktionstest: Bei senkrecht gehaltenem <strong>Karabiner</strong> und nur durch sein Eigengewicht<br />
belastetem Einsatz muss dieser beim Drücken der Verschlusstasten<br />
reibungsfrei herauskippen.<br />
Wartung und Pflege<br />
Reinigen und Fetten der Verschlusstasten und der Tragegurtachse des Einsatzes<br />
jährlich, bei Verwendung in salzhaltiger Luft monatlich, bei Kontakt mit<br />
Süßwasser wöchentlich, bei Kontakt mit Salzwasser täglich. Hierzu Ausbau<br />
der Tragegurtachse sowie der Verschlusstaste links und Ausblasen der rechten<br />
Verschlusstaste mittels trockener Pressluft. Säurefreies Öl (Art. Nr. HÖL)<br />
oder Marinefett Klüber Staburags MBU 12K verwenden. Das Achsengewinde<br />
des Einsatzes mit Loctite sichern. Bei Leichtgängigkeit Austausch der Tastensicherungen.<br />
Diese können mittels eines Schraubendrehers (oder ähnlichem)<br />
herausgehebelt werden.<br />
Web: http://www.finsterwalder-charly.de<br />
Fig. 4<br />
Operation of the<br />
<strong>Quick</strong>-<strong>Out</strong> <strong>karabiner</strong><br />
Locking of the <strong>Quick</strong>-<strong>Out</strong> fastening<br />
1. Slide open the security sleeves<br />
2. Lay the <strong>karabiner</strong> insert on the bearings in<br />
such a way that the red marker points on the<br />
housing and the insert are aligned with ine<br />
another (as shown in Fig. 4).<br />
3. Press down the insert until you hear it click<br />
into place (fig. 4).<br />
4. Slide the security sleeves all the way down in<br />
the direction of the release buttons.<br />
5. Release check: After the insert has snapped<br />
into place, the release buttons must protrude<br />
from the housing. After securing the release<br />
buttons, both security sleeves must e placed<br />
level with one another. If the release has not<br />
properly snapped into place, then the lefthand<br />
security sleeve cannot be slipped all the<br />
way down.<br />
Warning: The release buttons can block when<br />
heavily soiled, corroded or frozen. In this case the<br />
release will not properly snap into place.<br />
Freezing up arises especially when the warm <strong>karabiner</strong> comes into contact<br />
with cold snow. The release check should therefore always be systematically<br />
carried out!<br />
Opening the <strong>Quick</strong>-<strong>Out</strong> fastening<br />
1. Slide back both security sleeves. When dangerous situations demand a fast<br />
release of the <strong>Quick</strong>-<strong>Out</strong>, it is recommended that the security sleeves are<br />
slid back in advance.<br />
2. Open the <strong>Quick</strong>-<strong>Out</strong> by simultaneously and completely pressing down on<br />
boh release buttons.<br />
Operating test: The <strong>Quick</strong>-<strong>Out</strong> <strong>karabiner</strong> must be held vertically. When both release<br />
buttons are pressed simultaneously, the inserts must fall out of the housing<br />
simply due to their own weight.<br />
Caring for your <strong>karabiner</strong><br />
Clean and grease the release buttons and the axles for the risers every 12<br />
months, if used in sea air then clean and grease these parts every month, in<br />
the case of contact with fresh water clean every week, in the case of contact<br />
with salt water clean every day. For this purpose it is necessary to dismantle<br />
the axles for the risers and the release button (left) and to blow out the righthand<br />
release button with dry compressed air. Use acid-free oil (Art. No. HÖL) or<br />
marine grease (Klüber Staburags MBU 12K). Secure the axle thread of the insert<br />
with Loctite. If loose then replace the security sleeves. These can be levered out<br />
using a screwdriver (or similar tool).<br />
Pagodenburgstr. 8, 81247 Munich, e-mail: office@finsterwalder-charly.de