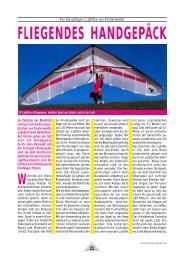
Rotor Vulto - Finsterwalder Gmbh
Rotor Vulto - Finsterwalder Gmbh
Rotor Vulto - Finsterwalder Gmbh

Create successful ePaper yourself
Turn your PDF publications into a flip-book with our unique Google optimized e-Paper software.
OWNER’S MANUAL<br />
Edition April 2004<br />
Hangglider harness<br />
ROTOR VULTO/VULTO S/HAVANA<br />
<strong>Finsterwalder</strong> GmbH - Charly Produkte<br />
Pagodenburgstr. 8, D-81247 München<br />
fon: ++49 (0)89-811 65 28<br />
fax: ++49 (0)89-814 41 07<br />
web: www.finsterwalder-charly.de<br />
mail: office@finsterwalder-charly.de
PARACHUTE PACKING INSTRUCTIONS<br />
Thank you for purchasing a ROTOR harness. Please read these instructions and tips carefully before flying in<br />
your new harness.<br />
OVERVIEW<br />
The ROTOR range of harnesses has been designed with the maximum comfort whilst remaining streamlined<br />
and close-fitting in order to reduce drag and optimise performance.<br />
We have measured more than a twenty five foot per minute reduction in sink rate at best glide speed<br />
between the ROTOR and a conventional pod harness.<br />
WARNING:<br />
We strongly recommend the use of a chute no larger in pack size than a CHARLY CLOU or equivalent. Use of a<br />
parachute larger in pack size could make the deployment difficult, or in the case of a very large chute,<br />
impossible. The ROTOR VULTO was designed for the needs of competition type flying, where optimal fit and<br />
streamlining take precedence, and as such has more precise requirements for reserve chute installation<br />
than a more general purpose type of harness.<br />
BRIDLE ROUTING<br />
Partially unzip the large zipper pull to gain access to the parachute container on the right side of the harness.<br />
There are two possible parachute attachment points on the ROTOR VULTO:<br />
1. To the karabiner (see figure 1) or<br />
2. to a 5 cm long internal harness strap positioned on the back of the harness immediately behind the slider.<br />
We recommend the first method of attachment, as this has been extensively tried and tested. When descending<br />
on a glider with a short keel tube, the pilot can arrive at a position in front of the nose of the glider, if the chute<br />
has been attached to the back of the harness, thus leading to possible injuries on landing.<br />
The two figures 1a and 1b show the course of the parachute bridle, that has been passed through the<br />
neoprene sheath around the mains and looped into the karabiner at the top.<br />
The mains and the parachute bridle should be connected to one another (by means of DYNEEMA rope or a<br />
harness-chute connector - Be31), so that the chute can still be effectively deployed in the case of karabiner<br />
breakage. This connecting element is not included with the new harness.<br />
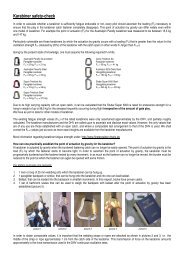
METAL-FATIGUE BY KARABINERS IN AVIATION SPORTS<br />
Tests carried out during the summer of 2004 have shown that karabiners with play in the fastening catch<br />
have an alarmingly low constant oscillation strength. The steel karabiners, that were tested, did not display<br />
any greater constant oscillation strength than that of the aluminium karabiners. None of the karabiner<br />
manufacturers have been able to present a proof of the constant oscillation strength, as demanded by the<br />
DHV. Until proof of a constant oscillation strength can be presented, karabiners must be replaced annually or<br />
an additional means of security used (for example a rope-loop). The only exception at present is the STUBAI<br />
5000 steel karabiner (HKar5) with an “open fastener strength” of 35 kN. This karabiner can be used for 6<br />
years.<br />
STOWING THE BRIDLE<br />
Neatly lay the remaining bridle into the internal pocket of the parachute container, that extends into the<br />
harness body (figure 2). This is important to prevent the bridle from interfering with the deployment and to<br />
keep the chute from becoming too tightly wedged into the harness.<br />
ATTACH THE DEPLOYMENT HANDLE<br />
Larks head the deployment handle to the parachute deployment bag, to the centre (short) loop on the bag<br />
(figure 3).<br />
Fig. 4a Fig. 4b<br />
Fig. 1a<br />
Fig. 1b<br />
Fig. 2<br />
Fig. 3<br />
INSTALL THE PARACHUTE<br />
The compatibility of the rescue chute and harness<br />
must be checked by an authority (manufacturer or<br />
flight instructor). With the harness laying flat with<br />
the mains upwards (as it would be while you are<br />
flying) place the parachute in the harness with the<br />
deployment handle attachment-point facing downward<br />
and outward (figure 4).
PARACHUTE PACKING INSTRUCTIONS<br />
Firmly push the parachute into the four flap container inside the harness. Use the bungees included with the<br />
harness to close the container with the deployment handle pins. Use the two ends of this string to go through<br />
the grommet on the side flap first, then the lower and upper flaps and finally through the grommets on the<br />
outer flaps. Engage the pin through the bungee and repeat the whole process on the other side of the<br />
container (figure 5).<br />
ATTACHING THE HANDLE<br />
Carefully seal all the Velcro surfaces and then remove the zipper pull. Seal the 2 inch Velcro on the deployment<br />
handle over the raw end of the zipper (figure 6).<br />
TEST THE INSTALLATION<br />
Warning: It is extremely important, that you test deploy the parachute while hanging in a simulator. You want<br />
to be sure you can deploy the parachute with your left hand!<br />
Note: The parachute is much easier to deploy with your right hand and that should be your first choice in an<br />
emergency. So, if you can deploy it with your left hand, you are all set.<br />
The best motion is to grasp the handle and pull sharply down and then laterally to the left. The tighter the<br />
harness fits and the larger the parachute, the higher the force required to get the parachute out of the<br />
harness.<br />
You want to be sure that the pins will clear the bungees. The deployment strength should amount to ab. 70 N.<br />
Warning: Because the outer shell of the harness is separate from the inner harness body, it is important, that<br />
the pin strings not be too short. Movement in flight could cause the pins to release without pulling the<br />
deployment handle! To prevent the pins from slipping out of the bungees, the pins should be secured with a<br />
50 N pre-determined breaking thread. Source for the pre-determined breaking thread for securing the release<br />
pins of the rescue container: <strong>Finsterwalder</strong> GmbH - Charly Produkte<br />
Am Osterösch 3, D-87637 Seeg<br />
fon: ++49 (0)8364-1286<br />
fax: ++49 (0)8364-8426<br />
mail: info@charly-produkte.de<br />
If you are unable to deploy it with your left hand, it is usually due to one or more of the following:<br />
the Velcro has become soiled and its retentive strength is too high ( to help, cover part of the Velcro, so<br />
that the retentive surface becomes smaller)<br />
parachute is too large<br />
deployment handle attachment was packed to the outside of the harness<br />
harness fit is too tight (foam can be removed from left side, to reduce the tension as a last resort)<br />
zipper-pull was not removed<br />
incompatible deployment bag, parachute or both<br />
Fig. 7c Fig. 7d<br />
Fig. 5a<br />
Fig. 5b<br />
Fig. 6<br />
Fig. 7a Fig. 7b ZIPPER REINSTALLATION<br />
After a practise deployment it will be necessary to<br />
reinstall the zipper pull. Facing the parachute<br />
container with the harness laying flat on the table<br />
and starting at the end of the zipper closest to the<br />
centre of the harness, fold the two zipper ends<br />
downwards until they are pointing at you. With the<br />
zipper pull portion facing you, work the two ends of<br />
the zipper into the zipper pull. This takes a bit of<br />
patience your first few times. Push the zipper pull<br />
onto the zipper as you pull the zipper edges down<br />
through the pull. Try to keep the ends of the zipper<br />
even in this process (figure 7a-d).<br />
Note: If you find it impossible to do, take a sharp<br />
pair of scissors and trim the last tooth of the<br />
zipper on each side and try again. Also be sure,<br />
that you do not have the zipper pull backwards<br />
or upside down.<br />
The pull on the zipper will be on the inside of the<br />
harness after you have installed it. Slide the pull about<br />
a foot down the zipper.
OPERATION AND MAINTAINANCE<br />
PUTTING ON THE HARNESS<br />
Stow away your glider cover and harness carrying bag in the compartment at the back of the harness, so that the screws on the back plate are padded. This storage<br />
compartment can be accessed via the left inner zipper. The glider cover fits best into the lower area and the harness carrying bag into the upper area. We find it<br />
easiest to put the harness on like a coat.<br />
Warning: Be sure, that you put your arms through the shoulder straps, not just the neoprene gap seal.<br />
Reach down between your legs and grasp the leg loops. Insert the lower chest tongue through both of the leg loops and fasten to the buckle on the opposite side of<br />
the zipper. Fasten the uppermost chest buckle over the chest pad and zip the centre zipper down to about your navel. Do not zip the zipper too low, as this could<br />
damage it, when the harness spreads open on take off or landing. Shorten the leg loops, so that they are easy to attach, but not overly loose. The shorter they are, the<br />
more flare authority you will have.<br />
The shoulder straps are adjustable and you can add or take out foam blocks in the boot to get the proper fit in length and the centre of gravity in the right place. Do<br />
not over loosen the shoulder straps or you will damage the neoprene gap seal at the neck of the harness. Everyone is built a little differently. It takes some time to<br />
break in the harness and get it adjusted properly.<br />
Warning: Be sure you are holding the base tube with your left hand, when you zip up the harness, as it is common to inadvertently engage the pitch<br />
adjustment lever above your butt and the harness will pitch head down to the limit of the adjustment. If you are not holding the base tube, you can rotate<br />
forward enough, to strike it with your face!<br />
The butt lever is used for small adjustments in your head up or down attitude while prone. To raise your pitch attitude, do a push up on the base tube and then bump<br />
the “butt lever” mounted in the back plate. To lower your pitch attitude, push the “butt lever” and lower yourself to the base tube. Release the lever, when you are at<br />
the pitch attitude you desire.<br />
Shorten the adjustment of the front perlon pitch rope, until it stops you at the furthest head down position you will use when flying. Usually fifteen degrees head down<br />
from level is enough. Shortening the rope in this way will give you more head up adjustment and make the harness safer in a crash.<br />
LAUNCH AND LANDING<br />
The slider at the base of the main support strap is connected to the boot of the harness by two lines. Pushing on the boot will pull the slider backwards. Transference<br />
of the centre of gravity eases transition to a prone position. The KICK ASS mechanism (VULTO/VULTO S) maintains the slider in this position. To get upright for landing, unzip<br />
the harness with the puller on the left side of the harness centre zipper. Drop your knees out of the harness and do a push up on the base tube. Doing this the KICK ASS<br />
mechanism unlocks the slider. You will feel the slider go forward and the harness will pitch up. When the slider is in the forward position, the harness will be inclined<br />
at about 45 degrees. This is the best position for landing. Because the ROTOR has a back plate, it is not possible to get in a straight upright position.<br />
WINCH TOWING<br />
When winch towing we recommend the use of a tow release main rope. When foot launching by UL towing, it may be difficult to attain a sufficiently prone position.<br />
For this reason we recommend the use of a launch trolley when launching behind an UL.<br />
DROGUE PARACHUTES<br />
The ROTOR has a drogue parachute pocket. Be sure to read the drogue parachute instructions before using any type of drogue parachute with this harness.<br />
INSPECTION<br />
Before each flight: Check the parachute lock pins to be sure, they are secure in the bungees.<br />
After every third flight: Check the retentive strength of the reserve chute (whilst on the ground) to prevent soiling of the Velcro.<br />
Before each flight: Inspect the nuts and bolts connecting the back plate and slider.<br />
Before each flight: The slider axle must not be deformed. Tip: In normal flight operation the 12 mm slider axle used by various harness manufacturers has proven<br />
sufficiently robust. Our loading tests carried out by the DHV show, that the slider axle deforms by mid-point loading of more than 3000 N. The tearing-out strength<br />
lays by over 4000 N. Should the slider axle fail, this would result in the pilot subsiding by about 30 cm.<br />
Before each flight: Inspect the mains for any signs of excessive wear or UV-exposure.<br />
MAINTAINANCE<br />
The harness is intended to be used for a duration of 10 years.<br />
By normal usage the harness should be works inspected after 6 years. Duration to additional works inspections are decided by the works.<br />
Lubricate the zippers with silicone spray, whenever the zipper becomes difficult to pull. A light application is all, that is required. Too much silicone will attract and<br />
hold dirt to the zipper and wear the zipper out prematurely.<br />
Keep your harness out of the sun as much as possible. Excessive exposure to UV will cause the harness cloth to fade and loose strength. It may also cause<br />
excessive shrinkage.<br />
Avoid using any harsh chemical solvents or cleaners to clean the harness. We recommend the use of mild soap or water based cleaners.<br />
If the harness becomes wet or soaked, make sure to open up or disassemble the harness as much as necessary, to prevent mould or mildew formation inside the<br />
harness and corrosion on any of the metal surfaces.<br />
If you have any questions, please ring us on 089/8116528 or 08364/1286 or contact us by e-mail (office@finsterwalder-charly.de) or (info@charly-produkte.de)! We<br />
wish you many glorious and, above all, safe flights with your new harness!