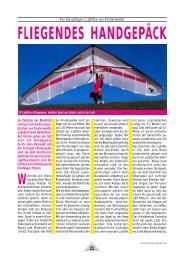

Create successful ePaper yourself
Turn your PDF publications into a flip-book with our unique Google optimized e-Paper software.
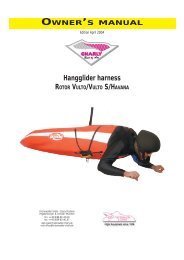
CHARLY <strong>GLOBE</strong><br />
Owners manual<br />
Version 1.0 from 6.2.2009<br />
Please read this owners manual before your first flight with the <strong>Charly</strong> <strong>GLOBE</strong> !<br />
It has been written to inform you comprehensively about the correct use of your paraglider harness. Should any questions arise relating to<br />
the use of this product, then please contact CHARLY PRODUCTS directly.<br />
____________________________________________________________________________________________________________<br />
CHARLY-PRODUKTE - AM OSTERÖSCH 3 - 87637 SEEG<br />
Tel.: 0049 (0) 8364/1286 - mail: info@charly-produkte.de - web: www.charly-produkte.de<br />
1
<strong>Charly</strong> <strong>GLOBE</strong> – reversible harness for paraglider pilots<br />
Thank you very much for choosing the <strong>Charly</strong> Globe for your paragliding harness. You have<br />
selected one of the most innovative harnesses available at present. We are very proud of<br />
our product, and we are convinced that it will give you much pleasure.<br />
We recommend that you read this manual carefully before making your first flight with the<br />
<strong>Charly</strong> Globe.<br />
If you sell your <strong>Charly</strong> Globe, please hand this manual over to the next owner.<br />
Happy flights and safe landings,<br />
your <strong>Charly</strong>-Team<br />
Important safety advice:<br />
When purchasing this equipment, you accept complete responsibility and all risks associated with the use of this equipment to paraglide,<br />
including injury and death. Inappropriate use of paragliding equipment increases the additional risks. To be able to paraglide you must<br />
possess the necessary qualification (rating) for that particular country. Neither Finsterwalder <strong>Charly</strong>-Products nor the seller or importer of<br />
this product can be held liable in the case of personal damage or damage to a third party. If you are unsure of any aspect involved with the<br />
use of this product, then please contact your <strong>Charly</strong> retailer, or <strong>Charly</strong> importer for your country.<br />
2
CONTENTS page<br />
1.1 TECHNICAL DESCRIPTION 4<br />
1.2 SAFETY 4<br />
2.0 THE PROTECTOR 5<br />
2.1 PROTECTOR INSERTION 5<br />
3.0 FLIGHT PREPARATION 5<br />
3.1 ACCELLERATOR 5<br />
4.0 RESCUE RESERVE / CONTAINER 6<br />
4.1 ALTERING THE CONTAINER VOLUME 6<br />
4.2 RESCUE RESERVE INSERTION 6-7<br />
4.3 INSERTION INSTRUCTIONS FOR RESCUE RESERVE 7-8<br />
5.0 HARNESS OVERVIEW 9<br />
5.1 ADJUSTMENTS 9-11<br />
6.0 IN-FLIGHT STORAGE 11<br />
6.1 STORAGE IN BACKPACK 11-12<br />
7.0 FLYING WITH THE CHARLY-<strong>GLOBE</strong> 12-13<br />
8.0 BACKPACK PACKING RECOMMENDATIONS 14<br />
9.0 MISCELLANEOUS 15<br />
10.0 CARE & MAINTENANCE 15-16<br />
3
1.1 TECHNICAL DESCRIPTION<br />
• The double <strong>Charly</strong> Inflate System for increased pilot safety – tested in accordance with the<br />
new certification norm. Rapid inflation in all seating positions due to the asymmetrical<br />
arrangement of the bilateral valve systems, with integrated flaps for optimised inner pressure<br />
and record-breaking shock absorption values even when the system is only half inflated.<br />
• Innovative and technical design of the harness geometry, compatible with all classes of<br />
paraglider<br />
• Perfect seating comfort in all pilot positions with many adjustment possibilities<br />
• Integrated rescue reserve container, can be individually suited to the various packing<br />
volumes of prevalent rescue systems.<br />
• Complete serial fitting with Finsterwalder P-Lock automatic light-weight components<br />
• Practical mountaineering - and travel backpack, suitable for all prevalent paraglider sizes,<br />
integrated in the <strong>Charly</strong> Globe<br />
• Very good compromise between minimalism, low weight, carrying comfort and removable hip<br />
strap for cable-car-only pilots.<br />
Intended purpose Paraglider harness<br />
Maximum certified launch weight: 120kg<br />
weight: 4,4 kg (size. M - without karabiners)<br />
Suspension height: 44 cm<br />
Protector: <strong>Charly</strong> impact pressure protector<br />
LTF-crash test: 19 G<br />
LTF-certification EAPR-GZ-7106/08<br />
Rescue reserve: Integrated container below the seating board<br />
Side deployment handle<br />
1.2 SAFETY<br />
<strong>Charly</strong> presents the world novelty C.I.S. in the field of protectors.<br />
Stand der Technik bei konventionellen Protektoren - Original commentary of the EAPR test<br />
centre:<br />
“The intake and outlet valves are problematic by almost all impact pressure protectors. Many<br />
protectors have good findings as long as they are fully inflated, but loose pressure too quickly (the<br />
intake openings have insufficient valve control)when a collision occurs. We have already been<br />
working with a harness manufacturer for 5 months on the optimising of the impact pressure protector<br />
and have now had a breakthrough.<br />
For the first time we have been able to test an impact pressure protector that exhibits the same good results (+-0,5 G) in a fully inflated<br />
condition, as well as after a 3-5 second approach flow interruption. The present intermediary results are a real advancement from a<br />
technical point of view.“<br />
4
2.0 THE PROTECTOR<br />
The <strong>GLOBE</strong> is a harness with an integrated airbag. The airbag is divided into several chambers so<br />
that in the case of a hard collision, not all of the air can escape at once. The <strong>GLOBE</strong> has been<br />
developed to absorb the impact energy as much as possible and to give the pilot maximum<br />
protection in the case of a crash. It cannot completely eliminate the risk of injury however.<br />
2.1 PROTECTOR INSERTION<br />
The impact pressure protector is connected solidly to the harness. It can neither be removed nor<br />
installed. When packing up the equipment, care must be taken that the polyethylene plate in the area<br />
of the protector is not bent.<br />
3.0 FLIGHT PREPARATION<br />
The <strong>GLOBE</strong> must be put together by an expert. Especially the first installation of the rescue reserve<br />
must be undertaken by a compatibility tester and requires the utmost care.<br />
The basic adjustment of the harness should be undertaken by the pilot himself whilst seated in a<br />
harness simulator.<br />
Assembly:<br />
<strong>Charly</strong> Products recommends assembling the harness in the following order. If in doubt, you should<br />
ask for competent advice from a flight instructor, the staff at <strong>Charly</strong> or a <strong>Charly</strong> dealer.<br />
3.1 ACCELERATOR<br />
All of the usual speed-systems delivered with your paraglider can be mounted to the <strong>Charly</strong>-<strong>GLOBE</strong>.<br />
<strong>Charly</strong> recommends the use of the FINSTERWALDER speed pedals made from steel cable and<br />
aluminium as these can be engaged in flight without the necessity of using the hands.<br />
Normally the accelerator is mounted from top to bottom. The accelerator cords are threaded through<br />
the rollers behind the side pockets and then through the eyelets in the lower front corners of the<br />
harness. Connect the elastic retainer to the accelerator in order to avoid getting it entangled by an<br />
emergency reserve deployment.<br />
elastic accelerator retainer<br />
5
4.0 RESCUE RESERVE / CONTAINER<br />
The integrated rescue reserve container below the seating board has been redesigned with a large<br />
conical reserve container to guarantee the fastest & easiest deployment. The bottom position was<br />
chosen because the centre of gravity of the harness is not influenced, resulting in better comfort and<br />
a more pleasant flight feeling. The deployment handle is positioned on the right hand side and is<br />
easy to reach.<br />
The elastic accelerator retainer system prevents the accelerator becoming entangled in the rescue<br />
reserve when the latter is deployed.<br />
<strong>Charly</strong>-Products recommend the use of <strong>Charly</strong> rescue reserves, e.g. the EXPERT 120 Rescue<br />
reserves from other manufacturers can also be used.<br />
As mentioned above, every first installation of the rescue reserve, (& every new combination of<br />
rescue reserve and harness), must be undertaken by qualified trained personnel. The pilot himself<br />
must undertake a test deployment of the rescue reserve whilst sitting in the harness in a harness<br />
simulator, by releasing the inner container from the harness outer container.<br />
This check must be carried out every time the reserve is repacked and reinstalled.<br />
4.1 RESCUE RESERVE INSERTION<br />
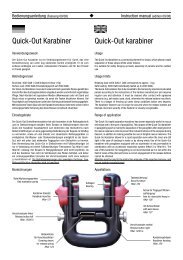
CONNECTING THE RESERVE BRIDLE LINE TO THE HARNESS<br />
A screw-lock link with a minimum strength of 2400 daN is recommended, eg. Maillon Rapid 6mm<br />
screw-lock link. The karabiner should have a strength of at least 9 times the maximum launch weight.<br />
The webbing straps on both sides of the screw-lock link should be fastened with rubber rings,<br />
retention bands or shrinkage tubing.<br />
By bridle line / webbing connections, great care must be taken to ensure that the fastening is not<br />
asymmetrical. By an asymmetrical connection, the webbing straps can slip, causing considerable<br />
frictional warmth and possible tearing in the case of a reserve deployment.<br />
Connection using screw-lock link<br />
Connection harness strap / bridle line<br />
6
CONNECTING THE DEPLOYMENT HANDLE TO THE INNER CONTAINER<br />
The deployment handle of the integrated rescue reserve container is a part of the <strong>Charly</strong>-<strong>GLOBE</strong><br />
harness. Only this deployment handle may be used. It is connected to the inner container by looping<br />
the band on the deployment handle through the side band of the inner container. Should there be no<br />
possibility of attachment on your inner container then such must be sewn on by qualified specialist<br />
staff.<br />
Always attach the deployment handle on the side<br />
4.2 ALTERING THE CONTAINER VOLUME<br />
As rescue reserves are tending to become smaller and lighter, we have developed a special “spacer”<br />
to assist.<br />
Using the spacer you can reduce or enlarge the volume of the container as required. When using a<br />
smaller reserve, fasten the spacer to the rear container wall using the Velcro strips.<br />
IMPORTANT : THE FLEECE SIDE ALWAYS FACES TOWARDS THE RESERVE !!!<br />
By larger reserves you simply omit the spacer.<br />
„spacer“ Container without „spacer“ Container with spacer”<br />
Important : Fleece towards the reserve !!!<br />
4.3 INSERTION INSTRUCTIONS FOR RESCUE RESERVE<br />
By installation of the rescue reserve into the <strong>Charly</strong>-<strong>GLOBE</strong> special attention must be paid to ensure<br />
that the deployment handle is looped through the band on the side of the inner container and not<br />
through the middle band. Make sure that the deployment handle is attached as high up as possible at<br />
the seating board.<br />
7
FOLLOW THE ORDER AS SHOWN IN THE PICTURES<br />
1 2<br />
3 4<br />
5 6<br />
<strong>Charly</strong> employs a loop-tensioner, hence you should not secure the release pins with a weal-link thread!<br />
Carry out a test deployment after the first installation of the rescue reserve (in the flight position,<br />
seated in the harness) to see that everything functions correctly.<br />
The deployment strength must lie between 4 and 10 kg !<br />
You should check that the container is properly fastened before every launch.<br />
As of 01.01.98 every new combination of rescue reserve and harness/outer container has to be<br />
retested by the manufacturer of the harness or of the rescue reserve or someone schooled and<br />
instructed by the manufacturer (dealer, flight instructor) after the initial packing. The operation of the<br />
rescue reserve must be carried out in the in-flight position, and perfect functioning must be possible<br />
according to the construction specifications. The re-examination must be entered in the packing and<br />
inspection document.<br />
8
5.0 HARNESS OVERVIEW<br />
5.1 ADJUSTMENT POSSIBILITIES<br />
The <strong>GLOBE</strong> paragliding harness in the appropriate size, can be individually adjusted to suit all body<br />
shapes.<br />
Adjustment can be carried out using the shoulder straps, the chest strap, and the side straps.<br />
Individual adjustment<br />
In order to ensure optimum seating comfort, various adjustment possibilities should be tried in a<br />
simulator before the initial flight is made, to suit the size of the pilot.<br />
9
SETTING OF THE CHEST STRAP:<br />
The chest strap is fastened by pressing the chest strap clasps onto the plastic button and drawing<br />
them outwards. The plastic button in the middle prevents opening. To release, press the plastic<br />
button, only then can the clasps be pushed towards the centre and lifted.<br />
SETTING OF THE LEG STRAPS:<br />
The properly closed chest strap<br />
The leg straps are closed by pulling the clasp into the groove. The plastic button prevents the clasp<br />
from opening. To release the clasp, press the plastic button and push the clasp out of the groove.<br />
The properly closed leg strap fasteners<br />
Due to the high suspension of the leg strap fastening, the pilots thighs have great freedom of<br />
movement. Generally the setting undertaken by the manufacturer should correspond to normal<br />
needs.<br />
Check to see that you can adopt a seated position after launch WITHOUT the additional use of the<br />
hands. This must be tested in a simulator. Should you require the use of your hands, then the seating<br />
angle must be checked again and the leg straps adjusted accordingly. The correct setting is achieved<br />
when the seating position can be adopted without the additional use of the hands. The leg straps are<br />
adjusted using the ends of the trimmers.<br />
The leg straps and the chest strap have been fitted with the so called “T-Lock-Safety-System”. This<br />
prevents the pilot from falling out of the harness should he forget to fasten the leg straps.<br />
10
SETTING OF THE SIDE STRAPS:<br />
Use the side straps to set the angle between the thighs and the trunk. This angle can be adjusted to<br />
between 100° and 120°. By tightening the straps the pilots sits more upright, by loosening the straps<br />
the pilot sits more laid back. It is easiest to adjust these straps during a calm flight. Consider that<br />
when flying in a more laid back position, the harness stability is lessened, and the danger of twisting<br />
up increases if a large part of the paraglider collapses.<br />
SETTING OF THE SEATING BOARD STRAPS:<br />
These straps set the seating depth. In the loosened position the transfer from hanging to the seated<br />
position after launch is eased, drawn tighter they ease the hanging position when landing. In the<br />
seated position, loosen the straps completely and then draw them gradually tighter until you achieve<br />
a comfortable position in which your back is well supported.<br />
SETTING OF THE SHOULDER STRAPS:<br />
When correctly adjusted, light pressure from the shoulder straps should be felt on the shoulders. The<br />
shoulder straps are used to adjust the harness to the body size, and also for the attitude of the<br />
seating position, from seated to prone.<br />
6.0 IN-FLIGHT STORAGE<br />
The <strong>Charly</strong>-<strong>GLOBE</strong> was conceived to function as an airbag. Air flows through the side valves into the<br />
chambers. Pilots should always ensure that the valve are open so that air can flow unhindered into<br />
the chambers.<br />
It is essential that objects such as clothing, drinking bottle, paraglider stuff bag etc. be attached to<br />
the floor of the storage compartment using the special netting and elastic cord. In this way the air can<br />
flow unhindered through the three eyelets in the storage compartment. If this is not the case then the<br />
additional protector function of the storage compartment is not guaranteed.<br />
Eyelets must remain uncovered !<br />
In addition, care must be taken to ensure that all compression bands are completely open before<br />
launch. Otherwise the storage and protector volume is considerably reduced.<br />
11
6.1 STORAGE IN BACKPACK<br />
The <strong>Charly</strong>-<strong>GLOBE</strong> has been constructed so that there is enough room for almost every current<br />
paraglider. The <strong>Charly</strong>-<strong>GLOBE</strong> is equipped with a polyethylene plate.<br />
This polyethylene plate ensures that the airbag is partly filled even by zero wind conditions. This<br />
partial inflation guarantees good protection even in the initial phase of the launch.<br />
It is important that the polyethylene plate is stowed away in the backpack in an S-shape (not bent!)<br />
Plate stowed in an S-shape !!!<br />
The <strong>Charly</strong>-Globe is a fully-fledged alpine backpack. The back area has excellent wicking properties<br />
and is very breathable. The helmet can be affixed to the top cover using the available net and elastic<br />
cords. Hiking sticks can be attached to the backpack as well as the storage compartment.<br />
The backpack can be pressed into a flat & pleasant to carry shape using the compression bands on<br />
either side. The back does not deform and the <strong>GLOBE</strong> remains comfortable to carry. The hip strap<br />
has an anatomically fitting shape and can be removed.<br />
Helmet attachment Hiking sticks attachment<br />
12
7.0 FLYING WITH THE CHARLY-<strong>GLOBE</strong><br />
PRE-FLIGHT CHECK<br />
Maximum safety is achieved when the pre-flight check is always carried out in the same sequence.<br />
Check that:<br />
• There is no visible damage to the harness or karabiners that could be detrimental to the<br />
airworthiness.<br />
• The rescue reserve container is properly fastened and the release pins are completely<br />
inserted in the loops.<br />
• The deployment handle is securely attached to the corresponding Velcro strip.<br />
• All buckles, straps, zippers are securely fastened. When closed, the clasps should engage<br />
lightly. Make sure that they are engaged by pulling lightly on the straps. Special care must be<br />
taken in the presence of snow and sand.<br />
• Compression bands from the backpack (inner side of storage compartment) are completely<br />
opened.<br />
• Polyethylene plate on the underside of the protector must be curved.<br />
• (not an S-shape!!!! – otherwise the protector is ineffective)<br />
• The paraglider is properly connected with the harness and both karabiners are properly<br />
closed and secured.<br />
• The accelerator is correctly connected on the risers.<br />
• All pockets are closed and nothing loose is hanging about.<br />
• Check again that the leg straps and chest straps are closed before you launch!<br />
PROCEDURE BY RESCUE RESERVE DEPLOYMENT<br />
It is very important to repeatedly reach down to the deployment handle in flight in order to note the<br />
position, in this way you will instinctively find the reserve in an emergency.<br />
In an emergency situation the pilot should be aware of how much ground clearance he has & how<br />
serious the situation is. To deploy the reserve unnecessarily can increase the chance of a landing<br />
injury. If the paraglider is in a spinning motion, then it is better to try and stop this motion first (eg.<br />
with a full stall) in order to minimise the risk of the reserve becoming entangled. On the other hand, if<br />
the ground clearance is minimal then every second can make the difference between life and death.<br />
If you have to deploy the reserve, proceed in the following manner:<br />
Search for the deployment handle and grab it tight with one<br />
hand. Pull hard upwards and outwards on the handle thus<br />
drawing the reserve out of the harness container. Take care to<br />
throw the reserve in the inner container into free air space. If<br />
possible throw in the opposite direction to the spin, and let go of<br />
the handle!<br />
When the reserve has opened, you must try to avoid swaying<br />
movements and tangling up. The best thing would be to draw in<br />
the paraglider symmetrically using the B-, C- or D-lines or using<br />
the steering lines. Before you touch down, adopt an upright<br />
position and try to land using the technique of a parachutist in<br />
order to minimise the risk of injuries.<br />
13
LANDING WITH YOUR CHARLY <strong>GLOBE</strong><br />
Upright yourself before touch down, transferring from the seated to the hanging position. NEVER<br />
land seated. This is dangerous in spite of the airbag because the spine can be injured. In all<br />
situations it is safer to land actively in an upright attitude than passively in a seated attitude.<br />
8.0 BACKPACK PACKING RECOMMENDATIONS<br />
These are general packing instructions, every paraglider requires a slightly different packing method<br />
depending on the size. Pack your equipment with care and do not use force.<br />
Do not forget to open all compression bands before packing your equipment.<br />
Position the paraglider in the upper area<br />
Pull the zipper half closed and pack the rest You can fasten your helmet to the cover flap<br />
in the bottom area if there is no room inside the backpack<br />
Pull on the compression bands.....and there you are, ready for the next flight/tour...<br />
14
9.0 MISCELLANEOUS<br />
WINDENSCHLEPP<br />
The <strong>Charly</strong>-<strong>GLOBE</strong> is very suitable for stationary towing. The tow release should be hung into the<br />
karabiners. The best method is to mount the tow release onto towing adapters that are slipped over<br />
the ends of the risers before these are connected with the karabiners. Stick to the instructions for<br />
your tow release & towing adaptors or ask the advice of a flight instructor with paraglider towing<br />
experience.<br />
BI-PLACE FLYING<br />
The <strong>Charly</strong>-<strong>GLOBE</strong> is not recommended for Bi-place flying.<br />
SAFETY TRAINING AND FLYING OVER WATER<br />
We do NOT recommend the use of the <strong>Charly</strong> Globe for flying over water or for use in safety training<br />
courses. It is possible that the buoyancy of the harness submerges the pilot under water.<br />
Caution when flying over water!<br />
BEHAVIOUR RECONCILABLE WITH NATUR AND THE LANDSCAPE<br />
Stick to the rules of each individual flying site. Do not discredit our fantastic sport.<br />
10.0 CARE AND MAINTENANCE<br />
The materials used for the <strong>Charly</strong>-<strong>GLOBE</strong> guarantee a maximum service life. In spite of this, you<br />
should always take care to keep your harness clean and to protect it, in order that it remains<br />
airworthy for as long as possible.<br />
Avoid dragging your harness over stony ground. Try to land standing. Avoid leaving your harness<br />
unnecessarily in the sun. UV-rays are very damaging for the material.<br />
Dry your harness if it has become wet. Store your paragliding equipment loosely in a dry and cool<br />
place. If your equipment has become wet, then dry it before you pack it away.<br />
If possible, use only water and a soft brush or cloth for cleaning purposes. Only use mild soap to<br />
clean the harness if absolutely necessary. In this case remove all parts such as the protector, rescue<br />
reserve and seating board.<br />
If your reserve has become wet (eg. after touching down in water), then it must be opened, dried, and<br />
repacked.<br />
Inspect your protector for damage after a hard landing. A tear or a burst seam greatly reduce the<br />
effectiveness of the protector!<br />
Zippers and buckles can be sprayed with silicon spray annually.<br />
CONTROL<br />
Before every launch, inspect the carrying harness apparatus for abrasion. Critical places are where<br />
the hip and leg straps join the seating board. Avoid abrasion to the hip straps by unburdening the<br />
straps before adjusting, and by not pulling diagonally to the strap direction.<br />
Karabiners and SIL can corrode after contact with aggressive substances such as salt water. If<br />
necessary, rinse, oil, and / or replace. Karabiners must be replaced every 2 years due to the danger<br />
of breakage from metal fatigue. Both aluminium karabiners must be replaced at the latest after 5<br />
years or 500 hours of usage. Hard knocks to the karabiners can lead to unseen damage and<br />
breakage during use. Aluminium karabiners with cross scratches or cracks on the surface must be<br />
replaced immediately. Since Velcro fasteners become matted and difficult to open with time, they<br />
must be inspected twice a year to ensure that the reserve deployment strength does not exceed 10<br />
Kg .<br />
15
The <strong>GLOBE</strong> rescue reserve container is fitted with a loop-tensioner system. The release pins should<br />
NOT be secured with weak link threads!<br />
To avoid mildew and corrosion, damp harnesses must be opened up, aired and dried. Never store<br />
harnesses compressed and / or in airtight bags for longer periods of time !<br />
MAINTENANCE CHECK LIST<br />
Depending upon usage, harnesses must be thoroughly checked following the list given below after 2<br />
or at the latest after 5 years. Man-made fibres are sensitive to ultraviolet rays. Therefore avoid<br />
unnecessary sunlight. The airworthiness certification expires 10 years after the date of purchase<br />
(invoice date) unless extended by an inspection from the manufacturer.<br />
Back part:<br />
� visual inspection of material for damage<br />
to seams, holes. tears<br />
� inspection of zippers for damage &<br />
smooth running<br />
� inspection of Velcro fastenings<br />
Webbing straps:<br />
Inspected for damage, wear & tear, aging<br />
� Main hang-in<br />
� chest strap<br />
� Hip straps<br />
� leg straps<br />
� Shoulder straps & V-lines<br />
Hardware:<br />
� visual inspection for damage, distortion<br />
, corrosion.<br />
� functionality test<br />
Protector:<br />
� inspected for damage<br />
� impermeability test carried out<br />
Rescue reserve:<br />
� control the course of the suspension<br />
lines<br />
� visual inspection of the deployment<br />
handle, release pins, loop<br />
� deployment of rescue reserve,<br />
functionality test<br />
REPAIRS<br />
All repairs to the load bearing parts of the harness must be carried out by the manufacturer or an<br />
authorised service centre, in order to ensure that the correct materials and processing techniques<br />
are utilised.<br />
ENVIRONMENT-FRIENDLY DISPOSAL<br />
After the end of a long service life, the <strong>Charly</strong> <strong>GLOBE</strong> should be disposed of in an environmentfriendly<br />
manner in accordance with prevailing laws.<br />
We wish you many beautiful flights and happy landings with your <strong>GLOBE</strong> !<br />
The information in this instruction manual is as accurate as possible, however, it should serve the<br />
user only as a guideline. This manual can be changed at any time if necessary. Before every flight<br />
you should ensure that no current safety notification has been issued for the <strong>Charly</strong> Globe harness.<br />
Safety notifications are issued under www.charly-produkte.de<br />
You will find the most up to date information about the <strong>Charly</strong>-<strong>GLOBE</strong> and all other products from<br />
FINSTERWALDER / CHARLY-PRODUKTE under www.finsterwalder-charly.de<br />
____________________________________________________________________________________________________________<br />
CHARLY-PRODUKTE - AM OSTERÖSCH 3 - 87637 SEEG<br />
Tel.: 0049 (0) 8364/1286 - mail: info@charly-produkte.de - web: www.charly-produkte.de<br />
16