BA Umschlag ROWELD ROFUSE Basic 48 DE-EN-FR-NL ... - Santeko
BA Umschlag ROWELD ROFUSE Basic 48 DE-EN-FR-NL ... - Santeko
BA Umschlag ROWELD ROFUSE Basic 48 DE-EN-FR-NL ... - Santeko
Erfolgreiche ePaper selbst erstellen
Machen Sie aus Ihren PDF Publikationen ein blätterbares Flipbook mit unserer einzigartigen Google optimierten e-Paper Software.
automatically reinitializes. In the process it behaves as if you had switched it off and then on again.<br />
However, this step does not entail the loss of any data or settings.<br />
6.4 Entering or Changing the Job Number<br />
When the input of the job number is enabled in the configuration menu, the corresponding input screen is<br />
displayed automatically for every welding. When the option is not enabled, entering the job number is still<br />
possible after pressing the ñ arrow key when “Enter Fitting Code” shows on the screen.<br />
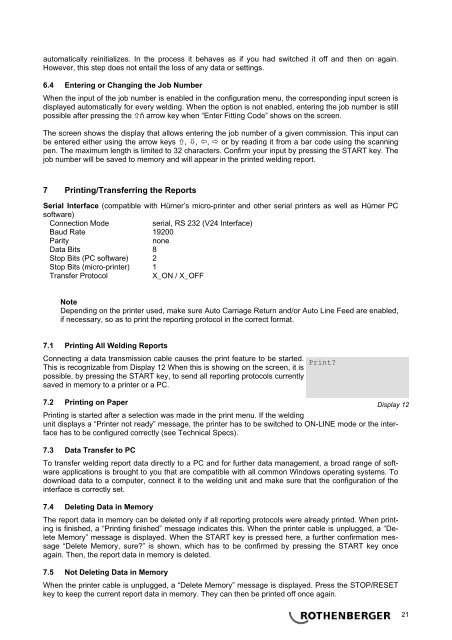
The screen shows the display that allows entering the job number of a given commission. This input can<br />
be entered either using the arrow keys , , , or by reading it from a bar code using the scanning<br />
pen. The maximum length is limited to 32 characters. Confirm your input by pressing the START key. The<br />
job number will be saved to memory and will appear in the printed welding report.<br />
7 Printing/Transferring the Reports<br />
Serial Interface (compatible with Hürner’s micro-printer and other serial printers as well as Hürner PC<br />
software)<br />
Connection Mode<br />
serial, RS 232 (V24 Interface)<br />
Baud Rate 19200<br />
Parity<br />
none<br />
Data Bits 8<br />
Stop Bits (PC software) 2<br />
Stop Bits (micro-printer) 1<br />
Transfer Protocol<br />
X_ON / X_OFF<br />
Note<br />
Depending on the printer used, make sure Auto Carriage Return and/or Auto Line Feed are enabled,<br />
if necessary, so as to print the reporting protocol in the correct format.<br />
7.1 Printing All Welding Reports<br />
Connecting a data transmission cable causes the print feature to be started.<br />
Print<br />
This is recognizable from Display 12 When this is showing on the screen, it is<br />
possible, by pressing the START key, to send all reporting protocols currently<br />
saved in memory to a printer or a PC.<br />
7.2 Printing on Paper<br />
Display 12<br />
Printing is started after a selection was made in the print menu. If the welding<br />
unit displays a “Printer not ready” message, the printer has to be switched to ON-LINE mode or the interface<br />
has to be configured correctly (see Technical Specs).<br />
7.3 Data Transfer to PC<br />
To transfer welding report data directly to a PC and for further data management, a broad range of software<br />
applications is brought to you that are compatible with all common Windows operating systems. To<br />
download data to a computer, connect it to the welding unit and make sure that the configuration of the<br />
interface is correctly set.<br />
7.4 Deleting Data in Memory<br />
The report data in memory can be deleted only if all reporting protocols were already printed. When printing<br />
is finished, a “Printing finished” message indicates this. When the printer cable is unplugged, a “Delete<br />
Memory” message is displayed. When the START key is pressed here, a further confirmation message<br />
“Delete Memory, sure” is shown, which has to be confirmed by pressing the START key once<br />
again. Then, the report data in memory is deleted.<br />
7.5 Not Deleting Data in Memory<br />
When the printer cable is unplugged, a “Delete Memory” message is displayed. Press the STOP/RESET<br />
key to keep the current report data in memory. They can then be printed off once again.<br />
21


