Gebrauchs- und Montageanleitung - Harvia
Gebrauchs- und Montageanleitung - Harvia
Gebrauchs- und Montageanleitung - Harvia

Erfolgreiche ePaper selbst erstellen
Machen Sie aus Ihren PDF Publikationen ein blätterbares Flipbook mit unserer einzigartigen Google optimierten e-Paper Software.
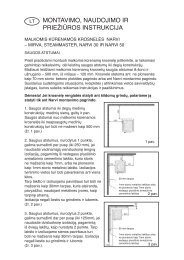
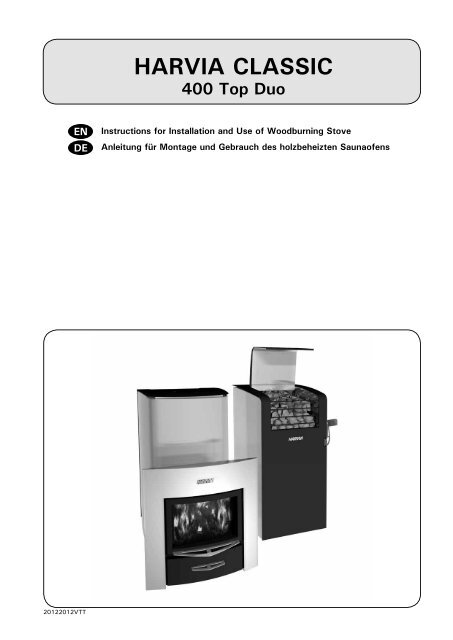
HARVIA CLASSIC<br />
400 Top Duo<br />
Instructions for Installation and Use of Woodburning Stove<br />
Anleitung für Montage <strong>und</strong> Gebrauch des holzbeheizten Saunaofens<br />
20122012VTT
Congratulations on your choice! The <strong>Harvia</strong> sauna<br />
stove works best and serves you longest when it is<br />
used and maintained according to these instructions.<br />
Read the instructions carefully before installing or<br />
using the stove. Keep the instructions for future<br />
reference.<br />
Wir beglückwünschen Sie zu Ihrer guten Wahl! Der<br />
<strong>Harvia</strong> Saunaofen funktioniert am Besten <strong>und</strong> am<br />
längsten, wenn Sie ihn dieser Anleitung entsprechend<br />
benutzen <strong>und</strong> warten.<br />
Lesen Sie die Anweisungen vor der Montage <strong>und</strong> Inbetriebnahme<br />
des Ofens aufmerksam durch. Bewahren<br />
Sie die Anweisungen zum späteren Nachschlagen<br />
gut auf.<br />
Contents<br />
1. General..................................................................... 4<br />
1.1. Stove Parts..........................................................4<br />
1.2. Stove’s Operating Principle.....................................5<br />
2. INSTRUCTIONS FOR USE...............................................6<br />
2.1. Warnings.............................................................6<br />
2.2. Preparing the Stove for Use....................................6<br />
2.3. Burning Material....................................................6<br />
2.4. Sauna Stones.......................................................7<br />
2.5. Heating the Stove.................................................7<br />
2.6. Sauna Water........................................................9<br />
2.7. Maintenance.........................................................9<br />
2.8. Troubleshooting.................................................. 10<br />
3. INSTRUCTIONS FOR INSTALLATION............................. 11<br />
3.1. Before Installation............................................... 11<br />
3.1.1. Ventilation of the Sauna Room..................... 11<br />
3.1.2. Protecting the Floor .................................... 12<br />
3.1.3. Safety Distances......................................... 13<br />
3.2. Installing the Stove.............................................. 13<br />
3.2.1. Adjustable Legs.......................................... 14<br />
3.2.2. Connecting the Stove to a Masonry Flue........ 14<br />
3.2.3. Connecting the Stove to a <strong>Harvia</strong> Steel<br />
Chimney.............................................................. 15<br />
3.3. Installing the Handle............................................ 16<br />
3.4. Changing the Opening Direction of the Stove Door.. 16<br />
3.5. Accessories........................................................ 17<br />
Inhalt<br />
1. allgemeines.............................................................. 4<br />
1.1. Ofenteile..............................................................4<br />
1.2. Die Funktionsweise des Ofen..................................5<br />
2. BEDIENUNGSANLEITUNG...............................................6<br />
2.1. Warnungen...........................................................6<br />
2.2. Vorbereiten des Ofens zur Benutzung......................6<br />
2.3. Brennmaterial.......................................................6<br />
2.4. Saunaofensteine...................................................7<br />
2.5. Heizen des Ofens..................................................7<br />
2.6. Saunawasser........................................................9<br />
2.7. Wartung..............................................................9<br />
2.8. Störungen.......................................................... 10<br />
3. MontageANLEITUNG................................................ 11<br />
3.1. Vor der Montage................................................. 11<br />
3.1.1. Belüftung der Saunakabine........................... 11<br />
3.1.2. Bodenschutz.............................................. 12<br />
3.1.3. Sicherheitsabstände.................................... 13<br />
3.2. Montage des Ofens............................................. 13<br />
3.2.1. Verstellbare Füße des Ofens......................... 14<br />
3.2.2. Anschluss des Ofens an einen gemauerten<br />
Rauchfang........................................................... 14<br />
3.2.3. Anschluss des Ofens an einen <strong>Harvia</strong>-<br />
Edelstahlschornstein............................................. 15<br />
3.3. Montage der Griff................................................ 16<br />
3.4. Änderung der Öffnungsrichtung der Ofentür........... 16<br />
3.5. Zubehör............................................................. 17<br />
These instructions for installation apply to CE marked<br />
stoves. If your stove doesn’t have CE marking<br />
in the type plate, please open instructions for installation<br />
here:<br />
▸▸<br />
Classic 400 Top Duo<br />
Information about CE marking<br />
Diese <strong>Gebrauchs</strong>anleitungen gelten für alle CE-gekennzeichneten<br />
Öfen. Falls Ihr Ofen auf dem Typenschild<br />
keine CE-Kennzeichnung hat, lesen Sie bitte<br />
die dazugehörigen <strong>Gebrauchs</strong>anleitungen hier:<br />
▸▸<br />
Classic 400 Top Duo<br />
Information zur CE-Kennzeichnung
EN<br />
Sauna room volume (m³)<br />
14–36<br />
Volumen der Saunakabine (m³)<br />
Required temperature class of chimney T600<br />
Erforderliche Temperaturklasse des<br />
Rauchfangs<br />
Diameter of connection opening (mm) 115<br />
Durchmesser der Anschlussöffnung<br />
(mm)<br />
Stone quantity (max. kg)<br />
80<br />
Steinmenge (max. kg)<br />
Stone size (cm)<br />
Ø10–15<br />
Steingröße (cm)<br />
Weight (kg)<br />
110<br />
Gewicht (kg)<br />
Width (mm)<br />
560<br />
Breite (mm)<br />
Depth + fire chamber extension (mm) 520<br />
Tiefe + Brennkammerfortsatz (mm) +230<br />
Height + adjustable legs (mm) 960<br />
Höhe + verstellbare Füße (mm) + 0–30<br />
Thickness of fire chamber cover (mm) 6<br />
Stärke der Brennkammerdecke (mm)<br />
Maximum length of firewood (cm) 39<br />
Maximale Länge des Brennholzes (cm)<br />
Diameter of firewood (cm)<br />
8–15<br />
Durchmesser des Brennholzes (cm)<br />
Water container volume (l)<br />
–<br />
Volumen des Wasserbehälters (l)<br />
Table 1.<br />
Tabelle 1.<br />
Technical Data<br />
Technische Daten<br />
Classic 400 Top Duo<br />
WKC400LUX<br />
DE<br />
<strong>Harvia</strong> Oy, PL 12, 40951<br />
Muurame, Finland<br />
12<br />
EN 15821:2010<br />
Fuel<br />
Brennstoffe<br />
Fire safety<br />
(initiation, risk to adjacent elements)<br />
Brandsicherheit<br />
(Brandgefahr der angrenzenden Bauteile)<br />
- safety distances to combustible materials<br />
- Sicherheitsabstände zu brennbaren<br />
Materialien<br />
Emission of combustible products<br />
Emission von unbrennbaren Stoffen<br />
Surface temperature<br />
Oberflächentemperatur<br />
Release of dangerous substances<br />
Abgabe gefährliche Stoffe<br />
Cleanability<br />
Reinigungsmöglichkeit<br />
Flue gas temperature*<br />
Abgastemperatur*<br />
Mechanical resistance<br />
Mechanische Beständigkeit<br />
Sauna room heating output<br />
Thermische Leistung<br />
Classic 400<br />
Top Duo<br />
WKC400LUX<br />
Wood<br />
Scheitholz<br />
p<br />
p<br />
p<br />
3.1.3.<br />
NPD<br />
p<br />
453 °C<br />
p<br />
31 kW<br />
p (0,9 %)<br />
- carbon monoxide emission at 13 % O 2<br />
- CO-emission 13 % O 2<br />
p (11256 mg/m 3 )<br />
- carbon monoxide emission (%) at<br />
13 % O 2<br />
- CO-emission (%) 13 % O 2<br />
- total efficiency<br />
- Wirkungsgrad<br />
p (66 %)<br />
- flue draught*<br />
- Förderdrück*<br />
12 Pa<br />
- ignition load<br />
- Holzmenge beim Anfeuern<br />
6,4 kg<br />
- refuelling loads<br />
- Brennstoffaufgabemenge<br />
7,2 kg<br />
- ash box gap (after ignition phase)<br />
- optimale Öffnungsbreite des<br />
50 mm<br />
Aschekastens nach der Anheizphase<br />
Durability<br />
Dauerhaftigkeit<br />
p<br />
Flue gas mass flow*<br />
Rauchgasmassenstrom*<br />
23,5 g/s<br />
Table 2.<br />
Tabelle 2.<br />
* Stove door closed/ Tür geschlossen<br />
p Pass/Erfüllt<br />
3
EN<br />
DE<br />
1. General<br />
Choose the stove model carefully. A stove with too<br />
low output must be heated longer and more intensely,<br />
which will shorten the stove’s life span.<br />
Please note that non-insulated wall and ceiling<br />
surfaces (such as brick, glass, tile and concrete<br />
surfaces) increase the output requirement of the<br />
stove. For every square meter of such wall and ceiling<br />
surface you should calculate an additional 1.2 m 3<br />
volume. If the sauna walls are made of massive log,<br />
the volume must be multiplied by 1.5. Examples:<br />
• A 10 m 3 sauna room with a brick wall 2 m high<br />
and 2 m wide is equivalent to a sauna room of<br />
approximately 15 m 3 .<br />
• A 10 m 3 sauna room with a glass door is<br />
equivalent to a sauna room of approximately<br />
12 m 3 .<br />
• A 10 m 3 sauna room with massive log walls is<br />
equivalent to a sauna room of approximately<br />
15 m 3 .<br />
The dealer or our factory representative can assist<br />
you in choosing the stove if needed. You can also<br />
visit our website www.harviasauna.com for further<br />
details.<br />
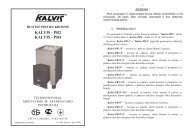
1.1. Stove Parts<br />
A. Upper connection opening<br />
B. Soot opening<br />
C. Stove door<br />
D. Ash box<br />
E. Flange<br />
F. Fire chamber extension<br />
G. Cover<br />
H. Handle<br />
1. allgemeines<br />
Wählen Sie den Ofen sorgsam nach seiner Leistung<br />
aus. Wenn die Heizleistung zu gering ist, muss der<br />
Ofen länger <strong>und</strong> intensiver beheizt werden, was<br />
seine Lebensdauer verkürzt.<br />
Beachten Sie bitte, dass nicht isolierte Wände <strong>und</strong><br />
Dachoberflächen (wie zum Beispiel Ziegel, Glas, Kacheln<br />
<strong>und</strong> Betonoberflächen) die Leistungsanforderungen<br />
des Ofens erhöhen. Für jeden Quadratmeter<br />
einer solchen Wand- oder Dachoberfläche sollten<br />
Sie zusätzliche 1,2 m 3 Volumen berechnen. Wenn<br />
die Saunawände aus Massivholz bestehen, muss<br />
das Volumen mit 1,5 multipliziert werden. Beispiele:<br />
• Eine 10 m 3 große Saunakabine mit einer 2 m<br />
breiten <strong>und</strong> 2 m hohen Steinwand entspricht<br />
einer Saunakabine von etwa 15 m 3 .<br />
• Eine 10 m 3 große Saunakabine mit einer Glastür<br />
entspricht einer Saunakabine von etwa 12 m 3 .<br />
• Eine 10 m 3 große Saunakabine mit Massivholzwänden<br />
entspricht einer Saunakabine von etwa<br />
15 m 3 .<br />
Wenn Sie wünschen, kann Ihnen Ihr Händler oder<br />
Vertreter des Herstellers bei der Auswahl des Ofens<br />
helfen. Weitere Informationen finden Sie auch auf<br />
unserer Website unter www.harviasauna.com.<br />
1.1. Ofenteile<br />
A. Obere Anschlussöffnung<br />
B. Rußöffnung<br />
C. Ofentür<br />
D. Aschekasten<br />
E. Manschette<br />
F. Brennkammerfortsatz<br />
G. Deckel<br />
H. Griff<br />
A<br />
G<br />
ZKIP-140<br />
B<br />
B<br />
C<br />
H<br />
F<br />
ZTS-45<br />
WX098<br />
ZKIP-10<br />
D<br />
E<br />
WX096<br />
Figure 1. Stove parts. Note! Only use replacement parts recommended by the manufacturer. Unauthorised<br />
modification of the stove is prohibited.<br />
Abbildung 1. Ofenteile. Achtung: Nur vom Hersteller empfohlene Ersatzteile benutzen! Ohne eine Genehmigung des<br />
Herstellers dürfen am Ofen keine Änderungen vorgenommen werden.<br />
4
EN<br />
1.2. Stove’s Operating Principle<br />
The purpose of the stove's cover is to control air<br />
flow through the stove. While the cover is closed,<br />
the stones heat up but the sauna remains reasonably<br />
warm. Only when the cover is opened, the stove<br />
starts to heat the sauna room air at full power. When<br />
the air in the sauna room is warm but the stones<br />
are hot, throwing water on the stones results in<br />
enjoyably humid sauna bath.<br />
If the cover is left open during heating, the stove<br />
heats the sauna like a normal stove.<br />
DE<br />
1.2. Die Funktionsweise des Ofen<br />
Die Aufgabe des Ofendeckels ist die Steuerung der<br />
Luftzufuhr innerhalb des Ofens. Ist der Decke geschlossen,<br />
erwärmen sich die Steine sehr schnell<br />
doch die Sauna nur langsam. Erst wenn der Deckel<br />
geöffnet wird, erhitzt sich auch die Sauna schnell.<br />
Ist die Luft in der Sauna bereits warm, die Ofensteine<br />
aber heißer, erwirkt das auf die Steine geworfene<br />
Wasser eine angenehm sanfte Dampfwelle.<br />
Ist der Deckel während der Erwärmung des Ofens<br />
offen, wird der Ofen <strong>und</strong> die Sauna ebenso wie bei<br />
einem gewöhnlichen Holzofen erwärmt.<br />
5
EN<br />
DE<br />
6<br />
2. INSTRUCTIONS FOR USE<br />
Read the instructions carefully before using<br />
the stove.<br />
2.1. Warnings<br />
• Staying in the hot sauna for long periods of<br />
time makes the body temperature rise, which<br />
may be dangerous.<br />
• Keep away from the stove when it is hot. The<br />
stones and outer surface of the stove may burn<br />
your skin.<br />
• Never throw water on the stones when there are<br />
people near the stove, because hot steam may<br />
burn their skin.<br />
• Keep children away from the stove.<br />
• Do not let young, handicapped or ill people<br />
bathe in the sauna on their own.<br />
• Consult your doctor about any health-related<br />
limitations to bathing.<br />
• Consult your child welfare clinic about taking<br />
little babies to the sauna.<br />
• Be very careful when moving in the sauna, as<br />
the platform and floors may be slippery.<br />
• Never go to a hot sauna if you have taken<br />
alcohol, strong medicines or narcotics.<br />
• Never sleep in a hot sauna.<br />
• Sea air and a humid climate may corrode the<br />
metal surfaces of the stove.<br />
• Do not hang clothes to dry in the sauna, as this<br />
may cause a risk of fire.<br />
2.2. Preparing the Stove for Use<br />
Perform the first heating outdoors or in a wellventilated<br />
room. The stove body has been painted<br />
with protective paint, which will vaporise during<br />
the first heating. This will cause the stove body to<br />
emit smoke. When the smoking stops, the stove is<br />
ready for normal use.<br />
If the first heating is done outdoors, install the<br />
smoke pipes ( 3.5.) for draught. This will cause<br />
odours to vaporize from the smoke pipes as well.<br />
• Close the upper connection opening with the<br />
blocking plug or install a smoke pipe to it<br />
before the first heating. ( 3.2.2.)<br />
• One load of wood is sufficient for the first<br />
heating.<br />
• The sauna stones should not be placed in the<br />
stove before the first heating. Place the stones<br />
in the stove only when the stove has cooled<br />
completely after the first heating.<br />
Do not throw water on the stove during first<br />
heating. Painted surfaces can get damaged.<br />
2.3. Burning Material<br />
Dry wood is the best material for heating the stove.<br />
Dry chopped firewood clinks when it is knocked<br />
together with another piece. The moisture of the<br />
wood has a significant impact on how clean the<br />
burning is as well as on the efficiency of the stove.<br />
You can start the fire with birch bark or newspapers.<br />
The thermal value of wood differs from one type<br />
of wood to another. For example, you must burn<br />
2. BEDIENUNGSANLEITUNG<br />
Lesen Sie die Anweisungen vor der Inbetriebnahme<br />
des Ofens aufmerksam durch.<br />
2.1. Warnungen<br />
• Ein langer Aufenthalt in einer heißen Sauna<br />
führt zum Ansteigen der Körpertemperatur,<br />
was gefährlich sein kann.<br />
• Achtung vor dem heißen Saunaofen. Die Steine<br />
sowie das Gehäuse werden sehr heiß <strong>und</strong> können<br />
die Haut verbrennen.<br />
• Achten Sie auch darauf, dass Sie kein Wasser<br />
auf die Steine gießen, wenn sich jemand in<br />
deren Nähe befindet. Der heiße Dampf könnte<br />
Brandw<strong>und</strong>en verursachen.<br />
• Halten Sie Kinder vom Ofen fern.<br />
• Kinder, Gehbehinderte, Kranke <strong>und</strong> Schwache<br />
dürfen in der Sauna nicht alleingelassen werden.<br />
• Ges<strong>und</strong>heitliche Einschränkungen bezogen auf das<br />
Saunen müssen mit dem Arzt besprochen werden.<br />
• Über das Saunen von Kleinkindern sollten Sie<br />
sich in der Mütterberatungsstelle beraten lassen.<br />
• Gehen Sie nicht in die Sauna, wenn Sie unter<br />
dem Einfluss von Narkotika (Alkohol, Medikamenten,<br />
Drogen usw.) stehen.<br />
• Schlafen Sie nie in einer erhitzten Sauna.<br />
• Meer- <strong>und</strong> feuchtes Klima können die Metalloberflächen<br />
des Saunaofens rosten lassen.<br />
• Benutzen Sie die Sauna wegen der Brandgefahr<br />
nicht zum Kleider- oder Wäschetrocknen.<br />
2.2. Vorbereiten des Ofens zur Benutzung<br />
Führen Sie das erste Heizen draußen oder in einem<br />
gut belüfteten Raum durch. Der Ofenkorpus hat eine<br />
Schutzschicht, die bei der erstmaligen Erhitzung<br />
wegbrennen soll. Dabei entsteht sehr viel Rauch.<br />
Sobald dieser nicht mehr entsteht, ist der Ofen zur<br />
Anwendung bereit.<br />
Wenn das erste Heizen draußen stattfindet,<br />
bringen Sie die Ofenrohre ( 3.5.) an, um einen<br />
Luftzug zu erreichen. Hierdurch kommt es auch an<br />
den Ofenrohren zur Geruchsentwicklung.<br />
• Schließen Sie die obere Abschlussöffnung mit<br />
dem Stopfen oder bringen Sie das Ofenrohr vor<br />
der erstmaligen Erhitzung an. ( 3.2.2.)<br />
• Eine Ladung Holz reicht für das erste Heizen aus.<br />
• Vor dem ersten Heizen sollten die Saunasteine<br />
noch nicht auf den Ofen gelegt werden. Legen<br />
Sie die Saunasteine erst dann auf den Ofen,<br />
wenn der Ofen nach dem ersten Heizen komplett<br />
abgekühlt ist.<br />
Während dem erstmaligen Aufheizen des Ofens<br />
darf kein Aufguss durchgeführt werden, da<br />
sonst durch das Wasser die Farboberfläche beschädigt<br />
wird!<br />
2.3. Brennmaterial<br />
Trockenes Holz ist das beste Material, um den Ofen<br />
zu heizen. Trockenes, gehacktes Brennholz klingt,<br />
wenn es gegen ein anderes Stück geschlagen wird.<br />
Die Feuchtigkeit des Holzes hat einen beträchtlichen<br />
Einfluss darauf, wie sauber die Verbrennung ist <strong>und</strong><br />
wie effizient der Ofen arbeitet. Sie können das Feuer<br />
mit Birkenrinde oder mit Zeitungspapier anfachen.<br />
Es gibt große Unterschiede zwischen den Brenn-
EN<br />
15 % less beech than birch to obtain the same heat<br />
quantity. If you burn large amounts of wood, which<br />
has a high thermal value, the life span of the stove<br />
will shorten!<br />
Do not burn the following materials in the stove:<br />
• Burning materials that have a high thermal<br />
value (such as chipboard, plastic, coal,<br />
brickets, pellets)<br />
• Painted or impregnated wood<br />
• Waste (such as PVC plastic, textiles, leather,<br />
rubber, disposable diapers)<br />
• Garden waste (such as grass, leaves)<br />
• Liquid fuel<br />
2.4. Sauna Stones<br />
• The stones should be 10–15 cm in diameter.<br />
• Only proper stones meant for the specific<br />
purpose should be used as sauna stones.<br />
Peridotite, olivine-dolerite and olivine are<br />
suitable stone types. Stones fo<strong>und</strong> in nature<br />
may contain harmful substances, such as iron<br />
pyrite, and therefore should not be used.<br />
• Wash off dust from the stones before piling<br />
them into the stove.<br />
DE<br />
werten der verschiedenen Holzsorten. Um die Heizkraft<br />
von Birkenholz zu erreichen, benötigt man beispielsweise<br />
ca. 15% weniger Buchenholz. Wenn zu<br />
viel Holz mit hohem Brennwert auf einmal im Ofen<br />
verbrannt wird, verkürzt sich die Lebensdauer des<br />
Ofens.<br />
Verbrennen Sie folgende Materialien nicht im Ofen:<br />
• Brennmaterialien, die einen hohen Wärmewert<br />
haben (wie etwa Spanplatten, Plastik, Kohle,<br />
Briketts, Pellets usw.)<br />
• Lackiertes oder imprägniertes Holz<br />
• Abfall (wie etwa PVC-Plastik, Textilien, Leder,<br />
Gummi, Einwegwindeln)<br />
• Gartenabfälle (wie etwa Gras, Blätter)<br />
2.4. Saunaofensteine<br />
• Die Steine sollten einen Durchmesser von<br />
10–15 cm haben.<br />
• Nur speziell für diesen Zweck vorgesehe Steine<br />
sollten als Saunasteine verwendet werden.<br />
Geeignete Gesteinsarten sind Peridodit, Olivin-<br />
Dolerit <strong>und</strong> Olivin. In der Natur gef<strong>und</strong>ene<br />
suprakrustale Steine dürfen nicht verwendet<br />
werden.<br />
• Die Steine sollten vor dem Aufschichten von<br />
Steinstaub befreit werden.<br />
1<br />
2<br />
Perform the first heating outdoors or in a well-ventilated room. Place the stones in the stove only when the<br />
stove has cooled completely.<br />
Führen Sie das erste Heizen draußen oder in einem gut belüfteten Raum durch. Legen Sie die Saunasteine erst<br />
dann auf den Ofen, wenn der Ofen nach dem ersten Heizen komplett abgekühlt ist.<br />
1. Place the stones in a dense layer between the<br />
front part and stove body. Use stones that fit<br />
in easily.<br />
2. Place rest of the stones sparsely to ensure<br />
that air can circulate between them.<br />
1. Stapeln Sie die Steine zwischen Vorraum<br />
<strong>und</strong> Rahmen des Ofens dicht aufeinander.<br />
Verwenden Sie hierzu nur Steine, die leicht in<br />
den Zwischenraum passen.<br />
2. Schichten Sie den Rest der Steine locker, so<br />
dass Luft zwischen ihnen hindurchströmen<br />
kann.<br />
Figure 2. Preparing the stove and piling the stones<br />
Abbildung 2. Vorbereitung des Ofens <strong>und</strong> Stapeln der Steine<br />
2.5. Heating the Stove<br />
Before heating the stove make sure that there<br />
are no unnecessary items in the sauna or<br />
inside the stove’s safety distances. Extractor fans<br />
when operated in the same space as the stove, may<br />
cause problems.<br />
2.5. Heizen des Ofens<br />
Sorgen Sie vor dem Heizen des Ofens dafür,<br />
dass sich keine unnötigen Gegenstände in der<br />
Sauna oder innerhalb der Sicherheitsabstände des<br />
Ofens befinden. Berücksichtigen Sie, dass Abluftsysteme,<br />
die im gleichen Raum mit dem Saunaofen in<br />
Betrieb sind, Probleme verursachen können.<br />
7
EN<br />
DE<br />
2<br />
4<br />
1<br />
3<br />
5 6<br />
Figure 3. Heating the Stove<br />
Abbildung 3. Heizen des Ofens<br />
1. Empty the ash box.<br />
2. Close the cover. 1.2.<br />
3. Place the firewood into the fire chamber, leaving<br />
enough room for the combustion air to flow<br />
between the firewood. Place the biggest firewood<br />
on the bottom and the smaller ones on the<br />
top. Use firewood with a diameter of 8–12 cm<br />
(consider the ignition load value, table 2). Place<br />
the firewood on the grate at back of the fire<br />
chamber. Avoid burning firewood in the fire<br />
chamber extension. Do not use excessively<br />
long firewood even though they would fit in<br />
the fire chamber.<br />
4. Place the kindling on the top of the firewood.<br />
By starting the fire on the top of the firewood,<br />
fewer emissions are produced.<br />
5. Fire the kindling and close the door. The<br />
amount of draught can be adjusted by opening<br />
the ash box. The stove is not intended for use<br />
with the stove door open.<br />
Note! The handles become hot while in use.<br />
Use the supplied tool for opening and closing<br />
the stove door and ash box (figure 4).<br />
- When heating the stove, it is generally a good<br />
idea to at first keep the ash box slightly open.<br />
This ensures that the fire starts burning properly.<br />
- Excessive draught will cause the stove body<br />
to become red-heated, which will shorten its<br />
life span considerably.<br />
- During bathing, and when the sauna room<br />
is already heated, the ash box can be closed<br />
to keep down the fire and decrease wood<br />
consumption. See the optimal ash box gap in<br />
table 2.<br />
6. Open the cover when you begin bathing. 1.2.<br />
7. If necessary, place more firewood into the<br />
fire chamber when the ember is dying down.<br />
Use firewood with a diameter of 12–15 cm.<br />
It takes only a couple of pieces of wood to<br />
maintain the bathing temperature (consider the<br />
refuelling loads value, table 2).<br />
8<br />
1. Leeren Sie den Aschekasten.<br />
2. Schließen Sie den Deckel. 1.2.<br />
3. Legen Sie das Brennholz in die Brennkammer,<br />
wobei Sie genügend Luftraum lassen, damit<br />
die Verbrennungsluft zwischen dem Brennholz<br />
hindurchströmen kann. Legen Sie die größeren<br />
Stücke Brennholz nach unten <strong>und</strong> die kleineren<br />
nach oben. Verwenden Sie Brennholz mit einem<br />
Durchmesser von 8–12 cm (die Holzmenge beim<br />
Anfeuern beachten, Tabelle 2). Lege das Brennholz<br />
hinten in den Feuerraum auf den Gitterrost.<br />
Vermeide, Holz im Verlängerungsteil brennen zu<br />
lassen. Verwende keine zu langen Holzstücke,<br />
auch wenn diese in den Ofen passen würden.<br />
4. Legen Sie das Zündholz oben auf das Brennholz.<br />
Wenn das Feuer von der Spitze des<br />
Brennholzes aus angefacht wird, werden weniger<br />
Emissionen produziert.<br />
5. Zünden Sie das Zündholz an <strong>und</strong> schließen Sie<br />
die Tür. Der Zug kann durch Öffnen des Aschekastens<br />
geregelt werden. Der Ofen darf nicht<br />
mit geöffneter Feuertür betrieben werden.<br />
Achtung: Die Türgriffe werden beim Anheizen<br />
des Ofens heiß. Verwenden Sie das mit gelieferte<br />
Werkzeug zum Öffnen <strong>und</strong> Schließen von<br />
Ofentür <strong>und</strong> Aschekasten (Abbildung 4).<br />
- Beim Heizen des Ofens ist es allgemein ratsam,<br />
den Aschekasten zunächst leicht geöffnet zu<br />
lassen. Hierdurch kann sich das Feuer am Anfang<br />
besser entwickeln.<br />
- Zu starker Zug führt dazu, dass sich der<br />
Ofenkorpus bis zum Glühen aufheizt, was seine<br />
Lebensdauer enorm verkürzt.<br />
- Während des Saunaganges <strong>und</strong> wenn die Sauna<br />
bereits aufgewärmt ist, kann der Aschekasten<br />
geschlossen werden, um das Feuer klein zu halten<br />
<strong>und</strong> den Holzverbrauch zu verringern. Siehe<br />
optimale Öffnungsbreite in der Tabelle 2.<br />
6. Öffnen Sie den Deckel sobald Sie mit dem Saunieren<br />
beginnen. 1.2.<br />
7. Legen Sie gegebenenfalls Brennholz in die<br />
Brennkammer nach, wenn das Feuer<br />
erlischt. Verwenden Sie Brennholz mit<br />
einem Durchmesser von 12–15 cm. Zur<br />
Aufrechterhaltung der Saunatemperatur<br />
Figure 4.<br />
Abbildung 4.<br />
sind nur wenige Holzstücke nötig (die<br />
Brennstoffaufgabemenge Beachten,<br />
Tabelle 2).
EN<br />
Prolonged, intense heating may cause risk<br />
of fire!<br />
• Excessive heating (several full loads in a<br />
row, for example) will make the sauna room,<br />
stove and the chimney overheat. Overheating<br />
shortens the stove’s life span and may cause<br />
risk of fire.<br />
• A good rule of thumb is that temperatures of<br />
over 100 ºC are too high in a sauna.<br />
• Observe the correct wood quantities noted in<br />
the heating instructions. Let the stove, chimney<br />
and sauna room cool down if necessary.<br />
2.6. Sauna Water<br />
The water that is thrown on the stones should be<br />
clean household water. Make sure the water is of<br />
high enough quality, because water containing salt,<br />
lime, iron or humus may prematurely corrode the<br />
stove. Especially seawater will corrode the stove<br />
very rapidly. The following quality requirements<br />
apply to household water:<br />
• humus content
EN<br />
4. After a sootfire, a chimney sweeper must<br />
check the stove and the flue before use.<br />
2.8. Troubleshooting<br />
There is no draught in the flue. Smoke comes into<br />
the sauna.<br />
• There are leaks in the flue connection. Seal the<br />
connection ( 3.2.2.).<br />
• The brick flue is cold.<br />
• There is low pressure caused by an extractor<br />
fan or another device in the room. Make sure<br />
there is enough air to compensate.<br />
• Several fireplaces are used at the same time.<br />
Make sure there is enough air to compensate.<br />
• The ash box is full.<br />
• The smoke canals of the stove are blocked<br />
( 2.7.).<br />
• The flue connection pipe is too deep in the<br />
chimney ( 3.2.2.).<br />
The sauna does not heat up.<br />
• The sauna is too big in relation to the stove’s<br />
heating capacity (see table 1).<br />
• There is lots of non-insulated wall surface in<br />
the sauna ( 1.).<br />
• The burning material is moist or its quality is<br />
otherwise low ( 2.3.).<br />
• The flue does not have a good draught.<br />
• The smoke canals of the stove are blocked<br />
( 2.7.).<br />
The stove stones do not heat up.<br />
• The sauna is too small in relation to the stove’s<br />
heating capacity ( 1.).<br />
• The flue does not have a good draught.<br />
• The burning material is moist or its quality is<br />
otherwise low ( 2.3.).<br />
• The smoke canals of the stove are blocked<br />
( 2.7.).<br />
• Check the stone placement ( 2.4.). Remove the<br />
small pieces of stone and stones that are less<br />
than 10 cm in diameter from the stone space.<br />
Replace the disintegrated stones with large and<br />
<strong>und</strong>amaged ones.<br />
The stove emits smell.<br />
• See section 2.2.<br />
• The hot stove may emphasize odours mixed in<br />
the air that are not, however, caused by the<br />
sauna or the stove. Examples: paint, glue, oil,<br />
seasoning.<br />
Wooden surfaces of the sauna room blacken<br />
• It is perfectly normal for the wooden surfaces<br />
of the sauna room to blacken in time. The<br />
blackening may be accelerated by sunlight,<br />
heat from the stove, protective agents on<br />
the walls (protective agents have a poor heat<br />
resistance level), fine particles disintegrating<br />
from the sauna stones which rise with the<br />
air flow and smoke that enters the sauna, for<br />
example, when adding firewood.<br />
DE<br />
2. Kontaktieren Sie die örtliche Feuerwehr.<br />
3. Versuchen Sie nicht, den Rußbrand mit Wasser<br />
zu löschen.<br />
4. Nach einem Rußbrand muss der Schornsteinfeger<br />
sowohl die Feuerstelle als auch den<br />
Schornsteinabzug vor dem nächsten Anheizen<br />
kontrollieren.<br />
2.8. Störungen<br />
Im Rauchfang findet kein Luftzug statt. Es tritt<br />
Rauch in die Sauna.<br />
• Es gibt <strong>und</strong>ichte Stellen im Anschluss des Rauchfangs.<br />
Dichten Sie den Anschluss ab ( 3.2.2.).<br />
• Der gemauerte Rauchfang ist kalt.<br />
• Ein Sauglüfter oder ein anderes Gerät im Raum<br />
führt zu einem Niederdruck. Sorgen Sie im Ausgleich<br />
für genügend Luft.<br />
• Es werden mehrere Feuerstellen gleichzeitig<br />
genutzt. Sorgen Sie im Ausgleich für genügend<br />
Luft.<br />
• Der Aschekasten ist voll.<br />
• Die Rauchkanäle des Ofens sind verstopft<br />
( 2.7.).<br />
• Das Abzugsanschlussrohr darf nicht zu weit in<br />
den Rauchfang hineinreichen ( 3.2.2.).<br />
Die Sauna wird nicht warm.<br />
• Die Sauna ist in Relation zur Heizkapazität des<br />
Ofens zu groß (siehe Tabelle 1).<br />
• Es gibt viele nicht isolierte Wandoberflächen in<br />
der Sauna ( 1.).<br />
• Das Brennmaterial ist feucht oder anderweitig<br />
von schlechter Qualität ( 2.3.).<br />
• Der Rauchfang hat keinen guten Luftzug.<br />
• Die Rauchkanäle des Ofens sind verstopft<br />
( 2.7.).<br />
Die Saunaofensteine werden nicht warm.<br />
• Die Sauna ist in Relation zur Heizleistung des<br />
Ofens zu klein ( 1.).<br />
• Der Rauchfang hat keinen guten Luftzug.<br />
• Das Brennmaterial ist feucht oder anderweitig<br />
von schlechter Qualität ( 2.3.).<br />
• Die Rauchkanäle des Ofens sind verstopft<br />
( 2.7.).<br />
• Überprüfen Sie die Anordnung der Steine<br />
( 2.4.). Entfernen Sie die kleinen Steinstücke<br />
<strong>und</strong> alle Steine, die weniger als 10 cm Durchmesser<br />
aufweisen, aus der Steinkammer. Ersetzen<br />
Sie die herausgenommenen Steine durch<br />
große <strong>und</strong> unbeschädigte.<br />
Der Ofen gibt Gerüche ab.<br />
• Siehe Abschnitt 2.2.<br />
• Ein heißer Ofen kann Gerüche in der Luft verstärken,<br />
die jedoch nicht durch die Sauna oder<br />
den Ofen selbst verursacht wurden. Beispiele:<br />
Farbe, Klebstoff, Öl, Würzmittel.<br />
Die Holzoberflächen der Sauna dunkeln nach<br />
• Es ist ganz normal, wenn sich die Holzoberflächen<br />
einer Sauna mit der Zeit verfärben. Die<br />
Schwärzung wird beschleunigt durch:<br />
• Sonnenlicht<br />
• Hitze des Ofens<br />
• Täfelungsschutz an den Wänden (mit geringem<br />
Hitzewiderstand)<br />
• Feinpartikel, die aus den zerfallenden Saunasteinen<br />
in die Luft entweichen<br />
• Rauch, der in die Sauna kommt, zum Beispiel<br />
beim Nachlegen von Brennholz.<br />
10
EN<br />
DE<br />
3. INSTRUCTIONS FOR INSTALLATION<br />
3.1. Before Installation<br />
Before installing the stove make sure that all<br />
safety distance requirements are fulfilled.<br />
There shall be no electrical devices, wires or<br />
inflammable materials within the established safety<br />
distances aro<strong>und</strong> the stove.<br />
• All local regulations, including those referring<br />
to national and European standards need to be<br />
complied with when installing the appliance.<br />
• The stove is not suitable for installation in a<br />
shared flue system.<br />
• The local fire authorities in charge of approving<br />
the installations can provide more detailed<br />
information about fire safety regulations.<br />
3.1.1. Ventilation of the Sauna Room<br />
See figure 5.<br />
A. Supply air vent location. If mechanical exhaust<br />
ventilation is used, place the supply air vent<br />
above the stove. If gravity exhaust ventilation<br />
is used, place the supply air vent below or next<br />
to the stove. The diameter of the supply air<br />
pipe must be 50–100 mm.<br />
B. Exhaust air vent. Place the exhaust air vent<br />
near the floor, as far away from the stove as<br />
possible. The diameter of the exhaust air pipe<br />
should be twice the diameter of the supply air<br />
pipe.<br />
C. Make sure there is enough air to compensate.<br />
3. MontageANLEITUNG<br />
3.1. Vor der Montage<br />
Sorgen Sie vor der Montage des Ofens dafür,<br />
dass alle Anforderungen bezüglich der Sicherheitsabstände<br />
eingehalten werden. Innerhalb des<br />
Sicherheitsabstands um den Ofen herum dürfen sich<br />
keine elektrischen Geräte, Kabel oder brennbare Materialien<br />
befinden.<br />
• Alle ortsüblichen Vorschriften, inbegriffen<br />
derer, die sich auf staatliche oder europäische<br />
Standards beziehen, müssen bei der Installation<br />
der Feuerstelle berücksichtigt werden.<br />
• Der Ofen ist nicht zum Anschluss an einen geteilten<br />
Schornstein geeignet (Bauart 1).<br />
• Nähere Informationen zu Brandschutzbestimmungen<br />
erhalten Sie von den örtlichen Behörden,<br />
die für die Genehmigung der Einbauten<br />
zuständig sind.<br />
3.1.1. Belüftung der Saunakabine<br />
Siehe Abbildung 5.<br />
A. Luftzufuhr. Bei mechanischer Entlüftung Luftzufuhr<br />
über dem Ofen anbringen. Bei Schwerkraftentlüftung<br />
Luftzufuhr unter oder neben<br />
dem Ofen anbringen. Der Durchmesser des<br />
Luftzufuhrrohres muss 50–100 mm betragen.<br />
B. Entlüftung. Entlüftung in Bodennähe anbringen,<br />
so weit weg vom Ofen wie möglich. Der Durchmesser<br />
des Entlüftungsrohres sollte doppelt so<br />
groß sein wie bei der Luftzufuhr.<br />
C. Sorgen Sie im Ausgleich für genügend Luft.<br />
A<br />
100<br />
C<br />
A<br />
B<br />
Figure 5. Ventilation of the Sauna Room<br />
Abbildung 5. Belüftung der Saunakabine<br />
11
EN<br />
3.1.2. Protecting the Floor<br />
See figure 6.<br />
A. Concrete floor without tiles. The stove can<br />
be installed on a concrete floor without any<br />
specific safety measures, if the concrete is at<br />
least 60 mm thick. Make sure that there are no<br />
wires or water pipes in the concrete cast below<br />
the stove.<br />
B. Tile floor. The floor glues and plasters and<br />
waterproof materials used below the tiles are<br />
not resistant to the heat radiation of the stove.<br />
Protect the floor with the <strong>Harvia</strong> protective<br />
bedding ( 3.5.) or similar heat radiation<br />
protection.<br />
C. Floor in front of the stove door made of<br />
inflammable material. Install floor protection<br />
made of nonflammable material.<br />
D. Floor made of inflammable material. Protect the<br />
floor with the <strong>Harvia</strong> protective bedding ( 3.5.).<br />
The stove shall be installed on a floor with an<br />
adequate load-bearing capacity. If the existing<br />
floor does not meet this prerequisite, suitable<br />
measures (e.g. load distributing plate) shall be taken<br />
to achieve it.<br />
Light-coloured floor materials will become<br />
dirty from the ash, particles of stone and<br />
metal flakes that fall from the stove. Use floor<br />
coverings made of dark materials and dark joint<br />
grouts.<br />
DE<br />
3.1.2. Bodenschutz<br />
Siehe Abbildung 6.<br />
A. Betonboden ohne Fliesen. Auf Betonboden kann<br />
der Ofen ohne besondere Sicherheitsmaße aufgebaut<br />
werden, solange der Beton mindestens<br />
60 mm dick ist. Vergewissern Sie sich, dass<br />
sich in dem Beton unter dem Ofen weder elektrische<br />
Kabel noch Wasserleitungen befinden.<br />
B. Fliesenboden. Die unter den Fliesen benutzten<br />
Klebstoffe, Mörtel <strong>und</strong> wasserfesten Materialien<br />
können der Wärmestrahlung des Ofens<br />
nicht standhalten. Schützen Sie den Boden mit<br />
der Schutzplatte von <strong>Harvia</strong> ( 3.5.) oder einem<br />
ähnlichen Hitzeschutz.<br />
C. Brennbarer Untergr<strong>und</strong> auf der Seite der Ofentür.<br />
Bringen Sie an dieser Stelle einen Schutz<br />
aus feuerfestem Material an.<br />
D. Boden aus brennbarem Material. Schützen Sie<br />
den Boden mit der Schutzplatte von <strong>Harvia</strong><br />
( 3.5.).<br />
Der Ofen muss auf einem Untergr<strong>und</strong> mit ausreichender<br />
Tragfähigkeit installiert werden.<br />
Wenn der vorhandene Boden diese unverzichtbare<br />
Bedingung nicht erfüllt, muss mit entsprechenden<br />
Mitteln nachgeholfen werde n (z.B. Einsatz von Platten<br />
zur Gewichtsverteilung).<br />
Helle Böden werden durch Asche, Steinpartikel<br />
<strong>und</strong> aus dem Ofen fallende Metallsplitter<br />
verunreinigt. Verwenden Sie Bodenabdeckungen aus<br />
dunklen Materialien <strong>und</strong> dunkle Zementschlämme.<br />
A. B. C.<br />
450 800<br />
Figure 6. Protecting the floor (all dimensions in millimeters)<br />
Abbildung 6. Bodenschutz (alle Abmessungen in Millimetern)<br />
12
EN<br />
3.1.3. Safety Distances<br />
See figure 7.<br />
A. Ceiling. The minimum safety distance between<br />
the stove and the ceiling is 1250 mm.<br />
B. Masonry walls. Leave 50 mm between the<br />
stove and walls, provided that the air can<br />
circulate in front and to one side of the stove.<br />
If the stove is installed in a recessed wall, leave<br />
100 mm between the stove and walls for the<br />
air circulation.<br />
C. Walls and benches made of inflammable<br />
materials. The minimum safety distances to<br />
inflammable materials: 500 mm on either side,<br />
500 mm behind the stove, 500 mm in the<br />
front.<br />
D. Space required for use and maintenance. The<br />
stove user needs at least one square metre of<br />
space in front of the stove.<br />
DE<br />
3.1.3. Sicherheitsabstände<br />
Siehe Abbildung 7.<br />
A. Dach. Der Mindest-Sicherheitsabstand zwischen<br />
Ofen <strong>und</strong> Dach beträgt 1250 mm.<br />
B. Gemauerte Wände. Lassen Sie 50 mm zwischen<br />
Ofen <strong>und</strong> Wänden, vorausgesetzt, die<br />
Luft kann vor dem Ofen <strong>und</strong> auf einer Seite<br />
zirkulieren. Wenn der Ofen in eine Nische eingebaut<br />
wird, lassen Sie für die Luftzirkulation<br />
zwischen dem Ofen <strong>und</strong> den Wänden 100 mm<br />
Platz.<br />
C. Wände <strong>und</strong> Liegen aus brennbarem Material.<br />
Mindest-Sicherheitsabstand von brennbaren<br />
Materialien: 500 mm auf beiden Seiten <strong>und</strong><br />
hinter dem Ofen <strong>und</strong> 500 mm davor.<br />
D. Für Nutzung <strong>und</strong> Wartung benötigter Raum.<br />
Der Benutzer des Ofens benötigt mindestens<br />
einen Quadratmeter Platz vor dem Ofen.<br />
min.<br />
50<br />
min.<br />
100<br />
min.<br />
100<br />
min.<br />
500<br />
B<br />
B<br />
C<br />
min.<br />
500<br />
min.<br />
500<br />
min.<br />
500<br />
C<br />
min.<br />
500<br />
min.<br />
500<br />
C<br />
A<br />
min. 1250<br />
D<br />
C<br />
min.<br />
500<br />
min.<br />
50<br />
Figure 7. Safety distances (all dimensions in millimeters)<br />
Abbildung 7. Sicherheitsabstände (alle Abmessungen in Millimetern)<br />
3.2. Installing the Stove<br />
See figure 8. The stove is installed in an opening in<br />
a concrete or brick wall.<br />
• Pull the front flange out.<br />
• Push the fire chamber extension through the<br />
opening far enough to allow attachment of the<br />
flange and door.<br />
3.2. Montage des Ofens<br />
Siehe Abbildung 8. Der Saunaofen wird in einer<br />
Öffnung in einer Wand aus Beton oder Ziegelstein<br />
installiert.<br />
• Ziehen Sie die vordere Manschette ab.<br />
• Schieben Sie den Brennkammerfortsatz des<br />
Saunaofens so weit durch die Öffnung, dass<br />
13
EN<br />
• Pull the stove back to make the flange press<br />
against the wall and door.<br />
DE<br />
sich die Manschette <strong>und</strong> die Luke in der richtigen<br />
Position befinden.<br />
• Ziehen Sie den Saunaofen so weit zurück, dass<br />
die Manschette gegen Wand <strong>und</strong> Luke drückt.<br />
min. 1560<br />
405<br />
485<br />
F<br />
max. 145<br />
min.<br />
580<br />
max. 100<br />
Figure 8. Installing the stove (all dimensions in millimeters)<br />
Abbildung 8. Montage des Ofens (alle Abmessungen in Millimetern)<br />
3.2.1. Adjustable Legs<br />
The adjustable legs enable the stove to be installed<br />
firmly on an inclined floor. The adjustable range is<br />
0–30 mm. Unscrew the adjustable feet to an extent<br />
that allows them to be adjusted using a wrench<br />
(17 mm) when the stove is in position.<br />
The adjustable feet could scratch the floor<br />
surface if the stove is moved on the floor.<br />
3.2.2. Connecting the Stove to a Masonry Flue<br />
See figure 9. Make an opening in the fireproof wall<br />
for the flue connection. Notice that the opening<br />
has to be at the correct height, if you intend to<br />
use, for instance, a protective bedding. The hole<br />
should be slightly larger than the flue connecting<br />
pipe. A suitable gap aro<strong>und</strong> the connection pipe<br />
is ca. 10 mm. It is advisable to ro<strong>und</strong> off the<br />
inner corners of the flue opening to ensure that<br />
the combustion gases can flow freely to the flue.<br />
Additional accessories are available to make the<br />
installation easier ( 3.5.).<br />
You will need an angled smoke pipe (45° or 90°) and<br />
connecting pipe WZ020ST for the upper connection<br />
( 3.5.).<br />
1. Attach the flue connection pipe to the upper<br />
connection opening. Ensure that the pipe fits<br />
tightly in place.<br />
14<br />
3.2.1. Verstellbare Füße des Ofens<br />
Die verstellbaren Füße dienen zur sicheren Installation<br />
auf schiefer Gr<strong>und</strong>fläche. Regelbereich 0–30 mm. Die<br />
verstellbaren Füße sollten bis zu einem Ausmaß gelöst<br />
werden, das es ermöglicht, sie mit einem Gabelschlüssel<br />
(17 mm) einzustellen, wenn der Ofen an seinem<br />
Platz steht.<br />
Die verstellbaren Füße können die Bodenoberfläche<br />
zerkratzen, wenn der Ofen auf dem<br />
Boden bewegt wird.<br />
3.2.2. Anschluss des Ofens an einen gemauerten<br />
Rauchfang<br />
Siehe Abbildung 9. Stellen Sie in der Brandmauer eine<br />
Öffnung für den Abzugsanschluss her. Beachten Sie,<br />
falls Sie z.B. eine Schutzplatte anzubringen gedenken,<br />
dass sich die Öffnung auf der richtigen Höhe<br />
befinden muss. Das Loch sollte etwas größer sein<br />
als der Durchmesser des Abzugsanschlussrohres.<br />
Eine Dichtungslücke von etwa 10 mm um das Rohr<br />
herum ist angemessen. Es ist ratsam, die inneren<br />
Ecken der Rauchfangsöffnung abzur<strong>und</strong>en, damit die<br />
Rauchgase in den Rauchfang frei abziehen können.<br />
Zur einfacheren Montage steht zusätzliches Zubehör<br />
zur Verfügung ( 3.5.).<br />
Für den Anschluss wird ein Winkelofenrohr (45°<br />
oder 90°) <strong>und</strong> Anschlussrohr WZ020ST benötigt<br />
( 3.5.).
EN<br />
2. Push the stove in place. Do not block the flue<br />
by pushing the flue connection pipe too far into<br />
the flue. If necessary, shorten the pipe.<br />
3. Seal the flue connection pipe to the opening<br />
in the fireproof wall, for example, by using<br />
fireproof mineral wool. Make sure that the flue<br />
connection is tightly sealed. Add more fireproof<br />
mineral wool if necessary.<br />
DE<br />
1. Bringen Sie das Abzugsanschlussrohr an die<br />
obere Anschlussöffnung an. Das Rohr muss<br />
fest an seinem Platz sitzen.<br />
2. Schieben Sie den Ofen an seine Position. Schieben<br />
Sie das Abzugsanschlussrohr nicht zu weit<br />
in den Rauchfang hinein. Kürzen Sie das Rohr,<br />
falls notwendig.<br />
3. Dichten Sie das Abzugsanschlussrohr in der<br />
Öffnung der feuerfesten Wand ab, z.B. mit<br />
feuerfester Mineralwolle. Der Abzugsanschluss<br />
muss absolut dicht sein. Fügen Sie gegebenenfalls<br />
mehr Mineralwolle hinzu.<br />
200<br />
WZ020ST<br />
135<br />
280<br />
750<br />
Figure 9. Connecting the stove to a masonry flue (all dimensions in millimeters)<br />
Abbildung 9. Anschluss des Ofens an einen gemauerten Rauchfang (alle Abmessungen in Millimetern)<br />
3.2.3. Connecting the Stove to a <strong>Harvia</strong> Steel<br />
Chimney<br />
A CE-marked <strong>Harvia</strong> steel chimney can be used<br />
to remove combustion gases. Its smoke pipes are<br />
made of stainless steel and the chimney has been<br />
insulated for fire safety. The chimney has a ro<strong>und</strong><br />
cross section. The smoke pipe diameter is 115 mm,<br />
and the outer casing is 220 mm.<br />
Connect the steel chimney’s smoke pipe to the<br />
upper connection opening of the stove. Ensure that<br />
the smoke pipe fits tightly in place.<br />
Make sure that all safety distance requirements<br />
are fulfilled. See the detailed instructions in<br />
the steel chimney’s installation instructions!<br />
The nonflammable wall through which the<br />
stove is installed must extend up to the roof.<br />
The safety distance between the inflammable<br />
structures and the chimney outer casing must be<br />
minimum 100 mm.<br />
If a protective cover is used aro<strong>und</strong> the stove,<br />
the insulation of the chimney must start from<br />
the same level as the top surface of the protective<br />
cover or <strong>und</strong>erneath it.<br />
3.2.3. Anschluss des Ofens an einen <strong>Harvia</strong>-Edelstahlschornstein<br />
Zur Abführung der Verbrennungsgase kann ein CEgeprüfter<br />
<strong>Harvia</strong>-Stahlschornstein verwendet werden.<br />
Die Ofenrohre sind aus rostfreiem Stahl gefertigt,<br />
<strong>und</strong> der Schornstein wurde feuerfest isoliert.<br />
Der Schornstein hat ein r<strong>und</strong>es Profil. Das Ofenrohr<br />
misst 115 mm im Durchmesser <strong>und</strong> der Außenmantel<br />
220 mm.<br />
Schließen Sie das Ofenrohr des Stahlschornsteins<br />
an die obere Anschlussöffnung des Ofens an. Vergewissern<br />
Sie sich, dass das Ofenrohr fest an seinem<br />
Platz sitzt.<br />
Sorgen Sie vor der Montage dafür, dass alle<br />
Anforderungen bezüglich der Sicherheitsabstände<br />
eingehalten werden. Genauere Anweisungen<br />
finden Sie in den Installationsanweisungen des<br />
Stahlschornsteins!<br />
Die Brennfeste Wand, in die der Ofen eingebaut<br />
wird, muss bis zum Außendach reichen.<br />
Der Sicherheitsabstand zwischen den brennbaren<br />
Strukturen <strong>und</strong> dem Außenmantel des Rauchfangs<br />
muss mindestens 100 mm betragen.<br />
Bei Verwendung eines Schutzmantels um den<br />
Ofen herum muss der isolierte Teil des Rauchfangs<br />
auf Höhe der Oberkante des Schutzmantels<br />
oder darunter anfangen.<br />
15
EN<br />
3.3. Installing the Handle<br />
See figure 10.<br />
DE<br />
3.3. Montage der Griff<br />
Siehe Abbildung 10.<br />
1 2<br />
1.<br />
2.<br />
SL<br />
Figure 10. Installing the handle<br />
Abbildung 10. Montage der Griff<br />
3.4. Changing the Opening Direction of the<br />
Stove Door<br />
The door to the firing chamber can be installed to<br />
open either to the right or to the left. See figure 11.<br />
3.4. Änderung der Öffnungsrichtung der Ofentür<br />
Die Ofentür kann so montiert werden, dass sie entweder<br />
nach links oder nach rechts zu öffnen ist.<br />
Siehe Abbildung 11.<br />
Duo<br />
1 2 3<br />
1 mm<br />
Figure 11. Changing the opening direction of the stove door<br />
Abbildung 11. Änderung der Öffnungsrichtung der Ofentür<br />
16
EN<br />
3.5. Accessories<br />
A. <strong>Harvia</strong> steel chimney WHP1500. 3.2.3.<br />
B. Water heater VL22l. Installed on the top of the<br />
upper connection opening. When a protective<br />
sheath or other protection is used that is<br />
not large enough to protect the inflammable<br />
materials aro<strong>und</strong> the stove from the heat<br />
radiation of the pipe between the water heater<br />
and smoke flue, you must install a radiation<br />
cover aro<strong>und</strong> the pipe.<br />
C. Radiation cover WZ020130. Installed aro<strong>und</strong><br />
the smoke pipe. The safety distance from<br />
inflammable materials of an unprotected smoke<br />
pipe is 1,000 mm. When the radiation cover is<br />
used, the safety distance is 500 mm.<br />
D. Connecting pipe WZ020ST.<br />
E. <strong>Harvia</strong> protective bedding WX018.<br />
F. Angle smoke pipe. Different models.<br />
G. Lead-through flange for smoke pipe<br />
WZ020115. Covers the edges of the flue<br />
opening and the sealing in the wall. Made of<br />
stainless steel. Consists of two parts to make it<br />
useable with differently inclined smoke pipes.<br />
H. Masonry connector WZ011115. Connected to<br />
the flue opening, does not require other seals.<br />
The inner side already has a seal.<br />
DE<br />
3.5. Zubehör<br />
A. <strong>Harvia</strong>-Stahlschornstein WHP1500. 3.2.3.<br />
B. Warmwasserbehälter VL22l. Oben auf der<br />
oberen Anschlussöffnung montiert. Wenn ein<br />
Schutzmantel oder ein anderer Schutz benutzt<br />
wird, der nicht groß genug ist, um die brennbaren<br />
Materialien um den Ofen herum vor der<br />
Wärmestrahlung des Rohres zwischen dem<br />
Warmwasserbehälter <strong>und</strong> dem Rauchfang zu<br />
schützen, so müssen Sie um das Rohr herum<br />
einen Strahlungsschutz anbringen.<br />
C. Strahlungsschutz WZ020130. Um das Ofenrohr<br />
herum angebracht. Der Sicherheitsabstand<br />
von brennbaren Materialien zu einem<br />
ungeschützten Ofenrohr beträgt 1000 mm. Bei<br />
Verwendung eines Strahlungsschutzes beträgt<br />
der Sicherheitsabstand 500 mm.<br />
D. Anschlussrohr WZ020ST.<br />
E. <strong>Harvia</strong>-Schutzplatte WX018.<br />
F. Winkelofenrohr. Verschiedene Modelle.<br />
G. Durchgangskragen für Ofenrohr WZ020115.<br />
Bedeckt die Kanten der Rauchfangöffnung<br />
<strong>und</strong> die Dichtung in der Wand. Aus Edelstahl<br />
gefertigt. Besteht aus zwei Teilen, die sich für<br />
verschieden geneigte Ofenrohre eignen.<br />
H. Maueranschluss WZ011115. Angebracht an<br />
die Rauchfangöffnung, benötigt keine weiteren<br />
Dichtungen. Die Innenseite verfügt bereits über<br />
eine Dichtung.<br />
C<br />
H<br />
148<br />
G<br />
215<br />
A<br />
270<br />
138<br />
210–290<br />
B<br />
F<br />
D<br />
200<br />
D<br />
200<br />
E<br />
Figure 12. Accessories (all dimensions in millimeters)<br />
Abbildung 12. Zubehör (alle Abmessungen in Millimetern)<br />
17
S/N:<br />
Copy the stove’s serial number from the carton and attach the manual<br />
to the house documentation.<br />
Notieren Sie hier die Seriennummer von der Verpackung des Saunaofens<br />
<strong>und</strong> fügen Sie die Anleitung zu den Hausunterlagen hinzu.