FUTURELIGHT PHS-220 Quick Guide
FUTURELIGHT PHS-220 Quick Guide
FUTURELIGHT PHS-220 Quick Guide

Sie wollen auch ein ePaper? Erhöhen Sie die Reichweite Ihrer Titel.
YUMPU macht aus Druck-PDFs automatisch weboptimierte ePaper, die Google liebt.
<strong>FUTURELIGHT</strong> <strong>PHS</strong>-<strong>220</strong><br />
<strong>Quick</strong> <strong>Guide</strong><br />
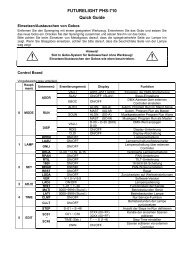
Einsetzen/Austauschen von Gobos<br />
Entfernen Sie den Sprengring mit einem geeigneten Werkzeug. Entnehmen Sie das Gobo und setzen Sie<br />
das neue Gobo ein. Drücken Sie den Sprengring zusammen und setzen Sie ihn vor das Gobo.<br />
Bitte achten Sie beim Einsetzen von Metallgobos darauf, dass die spiegelverkehrte Seite von der Lampe<br />
weg zeigt. Wenn Sie Glasgobos einsetzen, achten Sie bitte darauf, dass die beschichtete Seite zur Lampe<br />
hin zeigt.<br />
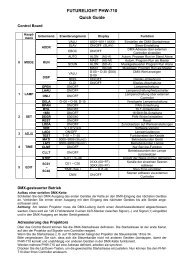
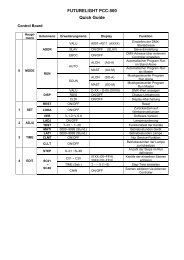
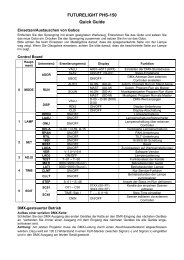
Control Board<br />
Hauptmenü<br />
0 MODE<br />
1 LAMP<br />
2 SET<br />
3 ADJU<br />
4 TIME<br />
5 EDIT<br />
Untermenü Erweiterungmenü Display Funktion<br />
VALU A001~A511 (AXX) Einstellen der DMX-Startadresse<br />
SLAV ON/OFF (SLAV) Slave-Einstellung<br />
ADDR<br />
DMX-Adresse über externen<br />
EBOC ON/OFF<br />
Controller einstellen<br />
AUTO ALON (AU-A) Autom. Program Run im Stand Alone<br />
RUN<br />
MAST (AU-M) Autom. Program Run als Master<br />
SOUN ALON (SO-A) Musikgesteuerter Program Run Alone<br />
MAST (SO-M) Musikgest. Program Run als Master<br />
D-00 ~ D-30 (DXX)<br />
DMX-Wert anzeigen<br />
VALU<br />
D-00<br />
DISP<br />
RDIS ON/OFF Display-Umkehrung<br />
CLDI ON/OFF Display-Abschaltung<br />
OPEN ON/OFF Lampenschaltung<br />
LAAU ON/OFF Lampenschaltung/Netzschalter<br />
ONLI<br />
ON/OFF<br />
Lampenschaltung über externen<br />
Controller<br />
DELA D–00 ~ D-59, D-15 Verzögerte Lampenschaltung<br />
RPAN ON/OFF PAN-Umkehrung<br />
RTIL ON/OFF TILT-Umkehrung<br />
16BI ON/OFF 16 Bit/8 Bit-Schaltung<br />
REST ON/OFF Reset<br />
LODA ON/OFF Zurücksetzen auf Werkseinstellungen<br />
VER V-1.0~V-9.9 Software-Version<br />
LADJ ON/OFF Lampenjustierung<br />
TEST T–01 ~ T–30 Funktionstest der Kanäle<br />
MATI 0000~9999 (Stund.) Betriebsstunden Gerät<br />
LATI 0000~9999 (Stund.) Betriebsstunden Lampe<br />
CLMT ON/OFF Nur Service-Funktion<br />
CLLT<br />
ON/OFF<br />
Betriebsstunden der Lampe<br />
zurücksetzen<br />
STEP S–01 ~ S–48 Anzahl der Steps im Run definieren<br />
01XX (00~FF)<br />
Kanäle der einzelnen Szenen<br />
SC01 C01 ~ C30<br />
30XX (00~FF)<br />
editieren<br />
~<br />
TIME (Sek.) T – – X (1~9) Step-Time einstellen<br />
SC48<br />
Szenen editieren via externen<br />
CNIN ON/OFF<br />
Controller<br />
DMX-gesteuerter Betrieb<br />
Aufbau einer seriellen DMX-Kette:<br />
Schließen Sie den DMX-Ausgang des ersten Gerätes der Kette an den DMX-Eingang des nächsten Gerätes<br />
an. Verbinden Sie immer einen Ausgang mit dem Eingang des nächsten Gerätes bis alle Geräte angeschlossen<br />
sind.<br />
Achtung: Am letzten Projektor muss die DMX-Leitung durch einen Abschlusswiderstand abgeschlossen<br />
werden. Dazu wird ein 120 Ω Widerstand in einen XLR-Stecker zwischen Signal (–) und Signal (+) eingelötet<br />
und in den DMX-Ausgang am letzten Gerät gesteckt.
Adressierung des Projektors<br />
Über das Control Board können Sie die DMX-Startadresse definieren. Die Startadresse ist der erste Kanal,<br />
auf den der Projektor auf Signale vom Controller reagiert.<br />
Wenn Sie die Startadresse z. B. auf 11 definieren belegt der Projektor die Steuerkanäle 11 bis 21.<br />
Bitte vergewissern Sie sich, dass sich die Steuerkanäle nicht mit anderen Geräten überlappen, damit der<br />
<strong>PHS</strong>-<strong>220</strong> korrekt und unabhängig von anderen Geräten in der DMX-Kette funktioniert.<br />
Werden mehrere <strong>PHS</strong>-<strong>220</strong> auf eine Adresse definiert, arbeiten sie synchron.<br />
Drücken Sie die Up/Down-Tasten, um die gewünschte Startadresse einzustellen. Nun können Sie den <strong>PHS</strong>-<br />
<strong>220</strong> über Ihren Controller ansteuern.<br />
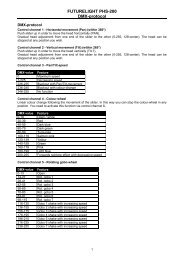
DMX-Protokoll<br />
Steuerkanal 1 PAN-Bewegung Steuerkanal 7 Fokus<br />
Steuerkanal 2 TILT-Bewegung Steuerkanal 8 Shutter, Strobe<br />
Steuerkanal 3 PAN/TILT-Geschwindigkeit Steuerkanal 9 Lampe, Reset, Programme<br />
Steuerkanal 4 Farbrad Steuerkanal 10 PAN Fine<br />
Steuerkanal 5 Rotierendes Goborad Steuerkanal 11 TILT Fine<br />
Steuerkanal 6 Goborotation<br />
Technische Daten<br />
Spannungsversorgung: 230 V AC, 50 Hz ~<br />
Gesamtanschlusswert:<br />
430 W<br />
DMX-Steuerkanäle: 11<br />
DMX 512-Anschluss:<br />
3-pol. XLR<br />
Blitzrate:<br />
10 Hz<br />
Farbrad:<br />
8 dichroitische Farben und offen<br />
Rotierendes Goborad:<br />
6 Gobos und offen<br />
Außendurchmesser der Gobos:<br />
27 mm<br />
Imagedurchmesser der Gobos:<br />
23 mm<br />
Länge der Grundfläche:<br />
330 mm<br />
Breite des Projektorarms:<br />
320 mm<br />
Höhe (Kopf horizontal):<br />
485 mm<br />
Gewicht (netto):<br />
13 kg<br />
Maximale Umgebungstemperatur t a<br />
:<br />
45° C<br />
Maximale Leuchtentemperatur im Beharrungszustand t B<br />
: 75° C<br />
Mindestabstand zu enflammbaren Oberflächen:<br />
0,5 m<br />
Mindestabstand zum angestrahlten Objekt:<br />
0,5 m<br />
Sicherung:<br />
T 4 A, 250 V<br />
Zubehör:<br />
OMNILUX OSD 90V/250W GY-9,5 2000h 6700K Best.-Nr. 89106005<br />
OSRAM HSD 250/60 90V/250W GY-9,5 2000h Best.-Nr. 89106010<br />
PHILIPS MSD250 90V/250W GY-9,5 2000h Best.-Nr. 89106015<br />
GE CSD250/2 95V/250W GY-9,5 2000h 8500K Best.-Nr. 89106100<br />
OMNILUX OSD 250/2 94V/250W 2000h 8000K Best.-Nr. 89106105<br />
OSRAM HSD250/78 90/250W GY9,5 3000h 7800K Best.-Nr. 89106110<br />
PHILIPS MSD250/2 90V/250W GY-9,5 2000h Best.-Nr. 89106115<br />
SYLVANIA BA250/2 SE D 90V/250W GY-9,5 Best.-Nr. 89106120<br />
OSRAM HSD250/80 90/250W GY9,5 3000h 8000K Best.-Nr. 89106210<br />
<strong>FUTURELIGHT</strong> CP-240 Controller Best.-Nr. 51834265<br />
<strong>FUTURELIGHT</strong> CP-256/32 Controller 16bit Best.-Nr. 51834286<br />
<strong>FUTURELIGHT</strong> CP-528 Controller 16bit Best.-Nr. 51834315<br />
Wizard-512 USB DMX-Software + Interface Best.-Nr. 51860102<br />
Wizard-1024 USB DMX-Software + Interface Best.-Nr. 51860110<br />
Transportcase für 2x<strong>PHS</strong>-150/<strong>220</strong>+Rollbrett Best.-Nr. 51836855<br />
Bitte beachten Sie: Technische Änderungen ohne vorherige Ankündigung und Irrtum vorbehalten.<br />
12.07.2005 ©
<strong>FUTURELIGHT</strong> <strong>PHS</strong>-<strong>220</strong><br />
<strong>Quick</strong> <strong>Guide</strong><br />
Inserting/Exchanging gobos<br />
Remove the fixation-ring with an appropriate tool. Remove the gobo and insert the new gobo. Press the<br />
fixation-ring together and insert it in front of the gobo.<br />
When installing metal gobos, please make sure that the mirror-inverted side points away from the lamp.<br />
When installing glass-gobos, please make sure that the coated side points to the lamp.<br />
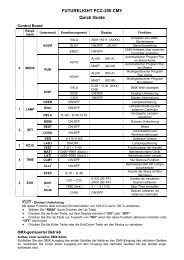
Control Board<br />
Main<br />
menu<br />
0 MODE<br />
1 LAMP<br />
2 SET<br />
3 ADJU<br />
4 TIME<br />
5 EDIT<br />
Sub<br />
menu<br />
Extension Display Function<br />
VALU A001~A511 (AXX) DMX address setting<br />
ADDR<br />
SLAV ON/OFF (SLAV) Slave setting<br />
EBOC ON/OFF Change DMX address via external<br />
controller<br />
AUTO ALON (AU-A) Automatic Program Run in Stand Alone<br />
MAST (AU-M) Automatic Program Run as Master<br />
RUN<br />
SOUN ALON (SO-A) Sound-control Program Run in Stand<br />
Alone<br />
MAST (SO-M) Sound-controlled Program Run as<br />
Master<br />
VALU D-00 ~ D-30 (DXX) Display the DMX 512 value of each<br />
DISP<br />
D-00<br />
channel<br />
RDIS ON/OFF Reverse display<br />
CLDI ON/OFF Shut off LED display<br />
OPEN ON/OFF Lamp on/off<br />
LAAU ON/OFF Lamp on/off/Power switch<br />
ONLI ON/OFF Lamp on/off via controller<br />
DELA D–00 ~ D-59, D-15 Delay lamp on<br />
RPAN ON/OFF Pan Reverse<br />
RTIL ON/OFF Tilt Reverse<br />
16BI ON/OFF Switch 16 bit/8 bit<br />
REST ON/OFF Reset<br />
LODA ON/OFF Restore factory settings<br />
VER V-1.0~V-9.9 Software version<br />
LADJ ON/OFF Lamp adjustment<br />
TEST T–01 ~ T–30 Test function of each channel<br />
MATI 0000~9999 (hours) Fixture running time<br />
LATI 0000~9999 (hours) Lamp running time<br />
CLMT ON/OFF Service-function<br />
CLLT ON/OFF Clear lamp time<br />
STEP S–01 ~ S–48 Steps of Program Run<br />
SC01 C01 ~ C30 01XX (00~FF)<br />
Edit the channels of each scene<br />
~<br />
30XX (00~FF)<br />
SC48 TIME (sec.) T – – X (1~9) Time for each scene<br />
CNIN ON/OFF Edit program via controller<br />
DMX-controlled operation<br />
Building a serial DMX-chain:<br />
Connect the DMX-output of the first fixture in the DMX-chain with the DMX-input of the next fixture. Always<br />
connect one output with the input of the next fixture until all fixtures are connected.<br />
Caution: At the last fixture, the DMX-cable has to be terminated with a terminator. Solder a 120 Ω resistor<br />
between Signal (–) and Signal (+) into a 3-pin XLR-plug and plug it in the DMX-output of the last fixture.
Addressing<br />
The Control Board allows you to assign the DMX starting address, which is defined as the first channel from<br />
which the <strong>PHS</strong>-<strong>220</strong> will respond to the controller.<br />
If you set, for example, the address to channel 11, the <strong>PHS</strong>-<strong>220</strong> will use the channel 11 to 21 for control.<br />
Please, be sure that you don’t have any overlapping channels in order to control each <strong>PHS</strong>-<strong>220</strong> correctly and<br />
independently from any other fixture on the DMX-chain.<br />
If several <strong>PHS</strong>-<strong>220</strong> are addressed similarly, they will work synchronically.<br />
Press the Up/Down-buttons for setting the desired starting address. Now you can start operating the <strong>PHS</strong>-<br />
<strong>220</strong> via your lighting controller.<br />
DMX-protocol<br />
Channel 1 PAN-movement Channel 7 Focus<br />
Channel 2 TILT- movement Channel 8 Shutter, strobe<br />
Channel 3 PAN/TILT-speed Channel 9 Lamp, reset, programs<br />
Channel 4 Colour-wheel Channel 10 PAN fine<br />
Channel 5 Rotating gobo-wheel Channel 10 TILT fine<br />
Channel 6 Gobo-rotation<br />
Technical specifications<br />
Power supply: 230 V AC, 50 Hz ~<br />
Power consumption:<br />
430 W<br />
DMX-control-channels: 11<br />
DMX-512-connection:<br />
3-pin XLR<br />
Flash-rate:<br />
10 Hz<br />
Colour-wheel:<br />
8 dichroic filters and open<br />
Rotating gobo-wheel:<br />
6 gobos and open<br />
Outside diameter of the gobos:<br />
27 mm<br />
Image diameter of the gobos:<br />
23 mm<br />
Length of base:<br />
330 mm<br />
Width of yoke:<br />
320 mm<br />
Height (head horizontal):<br />
485 mm<br />
Weight (net):<br />
13 kg<br />
Maximum ambient temperature t a<br />
:<br />
45° C<br />
Maximum housing temperature t B<br />
(steady state): 75° C<br />
Min.distance from flammable surfaces:<br />
0.5 m<br />
Min.distance to lighted object:<br />
0.5 m<br />
Fuse:<br />
T 4 A, 250 V<br />
Accessory:<br />
OMNILUX OSD 90V/250W GY-9.5 2000h 6700K No. 89106005<br />
OSRAM HSD 250/60 90V/250W GY-9.5 2000h No. 89106010<br />
PHILIPS MSD250 90V/250W GY-9.5 2000h No. 89106015<br />
GE CSD250/2 95V/250W GY-9.5 2000h 8500K No. 89106100<br />
OMNILUX OSD 250/2 94V/250W 2000h 8000K No. 89106105<br />
OSRAM HSD250/78 90/250W GY9.5 3000h 7800K No. 89106110<br />
PHILIPS MSD250/2 90V/250W GY-9.5 2000h No. 89106115<br />
SYLVANIA BA250/2 SE D 90V/250W GY-9.5 No. 89106120<br />
OSRAM HSD250/80 90/250W GY9.5 3000h 8000K No. 89106210<br />
<strong>FUTURELIGHT</strong> CP-240 controller No. 51834265<br />
<strong>FUTURELIGHT</strong> CP-256/32 controller 16bit No. 51834286<br />
<strong>FUTURELIGHT</strong> CP-528 controller 16bit No. 51834315<br />
Wizard-512 USB DMX-Software + Interface No. 51860102<br />
Wizard-1024 USB DMX-Software + Interface No. 51860110<br />
Flightcase for 2x<strong>PHS</strong>-150/<strong>220</strong> +roll./brake No. 51836855<br />
Please note: Every information is subject to change without prior notice. 12.07.2005©