Bedienungsanleitung | OPeRating instRuCtiOns - eisinger swiss
Bedienungsanleitung | OPeRating instRuCtiOns - eisinger swiss
Bedienungsanleitung | OPeRating instRuCtiOns - eisinger swiss

Erfolgreiche ePaper selbst erstellen
Machen Sie aus Ihren PDF Publikationen ein blätterbares Flipbook mit unserer einzigartigen Google optimierten e-Paper Software.
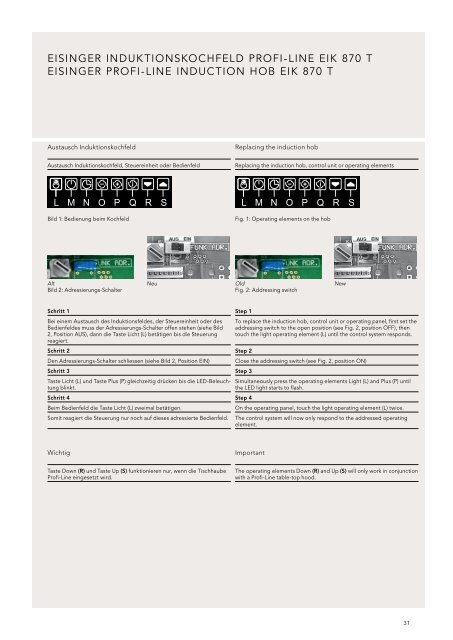
EISINGER INDuKTIONSKOCHFELD PROFI-LINE EIK 870 T<br />
EISINGER PROFI-LINE INDuCTION HOB EIK 870 T<br />
Austausch Induktionskochfeld<br />
Austausch Induktionskochfeld, Steuereinheit oder Bedienfeld<br />
Bild 1: Bedienung beim Kochfeld<br />
Alt Neu<br />
Bild 2: Adressierungs-Schalter<br />
Schritt 1<br />
Bei einem Austausch des Induktionsfeldes, der Steuereinheit oder des<br />
Bedienfeldes muss der Adressierungs-Schalter offen stehen (siehe Bild<br />
2, Position AuS), dann die Taste Licht (L) betätigen bis die Steuerung<br />
reagiert.<br />
Schritt 2<br />
Den Adressierungs-Schalter schliessen (siehe Bild 2, Position EIN)<br />
Schritt 3<br />
Taste Licht (L) und Taste Plus (P) gleichzeitig drücken bis die LED-Beleuchtung<br />
blinkt.<br />
Schritt 4<br />
Beim Bedienfeld die Taste Licht (L) zweimal betätigen.<br />
Somit reagiert die Steuerung nur noch auf dieses adressierte Bedienfeld.<br />
Wichtig<br />
Taste Down (R) und taste up (S) funktionieren nur, wenn die Tischhaube<br />
Profi-Line eingesetzt wird.<br />
Replacing the induction hob<br />
Replacing the induction hob, control unit or operating elements<br />
Fig. 1: Operating elements on the hob<br />
Old New<br />
Fig. 2: Addressing switch<br />
Step 1<br />
To replace the induction hob, control unit or operating panel, first set the<br />
addressing switch to the open position (see Fig. 2, position OFF), then<br />
touch the light operating element (L) until the control system responds.<br />
Step 2<br />
Close the addressing switch (see Fig. 2, position ON)<br />
Step 3<br />
Simultaneously press the operating elements Light (L) and Plus (P) until<br />
the LED light starts to flash.<br />
Step 4<br />
On the operating panel, touch the light operating element (L) twice.<br />
The control system will now only respond to the addressed operating<br />
element.<br />
Important<br />
The operating elements Down (R) and up (S) will only work in conjunction<br />
with a Profi-Line table-top hood.<br />
31