A TUNE-UP FOR THE DUAL TURNTABLE - ThaiHDbox
A TUNE-UP FOR THE DUAL TURNTABLE - ThaiHDbox
A TUNE-UP FOR THE DUAL TURNTABLE - ThaiHDbox
You also want an ePaper? Increase the reach of your titles
YUMPU automatically turns print PDFs into web optimized ePapers that Google loves.
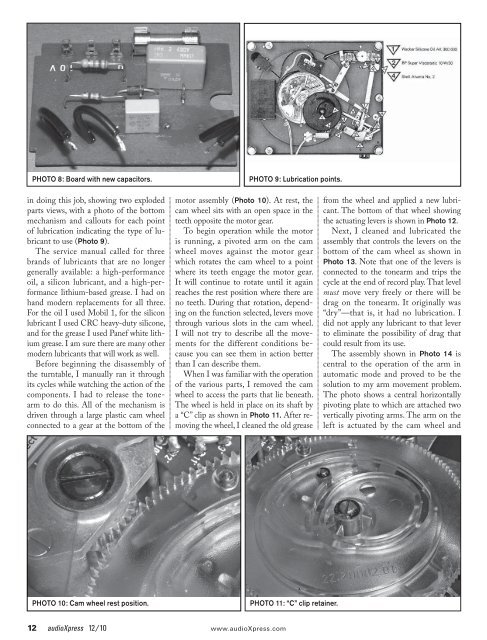
PHOTO 8: Board with new capacitors.<br />
in doing this job, showing two exploded<br />
parts views, with a photo of the bottom<br />
mechanism and callouts for each point<br />
of lubrication indicating the type of lubricant<br />
to use (Photo 9).<br />
The service manual called for three<br />
brands of lubricants that are no longer<br />
generally available: a high-performance<br />
oil, a silicon lubricant, and a high-performance<br />
lithium-based grease. I had on<br />
hand modern replacements for all three.<br />
For the oil I used Mobil 1, for the silicon<br />
lubricant I used CRC heavy-duty silicone,<br />
and for the grease I used Panef white lithium<br />
grease. I am sure there are many other<br />
modern lubricants that will work as well.<br />
Before beginning the disassembly of<br />
the turntable, I manually ran it through<br />
its cycles while watching the action of the<br />
components. I had to release the tonearm<br />
to do this. All of the mechanism is<br />
driven through a large plastic cam wheel<br />
connected to a gear at the bottom of the<br />
PHOTO 10: Cam wheel rest position.<br />
motor assembly (Photo 10). At rest, the<br />
cam wheel sits with an open space in the<br />
teeth opposite the motor gear.<br />
To begin operation while the motor<br />
is running, a pivoted arm on the cam<br />
wheel moves against the motor gear<br />
which rotates the cam wheel to a point<br />
where its teeth engage the motor gear.<br />
It will continue to rotate until it again<br />
reaches the rest position where there are<br />
no teeth. During that rotation, depending<br />
on the function selected, levers move<br />
through various slots in the cam wheel.<br />
I will not try to describe all the movements<br />
for the different conditions because<br />
you can see them in action better<br />
than I can describe them.<br />
When I was familiar with the operation<br />
of the various parts, I removed the cam<br />
wheel to access the parts that lie beneath.<br />
The wheel is held in place on its shaft by<br />
a “C” clip as shown in Photo 11. After removing<br />
the wheel, I cleaned the old grease<br />
12 audioXpress 12/10 www.audioXpress.com<br />
PHOTO 9: Lubrication points.<br />
PHOTO 11: “C” clip retainer.<br />
from the wheel and applied a new lubricant.<br />
The bottom of that wheel showing<br />
the actuating levers is shown in Photo 12.<br />
Next, I cleaned and lubricated the<br />
assembly that controls the levers on the<br />
bottom of the cam wheel as shown in<br />
Photo 13. Note that one of the levers is<br />
connected to the tonearm and trips the<br />
cycle at the end of record play. That level<br />
must move very freely or there will be<br />
drag on the tonearm. It originally was<br />
“dry”—that is, it had no lubrication. I<br />
did not apply any lubricant to that lever<br />
to eliminate the possibility of drag that<br />
could result from its use.<br />
The assembly shown in Photo 14 is<br />
central to the operation of the arm in<br />
automatic mode and proved to be the<br />
solution to my arm movement problem.<br />
The photo shows a central horizontally<br />
pivoting plate to which are attached two<br />
vertically pivoting arms. The arm on the<br />
left is actuated by the cam wheel and


