

Augen TheBook eReader Manual
Augen TheBook eReader Manual
Augen TheBook eReader Manual

You also want an ePaper? Increase the reach of your titles
YUMPU automatically turns print PDFs into web optimized ePapers that Google loves.
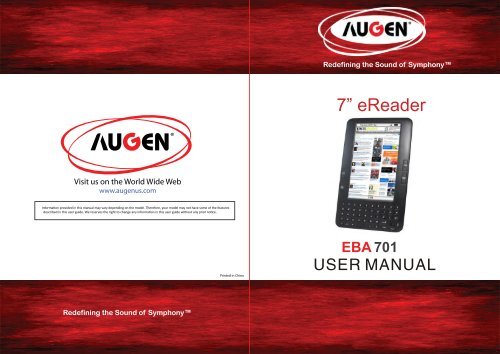
Visit us on the World Wide Web<br />
www.augenus.com<br />
Redefining the Sound of Symphony<br />
Printed in China<br />
Redefining the Sound of Symphony<br />
7” <strong>eReader</strong><br />
EBA 701
Congratulations<br />
Thank you for your purchase of an <strong>Augen</strong> product. Your business<br />
is very appreciated.<br />
Our goal is that you will be completely satisfied with this<br />
product’s quality and performance. We offer warranties on all<br />
our products<br />
Since 2004, <strong>Augen</strong> Electronics has shared the fun of discovering<br />
innovative products that make life better and more enjoyable.<br />
We strive to deliver outstanding customer service that exceeds<br />
your expectations.<br />
Enjoy your purchase!<br />
Table of Contents<br />
Introduction and Specifications .........................<br />
Safety Information & What is inside the box .....<br />
<strong>eReader</strong> Control Panel ...................................<br />
Charging the <strong>eReader</strong> ............................. 6<br />
Main Menu ..........................................<br />
Settings ......................................................<br />
Wi-Fi ...............................................................<br />
2<br />
3<br />
4-5<br />
7-11<br />
12-17<br />
Browser ............................................................... 19<br />
Buy Books ............................................................... 20<br />
DRM Register ............................................................... 20-21<br />
Music ............................................................... 22<br />
Video, Notepad ......................................................... 23<br />
USB Connection ................................................ 24<br />
Power Off .......................................................... 24<br />
How to Transfer Files ............................................ 25<br />
Help Reference .................................................... 26<br />
<strong>Augen</strong> Customer Service and Support ............ 27<br />
FCC Statement of Compliance .......................... 28<br />
>1<<br />
18
<strong>eReader</strong> Control Panel<br />
Front View Bottom View<br />
9<br />
11<br />
10<br />
1. Previous page/ + Volume increase<br />
2. Next Page / - Volume decrease<br />
3. Home<br />
4. Next Page<br />
5. Menu<br />
6. Joystick Button<br />
7. Back<br />
8. Enter Button<br />
9. Sleeping Screen / Renew<br />
10. Lower Case<br />
11. ALT: Press ALT key with any key together.<br />
Example: ALT + key “1” = “!” ALT + key “Q” = “+”<br />
ALT + key “2” = “@”<br />
12. Zoom In/Out<br />
8<br />
12<br />
<strong>eReader</strong> Control Panel<br />
13. DC jack<br />
14. USB slot<br />
15. Headphone Jack: uses 3.5mm jack<br />
16. SD Card Slot<br />
17. Power Button<br />
Back View<br />
18. Speaker<br />
19. Reset<br />
10 11 12 13 14<br />
15<br />
16
Charging the <strong>eReader</strong><br />
♦ Use the AC adapter and plug the adapter to the DC jack of<br />
the <strong>eReader</strong><br />
♦ Battery Indicator will show:<br />
<strong>eReader</strong> is charging<br />
Battery is full<br />
Note: Please charge the <strong>eReader</strong> at least 4 hours.<br />
>6<<br />
Main Menu<br />
Note: <strong>eReader</strong>’s Main Menu contains:<br />
Continue Reading , Favorite, Library, Settings, WIFI, Browser,<br />
Buy books, DRM Register, Music, Video, Notepad, Power off<br />
Use the “Joystick” to scroll/highlight the menu and press<br />
the “Enter” button to enter to the desired menu<br />
>7
Main Menu Main Menu<br />
Continue Reading<br />
♦ Select this option to go back to the last state or page where you<br />
left your ebook file.<br />
♦ Use the “Joystick” to highlight “Continue Reading” option<br />
♦ Press the “Enter” button to open the option. Press “Home” button<br />
to go back to the Main Menu<br />
Favorite<br />
♦ Use the “Joystick” to highlight “Favorite” Menu and press<br />
the “Enter” button to open the menu<br />
♦ The Favorite menu list the websites that is saved to your <strong>eReader</strong><br />
♦ Press “Back” button to go back to the HOME menu<br />
>8<<br />
Library<br />
♦ Use the “Joystick” to Highlight “Library” menu and press the “Enter” button,<br />
the submenu will be listed on the right. Library Submenu contains:<br />
Back to Parent, Audio, Digital Editions, Download, Free eBook, Picture,<br />
Video<br />
>9
Main Menu<br />
Back to Parent<br />
♦ Select “Back to Parent” to go back to the HOME menu<br />
♦ Use the “Joystick” to highlight on the following options:<br />
♦ Press the “Enter” button to open the selected option.<br />
♦ Once done, Press the “Back” button to go back to the submenu or<br />
press “Home” button to go to the Main Menu<br />
Digital Editions<br />
♦ contains DRM eBooks file. You can save your DRM eBook in this<br />
folder.<br />
Download<br />
♦ Can save any ebook files to this folder<br />
Free eBooks - contains free E-book files (may vary)<br />
My Books - All files downloaded from the internet will be save to this folder<br />
Picture - contains picture files<br />
Audio - contains Mp3 files, Audio files saved into the <strong>eReader</strong><br />
Video- contains video files saved into the <strong>eReader</strong><br />
Read Files/Books<br />
♦ After opening an eBook file, press “ Menu” button.Menu options<br />
contains :<br />
Font, GotoPage, Zoom(for PDF format),RefreshMode,Pronounce(Text to speech),<br />
Bookmark,Rotate,Favorite,Style,Outline(for PDF format),Time, Exit.<br />
Press “Exit” or “ Back” button to exit to this option.<br />
Note: To change screen orientation while reading from Portrait view,<br />
to Landscape bview use G-sensor function<br />
Main Menu<br />
Read PDF format file UI: Read other formats file UI:<br />
View Pictures:<br />
After opening a picture, press “ Menu” button. Menu option contains<br />
Zoom, Rotate functions<br />
Press “Exit” or “ Back” button to exit this option.<br />
To change display orientation from Portrait view to Landscape view,<br />
Move reader’s direction, use G-sensor function.<br />
>10< >11
Settings<br />
♦ Use the “Joystick” button to highlight the “Settings” menu<br />
♦ Press the “Enter” button to open “Settings” menu,<br />
Settings Submenu contains:<br />
Back to Parent, U Disk, Upgrade, Default, Format, Time,<br />
Help, System Info, Backlight, Language.<br />
>12<<br />
Settings<br />
Back to Parent<br />
♦ Select “Back to Parent” to go back to the HOME menu<br />
Use the “Joystick” button to highlight on the following options:<br />
U Disk<br />
♦ Use the U Disk Option if your computer did not recognize your<br />
<strong>eReader</strong> automatically<br />
♦ While the <strong>eReader</strong> is connected to USB. On the Settings Menu,<br />
use the “Joystick” button to highlight the U Disk option and press<br />
“Enter” button. The display will appear as shown in page 22.<br />
Upgrade<br />
♦ For Upgrade options: NOT available on this model<br />
Default<br />
♦ Use to restore the settings of the <strong>eReader</strong> to factory Default<br />
Settings<br />
♦ Use the “Joystick” button to highlight the buttons. Highlight<br />
restore button and press “enter” button to restore back to default<br />
or highlight Cancel button to abort the operation<br />
>13
Settings<br />
Format<br />
♦ Use to format the entire device.<br />
Caution: Formatting the device will erase all data on the device<br />
♦ Use the “Joystick” button to (left/right) to highlight the buttons<br />
“Format and Cancel”. Press “Enter” button to complete the<br />
operation<br />
>14<<br />
Settings<br />
Time<br />
♦ Use the “Joystick” button to highlight “Time” option and press the<br />
“Enter” button to open the menu<br />
♦ Press “Joystick” button(left/right) for adjust the month,<br />
Date ,year and time, press “Joystick” button(up/down) for line<br />
option<br />
♦ Press the “Enter” button to complete the settings.<br />
>15
Settings Settings<br />
Help<br />
♦ Press“Joystick” to highlight “Help ” menu,UM soft copy will be<br />
available<br />
System Info<br />
♦ Press “Joystick” to highlight “System Info ” and press “Enter”<br />
button to open the menu. Detailed information of the device will<br />
be provided;<br />
Bright<br />
Use “Joysick” to adjust backlight to “ Low “ or “ High”<br />
Press “ Enter” button to complete the settings<br />
>16<<br />
Language<br />
♦ Use “Joystick” to scroll Up/Down for “Language” selection,<br />
English and Simplified Chinese are available<br />
♦ Press “Enter” button to select the desired Language<br />
>17
Wi-Fi<br />
♦ Use the “Joystick” to highlight the “Wi-Fi” option and<br />
press “Enter” button.<br />
Note: Please make sure to have the wireless password/key<br />
to be able to connect to Internet. Call your ISP/network<br />
provider for the wireless settings<br />
♦ If Wi-Fi is “OFF”, put a check on “Enable Network” box by<br />
pressing “Enter” button. Once enabled, the Wi-Fi will scan<br />
for available networks.<br />
♦ Use the “Joystick” to highlight the wireless network and<br />
press “Enter” button. If your wireless network is secured,the<br />
password prompt will appear. Enter the wireless password and<br />
press “Enter” button<br />
♦ Once connected, it will automatically go back to the Main<br />
Menu<br />
>18<<br />
Browser<br />
♦ Use the “Joystick” button to highlight “Browser” option and<br />
press “Enter” button to open the browser<br />
Note:It needs to connected to Wifi first,then this option will work.<br />
♦ Press “Menu” button, 3 lines options will be shown in the<br />
lower left:<br />
1. Favorite- saving links to Favorite,<br />
2. Open Url- opens a new link<br />
3. Exit<br />
>19
Buy Books<br />
♦ Select this option to go to buy books website directly<br />
(ebooksmedia.com)<br />
♦ Use " Joystick" to highlight " Buy books" option<br />
♦ Press" Enter" button to open this option<br />
♦ Press " Home" button to go back to the Main Menu.<br />
Note:It needs to connect to Wi-Fi first,then this option will work.<br />
DRM Register<br />
♦ There are two ways for you to read the DRM file:<br />
1. Using Adobe Digital Edition:<br />
For details on how to install and use the Digital Edition Software,<br />
please visit the link below:<br />
http://www.adobe.com/products/digitaleditions/help<br />
Note: Please create an Adobe ID before downloading the Adobe<br />
Digital Edition Software.<br />
2. Using your <strong>eReader</strong>:<br />
Prior to downloading ebooks, you need to create an Adobe ID and<br />
register the device.<br />
Step 1: Please Create an Adobe ID.<br />
Visit the link: www.adobe.com<br />
Click the “Your account” link on the upper right hand corner<br />
of the website and click “Create an Adobe Account” button<br />
in the next page. A registration form will show.<br />
Please provide all necessary information and submit.<br />
Step 2: On the <strong>eReader</strong>, Connect to Wi-Fi<br />
Step 3: On the <strong>eReader</strong>’s Main Menu, Use the Joystick to highlight<br />
“DRM Register” option and press “Enter”.<br />
Input your Adobe ID and password and select “Activate”.<br />
press Enter.<br />
Note:If you are experiencing issues with creating a new Adobe ID go to<br />
support and search for "Adobe account, password, and login FAQ"<br />
>20<<br />
DRM Register - Continued<br />
Once you activated the DRM, it will display “Device has been<br />
activated”. If you want to deactivate it, you must do hard reset.<br />
Step 4: <strong>eReader</strong> is now ready to download DRM ebooks. You can<br />
visit ebooks sites to purchase and download DRM ebooks.<br />
Step 5: Downloaded files will be saved into Digital Editions folder<br />
under Library<br />
Note: Once you downloaded the DRM ebooks to the <strong>eReader</strong>. You will<br />
not be able to copy it from another device.<br />
DRM Hard Reset<br />
Step 1: Please press z, y, j, Number “3” key consecutively. The Testing<br />
window will appear, please select "DRM Hard Reset", then press<br />
“Enter” button<br />
Step 2: On screen Keyboard will pop up, please input the code "8299",<br />
press OK. Press the “Back” button and you can now input or<br />
activate a different Adobe ID<br />
>21
Music<br />
♦ Use “Joystick” button to highlight “Music” option and press<br />
“Enter” button.<br />
♦ Use the “Joystick” button (up/down) to select the desired<br />
audio file on the list<br />
♦ Press “Enter” button for PLAY/PAUSE, Press “Back” button<br />
to go back to the Main Menu<br />
♦ Press “+ Volume/ - Volume” button to adjust the volume<br />
>22<<br />
Video<br />
♦ Use the “Joystick” to highlight “Video” option and press the<br />
“Enter ”button open the video menu, Use the “Joystick” button<br />
(up/down direction) to choose your desired video file<br />
♦ Press “enter” button to PLAY/PAUSE,Press “Back” button to go<br />
back to the Main Menu<br />
♦ Press “+ Volume/- Volume” button to adjust the volume<br />
Notepad<br />
♦ Use the “Joystick” to highlight “Notepad” menu. Press “Enter”<br />
button to open the Notepad.<br />
♦ Press “Back” button to go back to the Main Menu<br />
Note: File is automatically saved once any text typed on the notepad or<br />
you can press” Menu” choice “ Export” save files to SD card<br />
>23
USB Connection<br />
♦ Connect the USB cable to your computer<br />
♦ Pop up window will appear on the device "The usb is connected. Are<br />
you sure to start Udisk?”<br />
♦ Press OK<br />
♦ Computer will recognize the <strong>eReader</strong> as a “Removable disk”<br />
Note: If the computer using Windows 98 operating system,<br />
Please install windows 98 2.0 USB driver from the CD in first.<br />
Power-Off<br />
♦ Use the “Joystick” to highlight the “Power Off” option and<br />
Press “Enter” button to shutdown the <strong>eReader</strong><br />
♦ Another way to shutdown the <strong>eReader</strong> is to press and hold the<br />
Power button till it shutdown.<br />
>24< >25<<br />
How to Transfer Files (Music,Video,Photo,etc)<br />
♦ Windows Operating system recognizes the <strong>eReader</strong> as “removable<br />
disk”. Choose “open folder to view files”<br />
Note: Some operating systems are not set for AutoPlay window. In this<br />
case, go to “My Computer” and look for “Removable Disk” and<br />
double click to enter<br />
♦ Simply locate your files (songs, photos etc...) on your “Local Disk”<br />
using “my computer” function. Once found, drag and drop your<br />
desired files into the disk drive (removable disk) assigned to the<br />
<strong>eReader</strong><br />
♦ Press “Complete” button on the bottom part of the <strong>eReader</strong> after<br />
transferring files. The <strong>eReader</strong> will be automatically disconnected<br />
from the computer
Help Reference<br />
1. CD comes with Windows 98 USB 2.0 driver<br />
2. “Calibre” is a software that can manage files downloaded to library<br />
database, convert eBooks file to different file formats.<br />
3. Install Calibre to your computer<br />
4. Use Calibre .msi for installation using windows operating system<br />
5. Use Calibre .dmg for installation using to Mac operating system<br />
>26< >27<<br />
<strong>Augen</strong> Service & Support<br />
<strong>Augen</strong> Customer Service Team hours of operations:<br />
MON-FRI 10:00AM – 5:00 PM (EST)<br />
<strong>Augen</strong> Technical Support Team<br />
250 N.Dixie Hwy. #13<br />
Hollywood, FL 33020<br />
If you have questions, please feel free to contact our customer service<br />
representatives at 1-877-AUGENOK or by email at support@augenus.com<br />
All rights reserved to:<br />
© 2008 <strong>Augen</strong> Electronics Corporation<br />
<strong>Augen</strong> Electronics Corporation<br />
250 N.Dixe Hwy. #13<br />
Hollywood, FL 33020<br />
Shop online: www.augenus.com
FCC Statement of Compliance<br />
FCC regulations<br />
FCC Declaration of Conformity Statement<br />
This device complies with Part 15 of the FCC Rules. Operation is<br />
subject to the following two conditions: (1) This device may not<br />
cause harmful interference; and (2) this device must accept any<br />
interference received, including interference that may cause<br />
undesired operation.• Radio and Television Interference: This<br />
equipment has been tested and found to comply with the limits<br />
for a Class B digital device, pursuant to Part 15 of the FCC Rules.<br />
These limits are designed to provide reasonable protection<br />
against harmful interference in a residential installation. This<br />
equipment generates, uses and can radiate radio frequency<br />
energy and, if not installed and used in accordance with the<br />
instructions, may cause harmful interference to radio communications.<br />
However, there is no guarantee that interference will not<br />
occur in a particular installation.•If this equipment does cause<br />
interference to radio or television reception, which can be<br />
encour aged to try to correct the interference by one or more of<br />
the following measures:<br />
• Increase the separation between the equipment and receiver.<br />
•<br />
• Consult the dealer or an experienced radio/TV technician for<br />
expressly approved by <strong>Augen</strong> could<br />
void the user’s authority to operate the equipment.<br />
>28<<br />
Redefining the Sound of Symphony