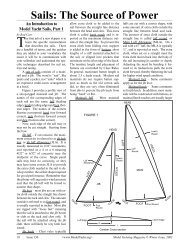
Santa Barbara and 36/600 - American Model Yachting Association
Santa Barbara and 36/600 - American Model Yachting Association
Santa Barbara and 36/600 - American Model Yachting Association

Create successful ePaper yourself
Turn your PDF publications into a flip-book with our unique Google optimized e-Paper software.
the equivalent of one or two parts micro-balloon<br />
filler to the glue. It will do<br />
wonders to keep the glue from running<br />
or failing to fill any gaps. After a first<br />
application of glue hardens, but does<br />
not cure completely, apply a 2” length<br />
of 3/4” nylon reinforcement tape at each<br />
end of the thwart <strong>and</strong> up the side of the<br />
hull. This nylon tape, half on the thwart<br />
<strong>and</strong> half up the hull, when impregnated<br />
in a second coat of epoxy, will help<br />
strengthen the joint.<br />
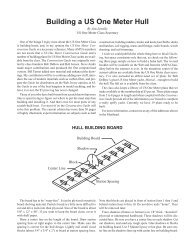
Step One: Installing the Sheer Strips<br />
Cut <strong>and</strong> shape a piece of the 1/4”<br />
x 1-3/8” lattice molding into a triangle<br />
that fits into the bow. Glue it in place using<br />
quick-set epoxy mixed with microballoons<br />
so that the top of the wood is<br />
flush with the top edge of the hull. Cut<br />
the two sheer strips to proper length so<br />
they fit from this block in the bow all<br />
the way aft to the transom. These sheer<br />
strips will serve to strengthen <strong>and</strong> serve<br />
as a gluing surface for the deck-to-hull<br />
joint. Clamps, lots of them (about onedozen<br />
per side), will be needed to hold<br />
the sheer strips in place while glue sets<br />
up <strong>and</strong> hardens. C-clamps are good, but<br />
expensive. What works well are “paper<br />
clamps,” available from the office supply<br />
store. The paper clamps to get are shiny<br />
black in color, have two “U” shaped<br />
squeeze-h<strong>and</strong>les, measure 1-1/4” wide,<br />
<strong>and</strong> open to a “bite” of 1/2 inch. Run<br />
a perimeter of masking tape all around<br />
the outside top edge of the hull so as to<br />
catch any glue run-off. Before mixing up<br />
the glue, do a “dry run” with the clamps<br />
so as to be certain you have enough<br />
clamping power to hold the sheer strips<br />
tight to the hull. Mix up micro-balloons<br />
with slow-setting epoxy glue, not the<br />
quick-set stuff—you will need time to<br />
do this job. Using an acid brush, apply<br />
the glue mixture to both one<br />
side of the sheer strip <strong>and</strong><br />
to the inside top one-inch<br />
of the hull. Line up the top<br />
edge of the sheer strips with<br />
the top edge of the hull as<br />
you put on the clamps. Use<br />
the acid brush to tidy up the<br />
glue underneath the sheer<br />
strips. Let harden overnight.<br />
Next day, remove the clamps<br />
<strong>and</strong> use an 80-grit s<strong>and</strong>ing<br />
block to bring the top of the<br />
sheer strip flush with the line<br />
scribed in the hull, put there to indicate<br />
height of the deck.<br />
Step Two:<br />
Fitting Keel Flange to Hull Socket<br />
The next step is to install supports<br />
for the removable keel. Drilling the holes<br />
in the hull for the keel bolts requires some<br />
careful pre-drill measuring. Along with<br />
using a ruler, make a paper template that<br />
matches the top of the keel <strong>and</strong> fits down<br />
over the keel bolts. When this template is<br />
then placed into the hull’s keel socket, it<br />
should give you an accurate indication of<br />
where to drill. Begin with holes that are<br />
about half the diameter of the keel bolts.<br />
Compare <strong>and</strong> measure the keel bolt positions<br />
repeatedly as you enlarge the holes<br />
while using a round <strong>and</strong> tapered rat-tail<br />
file. Once the holes in the hull-keel socket<br />
are large enough to allow the keel to be<br />
inserted, it will be obvious that the keeltop<br />
flange <strong>and</strong> the keel will need some<br />
final fitting. Use a s<strong>and</strong>ing block with<br />
120-grit paper to shave down the sides<br />
of the keel-top flange. Use 120-grit paper<br />
wrapped around a putty knife blade<br />
to work inside the hull socket. Slipping<br />
a corner of a piece of paper in, around,<br />
<strong>and</strong> about the gap between keel flange<br />
<strong>and</strong> hull socket will readily indicate where<br />
more s<strong>and</strong>ing is needed. At places where<br />
the paper gauge won’t pass, <strong>and</strong> instead<br />
gets stuck, are where you make a pencil<br />
mark <strong>and</strong> need to do more s<strong>and</strong>ing.<br />
Both keel top <strong>and</strong> hull socket have a<br />
seam running fore <strong>and</strong> aft where the two<br />
molded halves have been joined. Hartman<br />
does do a careful job of trying to<br />
minimize this seam, but it does exist, <strong>and</strong><br />
it does need to be smoothed flat. A filler<br />
such as NHP’s Micro-Fill, available from<br />
the hobby shop, works well <strong>and</strong> is easy<br />
to s<strong>and</strong>. Then too, lots of micro-balloons<br />
mixed with a little bit of the poly-<br />
ester resin, used for solidifying lead shot<br />
in the keel, can also be used as filler, but<br />
it is harder to s<strong>and</strong> down. Plan on s<strong>and</strong>ing<br />
with 120-grit on a s<strong>and</strong>ing block. A<br />
final s<strong>and</strong>ing with 220-grit will remove<br />
enough surface material to allow for the<br />
thickness of paint to be applied later.<br />
Step Three: Installing Keel Support<br />
Blocks <strong>and</strong> Thwarts<br />
Available with the Hartman Short<br />
Kit are three wooden blocks that are to<br />
be glued in place above the holes in the<br />
keel socket. Each block is predrilled<br />
with a hole into which a length of brass<br />
tubing is to be glued. When at the pond<br />
<strong>and</strong> the boat is being rigged for launch,<br />
the keel bolts protruding from the top<br />
of the keel are to be inserted into these<br />
brass-lined support blocks. A rubber<br />
washer, then a metal washer, <strong>and</strong> then<br />
a wing nut on each keel bolt secures the<br />
keel to the boat. When finished sailing<br />
for the day, the wing nuts are undone<br />
<strong>and</strong> the keel can be removed.<br />
Preparing the keel-bolt support<br />
blocks, thwarts, <strong>and</strong> tubing assemblies<br />
is easy. If need be, use the round file<br />
to make the holes in the blocks <strong>and</strong><br />
thwarts large enough to allow the tubing<br />
to be inserted readily. You will want<br />
the tubing to extend from the top of<br />
the block by the 1/4” thickness of the<br />
thwart. The tubing should extend about<br />
1/16” from the bottom of the block so it<br />
extends down into the hole in the hullkeel<br />
socket. Scuff up the outside of the<br />
brass tubing with coarse s<strong>and</strong>paper so<br />
as to provide “tooth” for the glue that<br />
will secure it in the wooden block. Use a<br />
cotton swab from the medicine cabinet<br />
to spread epoxy glue inside the block<br />
<strong>and</strong> on the tubing. Put a hole in the center<br />
of each keel thwart (K1, K2, <strong>and</strong> K3<br />
on the list of wooden parts) just large<br />
enough so that the thwart can<br />
fit down outside the tubing<br />
<strong>and</strong> flush against the top of the<br />
block. Cut <strong>and</strong> trim the keel<br />
thwarts to size by using a 6”<br />
pocket ruler to measure from<br />
the keel bolt over to where the<br />
thwart will meet the hull. Plan<br />
to cut the ends of each keel<br />
thwart at about a 45-degree<br />
angle so that it meets neatly the<br />
upward curve of the hull. Trim<br />
these ends to perfection with<br />
a s<strong>and</strong>ing block. Thwarts that<br />
14 Issue 147 <br />
<strong>Model</strong> <strong>Yachting</strong> Magazine © Spring Issue, 2007