Getting Hands-On with Soft Circuits - MIT Media Lab
Getting Hands-On with Soft Circuits - MIT Media Lab
Getting Hands-On with Soft Circuits - MIT Media Lab

You also want an ePaper? Increase the reach of your titles
YUMPU automatically turns print PDFs into web optimized ePapers that Google loves.
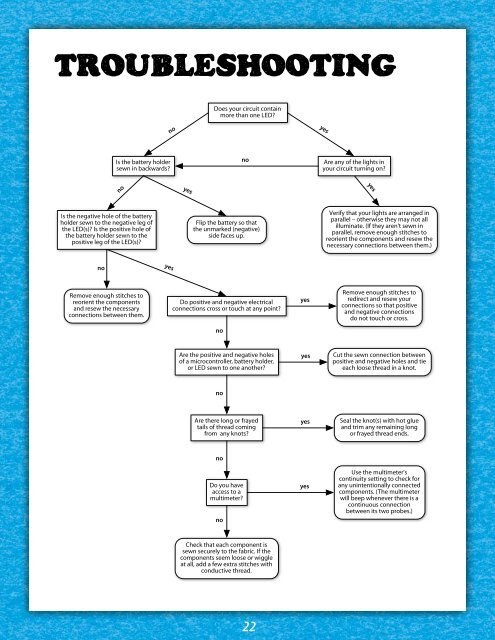
TroubleshooTing<br />
Is the battery holder<br />
sewn in backwards?<br />
Is the negative hole of the battery<br />
holder sewn to the negative leg of<br />
the LED(s)? Is the positive hole of<br />
the battery holder sewn to the<br />
positive leg of the LED(s)?<br />
no<br />
no<br />
Remove enough stitches to<br />
reorient the components<br />
and resew the necessary<br />
connections between them.<br />
yes<br />
no<br />
yes<br />
Does your circuit contain<br />
more than one LED?<br />
no<br />
Flip the battery so that<br />
the unmarked (negative)<br />
side faces up.<br />
Do positive and negative electrical<br />
connections cross or touch at any point?<br />
no<br />
Are the positive and negative holes<br />
of a microcontroller, battery holder,<br />
or LED sewn to one another?<br />
no<br />
Are there long or frayed<br />
tails of thread coming<br />
from any knots?<br />
no<br />
Do you have<br />
access to a<br />
multimeter?<br />
no<br />
Check that each component is<br />
sewn securely to the fabric. If the<br />
components seem loose or wiggle<br />
at all, add a few extra stitches <strong>with</strong><br />
conductive thread.<br />
22<br />
yes<br />
yes<br />
yes<br />
yes<br />
yes<br />
Are any of the lights in<br />
your circuit turning on?<br />
yes<br />
Verify that your lights are arranged in<br />
parallel – otherwise they may not all<br />
illuminate. (If they aren't sewn in<br />
parallel, remove enough stitches to<br />
reorient the components and resew the<br />
necessary connections between them.)<br />
Remove enough stitches to<br />
redirect and resew your<br />
connections so that positive<br />
and negative connections<br />
do not touch or cross.<br />
Cut the sewn connection between<br />
positive and negative holes and tie<br />
each loose thread in a knot.<br />
Seal the knot(s) <strong>with</strong> hot glue<br />
and trim any remaining long<br />
or frayed thread ends.<br />
Use the multimeter's<br />
continuity setting to check for<br />
any unintentionally connected<br />
components. (The multimeter<br />
will beep whenever there is a<br />
continuous connection<br />
between its two probes.)