Getting Hands-On with Soft Circuits - MIT Media Lab
Getting Hands-On with Soft Circuits - MIT Media Lab
Getting Hands-On with Soft Circuits - MIT Media Lab

You also want an ePaper? Increase the reach of your titles
YUMPU automatically turns print PDFs into web optimized ePapers that Google loves.
getting hands-on <strong>with</strong><br />
soft circuits<br />
a workshop facilitators ’ guide<br />
Emily Lovell
Table of ConTenTs<br />
The activities in this guide assume no prior knowledge of circuits, sewing, or design –<br />
so there are no prerequisite requirements aside from an interest in trying something new!<br />
Overview.. . . . . . . . . . . . . . . . . . . . . . . . . . . . . . . . . . . . . . . . . . . . . . . . . . . . . . . . . . . . . . . . . . . . . . . . . . . . . . . . . . . . . . . . . . . . . . . . . . . . . .2<br />
Activities<br />
A.Simple.Circuit. .. .. .. .. .. .. .. .. .. .. .. .. .. .. .. .. .. .. .. .. .. .. .. .. .. .. .. .. .. .. .. .. .. .. .. .. .. .. .. .. .. .. .. .. .. .4<br />
An introduction to soft circuits, including tips on working <strong>with</strong> conductive thread and<br />
guidance on sewing connections between a light and a battery.<br />
Switches.. . . . . . . . . . . . . . . . . . . . . . . . . . . . . . . . . . . . . . . . . . . . . . . . . . . . . . . . . . . . . . . . . . . . . . . . . . . . . . . . . . . . . . . . . . . . . . . . . . . .7<br />
Experimenting <strong>with</strong> conductive everyday objects, like metal beads, to make a flickering<br />
felt brooch.<br />
Parallel.<strong>Circuits</strong> . .. .. .. .. .. .. .. .. .. .. .. .. .. .. .. .. .. .. .. .. .. .. .. .. .. .. .. .. .. .. .. .. .. .. .. .. .. .. .. .. .. .. .. .. . 10<br />
Learning how to add multiple lights to a circuit while creating an illuminated bracelet<br />
(or cuff) that shines only when worn.<br />
Microcontrollers.. . . . . . . . . . . . . . . . . . . . . . . . . . . . . . . . . . . . . . . . . . . . . . . . . . . . . . . . . . . . . . . . . . . . . . . . . . . . . . . . . . . . . . . . 13<br />
Understanding how programmability can enhance our projects by embedding a<br />
microcontroller in a light-up patch.<br />
Connecting.Back. .. .. .. .. .. .. .. .. .. .. .. .. .. .. .. .. .. .. .. .. .. .. .. .. .. .. .. .. .. .. .. .. .. .. .. .. .. .. .. .. .. .. .. . 19<br />
An opportunity to draw upon knowledge from previous activities and work <strong>with</strong> others<br />
to create an interconnected patchwork quilt.<br />
Troubleshooting. .. .. .. .. .. .. .. .. .. .. .. .. .. .. .. .. .. .. .. .. .. .. .. .. .. .. .. .. .. .. .. .. .. .. .. .. .. .. .. .. .. .. .. .. .. ..22<br />
Tools & Materials.. . . . . . . . . . . . . . . . . . . . . . . . . . . . . . . . . . . . . . . . . . . . . . . . . . . . . . . . . . . . . . . . . . . . . . . . . . . . . . . . . . . . . . . . . . 23<br />
Further Resources<br />
Print. .. .. .. .. .. .. .. .. .. .. .. .. .. .. .. .. .. .. .. .. .. .. .. .. .. .. .. .. .. .. .. .. .. .. .. .. .. .. .. .. .. .. .. .. .. .. .. .. .. .. .. . 26<br />
Web . .. .. .. .. .. .. .. .. .. .. .. .. .. .. .. .. .. .. .. .. .. .. .. .. .. .. .. .. .. .. .. .. .. .. .. .. .. .. .. .. .. .. .. .. .. .. .. .. .. .. .. . 27<br />
1
overview<br />
What Are <strong>Soft</strong> <strong>Circuits</strong>?<br />
<strong>Soft</strong>.circuits,.also.known.as.electronic.textiles.(e-textiles),.are.electrical.circuits.created.using.<br />
flexible.conductive.materials.(such.as.conductive.threads.and.fabrics).in.conjunction.<strong>with</strong>.<br />
discrete.electronics.components.(such.as.lights,.batteries,.switches,.and.sensors) .<br />
Why <strong>Soft</strong> <strong>Circuits</strong>?<br />
Learning.to.design.and.create.soft.circuits.of.increasing.complexity.has.the.potential.to.be.<br />
an.empowering.and.formative.experience.for.young.adults ..Such.activities.invite.students.to.<br />
consider.technology.in.a.more.creative.context.-.and,.likewise,.to.consider.creativity.in.a.more.<br />
technical.context ..<br />
By.integrating.electronic.and.craft.materials,.soft.circuit.activities.can.appeal.to.a.wider.variety.<br />
of.students.than.traditional.science.or.art.activities ..Furthermore,.students.should.develop.a.<br />
sense.of.confidence.when.working.<strong>with</strong>.science.and.technology,.as.they.will.be.supported.<br />
throughout.the.process.of.successfully.debugging.unexpected.behavior.in.their.projects ..<br />
As.outlined.in.the.following.workshop.activities,.students.will.learn.about.electricity.in.the.<br />
context.of.hands-on.design ..Because.students.are.making.creative.decisions.about.appearance.<br />
and.functionality,.their.projects.will.reflect.characteristics.of.personal.identity ..They.may.find.<br />
the.activities.to.be.a.welcome.outlet.for.self-expression ..Whether.students.are.motivated.by.the.<br />
technical.or.creative.aspects.of.each.activity,.they.will.learn.by.doing,.instead.of.just.by.listening,.<br />
reading,.or.watching.others .<br />
Notes on Facilitation<br />
As.a.facilitator,.your.role.will.be.to.guide.students.through.the.activities ..This.will.include.<br />
providing.students.<strong>with</strong>.the.technical.understanding.necessary.to.complete.each.project,.while.<br />
also.promoting.the.development.of.creative.problem-solving.and.design.skills ..If.something.<br />
isn’t.functioning.as.expected,.refer.to.the.Troubleshooting.section.of.the.guide.for.some.helpful.<br />
tips ..But.be.sure.to.challenge.students.to.question,.reason.about,.and.revise.their.mental.<br />
models.as.well ..In.these.activities,.the.process.of.discovery.is.just.as.important.as.the.outcome .<br />
You.should.also.encourage.students.to.help.one.another ..Those.who.already.know.how.to.sew.<br />
can.assist.peers.who.lack.sewing.experience;.likewise,.students.<strong>with</strong>.knowledge.of.electronics.<br />
can.aid.those.who.lack.this.familiarity .<br />
You.may.find.it.useful.to.begin.the.first.session.<strong>with</strong>.brief.introductions.and.an.icebreaker.<br />
exercise ..This.will.allow.students.to.begin.to.build.social.relationships,.which.they.will.draw.on.<br />
as.they.experiment.<strong>with</strong>.(and.troubleshoot).their.soft.circuits ..<br />
Consider.starting.each.session.by.connecting.back.to.the.previous.session ..For.example,..<br />
summarize.what.students.learned.(and.created).last.time,.or.ask.a.rotating.student.volunteer.<br />
to.do.so ..After.you’ve.done.this,.introduce.students.to.what.they’ll.be.learning.in.the.current.<br />
2
session.by.framing.it.in.the.context.of.the.session’s.tangible.project ..If.you.have.time.to.try.<br />
the.activities.ahead.of.time,.bring.your.example(s).to.share.<strong>with</strong>.students ..Students.may.also.<br />
find.it.helpful.to.walk.through.each.activity’s.materials.list.as.a.group,.visually.identifying.each.<br />
component.and.reviewing.its.function.or.purpose .<br />
Conclude.each.activity.by.asking.students.to.take.turns.presenting.their.work.to.one.another ..<br />
Encourage.them.to.share.thoughts.or.the.motivation.behind.the.aesthetic.design.of.their.<br />
project,.in.addition.to.an.explanation.of.how.their.circuit.functions ..This.is.a.great.time.for.<br />
students.to.share.any.difficulties.that.they.encountered.and.how.they.managed.to.overcome.<br />
them .<br />
Additionally,.invite.students.to.take.what.they’ve.learned.in.each.session.and.relate.it.back.<br />
to.their.daily.lives ..For.example,.at.the.end.of.the.activity.on.switches,.encourage.students.to.<br />
think.carefully.throughout.the.coming.week.about.which.objects.in.their.bedrooms.or.school.<br />
classrooms.would.conduct.electricity .<br />
Structure<br />
This.guide.has.been.developed.for.use.in.informal.learning.environments,.such.as.after.school.<br />
programs,.community.technology.centers,.and.art/science.museums ..With.the.exception.of.the.<br />
final.activity,.each.activity.takes.about.two.hours ..A.full.morning.or.afternoon.(4-5.hours).should.<br />
be.dedicated.to.the.final.activity ..Ideally,.the.activities.should.be.offered.in.close.succession.-.for.<br />
example,.one.session.each.week.over.the.course.of.five.weeks .<br />
If.necessary.or.desired,.the.activities.may.be.compressed.into.a.one.or.two-day.weekend.<br />
workshop ..Alternatively,.intermediate.activities.may.be.skipped.if.you.wish.to.pursue.a.<br />
simplified.version.of.the.final.activity .<br />
If.a.student’s.circuit.isn’t.working.-.or.is.functional,.but.not.behaving.as.expected.-.see.the.<br />
Troubleshooting.section.at.the.end.of.this.guide .<br />
Additional.information.on.the.materials.and.tools.listed.for.each.activity.may.be.found.in.the<br />
Tools & Materials.section,.also.at.the.end.of.this.guide ..Pencils.and.paper.should.be.available.<br />
during.each.session,.and.you.may.choose.to.also.offer.conductive.household.items.(paper.clips,.<br />
staples,.safety.pins,.aluminum.foil).from.the.second.activity.on ..<br />
The.Further Resources section.also.includes.suggestions.for.print.literature.and.web.sites.related.<br />
to.these.activities .<br />
Intended Audience<br />
Although.the.activities.in.this.guide.may.be.adapted.for.other.age.groups,.they.were.designed.<br />
<strong>with</strong>.middle.and.high.school.students.(ages.11-17).in.mind ..Each.activity.builds.on.those.<br />
preceding.it;.ideally,.participants.should.be.able.to.commit.to.attending.all.workshop.sessions .<br />
3
aCTiviTies<br />
alternatively, students<br />
can sew a simple circuit<br />
into something brought<br />
from home – such as<br />
a shirt, bag, hat, or<br />
hair tie (seen here)<br />
For each student:<br />
•.battery<br />
•.battery.holder<br />
•.piece.of.felt<br />
•.LED.(light)<br />
activity #1<br />
a simple CirCuiT<br />
Tools & Materials<br />
For the group to share:<br />
•.needle.threaders.or.beeswax<br />
•.conductive.thread<br />
•.fabric.scissors<br />
•.hot.glue.gun.and.glue.sticks<br />
•.needle.nose.pliers<br />
•.sewing.chalk<br />
•.sewing.needles<br />
connecting a light and a battery<br />
4<br />
Summary<br />
Students.are.introduced.to.circuits.and.sewing.<br />
<strong>with</strong>.electrically.conductive.thread ..Each.student.<br />
will.create.his/her.first.soft.circuit,.connecting.a.<br />
light.and.battery .<br />
Learning Goals<br />
Students.will . . .<br />
•.understand.that.power.flows.from.the.positive.<br />
terminal.of.the.battery,.through.components.<br />
of.a.circuit.(such.as.lights),.and.back.to.the.<br />
negative.terminal.of.the.battery .<br />
•.recognize.positive (+) and.the.color.red.as.<br />
representative.of power .<br />
•.recognize negative (-) and.the.color.black.as.<br />
representative.of.ground .<br />
•.understand.that.LEDs.have.electrical.polarity.<br />
•.understand.that.a.short.circuit.occurs.when.<br />
positive.and.negative.connections.cross.and.<br />
that.a.short.circuit.is.not.functional .<br />
Preparation<br />
•.Gather.the.materials ..<br />
•.Cut.felt.into.squares.around.8”.x.8”.in.size .<br />
•.If.you.plan.to.give.students.handouts.of.<br />
the.simple.circuit.schematic,.print.copies.in.<br />
advance .<br />
Activity<br />
1. If.examples.are.available,.begin.by.sharing.<br />
those.<strong>with</strong>.the.students ..<br />
2. Review.the.simple.circuit.schematic.and.<br />
polarity.diagrams.(on.page.6).<strong>with</strong>.the.<br />
students ..This.can.be.done.by.distributing.<br />
copies,.projecting,.or.redrawing.the.diagram.<br />
on.a.chalkboard.or.whiteboard .
3. Explain.that.a.circuit.is.a.continuous.loop.<br />
through.which.electricity.can.travel ..Our.<br />
circuits.all.have.a.power.source,.and.for.<br />
our.purposes.this.will.be.a.coin.cell.battery ..<br />
Additionally,.circuits.can.have.outputs,.such.<br />
as.lights.and.motors ..As.we.design.a.circuit,.<br />
our.goal.is.to.guide.the.electricity.out.of.the.<br />
battery,.through.any.output.components.<br />
(like.lights),.and.then.back.to.the.battery .<br />
4. Point.out.that.batteries.and.LEDs.have.a.<br />
“positive”.and.a.“negative”.side ..This.is.called.<br />
polarity..<br />
•..Positive.is.also.referred.to.as.+,.power,.or.by.<br />
using.the.color.red ..The.positive.side.of.an.<br />
LED.is.known.as.an.anode and.corresponds.<br />
to.the.longer.metal.leg .<br />
•..Negative.is.also.referred.to.as.-,.ground,.<br />
or.by.using.the.color.black ..The.negative.<br />
side.of.an.LED.is.known.as.a.cathode and.<br />
corresponds.to.the.shorter.metal.leg .<br />
5. Explain.that.connections.should.be.made.<br />
from.positive-to-positive.and.negative-tonegative<br />
..Positive.and.negative.connections.<br />
should.never.touch.or.cross.-.this.will.cause.a.<br />
short circuit (which.won’t.be.functional) .<br />
6. Ask.students.to.sketch.the.electrical.<br />
connections.and.placement.of.components.<br />
for.their.first.project ..This.may.look.similar.<br />
to.the.example.schematic,.or.it.can.vary.(for.<br />
example,.the.electrical.connections.might.<br />
zigzag.or.follow.a.decorative.path) ..<br />
7. Distribute.one.of.the.following.to.each.<br />
student:.battery,.battery.holder,.LED.(light),.<br />
felt.piece ..Make.the.rest.of.the.materials.<br />
available.on.a.common.table .<br />
8. Ask.students.to.pair.up.and.compare.LEDs,.<br />
identifying.the anode.and.cathode .<br />
9. Instruct.students.to.curl.the.legs.of.their.<br />
LEDs.using.the.needle.nose.pliers.so.that.the.<br />
LEDs.can.be.sewn.to.fabric ..(See.photo.at.<br />
right.for.an.example .)<br />
10. Have.students.transfer.their.sketched.circuit.<br />
design.onto.their.piece.of.felt.by.using.chalk ..<br />
(The.chalk.will.wash.or.rub.off.after.the.<br />
project.is.complete .)<br />
5<br />
11. Suggest.that.students.attach.the.<br />
components.to.their.fabric.<strong>with</strong>.a.dab.of.<br />
hot.glue,.being.careful.leave.the.conductive.<br />
parts.of.the.components.exposed ..<br />
12. Students.can.follow.the.chalk.pattern.to.sew.<br />
the.connections.between.components.and.<br />
sew.the.components.to.the.fabric ..Make.sure.<br />
they.sew.each.component.securely.to.the.<br />
fabric.(similar.to.sewing.on.a.button).before.<br />
sewing.between.components ..After.sewing.<br />
each.connection,.students.should.tie.a.knot.<br />
on.the.fabric’s.backside.and.cut.the.thread .<br />
13. After.students.have.finished.sewing,.show.<br />
them.how.to.insert.the.battery.into.the.<br />
battery.holder.(<strong>with</strong>.the.“+”.side.facing.up) .<br />
Tips for Working <strong>with</strong><br />
Conductive Thread<br />
•.Try.to.keep.your.stitches.as.close.together.as.<br />
possible.-.this.will.keep.them.in.place.whenever.<br />
you.bend.or.pull.on.your.fabric .<br />
•.Conductive.thread.tends.to.fray,.so.if.a.circuit.is.<br />
not.functioning,.check.for.spots.where.the.thread.<br />
has.frayed.to.the.point.of.making.contact.<strong>with</strong>.<br />
another.electrical.connection.of.opposite.polarity .<br />
•.Because.the.thread.frays.easily,.it.may.be.difficult.<br />
to.thread.your.sewing.needle ..Run.thread.through.<br />
beeswax.or.use.needle.threaders.to.help.<strong>with</strong>.this .<br />
•.Knots.that.are.tied.<strong>with</strong>.conductive.thread.may.<br />
not.stay.in.place.permanently.on.their.own ..<br />
Secure.each.of.your.knots.by.dabbing.them.<strong>with</strong>.<br />
hot.glue ..This.will.also.help.insulate.any.loose.<br />
thread.ends .<br />
•.The.soft.circuits.created.in.these.activities.are.<br />
washable!.Just.remove.the.battery.and.hand-wash.<br />
<strong>with</strong>.gentle.detergent .<br />
a sewable LED whose legs<br />
have been curled <strong>with</strong><br />
needle nose pliers
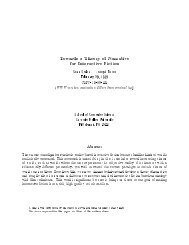
Identifying Polarity<br />
+ - + -<br />
battery holder LED<br />
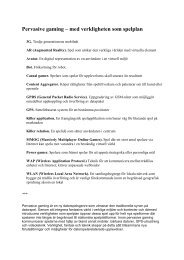
A Simple Circuit Schematic<br />
+<br />
power<br />
+<br />
anode<br />
–<br />
cathode<br />
–<br />
ground<br />
the connection stops on one<br />
side of the light and starts<br />
again on the other side<br />
sewn electrical connections<br />
directional flow of electricity through the circuit
Tools & Materials<br />
For each student:<br />
•.battery<br />
•.battery.holder<br />
•.LED.(light)<br />
•.safety.pin<br />
For the group to share:<br />
•.needle.threaders.or.beeswax<br />
•.conductive.thread<br />
•.fabric.scissors<br />
•.hot.glue.gun.and.glue.sticks<br />
•.needle.nose.pliers<br />
•.sewing.chalk<br />
•.sewing.needles<br />
•.felt.scraps<br />
•.metal.(conductive).beads<br />
•.glass.or.plastic.beads<br />
•.sewing.thread.(any.color)<br />
7<br />
activity #2<br />
swiTChes<br />
Summary<br />
Students.become.familiar.<strong>with</strong>.switches.and.<br />
how.they.affect.electrical.flow.through.a.circuit ..<br />
Each.student.will.construct.a.brooch.which.<br />
flickers.as.it.moves,.using.a.dangling.metal.bead.<br />
to.close.a.circuit ..<br />
Learning Goals<br />
Students.will . . .<br />
•.understand.that.a.switch.interrupts.the.flow.of.<br />
electricity.through.a.circuit .<br />
•.understand.that,.unlike.LEDs,.switches.are.not.<br />
polarized .<br />
•.become.familiar.<strong>with</strong>.conductivity.as.a.<br />
material’s.ability.to.conduct.electrical.current .<br />
Preparation<br />
•.Gather.the.materials ..<br />
•.If.you.plan.to.give.students.handouts.of.the.<br />
simple.circuit.schematic.for.switches,.print.<br />
copies.in.advance .<br />
Activity<br />
a flickering brooch<br />
1. If.examples.are.available,.begin.by.sharing.<br />
those.<strong>with</strong>.the.students .<br />
2. Share.the.simple.circuit.schematic.for.<br />
switches.(on.page.9).<strong>with</strong>.the.students ..<br />
This.can.be.done.by.distributing.copies,.<br />
projecting,.or.redrawing.the.diagram.on.a.<br />
chalkboard.or.whiteboard .<br />
3. Explain.that.a.switch.interrupts.the.flow.of.<br />
electricity.through.a.circuit ..An.open.switch.<br />
stops.the.flow.of.power.through.a.circuit,.<br />
while.a.closed.switch.allows.power.to.flow.<br />
continuously.through.it ..In.this.activity,.we’ll.<br />
use.a.switch.to.control.the.flow.of.power.to.<br />
an.LED .
4. Additionally,.explain.that.switches.do.not.<br />
have.polarity in.the.way.that.LEDs.do.–.that.<br />
is.to.say,.they.do.not.have.a.positive.(+).<br />
side.and.a.negative.(-).side ..Consequently,.it.<br />
doesn’t.matter.which.way.they.are.oriented.<br />
<strong>with</strong>in.a.circuit .<br />
5. Explain.that.a.material.which.is.conductive<br />
allows.electricity.to.pass.through.it ..Ask.<br />
students.to.give.examples.of.materials.that.<br />
are.conductive.(such.as.water,.paper.clips,.<br />
and.tin.foil).and.non-conductive.(like.wood,.<br />
fabric,.and.paper) ..<br />
6. Instruct.students.to.curl.the.legs.of.their.<br />
LEDs.using.needle.nose.pliers.so.that.the.<br />
LEDs.can.be.sewn.to.fabric.(see.photo.on.<br />
page.5) .<br />
7. Review.the.circuit.template.(on.page.9).<strong>with</strong>.<br />
students.and.ask.them.to.use.chalk.to.draw.<br />
the.connections.on.their.felt.scrap(s) ..Explain.<br />
that.they.will.each.make.a.switch.using.a.<br />
metal.bead.which.closes.a.circuit.whenever.<br />
it.touches.areas.of.conductive.thread ..<br />
Students.can.create.the.body.of.the.brooch.<br />
however.they.like,.although.its.surface.<br />
should.be.big.enough.to.sew.between.the.<br />
battery.holder,.LED,.and.switch .<br />
8. Suggest.that.students.attach.the.<br />
components.to.their.fabric.<strong>with</strong>.a.dab.of.<br />
hot.glue,.being.careful.leave.the.conductive.<br />
parts.of.the.components.exposed ..<br />
8<br />
9. Direct.students.to.sew.their.components.<br />
to.their.fabric,.following.the.design.pattern.<br />
which.they.sketched.in.chalk .<br />
10. Show.students.how.to.use.regular.thread.<br />
to.sew.a.safety.pin.to.the.backside.of.their.<br />
brooches.(see.photo.below) ..If.the.safety.pin.<br />
makes.contact.<strong>with</strong>.any.conductive.thread,.<br />
it.can.cause.a.short.circuit.–.so.be.careful.to.<br />
separate.it.<strong>with</strong>.extra.felt.if.necessary .<br />
11. Direct.students.to.insert.the.battery.into.the.<br />
battery.holder.(<strong>with</strong>.the.“+”.side.facing.up) .<br />
a safety pin sewn onto the back of a felt brooch,<br />
using regular sewing thread
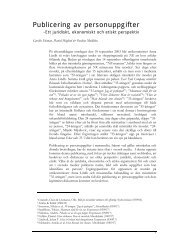
Simple Circuit Schematic for a Switch<br />
a switch breaks the<br />
flow of electricity<br />
through a circuit<br />
+<br />
power<br />
–<br />
+<br />
anode<br />
–<br />
cathode<br />
–<br />
ground<br />
directional flow of electricity through the circuit<br />
Example Beaded Switch Template<br />
a strand of non-conductive<br />
beads dangles on conductive<br />
thread, <strong>with</strong> a metal bead<br />
at the loose end<br />
– +<br />
+<br />
battery holder is<br />
sewn to the backside<br />
of the fabric
parallel CirCuiTs<br />
activity #3<br />
an illuminated cuff/bracelet<br />
Tools & Materials<br />
For each student:<br />
•.battery<br />
•.battery.holder<br />
•.felt.strip<br />
•.3.LEDs.(lights)<br />
•.matched.set.of.metal.snaps<br />
For the group to share:<br />
•.needle.threaders.or.beeswax<br />
•.conductive.thread<br />
•.fabric.scissors<br />
•.hot.glue.gun.and.glue.sticks<br />
•.needle.nose.pliers<br />
•.sewing.chalk<br />
•.sewing.needles<br />
10<br />
Summary<br />
Students.come.to.understand.what.constitutes.<br />
a.parallel.circuit ..Each.student.will.leverage.this.<br />
knowledge.as.he/she.fabricates.a.bracelet.or.<br />
cuff.which.incorporates.multiple.lights.and.turns.<br />
on.only.when.it.is.worn .<br />
Learning Goals<br />
Students.will . . .<br />
•.understand.that.lights.arranged.in.a.parallel<br />
configuration.each.receive.the.same.amount.<br />
of.voltage .<br />
•.understand.that.multiple.lights.<strong>with</strong>in.one.<br />
circuit.should.be.arranged.in parallel.to.ensure.<br />
that.they.all.light.up .<br />
Preparation<br />
•.Gather.the.materials ..<br />
•.Cut.felt.into.strips,.about.2”.wide.and.16”.long .<br />
•.If.you.are.plan.to.give.students.handouts.<br />
of.the.simple.circuit.schematic.for lights in.<br />
parallel,.print.out.copies.in.advance .<br />
Activity<br />
1. If.examples.are.available,.begin.by.sharing.<br />
those.<strong>with</strong>.the.students ..<br />
2. Share.the.simple.circuit.schematic.for.lights.<br />
in.parallel.(on.page.12) ...This.can.be.done.by.<br />
printing.copies,.projecting,.or.redrawing.the.<br />
diagram.on.a.chalkboard.or.whiteboard .<br />
3. Explain.that.in.order.to.add.additional.lights.<br />
to.a.circuit,.the.lights.must.be.arranged.<br />
in.parallel ..This.means.that.the.first.light’s.<br />
positive.end.is.connected.to.the.second.<br />
light’s.positive.end ..Likewise,.the.first.light’s.<br />
negative.end.should.be.connected.to.the.<br />
second.light’s.negative.end ..
4. Ask.students.to.draw.or.sketch.the.electrical.<br />
connections.and.placement.of.components.<br />
for.their.project.which.will.incorporate.three.<br />
lights ..This.may.look.similar.to.the.example.<br />
pictured.here.(see.right),.or.it.can.vary ..The.<br />
electrical.traces.may.spiral.and/or.travel.<br />
anywhere.on.the.fabric,.so.long.as.positive.<br />
and.negative.connections.do.not.touch.or.<br />
intersect ..<br />
5. Distribute.one.of.the.following.to.each.<br />
student:.battery,.battery.holder,.felt.piece ..<br />
Distribute.three.lights.to.each.student ..<br />
Make.the.rest.of.the.materials.available.on.a.<br />
common.table .<br />
6. Instruct.students.to.curl.the.legs.of.their.<br />
LEDs.using.needle.nose.pliers.so.that.the.<br />
LEDs.can.be.sewn.to.fabric.(see.page.5.for.a.<br />
photo.of.this) .<br />
7. Ask.students.to.wrap.the.felt.strip.around.<br />
their.wrist.and.trim.it.to.the.correct.length.<br />
–.the.felt.should.overlap.by.about.1”.or.2”.to.<br />
leave.enough.room.for.the.snaps.and.battery.<br />
holder ..<br />
8. Show.students.how.to.attach.their.snaps.to.<br />
each.end.of.their.felt.strip.(sewing,.riveting,.<br />
etc .,.depending.on.which.type.of.snaps.are.<br />
used) ..Tell.students.to.leave.enough.room.to.<br />
sew.to.the.snaps.later.in.the.activity,.since.<br />
this.is.how.the.snaps.will.be.electrically.<br />
connected.to.the.rest.of.the.circuit .<br />
9. Have.students.transfer.their.sketched.circuit.<br />
design.onto.their.piece.of.felt.by.using.chalk ..<br />
10. Suggest.that.students.attach.the.<br />
components.to.their.fabric.<strong>with</strong>.a.dab.of.<br />
hot.glue,.being.careful.leave.the.conductive.<br />
parts.of.the.components.exposed ..<br />
11. Students.can.now.follow.the.chalk.pattern.<br />
to.sew.the.connections.between.snaps.and.<br />
components .<br />
12. Finally,.show.students.how.to.insert.the.<br />
battery.into.the.battery.holder.(<strong>with</strong>.the..<br />
“+”.side.facing.up) .<br />
11
Simple Circuit Schematic for Lights in Parallel<br />
+<br />
power<br />
+ –<br />
+ –<br />
–<br />
ground<br />
sewn electrical connections
miCroConTrollers<br />
activity #4<br />
an electronic patch<br />
Tools & Materials<br />
For preparing patches:<br />
•.canvas.paper<br />
•.inkjet.color.printer.<br />
For each student:<br />
•.battery<br />
•.battery.holder<br />
•.LED.(light)<br />
•.sewable.microcontroller<br />
For the group to share:<br />
•.needle.threaders.or.beeswax<br />
•.conductive.thread<br />
•.fabric.scissors<br />
•.hot.glue.gun.and.glue.sticks<br />
•.needle.nose.pliers<br />
•.sewing.needles<br />
13<br />
Summary<br />
Students.are.exposed.to.microcontrollers.and.<br />
the.concept.of.programmability ..Each.student.<br />
will.make.a.personalized.light-up.patch,.using.<br />
a.sewable.pre-programmed.microcontroller.to.<br />
control.the.behavior.of.an.LED .<br />
Learning Goals<br />
Students.will . . .<br />
•.understand.what.a.microcontroller.is.and.how..<br />
programming.can.add.interactivity.and.<br />
dynamic.behavior.to.an.e-textile.project .<br />
Preparation<br />
•.Gather.the.materials ..<br />
•.If.you.plan.to.give.students.the.microcontroller.<br />
diagram.handout,.print.copies.in.advance .<br />
•.Print.copies.of.the.patch.template(s).on.an.<br />
inkjet.printer,.using.canvas.paper ..Make.sure.<br />
that.the.printer.is.adjusted.to.accept.thicker.<br />
print.media.(if.available.as.an.option) ..Cut.out.<br />
the.individual.patches .<br />
Activity<br />
1. Introduce.the.activity.by.sharing.examples,.if.<br />
they.are.available .<br />
2. Distribute.the.following.materials.to.each.<br />
student,.or.ask.the.students.to.collect.them.<br />
from.a.materials.station:<br />
•..one.LED<br />
•..one.pre-printed.canvas.patch<br />
•..one.needle<br />
•..16”.or.so.of.thread<br />
•..sewable.microcontroller<br />
•..battery.holder<br />
•..battery<br />
•..microcontroller.diagram.handout
3. Spend.a.few.minutes.introducing.the.<br />
microcontroller.as.a.miniature.computer.<br />
that.can.be.programmed.to.control.<br />
certain.behaviors.<strong>with</strong>in.a.circuit ..The.<br />
microcontrollers.in.this.activity.have.been.<br />
pre-programmed.to.control.the.behavior.of.<br />
an.LED .<br />
4. Instruct.students.to.curl.the.legs.of.their.<br />
LEDs.using.needle.nose.pliers.so.that.the.<br />
LEDs.can.be.sewn.to.fabric.(see.page.5.for.a.<br />
photo.of.this) .<br />
5. Guide.students.through.creating.their.own.<br />
patch ..Begin.by.explaining.the.first.step.<br />
listed.below,.then.allow.students.to.spend.<br />
the.rest.of.the.time.working.individually ..As.<br />
students.begin.to.finish.one.step,.pause.to.<br />
explain.the.next.step.in.the.process .<br />
•..Follow.the.template.on.the.patch.<br />
to.determine.how.to.place.the.<br />
microcontroller ..Orient.the.battery.holder.<br />
so.that.one.dotted.line.connects.its.<br />
positive.(+).hole.to.the.positive.(+).hole.<br />
on.the.microcontroller ..If.the.battery.<br />
holder.is.placed.correctly,.another.<br />
dotted.line.should.connect.its.negative.<br />
(-).hole.<strong>with</strong>.the.negative.(-).hole.on.the.<br />
microcontroller .<br />
•..Using.a.hot.glue.gun,.glue.the.battery.<br />
holder.and.sewable.microcontroller.to.your.<br />
patch ..Use.just.enough.glue.to.make.the.<br />
components.stick;.using.too.much.glue.<br />
will.cover.the.metal.contacts.and.prevent.<br />
them.from.conducting.electricity!..<br />
•..Sew.from.the.positive.(+).hole.on.the.<br />
battery.holder.to.the.positive.(+).hole.on.<br />
the.microcontroller ..<br />
•..Sew.from.the.negative.(-).hole.on.the.<br />
battery.holder.to.the.negative.(-).hole.on.<br />
the.microcontroller ..<br />
•..Decide.which.way.you.need.to.orient.your.<br />
LED.so.that.the.dotted.line.will.connect.<br />
the.negative.(-).side.of.your.LED.to.the.<br />
negative.(-).hole.on.your.microcontroller ..<br />
<strong>On</strong>ce.you’ve.figured.it.out,.use.a.hot.glue.<br />
gun.to.glue.the.LED.to.your.patch .<br />
14<br />
•..Sew.from.the.negative.(-).hole.on.your.<br />
microcontroller.to.the.negative.(-).side.of.<br />
your.LED ..<br />
•..Now,.decide.which.behavior.you.would.<br />
like.your.LED.to.have.(steady,.blinking,.<br />
or.fading) ..Look.at.the.microcontroller.<br />
diagram.and.figure.out.which.<br />
microcontroller.hole.you’ll.have.to.connect.<br />
the.positive.(+).side.of.the.light.to.in.order.<br />
to.produce.this.behavior ..<strong>On</strong>ce.you’ve.<br />
decided,.sew.from.the.positive.(+).side.<br />
of.the.light.to.that.particular.hole.on.the.<br />
microcontroller ..<br />
•..Examine.the.backside.of.your.patch.and.<br />
make.sure.that.there.are.no.loose.pieces.of.<br />
thread.that.are.accidentally.touching.one.<br />
another ..Trim.any.loose.ends,.if.necessary ..<br />
Using.a.hot.glue.gun,.put.a.dab.of.hot.<br />
glue.over.each.of.your.knots ..This.will.help.<br />
protect.them.from.unraveling.and.will.also.<br />
prevent.the.thread.ends.from.shorting.<br />
your.circuit .<br />
•..Insert.the.battery.into.the.battery.holder.<br />
(<strong>with</strong>.the.“+”.side.facing.up) .<br />
An Extra Challenge...<br />
If.students.finish.early,.you.can.challenge.<br />
them.to.add.a.second.light.to.their.circuit,.<br />
in.parallel .
• LED (Light): A light emi0ng diode -‐ basically, a light. An LED lights up when current flows<br />
through it in one direc;on, but not the other. It has a posi%ve part and a nega%ve part, just<br />
like a baEery.<br />
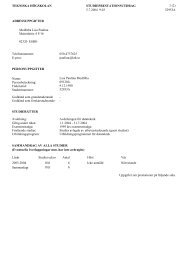
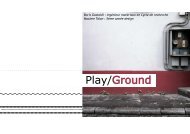
Microcontroller Diagram<br />
• Conduc=ve Thread: We use this to connect the parts in our circuit by sewing it into our fabric.<br />
It acts just like regular wire, except it doesn’t have a layer of protec;on around it -‐ so we need<br />
to make sure that the different pieces of thread don’t touch one another.<br />
• Sewable Microcontroller: A mini-‐computer that stores a short computer program. Our<br />
microcontroller is made to be sewable to fabric. It has a program on it which controls the<br />
behavior of an LED, depending on which pin we connect the posi%ve part of the LED to.<br />
Microcontroller Diagram<br />
Light (Steady)<br />
Ground (-)<br />
'<br />
(<br />
&<br />
!"#<br />
)<br />
*<br />
%<br />
$<br />
Power (+)<br />
Light (Blinking)<br />
Light (Fading)
ConneCTing baCk<br />
activity #5<br />
a patchwork quilt<br />
Tools & Materials<br />
For preparing quilt squares<br />
•.9”.x.12”.pieces.of.felt<br />
For the group to share:<br />
•.needle.threaders.or.beeswax<br />
•.conductive.thread<br />
•.fabric.scissors<br />
•.hot.glue.gun.and.glue.sticks<br />
•.needle.nose.pliers<br />
•.sewing.needles<br />
•.Heat.‘n.Bond.Ultra.Hold.<br />
Iron-<strong>On</strong>.Adhesive*.<strong>with</strong>.mini.<br />
iron*.or.fabric.glue*<br />
•.puffy.fabric.paint*<br />
•.sewing.chalk<br />
•.batteries<br />
•.battery.holders<br />
•.LEDs.(lights)<br />
•.sewable.microcontrollers<br />
•.small.felt.scraps<br />
•.assorted.beads<br />
•.metal.snaps<br />
19<br />
Summary<br />
Students.draw.upon.their.understanding.of.<br />
circuits.to.make.their.own.electronic.quilt.<br />
squares ..The.squares.can.then.be.pieced.<br />
together.to.create.an.electronic.patchwork.quilt ..<br />
Encourage.participants.to.design.and.construct.<br />
a.few.different.squares;.this.way,.some.can.<br />
remain.part.of.a.collective.project,.while.others.<br />
can.be.taken.home .<br />
The.physical.structure.of.the.squares.allows.<br />
them.to.be.rearranged.repeatedly,.encouraging.<br />
the.exploration.and.development.of.a.group.<br />
narrative.and/or.artwork .<br />
Learning Goals<br />
Students.will . . .<br />
•.understand.how.to.combine.and.apply.all.of.<br />
the.concepts.covered.in.previous.sessions .<br />
Preparation.<br />
•.Gather.the.materials ..<br />
•.Cut.out.tabbed.quilt.squares.(at.least.two.<br />
per.student),.using.the.template.on.page.21 ..<br />
If.using.9”.x.12”.pieces.of.felt,.you.should.be.<br />
able.to.fit.two.quilt.squares.on.each.piece ..Cut.<br />
along.the.template.outline.and.cut.slits.along.<br />
the.short,.straight.lines .<br />
•.Decide.how.you.would.like.students.to.attach.<br />
embellishments.to.their.quilt.pieces:<br />
-. Fabric.glue.is.convenient,.but.takes.a.long.<br />
time.to.dry .<br />
-. Heat’n.Bond.Ultra.Hold.Iron-<strong>On</strong>.Adhesive.<br />
requires.more.preparation,.but.works.almost.<br />
instantly.when.ironed ..(If.using.Heat’n.Bond,.<br />
it’s.best.to.use.an.iron.to.pre-fuse.it.to.scrap.<br />
felt ..This.way,.students.can.cut.out.their.<br />
desired.shapes.and.iron.them.right.onto.their.<br />
quilt.squares .)
•.Print.copies.of.the.quilt.square.template.for.<br />
students.to.sketch.their.designs.on .<br />
•.Decide.upon.a.theme.for.the.electronic.<br />
patchwork.quilt ..It.should.be.broad.enough.to.<br />
allow.for.creative.interpretation,.but.narrow.<br />
enough.to.provide.guidance.to.students.who.<br />
might.otherwise.feel.lost ..The.theme.may.be.<br />
concrete.(calendar.months,.seasons.of.the.<br />
year,.animals,.etc .).or.abstract.(civic.issues,.<br />
personal.aspirations,.etc .)<br />
Activity<br />
1. Introduce.the.activity.by.sharing.examples,.if.<br />
they.are.available .<br />
2. Explain.that.students.will.be.making.more.<br />
than.one.quilt.square.during.today’s.session;.<br />
this.way.they.can.take.one.home.to.share.<br />
<strong>with</strong>.family.and.friends,.while.leaving.others.<br />
to.remain.part.of.the.group.quilt .<br />
3. Ask.students.to.draw.or.sketch.the.electrical.<br />
connections.and.placement.of.components.<br />
for.each.square.onto.the.template.provided ..<br />
Their.design.may.incorporate.lights.and/or.<br />
switches.along.<strong>with</strong>.decorative.elements.and.<br />
a.battery .<br />
4. Distribute.one.of.the.following.to.each.<br />
student.(per.square):.battery,.battery.holder,.<br />
quilt.square ..Make.the.rest.of.the.materials.<br />
(including.a.variety.of.lights).available.on.a.<br />
common.table .<br />
20<br />
5. Instruct.students.to.curl.the.legs.of.their.<br />
LEDs.using.needle.nose.pliers.so.that.the.<br />
LEDs.can.be.sewn.to.fabric.(see.page.5.for.a.<br />
photo.of.this) .<br />
6. Have.students.use.chalk.to.transfer.their.<br />
sketched.circuit.designs.onto.their.quilt.<br />
squares .<br />
7. Suggest.that.students.attach.the.<br />
components.to.their.fabric.<strong>with</strong>.a.dab.of.<br />
hot.glue,.being.careful.leave.the.conductive.<br />
parts.of.the.components.exposed ...<br />
8. Direct.students.to.sew.their.components.<br />
to.their.fabric,.following.the.design.pattern.<br />
which.they.sketched.in.chalk .<br />
9. Encourage.students.to.embellish.their.<br />
functional.circuit.<strong>with</strong>.beads,.additional.<br />
fabric,.and.fabric.paint ..Feel.free.to.provide.<br />
additional.craft.supplies.(such.as.feathers,.<br />
sequins,.and.buttons).as.well ..You.may.even.<br />
suggest.that.students.sign.their.name.in.<br />
fabric.paint.somewhere.on.each.square.that.<br />
they.create .<br />
10. As.students.begin.to.finish.their.patches,.<br />
encourage.them.to.arrange.(and.rearrange).<br />
how.the.pieces.fit.together ..<br />
11. At.the.end.of.the.session,.let.students.<br />
choose.which.square.of.theirs.they.would.<br />
like.to.take.home .
Quilt Square Template
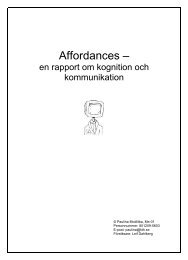
TroubleshooTing<br />
Is the battery holder<br />
sewn in backwards?<br />
Is the negative hole of the battery<br />
holder sewn to the negative leg of<br />
the LED(s)? Is the positive hole of<br />
the battery holder sewn to the<br />
positive leg of the LED(s)?<br />
no<br />
no<br />
Remove enough stitches to<br />
reorient the components<br />
and resew the necessary<br />
connections between them.<br />
yes<br />
no<br />
yes<br />
Does your circuit contain<br />
more than one LED?<br />
no<br />
Flip the battery so that<br />
the unmarked (negative)<br />
side faces up.<br />
Do positive and negative electrical<br />
connections cross or touch at any point?<br />
no<br />
Are the positive and negative holes<br />
of a microcontroller, battery holder,<br />
or LED sewn to one another?<br />
no<br />
Are there long or frayed<br />
tails of thread coming<br />
from any knots?<br />
no<br />
Do you have<br />
access to a<br />
multimeter?<br />
no<br />
Check that each component is<br />
sewn securely to the fabric. If the<br />
components seem loose or wiggle<br />
at all, add a few extra stitches <strong>with</strong><br />
conductive thread.<br />
22<br />
yes<br />
yes<br />
yes<br />
yes<br />
yes<br />
Are any of the lights in<br />
your circuit turning on?<br />
yes<br />
Verify that your lights are arranged in<br />
parallel – otherwise they may not all<br />
illuminate. (If they aren't sewn in<br />
parallel, remove enough stitches to<br />
reorient the components and resew the<br />
necessary connections between them.)<br />
Remove enough stitches to<br />
redirect and resew your<br />
connections so that positive<br />
and negative connections<br />
do not touch or cross.<br />
Cut the sewn connection between<br />
positive and negative holes and tie<br />
each loose thread in a knot.<br />
Seal the knot(s) <strong>with</strong> hot glue<br />
and trim any remaining long<br />
or frayed thread ends.<br />
Use the multimeter's<br />
continuity setting to check for<br />
any unintentionally connected<br />
components. (The multimeter<br />
will beep whenever there is a<br />
continuous connection<br />
between its two probes.)
Tools & maTerials<br />
Item Where to Purchase Notes<br />
alligator.clips* SparkFun 2<br />
RadioShack<br />
23<br />
•.SparkFun.SKU.#:.CAB-08927.(or.search.for.<br />
“Alligator.to.Alligator.Cables”)<br />
•.RadioShack.catalog.#:.278-1156.(or.search.<br />
for.“Test/Jumper.Leads”)<br />
assorted.beads fabric.&.craft.stores •.provide.a.variety.of.metal.(conductive).and.<br />
non-metal.(glass,.wood,.plastic).beads<br />
batteries.(CR2032) Digi-Key1 SparkFun2 RadioShack.<br />
electronics.stores<br />
battery.holders Digi-Key 1<br />
SparkFun 2<br />
beeswax JoAnn.Fabrics.<br />
fabric.&.craft.stores<br />
conductive.<br />
thread<br />
fabric.glue fabric.&.craft.stores<br />
fabric.scissors fabric.&.craft.stores<br />
felt JoAnn.Fabrics.<br />
A .C ..Moore.<br />
fabric.&.craft.stores<br />
•.Digi-Key.part.#:.N189-ND<br />
•.SparkFun.SKU.#:.PRT-00338.(or.search.for.<br />
“Coin.Cell.Battery.-.20mm”)<br />
•.Digi-Key.part.#:.BA2032SM-ND<br />
•.SparkFun.SKU.#:.DEV-08822.(or.search.for.<br />
“Coin.Cell.Holder.-.Sewable.SMD”)<br />
SparkFun 2 •.SparkFun.SKU.#:.DEV-08549.(or.search.for.<br />
“Conductive.Thread.-.234/34.4ply)<br />
•.9”.x.12”.size.can.fit.two.quilt.square.pieces<br />
•.may.also.be.purchased.in.large.sheets/rolls
Item Where to Purchase Notes<br />
Heat’n.Bond.Ultra.<br />
Hold.Iron-<strong>On</strong>.<br />
Adhesive*<br />
hot.glue.gun.<br />
(<strong>with</strong>.glue.sticks)<br />
JoAnn.Fabrics.<br />
A .C ..Moore.<br />
fabric.&.craft.stores<br />
fabric.&.craft.stores.<br />
hardware.stores<br />
LEDs.(lights) Digi-Key1 SparkFun2 RadioShack<br />
metal.snaps JoAnn.Fabrics.<br />
A .C ..Moore.<br />
fabric.&.craft.stores<br />
mini.iron* JoAnn.Fabrics.<br />
Target.<br />
Walmart.<br />
fabric.&.craft.stores<br />
multimeter* SparkFun2 RadioShack.<br />
Sears.<br />
hardware.stores<br />
needle.nose.pliers SparkFun2 RadioShack.<br />
Sears.<br />
hardware.stores<br />
needle.threaders fabric.&.craft.stores<br />
24<br />
•.a.type.of.fusible.interfacing.which.includes.<br />
a.paper.backing<br />
•.available.in.sheets.(pictured.here).or.rolls<br />
•.any.glue.gun.will.work,.but.“mini”.glue.<br />
guns.work.especially.well.<strong>with</strong>.small.craft.<br />
materials.and.electronics.components<br />
•.Digi-Key.part.#’s:.160-1127-ND,.160-1133-<br />
ND,.and.160-1131-ND.(red,.yellow,.and.<br />
green)<br />
•.SparkFun.SKU.#’s:.COM-09590,.COM-09594,.<br />
and.COM-09592.(red,.yellow,.and.green.-.or.<br />
search.for.“Basic.LED”)<br />
•.magnetic.snaps.work.particularly.well.and.<br />
are.easy.to.sew.into.a.project<br />
•.a.regular.iron.will.also.work,.but.will.require.<br />
an.ironing.board.(or.other.large.suitable.<br />
surface.on.which.to.iron)<br />
•.SparkFun.SKU.#:.TOL-09141.(or.search.for.<br />
“Digital.Multimeter”)<br />
•.RadioShack.catalog.#:.22-813.(or.search.for.<br />
“29-Range.Digital.Multimeter)<br />
•.digital.multimeters.will.be.easier.to.use.<br />
than.analog.ones<br />
•.your.multimeter.should.be.able.to.measure.<br />
continuity.(<strong>with</strong>.a.buzzer/beep.sound)<br />
•.SparkFun.SKU.#:.TOL-08793.(or.search.for.<br />
“Needle.Nose.Pliers”)<br />
•.RadioShack.catalog.#:.64-062.(or.search.for.<br />
“Mini.Long-Nose.Pliers”)
Item Where to Purchase Notes<br />
puffy.fabric.paint* A .C ..Moore.<br />
Michaels.<br />
fabric.&.craft.stores<br />
safety.pins drug.stores.<br />
fabric.&.craft.stores<br />
sewing.chalk A .C ..Moore.<br />
Michaels.<br />
fabric.&.craft.stores<br />
25<br />
•.can.be.used.as.an.insulator.when.painted.<br />
over.sewn.traces<br />
•.also.known.as.“tailor’s.chalk”.or.“designer’s.<br />
chalk”<br />
sewing.needles fabric.&.craft.stores •.needles.<strong>with</strong>.bigger.eyes.will.be.easier.to.<br />
thread.(look.for.“crewel”.or.“embroidery”.<br />
needles)<br />
•.needles.must.be.slender.enough.to.sew.<br />
through.the.holes.of.the.battery.holders<br />
sewing.thread fabric.&.craft.stores<br />
*.optional.<br />
1 .http://www .digikey .com.-.lowest.prices,.difficult.to.navigate<br />
2 .http://www .sparkfun .com.-.slightly.higher.prices,.easier.to.navigate
furTher resourCes<br />
Print<br />
Fashioning Technology<br />
by.Syuzi.Pakhchyan<br />
Switch Craft: Battery-Powered Crafts to Make and Sew<br />
by.Alison.Lewis.(<strong>with</strong>.Fang-Yu.Lin)<br />
Fashion Geek<br />
by.Diana.Eng<br />
Make: Electronics<br />
by.Charles.Platt<br />
26
Web<br />
Craft<br />
http://www .craftzine .com<br />
Fashioning Technology<br />
http://www .fashioningtech .com<br />
How To Get What You Want<br />
http://www .kobakant .at/DIY/<br />
Instructables<br />
http://www .instructables .com<br />
LilyPond<br />
http://lilypond .media .mit .edu<br />
Make<br />
http://www .makezine .com<br />
<strong>Soft</strong> Circuit Saturdays<br />
http://softcircuitsaturdays .com/<br />
talk2myShirt<br />
http://www .talk2myshirt .com/<br />
27