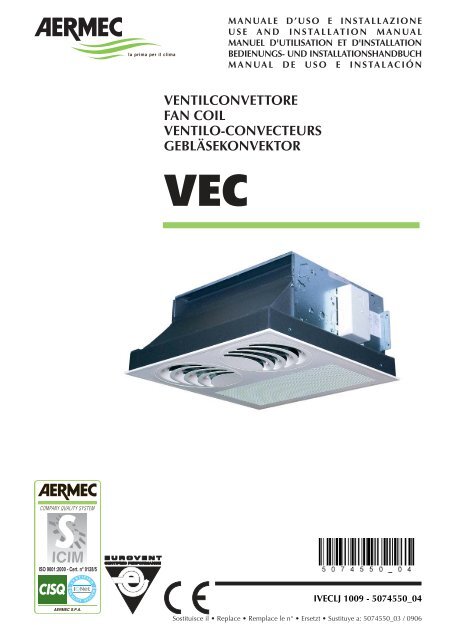
Fan coil Aermec VEC Installation manual
Fan coil Aermec VEC Installation manual
Fan coil Aermec VEC Installation manual

You also want an ePaper? Increase the reach of your titles
YUMPU automatically turns print PDFs into web optimized ePapers that Google loves.
<strong>VEC</strong><br />
MANUALE D’USO E INSTALLAZIONE<br />
USE AND INSTALLATION MANUAL<br />
MANUEL D'UTILISATION ET D'INSTALLATION<br />
BEDIENUNGS- UND INSTALLATIONSHANDBUCH<br />
MANUAL DE USO E INSTALACIÓN<br />
VENTILCONVETTORE<br />
FAN COIL<br />
VENTILO-CON<strong>VEC</strong>TEURS<br />
GEBLÄSEKONVEKTOR<br />
I<strong>VEC</strong>LJ 1009 - 5074550_04<br />
Sostituisce il Replace Remplace le n° Ersetzt Sustituye a: 5074550_03 / 0906
OSSERVAZIONI<br />
Conservare i <strong>manual</strong>i in luogo asciutto, per evitare il deterioramento,<br />
per almeno 10 anni per eventuali riferimenti futuri.<br />
Leggere attentamente e completamente tutte le informazioni<br />
contenute in questo <strong>manual</strong>e. Prestare particolarmente<br />
attenzione alle norme d’uso accompagnate dalle scritte<br />
“PERICOLO” o “ATTENZIONE” in quanto, se non osservate,<br />
possono causare danno alla macchina e/o a persone e cose.<br />
Per anomalie non contemplate da questo <strong>manual</strong>e, interpellare<br />
tempestivamente il Servizio Assistenza di zona.<br />
L'apparecchio deve essere installato in maniera tale da rende-<br />
REMARKS<br />
Store the <strong>manual</strong>s in a dry location to avoid deterioration, as<br />
they must be kept for at least 10 years for any future reference.<br />
Carefully and thoroughly read all the information referred to<br />
in this <strong>manual</strong>. Pay particular attention to the instructions for<br />
use accompanied by the words “DANGER” or “WARNING”<br />
because, if they are not complied with, the machine/property<br />
can damaged and/or people can be injured.<br />
If any kind of malfunction is not included in this <strong>manual</strong>, contact<br />
the local After Sales Service immediately.<br />
The device must be installed in such a way that maintenance<br />
REMARQUES<br />
Conserver les manuels dans un endroit sec, afin d’éviter leur<br />
détérioration, pendant au moins 10 ans, pour toutes éventuelles<br />
consultations futures.<br />
Lire attentivement et entièrement toutes les informations contenues<br />
dans ce manuel. Prêter une attention particulière aux<br />
normes d’utilisation signalées par les inscriptions “DANGER”<br />
ou “ATTENTION”, car leur non observance pourrait causer un<br />
dommage à l’appareil et/ou aux personnes et objets.<br />
Pour toute anomalie non mentionnée dans ce manuel, contacter<br />
aussitôt le service après-vente de votre secteur.<br />
Lors de l'installation de l'appareil, il faut prévoir l'espace<br />
HINWEISE<br />
Die Handbücher an einem trockenen Ort aufbewahren, damit<br />
es mindestens weitere 10 Jahre für eventuelle Informationen<br />
einsehbar ist.<br />
Alle in diesem Handbuch enthaltenen Informationen aufmerksam<br />
und vollständig lesen. Achten Sie insbesondere auf<br />
die Benutzungsanweisungen mit den Hinweisen “VORSICHT”<br />
oder “ACHTUNG”, da deren Nichtbeachtung Schäden am<br />
Gerät bzw. Sach- und Personenschäden zur Folge haben kann.<br />
Bei Betriebsstörungen, die in dieser Gebrauchsanweisung nicht<br />
aufgeführt sind, wenden Sie sich umgehend an die zuständige<br />
Kundendienststelle.<br />
OBSERVACIONES<br />
Guarde los <strong>manual</strong>es en un lugar seco para evitar su deterioro,<br />
al menos durante 10 años, para posibles consultas futuras.<br />
Lea atentamente y por completo toda la información contenida<br />
en el presente <strong>manual</strong>. Preste particular atención a las<br />
normas de uso acompañadas de las indicaciones “PELIGRO”<br />
o “ATENCIÓN” puesto que, si no se cumplen, pueden causar<br />
daños a la máquina y/o a personas y cosas.<br />
En caso de anomalías no contempladas en este <strong>manual</strong>, contacte<br />
inmediatamente el Servicio de Asistencia de su zona.<br />
El aparato debe ser instalado de manera que puedan realizar-<br />
2<br />
re possibili operazioni di manutenzione e/o riparazione.<br />
La garanzia dell'apparecchio non copre in ogni caso i costi<br />
dovuti ad autoscale, ponteggi o altri sistemi di elevazione che<br />
si rendesero necessari per effettuare gli interventi in garanzia.<br />
AERMEC S.p.A. declina ogni responsabilità per qualsiasi danno<br />
dovuto ad un uso improprio della macchina, ad una lettura<br />
parziale o superficiale delle informazioni contenute in questo<br />
<strong>manual</strong>e.<br />
Il numero di pagine di questo <strong>manual</strong>e è:.40<br />
and/or repair operations are possible.<br />
The device warranty does not in any case cover costs resulting<br />
from the use of automatic ladders, scaffolding or any other lifting<br />
system necessary for carrying out repairs under warranty.<br />
AERMEC S.p.A. declines all liability for any damage due to<br />
improper use of the machine, or the partial or superficial reading<br />
of the information contained in this <strong>manual</strong>.<br />
This <strong>manual</strong> contains the following number of pages: 40<br />
nécessaire pour les opérations d'entretien et/ou de réparation.<br />
La garantie de l'appareil ne couvre pas les coûts dérivant de<br />
l'utilisation de voitures avec échelle mécanique, d'échafaudages<br />
ou d'autres systèmes de levée employés pour effectuer des<br />
interventions en garantie.<br />
AERMEC S.p.A. décline toute responsabilité pour tout dommage<br />
dû à une utilisation impropre de l’appareil et à une lecture<br />
partielle ou superficielle des informations contenues dans ce<br />
manuel.<br />
Ce manuel se compose de pages: 40.<br />
Stellen Sie das Gerät so auf, dass Instandhaltungs- und/oder<br />
Reparaturarbeiten durchgeführt werden können.<br />
Die Garantie des Gerätes deckt in keinem Fall Kosten für<br />
Feuerwehrleitern, Gerüste oder andere Hebesysteme ab, die<br />
sich für die Garantiearbeiten als erforderlich erweisen sollten.<br />
Die AERMEC S.p.A. übernimmt keine Haftung für Schäden aus<br />
dem unsachgemäßen Gebrauch des Gerätes und der teilweisen<br />
oder oberflächlichen Lektüre der in diesem Handbuch enthaltenen<br />
Informationen.<br />
Dieses Handbuch hat eine Seitenzahl von: 40<br />
se las operaciones de mantenimiento y/o reparación.<br />
En cualquier caso, la garantía del aparato no cubre los costes<br />
derivados del uso de escaleras automáticas, andamios u otros<br />
sistemas de elevación necesarios para efectuar las intervenciones<br />
en garantía.<br />
AERMEC S.p.A. declina cualquier responsabilidad por cualquier<br />
daño debido a un uso impropio de la máquina, o bien a<br />
una lectura parcial o superficial de las informaciones contenidas<br />
en este <strong>manual</strong>.<br />
El número de páginas de este <strong>manual</strong> es: 40
INDICE<br />
DICHIARAZIONE DI CONFORMITÀ<br />
Trasporto Simboli di sicurezza<br />
Informazioni importanti Manutenzione Imballo Utilizzo<br />
Descrizione dell'unità Limiti di funzionamento<br />
Dati tecnici<br />
Installazione dell’unità Collegamenti elettrici<br />
Accessori obbligatori<br />
Manutenzione (Sostituzione filtro)<br />
Dati dimensionali<br />
Schemi elettrici<br />
SOLUZIONE DEI PROBLEMI<br />
TABLE OF CONTENTS<br />
DECLARATION OF CONFORMITY<br />
Transport Safety symbols<br />
Important information Maintenance Package Use<br />
Description of the unit Operating limits<br />
Technical data<br />
Installing the unit Electrical wirings<br />
Mandatory accessory<br />
Maintenance (Filter replacement)<br />
Dimensions<br />
Electrical layouts<br />
TROUBLESHOOTING<br />
INDEX<br />
CERTIFICAT DE CONFORMITE<br />
Transport Simboles de securite<br />
Informations importantes Entretien Emballage Utilisation<br />
Versions Limites de fonctionnement<br />
Donnes techniques<br />
<strong>Installation</strong> de l'unité Raccordements électriques<br />
Accessoire obligatoire<br />
Entretien (remplacement du filtre a air)<br />
Dimensions<br />
Schemas electriques<br />
SOLUTION DES PROBLEMES<br />
INHALTSVERZEICHNIS<br />
KONFORMITÄTSERKLÄRUNG<br />
Transport Sicherheitssymbole<br />
Wichtige Hinweise Wartung Verpackung Gebrauch<br />
Beschreibung der Einheit Betriebsgrenzen<br />
Technische Daten<br />
<strong>Installation</strong> des Gerätes Stromanschlüsse<br />
Obligatorischen Zubehörs<br />
Wartung (Wechsel des Filters)<br />
Abmessungen<br />
Elektrische Schaltpläne<br />
LÖSUNG VON PROBLEMEN<br />
ÍNDICE<br />
DECLARACIÓN DE CONFORMIDAD<br />
Transporte Símbolos de seguridad<br />
Información importante Mantenimiento Embalaje Uso<br />
Descripción de la unidad Límites de funcionamiento<br />
Datos técnicos<br />
Instalación de la unidad Conexiones eléctricas<br />
Accesorio obligatorio<br />
Mantenimiento (Sustitución del filtro)<br />
Dimensiones<br />
Esquemas eléctricos<br />
SOLUCIÓN DE PROBLEMAS<br />
4<br />
5<br />
6<br />
7<br />
8<br />
9<br />
26<br />
28<br />
29<br />
30<br />
31<br />
4<br />
5<br />
10<br />
11<br />
12<br />
13<br />
26<br />
28<br />
29<br />
30<br />
31<br />
4<br />
5<br />
14<br />
15<br />
16<br />
17<br />
26<br />
28<br />
29<br />
30<br />
31<br />
4<br />
5<br />
18<br />
19<br />
20<br />
21<br />
26<br />
28<br />
29<br />
30<br />
31<br />
4<br />
5<br />
22<br />
23<br />
24<br />
25<br />
26<br />
28<br />
29<br />
30<br />
31<br />
3
AERMEC S.p.A.<br />
I-37040 Bevilacqua (VR) Italia – Via Roma, 996<br />
Tel. (+39) 0442 633111<br />
Telefax (+39) 0442 93730 – (+39) 0442 93566<br />
www .aermec. com - info @aermec. com<br />
DICHIARAZIONE DI CONFORMITÀ<br />
Noi, fi rmatari della presente, dichiariamo sotto la nostra esclusiva<br />
responsabilità, che il prodotto:<br />
VENTILCONVETTORE<br />
serie <strong>VEC</strong><br />
al quale questa dichiarazione si riferisce è conforme alle seguenti norme<br />
armonizzate:<br />
- CEI EN 60335-2-40<br />
- CEI EN 55014-1<br />
- CEI EN 55014-2<br />
- CEI EN 61000-6-1<br />
- CEI EN 61000-6-3<br />
soddisfando così i requisiti essenziali delle seguenti direttive:<br />
- Direttiva LVD 2006/95/CE<br />
- Direttiva compatibilità elettromagnetica 2004/108/CE<br />
<strong>VEC</strong> APC CON ACCESSORI<br />
E’ fatto divieto di mettere in servizio il prodotto dotato di accessori<br />
non di fornitura <strong>Aermec</strong>.<br />
CERTIFICAT DE CONFORMITÉ<br />
Nous soussignés déclarons sous notre exclusive responsabilité que le<br />
produit:<br />
VENTILO-CON<strong>VEC</strong>TEURS<br />
série <strong>VEC</strong><br />
auquel cette déclaration fait référence, est conforme aux normes<br />
harmonisées suivantes:<br />
- EN 60335-2-40<br />
- EN 55014-1<br />
- EN 55014-2<br />
- EN 61000-6-1<br />
- EN 61000-6-3<br />
satisfaisant ainsi aux conditions essentielles des directives suivantes:<br />
- Directive LVD 2006/95/CE<br />
- Directive compatibilité électromagnétique 2004/108/CE<br />
<strong>VEC</strong> APC PLUS ACCESSOIRES<br />
Il est interdit de faire fonctionner l'appareil avec des accessoires qui ne<br />
sont pas fournis de <strong>Aermec</strong>.<br />
DECLARACIÓN DE CONFORMIDAD<br />
Los que suscriben la presente declaran bajo la propia y exclusiva<br />
responsabilidad que el conjunto en objeto, defi nido como sigue:<br />
FAN COIL<br />
serie <strong>VEC</strong><br />
al que esta declaración se refi ere, está en conformidad a las siguientes<br />
normas armonizadas:<br />
- EN 60335-2-40<br />
- EN 55014-1<br />
- EN 55014-2<br />
- EN 61000-6-1<br />
- EN 61000-6-3<br />
al que esta declaración se refi ere, está en conformidad a las siguientes<br />
normas armonizadas:<br />
- Directiva LVD 2006/95/CE<br />
- Directiva compatibilidad electromagnétic 2004/108/CE<br />
<strong>VEC</strong> APC CON ACCESORIOS<br />
Está prohibido poner en marcha el producto con accesorios<br />
no suministrados por <strong>Aermec</strong>.<br />
4<br />
<strong>VEC</strong><br />
CONFORMITY DECLARATION<br />
We the undersigned declare, under our own exclusive responsibility,<br />
that the product:<br />
FAN COIL<br />
<strong>VEC</strong> series<br />
to which this declaration refers, complies with the following standardised<br />
regulations:<br />
- EN 60335-2-40<br />
- EN 55014-1<br />
- EN 55014-2<br />
- EN 61000-6-1<br />
- EN 61000-6-3<br />
thus meeting the essential requisites of the following directives:<br />
- Directive LVD 2006/95/CE<br />
- EMC Electromagnetic Compatibility Directive 2004/108/CE<br />
<strong>VEC</strong> APC WITH ACCESSORIES<br />
It is not allowed to use the unit equipped with accessories not supplied<br />
by <strong>Aermec</strong>.<br />
KONFORMITÄTSERKLÄRUNG<br />
Wir, die hier Unterzeichnenden, erklären auf unsere ausschließlich<br />
Verantwortung, dass das Produkt:<br />
GEBLÄSEKONVEKTOR<br />
der Serie <strong>VEC</strong><br />
auf das sich diese Erklärung bezieht, den folgenden harmonisierten<br />
Normen entspricht:<br />
- EN 60335-2-40<br />
- EN 55014-1<br />
- EN 55014-2<br />
- EN 61000-6-1<br />
- EN 61000-6-3<br />
womit die grundlegenden Anforderungen folgender Richtlinien erfüllt<br />
werden:<br />
- Richtlinie LVD 2006/95/CE<br />
- Richtlinie zur elektromagnetischen Verträglichkeit 2004/108/CE<br />
<strong>VEC</strong> APC + ZUBEHÖR<br />
Falls das Gerät mit Zubehörteilen ausgerüstet wird, die nicht von<br />
<strong>Aermec</strong> geliefert werden, ist dessen Inbetriebnahme solange untersagt.<br />
Bevilacqua, 02/03/2009 La Direzione Commerciale – Sales and Marketing Director<br />
Luigi Zucchi
TRASPORTO CARRIAGE TRANSPORT TRANSPORT TRANSPORTE<br />
NON bagnare Do NOT wet<br />
CRAINT l’humidité Vor Nässe schützen<br />
NO mojar<br />
Sovrapponibilità: controllare sull’imballo la posizione della freccia per<br />
conoscere il numero di macchine impilabili.<br />
Stacking: control the packing for the arrow position to know the number<br />
of machines that can be stacked.<br />
Empilement: vérifier sur l’emballage la position de la flèche pour connaître<br />
le nombre d’appareils pouvant être empilés.<br />
Stapelung: Anhand der Position des Pfeiles an der Verpackung kontrollieren,<br />
wieviele Geräte stapelbar sind.<br />
Apilamiento: observe en el embalaje la posición de la flecha para saber<br />
cuántos equipos pueden apilarse.<br />
NON trasportare la macchina da soli se il suo peso supera i 35 Kg.<br />
DO NOT handle the machine alone if its weight is over 35 Kg.<br />
NE PAS transporter tout seul l’appareil si son poids dépasse 35 Kg.<br />
Das Gerät NICHT alleine tragen, wenn sein Gewicht 35 Kg überschreitet.<br />
NO maneje los equipos en solitario si pesan más de 35 kg.<br />
SIMBOLI DI SICUREZZA SAFETY SYMBOL SIMBOLES DE SECURITE<br />
SICHERHEITSSYMBOLE SÍMBOLOS DE SEGURIDAD<br />
NON calpestare Do NOT trample<br />
NE PAS marcher sur cet emballage Nicht betreten<br />
NO pisar<br />
6<br />
5<br />
4<br />
3<br />
2<br />
1<br />
NON lasciare gli imballi sciolti durante il trasporto.<br />
Do NOT leave loose packages during transport.<br />
ATTACHER les emballages pendant le transport.<br />
Die Verpackungen nicht ungesichert transportieren.<br />
NO lleve las cajas sueltas durante el transporte.<br />
35Kg<br />
Pericolo: Pericolo: Pericolo!!!<br />
Tensione Organi in movimento<br />
Danger: Danger: Danger!!!<br />
Power supply Movings parts<br />
Danger: Danger: Danger!!!<br />
Tension Organes en mouvement<br />
Gefahr ! Gefahr ! Gefahr!!!<br />
Spannung Rotierende Teile<br />
Peligro: Peligro: Peligro!!!<br />
Tensión Elementos en movimiento<br />
5
English<br />
IMPORTANT INFORMATION<br />
WARNING: electrical wirings, installation<br />
of the fan <strong>coil</strong>s and relevant accessories<br />
should be performed by a technician<br />
who has the necessary technical<br />
and professional expertise to install,<br />
modify, extend and maintain systems,<br />
and who is able to check the systems<br />
for the purposes of safety and correct<br />
operation.<br />
WARNING: the fan <strong>coil</strong> is connected<br />
to power supply and water circuit.<br />
Operations performed by persons<br />
without the required technical skills can<br />
lead to personal injury to the operator<br />
or damage to the unit and surrounding<br />
objects.<br />
WARNING: before carrying out any<br />
work, put the proper individual protection<br />
equipment on.<br />
WARNING: The appliance must be fitted<br />
according to the national regulations<br />
on process plant engineering.<br />
WARNING: before carrying out any<br />
work, make sure the power supply is<br />
disconnected.<br />
WARNING: Install a device, main<br />
switch or plug which allows to completely<br />
cut off the power supply from<br />
the unit.<br />
WARNING! DANGER! Any use of the<br />
unit not expressly indicated by <strong>Aermec</strong><br />
is strictly prohibited.<br />
MALFUNCTION<br />
In case of malfunction, cut off power<br />
to the unit, then energise it again and<br />
restart the device. If the problem occurs<br />
again, call the local After-Sales Service<br />
immediately.<br />
POWER THE FAN COIL ONLY WITH<br />
230 VOLT, SINGLE PHASE, 50 Hz<br />
Use of other power supplies could cause<br />
permanent damage to the fan <strong>coil</strong>.<br />
DO NOT TUG THE ELECTRICAL CABLE<br />
It is very dangerous to pull, tread on or<br />
crush the electrical power cable or fix it<br />
with nails or drawing pins.<br />
A damaged power cable can cause short<br />
circuits and injure people.<br />
PACKAGE<br />
The fan <strong>coil</strong>s are shipped in standard package which consists of expanded polystyrene foam and cardboard shells.<br />
USE<br />
Consult control panel <strong>manual</strong> for installation and use instructions.<br />
10<br />
I<strong>VEC</strong>LJ 1009 - 5074550_04<br />
DO NOT OBSTRUCT THE AIR<br />
OUTLETS BY PLACING OBJECTS INTO<br />
THEM<br />
Do not put anything in the air outlet<br />
slots.<br />
This could injure people and damage<br />
the fan.<br />
DO NOT USE THE FAN COIL<br />
IMPROPERLY<br />
Do not use the fan <strong>coil</strong> for animal<br />
husbandry applications (e.g. incubation).<br />
AIR THE ROOM<br />
Periodically air the room in which<br />
the fan <strong>coil</strong> has been installed; this is<br />
particularly important if the room is<br />
occupied by many people, or if gas<br />
appliances or sources of odours are<br />
present.<br />
ADJUST TEMPERATURE ADEQUATELY<br />
The room temperature should be<br />
adjusted in order to provide maximum<br />
comfort to the people in the room,<br />
especially if they are elderly, children<br />
or sick people; avoid differences over<br />
7°C between the outdoor temperature<br />
and the temperature inside the room in<br />
summer.<br />
Carefully choose the room temperature<br />
so as to save energy.<br />
CORRECTLY ADJUST THE AIR JET<br />
Air coming out from the fan <strong>coil</strong> must<br />
not reach people directly; in fact, even<br />
if the air is warmer than the room<br />
temperature, it could cause a cold<br />
sensation and result in discomfort.<br />
DO NOT USE EXCESSIVELY HOT<br />
WATER<br />
To clean the indoor unit, use soft cloths<br />
or sponges that are wet with water at a<br />
maximum of 40 °C. Do not use chemical<br />
products or solvents to clean any part of<br />
the fan <strong>coil</strong>. Do not spray water on the<br />
outer or inner surfaces of the fan <strong>coil</strong><br />
(this might cause short circuits).<br />
CLEAN THE FILTER PERIODICALLY<br />
Frequently cleaning the filter guarantees<br />
greater operating efficiency.<br />
Check whether the filter is very dirty: in<br />
this case, clean it more often.<br />
Clean frequently. Remove the accumulated<br />
dust with a vacuum cleaner.<br />
Once the filter is clean, refit it on the fan<br />
<strong>coil</strong> following the removal instructions<br />
but in reverse order.<br />
The normal wear and tear of germicidal<br />
lamps and filter is not covered by the<br />
warranty.<br />
EXTRAORDINARY CLEANING<br />
The possibility to remove the basin and<br />
the shrouds of the examinable fans (done<br />
only by suitably trained and qualified<br />
personnel) allows to thoroughly clean<br />
even the internal parts - an essential condition<br />
when the unit is installed in very<br />
crowded areas or places requiring high<br />
standards of hygiene.<br />
WHAT IS NORMAL<br />
In the cooling function, water vapour<br />
may be present in the air delivery of the<br />
fan <strong>coil</strong>.<br />
In the heating function, a slight hiss<br />
might be heard close to the fan <strong>coil</strong>.<br />
Sometimes the fan <strong>coil</strong> might give off<br />
unpleasant smells due to the accumulation<br />
of substances present in the air of<br />
the room (clean the filter more often,<br />
especially if the room is not ventilated<br />
regularly).<br />
While the unit is functioning, there<br />
could be noises and creaks inside<br />
the device due to the various thermal<br />
expansions of the elements (plastic and<br />
metal), but this does not indicate any<br />
malfunction and does not damage the<br />
unit unless the maximum input water<br />
temperature is exceeded.
DESCRIPTION OF THE UNIT<br />
The fan <strong>coil</strong> is a room air treatment terminal unit for mainly summer operation.<br />
Install the unit on the suspended ceiling.<br />
AVAILABLE VERSIONS AND SIZES<br />
<strong>VEC</strong> fan <strong>coil</strong>s are available in:<br />
4 sizes with a 3-row <strong>coil</strong> compulsory accessory<br />
<strong>VEC</strong> 20 <strong>VEC</strong> 20 GL<br />
<strong>VEC</strong> 30 <strong>VEC</strong> 30 GL<br />
<strong>VEC</strong> 40 <strong>VEC</strong> 40 GL<br />
<strong>VEC</strong> 50 <strong>VEC</strong> 40 GL<br />
OPERATING LIMITS<br />
Maximum water input temperature ........................... 50°C<br />
Maximum operating pressure ..................................... 8 bar<br />
Operating voltage ..............................230V(±10%) ~ 50Hz<br />
Room temperature .................................................. 0-40°C<br />
Air humidity .....................................................
English<br />
TECHNICAL DATA<br />
<strong>VEC</strong> with a 3-row <strong>coil</strong><br />
Mod.<br />
Heating<br />
W (max.)<br />
Heating capacity W (med.)<br />
W (min.)<br />
Electric heater heating capacity W<br />
Cooling<br />
W (max.)<br />
Total cooling capacity W (med.)<br />
W (min.)<br />
W (max.)<br />
Sensible cooling capacity W (med.)<br />
W (min.)<br />
Water flow rate l/h<br />
Water pressure drops kPa<br />
m3 /h (max.)<br />
Air flow rate m3 /h (med.)<br />
m3 /h (min.)<br />
Number of fans<br />
dB (A) (max.)<br />
� Sound power dB (A) (med.)<br />
dB (A) (min.)<br />
dB (A) (max.)<br />
Sound power dB (A) (med.)<br />
dB (A) (min.)<br />
Water content l<br />
Max. motor power W<br />
Max. input current A<br />
Max. motor power<br />
W<br />
with electric heater<br />
Input current<br />
A<br />
with electric heater<br />
3R <strong>coil</strong> connections ø<br />
1R <strong>coil</strong> connections ø<br />
Power supply<br />
Performance values refer to the following conditions:<br />
� Sound pressure measured in semi-reverberating chamber, 85m 3 ,<br />
and with reverberation time Tr = 0.5s.<br />
Cooling:<br />
- room air temperature 27°C D.B., 19°C W.B.;<br />
maximum speed:<br />
- water inlet temperature 7°C; Δt water 5°C.<br />
medium and minimum speed:<br />
- water inlet temperature 7°C;<br />
- water flow rate as at maximum speed.<br />
12<br />
I<strong>VEC</strong>LJ 1009 - 5074550_04<br />
<strong>VEC</strong> 20 <strong>VEC</strong> 30 <strong>VEC</strong> 40 <strong>VEC</strong> 50<br />
1835 2770 3745 4285<br />
1505 2340 3105 3785<br />
1105 1950 2505 2840<br />
950 1300 1650 1950<br />
1320 1950 2985 3610<br />
1085 1645 2470 3170<br />
805 1370 1985 2350<br />
1085 1535 2410 2595<br />
885 1285 1980 2275<br />
640 1055 1580 1680<br />
227 335 514 621<br />
4,6 13,3 11,3 14,8<br />
247 383 511 613<br />
194 309 406 529<br />
130 241 306 371<br />
1 2 2 2<br />
39,5 36,5 40,0 44,5<br />
33,5 31,5 34,5 41,5<br />
26,5 26,5 29,5 34,5<br />
48,0 45,0 48,5 53,0<br />
42,0 40,0 43,0 50,0<br />
35,0 35,0 38,0 43,0<br />
0,79 1,11 1,48 1,48<br />
25 44 57 67<br />
0,12 0,21 0,28 0,35<br />
975 1344 1707 2017<br />
4,25 5,86 7,45 8,83<br />
1/2" 1/2" 3/4" 3/4"<br />
1/2" 1/2" 1/2" 1/2"<br />
230V ~ 50Hz<br />
Heating:<br />
room air temperature 20°C D.B.;<br />
maximum speed:<br />
- water inlet temperature 50°C; Δt water 10°C.<br />
- water flow rate as for cooling operation.<br />
medium and minimum speed:<br />
- water inlet temperature 50°C;<br />
- water flow rate as at maximum speed.
INSTALLATION<br />
WARNING: before carrying out any<br />
intervention, check the power supply is<br />
disconnected.<br />
WARNING:before carrying out any<br />
work, put the proper individual<br />
protection equipment on.<br />
WARNING: the appliance must be fitted<br />
according to the national regulations on<br />
process plant engineering.<br />
WARNING: electrical wirings,<br />
installation of the fan <strong>coil</strong>s and relevant<br />
accessories should be performed by<br />
a technician who has the necessary<br />
technical and professional expertise<br />
to install, modify, extend and maintain<br />
systems, and who is able to check the<br />
INSTALLING THE UNIT<br />
- Choose the place where to install<br />
the unit according to the layout of<br />
the room, the number of units to be<br />
installed and any limitations imposed<br />
by the architecture. Check that the<br />
chosen place facilitates installing and<br />
servicing the unit.<br />
- Install four M8 threaded rods into the<br />
ceiling to hold the frame.<br />
<strong>VEC</strong> allows 2 installation options thanks<br />
to the grill prepared to be fixed in two<br />
positions:<br />
A) for suspended ceiling installation with<br />
reduced space that requires units with<br />
small dimensions.<br />
B) allows (increasing total height)<br />
to increase the difference in level<br />
between condensate drain and<br />
suspended ceiling by a further 30<br />
mm, to make the realisation of the<br />
condensate drain ducting even easier,<br />
in order to prevent, in most cases,<br />
the necessity for a condensate drain<br />
pump.<br />
To install the <strong>VEC</strong> unit, proceed as<br />
follows:<br />
- open the cardboard box<br />
- if necessary, mount any accessory<br />
before installing the unit on the ceiling<br />
WARNING: consult the relevant<br />
<strong>manual</strong>s of the accessories<br />
- lift the unit carefully and, keeping it<br />
ELECTRICAL WIRINGS<br />
The unit must be connected directly<br />
to an electrical outlet or to an<br />
independent circuit.<br />
To protect the unit against short circuits,<br />
fit an omnipolar thermal-magnetic<br />
trip 2A 250V (IG) to the power line<br />
with a minimum contact opening<br />
distance of 3mm.<br />
CHARACTERISTICS OF THE<br />
CONNECTION CABLES<br />
Use H05V-K or N07V-K type cables<br />
with 300/500V with insulation, piped<br />
or ducted.<br />
All the cables must be piped or ducted<br />
until they are inside the fan <strong>coil</strong>.<br />
The cables coming out of the pipe or<br />
duct must not be subject to stretching<br />
or twisting. They must be protected from<br />
systems for the purposes of safety and<br />
correct operation.<br />
WARNING: install a device, main<br />
switch or plug which allows to<br />
completely cut off the power supply<br />
from the unit.<br />
Instructions which are essential for the<br />
proper installation of the equipment are<br />
given here.<br />
The completion of all the operations<br />
in accordance with the specific<br />
requirements is however left to the<br />
experience of the installation engineer.<br />
Do not install units in rooms where<br />
there are inflammable gases or acid<br />
or alkaline substances that could<br />
slightly inclined, attach it to the 4<br />
threaded bars using 8 nuts, 4 of which<br />
are self-locking. Operate the nuts<br />
to adjust height; finally, check that<br />
the unit is installed in a horizontal<br />
position<br />
- lay the hydraulic pipes through the<br />
suspended ceiling to the attachment<br />
plate on the unit<br />
- make the hydraulic connections as<br />
described in the relative chapter<br />
- bring the condensate discharge pipe<br />
so that it matches the relative fitting on<br />
the condensate discharge device<br />
external agents.<br />
Stranded wires can only be used with<br />
terminating sleeves. Make sure that the<br />
strands of the wires are inserted properly.<br />
Wiring diagrams are constantly updated.<br />
It is therefore compulsory to refer<br />
to the ones supplied with the unit.<br />
The control panel may not be fitted on<br />
a metal wall unless this is permanently<br />
connected to an earthed outlet.<br />
The control panels consist simply of<br />
electric circuits connected at the mains<br />
voltage of 230V; all the inputs for the<br />
probes and controls must therefore be<br />
correspondingly insulated for this voltage.<br />
Multifunctional electronic thermostats<br />
irretrievably damage the aluminiumcopper<br />
heat exchanger or the internal<br />
plastic parts.<br />
Do not install the unit in workshops or<br />
kitchens where the oil vapours mixed<br />
with the treated air can be deposited<br />
on the exchange <strong>coil</strong>s, reducing their<br />
performance, or on the parts inside the<br />
unit, damaging the plastic parts.<br />
Choose a position at the centre of the<br />
room whenever possible; adjusting the<br />
air output allows air to be distributed<br />
optimally within the room. Do not<br />
install at a height above three metres.<br />
- drain the system via the drain valve<br />
- bring the power supply and the<br />
control cables close to the electrical<br />
box<br />
- adjust the position of the unit from the<br />
support bracket by means of the nuts<br />
so that the unit is level and the frame<br />
rests slightly on the suspended ceiling<br />
- start the fan <strong>coil</strong> unit and carry out<br />
an operation test; the functions are<br />
described in the User Manual<br />
are provided ready for operation in the<br />
standard configuration but allow the<br />
installer to adjust them to the specific<br />
necessities of the system by modifying<br />
the internal dip-switch configuration.<br />
The functions that can be customised might<br />
vary from model to model, for this reason it<br />
is advisable to consult the relevant <strong>manual</strong>s.<br />
WARNING:check whether the installation<br />
has been carried out correctly.<br />
FOLLOW THE CHECKING PROCE-<br />
DURES indicated in the control panel<br />
<strong>manual</strong>s.<br />
I<strong>VEC</strong>LJ 1009 - 5074550_04<br />
Do not install at a height<br />
above three metres.<br />
13<br />
English
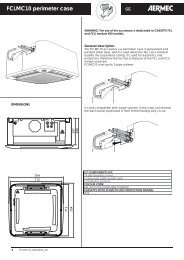
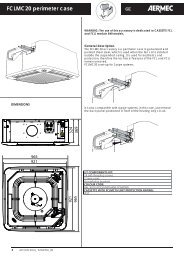
ACCESSORI OBBLIGATORI<br />
MANDATORY ACCESSORY<br />
ACCESSOIRE OBLIGATOIRE<br />
OBLIGATORISCHEN ZUBEHÖRS<br />
ACCESORIO OBLIGATORIO<br />
Ø262<br />
26<br />
595<br />
15<br />
15<br />
595<br />
895<br />
<strong>VEC</strong>20GL <strong>VEC</strong>30GL<br />
<strong>VEC</strong>40GL<br />
<strong>VEC</strong>_GL consente 2<br />
posizioni di installazione:<br />
A) per installazione<br />
in controsoffitto con<br />
spazio ridotto, che<br />
richiede l'unità di<br />
dimensioni compatte.<br />
B) consente (aumentando<br />
l’altezza complessiva)<br />
di incrementare<br />
il dislivello<br />
tra scarico condensa<br />
e controsoffitto<br />
di ulteriori 30 mm,<br />
per agevolare ancor<br />
più la realizzazione<br />
della canalizzazione<br />
di scarico condensa,<br />
in modo da evitare<br />
nella maggior parte<br />
dei casi la necessità<br />
della pompa di scarico<br />
condensa.<br />
In questo caso è<br />
obbligatorio applicare<br />
al divisorio ferma<br />
filtro la guarnizione<br />
isolante (fornita a<br />
corredo) per evitare<br />
by-pass fra aspirazione<br />
e mandata. Inoltre<br />
dopo aver fissato con<br />
le 4 viti la cornice<br />
al ventilconvettore,<br />
applicare l'isolante<br />
adesivo (fornito a<br />
corredo) per l'intero<br />
perimetro scoperto<br />
della cornice.<br />
ATTENZIONE: La<br />
mancata o non corretta<br />
installazione<br />
degli isolanti provoca<br />
la riduzione delle<br />
prestazioni e la formazione<br />
di condensa<br />
sulle superfici.<br />
<strong>VEC</strong>_GL allows 2<br />
installation positions:<br />
A) for suspended<br />
ceiling installation<br />
with reduced<br />
space that requires<br />
units with small<br />
dimensions.<br />
B) allows (increasing<br />
total height) to<br />
increase the<br />
difference in level<br />
between condensate<br />
drain and suspended<br />
ceiling by a further<br />
30 mm, to make the<br />
realisation of the<br />
condensate drain<br />
ducting even easier,<br />
in order to prevent,<br />
in most cases, the<br />
necessity for a<br />
condensate drain<br />
pump. In this case it<br />
is mandatory to apply<br />
the insulating gasket<br />
to the filter retainer<br />
divider (supplied)<br />
to prevent by-pass<br />
between intake and<br />
flow. Moreover, after<br />
having fixed the<br />
frame to the fan <strong>coil</strong><br />
using the 4 screws,<br />
apply the insulating<br />
tape (supplied) to<br />
the entire exposed<br />
perimeter of the<br />
frame.<br />
WARNING: No or<br />
incorrect installation<br />
of the insulating<br />
products caused<br />
the reduction in<br />
performance and<br />
the formation of<br />
condensate on the<br />
surfaces.<br />
595<br />
<strong>VEC</strong>_GL permet 2<br />
positions d'installation:<br />
A) pour installation en<br />
faux-plafond avec<br />
espace réduit qui<br />
demande une unité<br />
aux dimensions réduites.<br />
B) permet (en augmentant<br />
la hauteur totale)<br />
d'augmenter la dénivellation<br />
entre évacuation<br />
condensation<br />
et faux-plafond de<br />
30mm supplémentaires,<br />
pour faciliter<br />
encore plus la réalisation<br />
de la canalisation<br />
d'évacuation<br />
condensation, de<br />
façon à éviter, dans<br />
la plupart des cas,<br />
d'avoir besoin de la<br />
pompe d'évacuation<br />
condensation.<br />
Dans ce cas, il est<br />
obligatoire d'appliquer<br />
à la division<br />
de blocage du filtre<br />
le joint isolant<br />
(fourni) pour éviter<br />
le by-pass entre aspiration<br />
et soufflage<br />
En plus après avoir<br />
fixé le cadre au<br />
ventilo-convecteur<br />
avec les 4 vis, appliquer<br />
l'isolant adhésif<br />
(fourni) sur tout le<br />
périmètre découvert<br />
du cadre.<br />
ATTENTION:<br />
L'absence d'installation<br />
ou l'installation<br />
incorrecte des<br />
isolants provoque la<br />
diminution des prestations<br />
et la formation<br />
de condensation<br />
sur les superficies.<br />
1195<br />
Mit <strong>VEC</strong>_GL sind 2<br />
<strong>Installation</strong>spositionen<br />
möglich:<br />
A) Für <strong>Installation</strong>en<br />
in Zwischendecken<br />
mit wenig Platz, wo<br />
Einheiten mit kompakten<br />
Abmessungen<br />
erforderlich sind.<br />
B) Sie erlaubt, (bei<br />
Erhöhung der Gesamthöhe)<br />
den Höhenunterschied<br />
zwischen<br />
Kondensatablauf und<br />
Zwischendecke um<br />
weitere 30mm zu<br />
vergrößern, um die<br />
Erstellung des Kondensatabflusskanals<br />
weiter zu vereinfachen,<br />
so dass in den<br />
meisten Fällen eine<br />
Pumpe zur Kondensatableitung<br />
nicht<br />
erforderlich ist. In<br />
diesem Fall muss an<br />
der Filterhalter-Trennwand<br />
die (mitgelieferte)<br />
Dichtung eingesetzt<br />
werden, um<br />
Nebenströmungen<br />
zwischen Ansaugung<br />
und Luftaustritt zu<br />
vermeiden. Außerdem<br />
ist, nachdem der<br />
Rahmen mit den 4<br />
Schrauben am Gebläsekonvektor<br />
befestigt<br />
wurde, die (mitgelieferte)<br />
selbstklebende<br />
Isolierung auf dem<br />
gesamten freiliegenden<br />
Umfang des Rahmens<br />
anzubringen.<br />
ACHTUNG: Werden<br />
die Isolierungen nicht<br />
oder nicht richtig<br />
montiert, reduzieren<br />
sich die Leistungen<br />
und es bildet sich<br />
Kondenswasser auf<br />
den Oberfl ächen.<br />
<strong>VEC</strong>20GL<br />
595<br />
<strong>VEC</strong>_GL permite 2<br />
posiciones de instalación:<br />
A) para instalación en<br />
falso techo con espacio<br />
reducido que<br />
requiere unidades de<br />
dimensiones compactas.<br />
B) permite (aumentando<br />
la altura total)<br />
incrementar el desnivel<br />
entre descarga<br />
de condensación y<br />
falso techo de otros<br />
30 mm, para facilitar<br />
aún más la realización<br />
de la canalización<br />
de descarga<br />
de la condensación,<br />
evitando así en la<br />
mayor parte de los<br />
casos la necesidad<br />
de la bomba de<br />
descarga de la condensación.<br />
En este<br />
caso es obligatorio<br />
aplicarle la junta<br />
aislante (proporcionada)<br />
al dispositivo<br />
divisor de sostén<br />
del filtro para evitar<br />
el desvío entre aspiración<br />
e impulsión.<br />
Además, después de<br />
fijar con los 4 tornillos<br />
el marco al ventilconvector,<br />
aplique<br />
el aislante adhesivo<br />
(proporcionado)<br />
sobre todo el perímetro<br />
descubierto del<br />
marco.<br />
ATENCIÓN: La falta<br />
de instalación o la<br />
instalación incorrecta<br />
de los aislantes provoca<br />
la reducción<br />
de las prestaciones<br />
y la formación de<br />
condensación en las<br />
superficies.
Installazione "A"<br />
<strong>Installation</strong> "A"<br />
Instalación "A"<br />
Installazione "B"<br />
<strong>Installation</strong> "B"<br />
Instalación "B"<br />
27
28<br />
H2O<br />
H2O<br />
AIR<br />
INSTALLAZIONE E SOSTITUZIONE DEL FILTRO ARIA<br />
INSTALLATION AND REPLACEMENT OF THE AIR FILTER<br />
INSTALLATION ET REMPLACEMENT DU FILTRE A AIR<br />
INSTALLATION UND AUSTAUCH DES LUFTFILTERS<br />
INSTALACIÓN Y SUSTITUCIÓN DEL FILTRO DE AIRE<br />
H2O
DIMENSIONI [mm]<br />
DIMENSIONS [mm]<br />
DONNÉES DES LES DIMENSIONS [mm]<br />
ABMESSUNGEN DATOS [mm]<br />
DIMENSIONALES [mm]<br />
284(A) / 314(B)<br />
<strong>VEC</strong> 20 30 40 50<br />
L [mm] 540 771 991 991<br />
I [mm] 440 671 891 891<br />
Peso Weight Poids Gewicht Peso (<strong>VEC</strong>) [kg] 15,5 20,6 24,7 24,7<br />
Peso Weight Poids Gewicht Peso (<strong>VEC</strong> GL) [kg] 3,7 5,7 7 7<br />
I<br />
L<br />
216(A) / 246(B)<br />
63<br />
5<br />
388 43<br />
Max. 3000mm<br />
279(A) / 309(B)<br />
8<br />
129<br />
29
SCHEMI ELETTRICI WIRING DIAGRAMS SCHEMAS ELECTRIQUES SCHALTPLÄNE ESQUEMAS ELÉCTRICOS<br />
LEGENDA READING KEY LEGENDE LEGENDE LEYENDA<br />
F = Fusibile Fuse Fusible<br />
Sicherung Fusible<br />
IG = Interruttore generale Main switch<br />
Interupteur général Hauptschalter<br />
Interruptor general<br />
M = Morsettiera Terminal board<br />
Boitier Klemmleiste<br />
Placa de bornes<br />
MV = Motore ventilatore <strong>Fan</strong> motor<br />
Moteur ventilateur Ventilatormotor<br />
Motor del ventilador<br />
PE = Collegamento a terra<br />
Earth connection<br />
Mise à terre<br />
Erdanschluss<br />
Toma de tierra<br />
Sonda temperatura mínima del agua<br />
VCF =Valvola solenoide Solenoid valve<br />
Vanne solenoide Magnetventil<br />
Válvula solenoide<br />
30<br />
SPC = Dispositivo scarico condensa<br />
Condensate drainage device<br />
Dispositif pour évacuation condensation<br />
Kondensatablauf Einrichtung<br />
Dispositivo para desagüe de condensación<br />
= Componenti non forniti<br />
Components not supplied<br />
Composants non fournis<br />
Nicht lieferbare Teile<br />
Componentes no suministrados<br />
= Componenti forniti optional<br />
Optional components<br />
Composants en option<br />
Optionsteile<br />
Componentes opcionales<br />
= Collegamenti da eseguire in loco<br />
On-site wiring<br />
Raccordements à effectuer in situ<br />
Vor Ort auszuführende Anschlüsse<br />
Cableado in situ<br />
AR = Arancio Orange Orange Orange Naranja<br />
BI = Bianco White Blanc Weiss Blanco<br />
BL = Blu Blue Bleu Blau Azul<br />
GR = Grigio Grey Gris Gray Gris<br />
MA = Marrone Brown Marron Braun Marrón<br />
NE = Nero Black Noir Schwarz Negro<br />
RO = Rosso Red Rouge Rot Rojo<br />
VE = Verde Green Vert Grün Verde<br />
VI = Viola Violet Violet Violet Violeta<br />
Gli schemi elettrici sono soggetti ad un continuo aggiornamento, è obbligatorio quindi fare riferimento a quelli a bordo macchina.<br />
All wiring diagrams are constantly updated. Please refer to the ones supplied with the unit.<br />
Nos schémas électriques étant constamment mis à jour, il faut absolument se référer à ceux fournis à bord de nos appareils.<br />
Die Schaltpläne werden ständig aktualisiert, deswegen muss man sich stets auf das mit dem Gerät gelieferte Schaltschema beziehen.<br />
El cableado de las máquinas es sometido a actualizaciones constantes. Por favor, para cada unidad hagan referencia a los esquemas suministrados con la misma.
SCHEMI ELETTRICI WIRING DIAGRAMS SCHEMAS ELECTRIQUES SCHALTPLÄNE ESQUEMAS ELÉCTRICOS<br />
<strong>VEC</strong><br />
DSC<br />
BL<br />
Gli schemi elettrici sono soggetti ad un continuo aggiornamento, è obbligatorio quindi fare riferimento a quelli a bordo macchina.<br />
All wiring diagrams are constantly updated. Please refer to the ones supplied with the unit.<br />
Nos schémas électriques étant constamment mis à jour, il faut absolument se référer à ceux fournis à bord de nos appareils.<br />
Die Schaltpläne werden ständig aktualisiert, deswegen muss man sich stets auf das mit dem Gerät gelieferte Schaltschema beziehen.<br />
El cableado de las máquinas es sometido a actualizaciones constantes. Por favor, para cada unidad hagan referencia a los esquemas suministrados con la misma.<br />
31
SCHEMI ELETTRICI WIRING DIAGRAMS SCHEMAS ELECTRIQUES SCHALTPLÄNE ESQUEMAS ELÉCTRICOS<br />
<strong>VEC</strong><br />
PXAE + VC + VF<br />
4 tubi pannello PXAE a muro<br />
4 tubes PXAE wall-mounted panel<br />
4 tuyaux panneau PXAE inst. murale<br />
4 Röhren Platte PXAE an Wand<br />
4 tubos panel PXAE mural<br />
<strong>VEC</strong><br />
PXAE + VCF<br />
2 tubi pannello PXAE a muro<br />
2 tubes PXAE wall-mounted panel<br />
2 tuyaux panneau PXAE inst. murale<br />
2 Röhren Platte PXAE an Wand<br />
2 tubos panel PXAE mural<br />
Gli schemi elettrici sono soggetti ad un continuo aggiornamento, è obbligatorio quindi fare riferimento a quelli a bordo macchina.<br />
All wiring diagrams are constantly updated. Please refer to the ones supplied with the unit.<br />
Nos schémas électriques étant constamment mis à jour, il faut absolument se référer à ceux fournis à bord de nos appareils.<br />
Die Schaltpläne werden ständig aktualisiert, deswegen muss man sich stets auf das mit dem Gerät gelieferte Schaltschema beziehen.<br />
El cableado de las máquinas es sometido a actualizaciones constantes. Por favor, para cada unidad hagan referencia a los esquemas suministrados con la misma.<br />
32
SCHEMI ELETTRICI WIRING DIAGRAMS SCHEMAS ELECTRIQUES SCHALTPLÄNE ESQUEMAS ELÉCTRICOS<br />
<strong>VEC</strong><br />
PXAR + VF + RX<br />
2 tubi pannello PXAR a muro<br />
2 tubes PXAR wall-mounted panel<br />
2 tuyaux panneau PXAR inst. murale<br />
2 Röhren Platte PXAR an Wand<br />
2 tubos panel PXAR mural<br />
Gli schemi elettrici sono soggetti ad un continuo aggiornamento, è obbligatorio quindi fare riferimento a quelli a bordo macchina.<br />
All wiring diagrams are constantly updated. Please refer to the ones supplied with the unit.<br />
Nos schémas électriques étant constamment mis à jour, il faut absolument se référer à ceux fournis à bord de nos appareils.<br />
Die Schaltpläne werden ständig aktualisiert, deswegen muss man sich stets auf das mit dem Gerät gelieferte Schaltschema beziehen.<br />
El cableado de las máquinas es sometido a actualizaciones constantes. Por favor, para cada unidad hagan referencia a los esquemas suministrados con la misma.<br />
33
SCHEMI ELETTRICI WIRING DIAGRAMS SCHEMAS ELECTRIQUES SCHALTPLÄNE ESQUEMAS ELÉCTRICOS<br />
<strong>VEC</strong><br />
KTLP + VCF<br />
2 tubi<br />
2 tube<br />
2 tuyaux<br />
2 Röhren<br />
2 tubos<br />
<strong>VEC</strong><br />
WMT05<br />
2 tubi<br />
2 tube<br />
2 tuyaux<br />
2 Röhren<br />
2 tubos<br />
Gli schemi elettrici sono soggetti ad un continuo aggiornamento, è obbligatorio quindi fare riferimento a quelli a bordo macchina.<br />
All wiring diagrams are constantly updated. Please refer to the ones supplied with the unit.<br />
Nos schémas électriques étant constamment mis à jour, il faut absolument se référer à ceux fournis à bord de nos appareils.<br />
Die Schaltpläne werden ständig aktualisiert, deswegen muss man sich stets auf das mit dem Gerät gelieferte Schaltschema beziehen.<br />
El cableado de las máquinas es sometido a actualizaciones constantes. Por favor, para cada unidad hagan referencia a los esquemas suministrados con la misma.<br />
34<br />
<strong>VEC</strong><br />
KTLP + VC + VF<br />
4 tubi<br />
4 tube<br />
4 tuyaux<br />
4 Röhren<br />
4 tubos
SCHEMI ELETTRICI WIRING DIAGRAMS SCHEMAS ELECTRIQUES SCHALTPLÄNE ESQUEMAS ELÉCTRICOS<br />
<strong>VEC</strong><br />
WMT10 + VCF<br />
2 tubi<br />
2 tube<br />
2 tuyaux<br />
2 Röhren<br />
2 tubos<br />
<strong>VEC</strong><br />
WMT10 + VF + VC<br />
4 tubi<br />
4 tube<br />
4 tuyaux<br />
4 Röhren<br />
4 tubos<br />
<strong>VEC</strong><br />
WMT10 + VF + RX<br />
2 tubi<br />
2 tube<br />
2 tuyaux<br />
2 Röhren<br />
2 tubos<br />
Gli schemi elettrici sono soggetti ad un continuo aggiornamento, è obbligatorio quindi fare riferimento a quelli a bordo macchina.<br />
All wiring diagrams are constantly updated. Please refer to the ones supplied with the unit.<br />
Nos schémas électriques étant constamment mis à jour, il faut absolument se référer à ceux fournis à bord de nos appareils.<br />
Die Schaltpläne werden ständig aktualisiert, deswegen muss man sich stets auf das mit dem Gerät gelieferte Schaltschema beziehen.<br />
El cableado de las máquinas es sometido a actualizaciones constantes. Por favor, para cada unidad hagan referencia a los esquemas suministrados con la misma.<br />
35
SCHEMI ELETTRICI WIRING DIAGRAMS SCHEMAS ELECTRIQUES SCHALTPLÄNE ESQUEMAS ELÉCTRICOS<br />
Gli schemi elettrici sono soggetti ad un continuo aggiornamento, è obbligatorio quindi fare riferimento a quelli a bordo macchina.<br />
All wiring diagrams are constantly updated. Please refer to the ones supplied with the unit.<br />
Nos schémas électriques étant constamment mis à jour, il faut absolument se référer à ceux fournis à bord de nos appareils.<br />
Die Schaltpläne werden ständig aktualisiert, deswegen muss man sich stets auf das mit dem Gerät gelieferte Schaltschema beziehen.<br />
El cableado de las máquinas es sometido a actualizaciones constantes. Por favor, para cada unidad hagan referencia a los esquemas suministrados con la misma.<br />
36<br />
<strong>VEC</strong><br />
FMT10 + VCF<br />
2 tubi<br />
2 tube<br />
2 tuyaux<br />
2 Röhren<br />
2 tubos<br />
<strong>VEC</strong><br />
FMT10 + VF + VC<br />
4 tubi<br />
4 tube<br />
4 tuyaux<br />
4 Röhren<br />
4 tubos<br />
<strong>VEC</strong><br />
FMT10 + VF + RX<br />
2 tubi<br />
2 tube<br />
2 tuyaux<br />
2 Röhren<br />
2 tubos
SCHEMI ELETTRICI WIRING DIAGRAMS SCHEMAS ELECTRIQUES SCHALTPLÄNE ESQUEMAS ELÉCTRICOS<br />
<strong>VEC</strong><br />
FMT20 + VCF<br />
2 tubi<br />
2 tube<br />
2 tuyaux<br />
2 Röhren<br />
2 tubos<br />
<strong>VEC</strong><br />
FMT20 + VF + VC<br />
4 tubi<br />
4 tube<br />
4 tuyaux<br />
4 Röhren<br />
4 tubos<br />
<strong>VEC</strong><br />
FMT20 + VF + RX<br />
2 tubi<br />
2 tube<br />
2 tuyaux<br />
2 Röhren<br />
2 tubos<br />
Gli schemi elettrici sono soggetti ad un continuo aggiornamento, è obbligatorio quindi fare riferimento a quelli a bordo macchina.<br />
All wiring diagrams are constantly updated. Please refer to the ones supplied with the unit.<br />
Nos schémas électriques étant constamment mis à jour, il faut absolument se référer à ceux fournis à bord de nos appareils.<br />
Die Schaltpläne werden ständig aktualisiert, deswegen muss man sich stets auf das mit dem Gerät gelieferte Schaltschema beziehen.<br />
El cableado de las máquinas es sometido a actualizaciones constantes. Por favor, para cada unidad hagan referencia a los esquemas suministrados con la misma.<br />
37
SCHEMI ELETTRICI WIRING DIAGRAMS SCHEMAS ELECTRIQUES SCHALTPLÄNE ESQUEMAS ELÉCTRICOS<br />
38<br />
PXAE<br />
F 1A<br />
M1<br />
N<br />
L<br />
V3 V2 V1 N N PH L<br />
INPUT<br />
SIT5<br />
OUTPUT<br />
V1 V2 V3<br />
Y1<br />
Y2<br />
+<br />
-<br />
V1<br />
Y1<br />
V3<br />
V2<br />
Y2<br />
CE<br />
CE<br />
MS<br />
MS<br />
F<br />
2A<br />
Y1<br />
Y2<br />
V1 V2<br />
OUTPUT<br />
V3<br />
SIT3/1<br />
V3 V2 V1 N L<br />
NINPUT<br />
PH<br />
F<br />
2A<br />
V1 V2<br />
OUTPUT<br />
V3<br />
SIT3/2<br />
V3 V2 V1 N L<br />
NINPUT<br />
PH<br />
F<br />
2A<br />
V1 V2<br />
OUTPUT<br />
V3<br />
SIT3/10<br />
L = 15m MAX<br />
V3 V2 V1 N L<br />
NINPUT<br />
PH<br />
MS<br />
MS<br />
MS<br />
SW<br />
SW<br />
EXT<br />
M 1 2 3 4 5<br />
M 1 2 3 4 5 6 7 8 9 10<br />
M 1 2 3 4 5 6 7 8 9 10<br />
SA (INT)<br />
6<br />
JP1<br />
7 8 9 10<br />
B L NE MA RO<br />
1 2 3 4<br />
1 2 3 4<br />
6<br />
6<br />
B L NE MA RO<br />
1 2 3 4<br />
1 2 3 4<br />
5<br />
5<br />
6<br />
6<br />
B L NE MA RO<br />
1 2 3 4<br />
1 2 3 4<br />
INT<br />
6<br />
6<br />
5<br />
5<br />
5<br />
5<br />
MIN<br />
MED<br />
MAX<br />
MIN<br />
MED<br />
MAX<br />
MIN<br />
MED<br />
MAX<br />
VCH<br />
VCH<br />
VCH<br />
FCX/1<br />
B L NE MA RO<br />
M<br />
1<br />
MV<br />
FCX/2<br />
B L NE MA RO<br />
M<br />
1<br />
MV<br />
FCX/N<br />
B L NE MA RO<br />
M<br />
1<br />
MV<br />
<strong>VEC</strong><br />
PXAE<br />
SIT3 + SIT5<br />
Gli schemi elettrici sono soggetti ad un continuo aggiornamento, è obbligatorio quindi fare riferimento a quelli a bordo macchina.<br />
All wiring diagrams are constantly updated. Please refer to the ones supplied with the unit.<br />
Nos schémas électriques étant constamment mis à jour, il faut absolument se référer à ceux fournis à bord de nos appareils.<br />
Die Schaltpläne werden ständig aktualisiert, deswegen muss man sich stets auf das mit dem Gerät gelieferte Schaltschema beziehen.<br />
El cableado de las máquinas es sometido a actualizaciones constantes. Por favor, para cada unidad hagan referencia a los esquemas suministrados con la misma.<br />
PE<br />
IG<br />
4A<br />
L N<br />
230V ~ 50Hz
SOLUZIONE DEI PROBLEMI SOLUTION DES PROBLEMES<br />
PROBLEMA PROBLEM<br />
PROBLEME PROBLEM<br />
PROBLEMA<br />
Poca aria in uscita.<br />
Feeble air discharge.<br />
Il y a peu d’air en sortie.<br />
Schwacher Luftstrom am<br />
Austritt.<br />
Poco aire en salida.<br />
Non fa caldo.<br />
It does not heat.<br />
Pas de chaleur.<br />
Keine Heizung.<br />
No hace calor.<br />
Non fa freddo.<br />
It does not cool.<br />
Pas de froid.<br />
Keine Kühlung.<br />
No hace frío.<br />
Il ventilatore non gira.<br />
The fan does not turn.<br />
Le ventilateur ne tourne pas.<br />
Ventilator Arbeitet nicht.<br />
El ventilador no gira.<br />
Fenomeni di condensazione<br />
sulla struttura esterna dell’apparecchio.<br />
Condensation on the unit<br />
cabinet.<br />
Phénomènes de condensation<br />
sur la structure exterieure<br />
de l’appareil.<br />
Kondenswasserbildung am<br />
Gerät.<br />
Fenómenos de condensación<br />
en la estructura externa del<br />
aparato.<br />
PROBABILE CAUSA PROBABLE CAUSE<br />
CAUSE PROBABLE MÖGLICHE URSACHE<br />
CAUSA PROBABLE<br />
Errata impostazione della velocità sul pannello comandi.<br />
Wrong speed setting on the control panel.<br />
Mauvaise préselection de la vitesse sur le panneau de commandes.<br />
Falsche Geschwindigkeitseinstel lung am Bedien paneel.<br />
Programación errada de la velocidad en el tablero de mandos.<br />
Filtro intasato.<br />
Blocked filter.<br />
Filtre encrassé.<br />
Filter verstopft.<br />
Filtro atascado.<br />
Ostruzione del flusso d’aria (entrata e/o uscita).<br />
Obstruction of the air flow (inlet and/or outlet).<br />
Obstruction du flux d’air (entrée/sortie).<br />
Luftstrom behindert (Eintritt bzw. Austritt).<br />
Obstrucción del chorro del aire (entrada y/o salida).<br />
Mancanza di acqua calda.<br />
Poor hot water supply.<br />
Il n’y a pas d’eau chaude.<br />
Kein Warmwasser.<br />
Falta de agua caliente.<br />
Impostazione errata del pannello comandi.<br />
Wrong setting on control panel.<br />
Mauvaise présélection sur le panneau de commandes.<br />
Falsche Einstellung am Bedien paneel.<br />
Programación errada del tablero de mandos.<br />
Mancanza di acqua fredda.<br />
Poor chilled water supply.<br />
Il n’y a pas d’eau froide.<br />
Kein Kaltwasser.<br />
Falta de agua fría.<br />
Impostazione errata del pannello comandi.<br />
Wrong setting on control panel.<br />
Mauvaise présélection sur le panneau de commandes.<br />
Falsche Einstellung am Bedien paneel.<br />
Programación errada del tablero de mandos.<br />
Mancanza di corrente.<br />
No current.<br />
l n’y a pas de courant.<br />
Kein Strom.<br />
Falta de corriente.<br />
L’acqua non ha raggiunto la temperatura d’esercizio.<br />
The water has not reached operating temperature.<br />
L'eau n'a pas atteint la température de service.<br />
Das Wasser hat die Betriebstemperatur nicht erreicht.<br />
El agua no ha alcanzado la temperatura de ejercicio.<br />
Sono state raggiunte le condizioni limite di temperatura<br />
e umidità descritte in “MINIMA TEMPERATURA MEDIA<br />
DELL’ACQUA”.<br />
The limit conditions of temperature and humidity indicated in<br />
“MINIMUM AVERAGE WATER TEMPERATURE” have been<br />
reached.<br />
On a atteint les conditions limite de température et d’humidité<br />
indiquées dans “TEMPERATURE MINIMALE MOYENNE<br />
DE L'EAU”.<br />
Erreichen der maximalen Temperatur- und Feuchtigkeitswerte<br />
(siehe Abschnitt “DURCHSCHNITTLICHE MINDEST -<br />
WASSERTEMPERATUR”).<br />
Se han alcanzado las condiciones límites de temperatura<br />
y humedad descritas en “MÍNIMA TEMPERATURA MEDIA<br />
DEL AGUA".<br />
SOLUZIONE REMEDY<br />
SOLUTION ABHILFE<br />
SOLUCIÓN<br />
Scegliere la velocità corretta sul pannello comandi.<br />
Select the speed on the control panel.<br />
Choisir la vitesse sur la panneau de commandes.<br />
Die Geschwindigkeit am Bedien paneel wählen.<br />
Elegir la velocidad correcta en el tablero de mandos.<br />
Pulire il filtro.<br />
Clean the filter.<br />
Nettoyer le filtre.<br />
Filter reinigen.<br />
Limpiar el filtro.<br />
Rimuovere l’ostruzione.<br />
Remove the obstruction.<br />
Enlever l’objet faisant obstruction.<br />
Verstopfung beseitigen.<br />
Quitar la obstrucción.<br />
Controllare la caldaia.<br />
Control the boiler.<br />
Verifier la chaudière.<br />
Kaltwasserseitigen Wärmeaus tau scher kontrollieren.<br />
Comprobar el calentador.<br />
Impostare il pannello comandi.<br />
See control panel settings.<br />
Présélectionner au panneau de commandes.<br />
Richtige Einstellung am Bedien paneel vornehmen.<br />
Programar el tablero de mandos.<br />
Controllare il refrigeratore.<br />
Control the chiller.<br />
Vérifier le réfrigerateur.<br />
Kaltwasserseitigen Wärmeaus tau scher kontrollieren.<br />
Comprobar el refrigerador.<br />
Impostare il pannello comandi.<br />
See control panel settings.<br />
Présélectionner au panneau de commandes.<br />
Richtige Einstellung am Bedien paneel vornehmen.<br />
Programar el tablero de mandos.<br />
Controllare la presenza di tensione elettrica.<br />
Control the power supply.<br />
Contrôler l’alimentation électrique.<br />
Kontrollieren, ob Spannung anliegt.<br />
Comprobar la presencia de tensión eléctrica.<br />
Controllare la caldaia o il refrigeratore.<br />
Controllare il settaggio del termostato.<br />
Please check up the boiler or the chiller.<br />
Check up the thermostat settings.<br />
Contrôler la chaudière ou le refroidisseur.<br />
Contrôler le réglage du thermostat.<br />
Das Heiz- oder Kühlaggregat überprüfen.<br />
Die Einstellungen des Temperaturreglers überprüfen.<br />
Comprobar el calentador o el refrigerador.<br />
Comprobar la programación del termostato.<br />
Innalzare la temperatura dell’acqua oltre i limiti<br />
minimi descritti in “MINIMA TEMPERATURA<br />
MEDIA DELL’ACQUA”.<br />
Increase the water temperature beyond the minimum<br />
limits indicated in “MINIMUM AVERAGE<br />
WATER TEMPERATURE”.<br />
Elever la température de l’eau audelà des limites<br />
minimales indiquées dans “TEMPERATURE MINI-<br />
MALE MOYENNE DE L'EAU”.<br />
Wassertemperatur über die um Abschnitt “DURCH-<br />
SCHNITTLICHE MINDEST - WASSERTEMPERATUR”<br />
angegebenen min. Werte erhöhen.<br />
Aumentar la temperatura del agua por encima de<br />
los límites descritos en “Mínima temperatura media<br />
del agua”.<br />
Per anomalie non contemplate, interpellare tempestivamente il Servizio Assistenza.<br />
For anomalies don’t hesitate, contact the aftersales service immediately.<br />
Pour toute anomalie non répertoriée, consulter le service après-vente.<br />
Sich bei hier nicht aufgeführten Störungen umgehend an den Kundendienst wenden.<br />
En el caso de anomalías no contempladas, ponerse en contacto de inmediato con el Servicio de Asistencia.<br />
39
I dati tecnici riportati nella presente documentazione non sono impegnativi.<br />
AERMEC S.p.A. si riserva la facoltà di apportare in qualsiasi momento tutte le modifiche ritenute necessarie per il miglioramento del prodotto.<br />
Les données mentionnées dans ce manuel ne constituent aucun engagement de notre part. <strong>Aermec</strong> S.p.A. se réserve le droit de modifier à tous moments les<br />
données considérées nécessaires à l’amelioration du produit.<br />
Technical data shown in this booklet are not binding.<br />
<strong>Aermec</strong> S.p.A. shall have the right to introduce at any time whatever modifications deemed necessary to the improvement of the product.<br />
Im Sinne des technischen Fortsschrittes behält sich <strong>Aermec</strong> S.p.A. vor, in der Produktion Änderungen und Verbesserungen ohne Ankündigung durchzuführen.<br />
ILos datos técnicos indicados en la presente documentación no son vinculantes.<br />
<strong>Aermec</strong> S.p.A. se reserva el derecho de realizar en cualquier momento las modificaciones que estime necesarias para mejorar el producto.<br />
AERMEC S.p.A.<br />
I-37040 Bevilacqua (VR) - Italia<br />
Via Roma, 996 - Tel. (+39) 0442 633111<br />
Telefax (+39) 0442 93730 - (+39) 0442 93566<br />
www .aermec. com