86738 EN ALDI AUS Content RC2.indd - Medion
86738 EN ALDI AUS Content RC2.indd - Medion
86738 EN ALDI AUS Content RC2.indd - Medion

You also want an ePaper? Increase the reach of your titles
YUMPU automatically turns print PDFs into web optimized ePapers that Google loves.
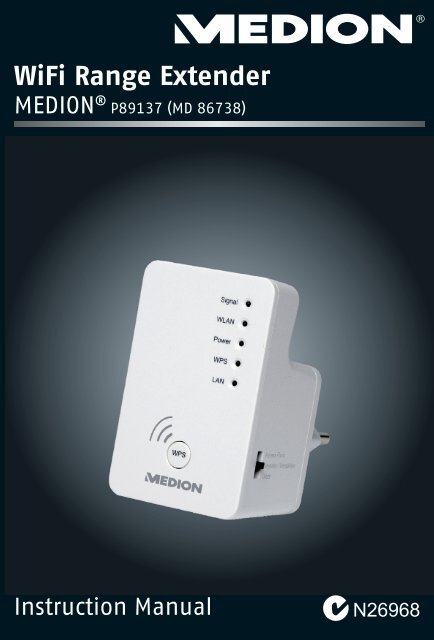
WiFi Range Extender<br />
MEDION ® P89137 (MD <strong>86738</strong>)<br />
Instruction Manual<br />
N26968
WiFi Range Extender<br />
P89137 (MD <strong>86738</strong>)<br />
Warranty Details<br />
The product is guaranteed to be free from defects in<br />
workmanship and parts for a period of 12 months from<br />
the date of purchase. Defects that occur within this<br />
warranty period, under normal use and care, will be<br />
repaired, replaced or refunded at our discretion. The<br />
benefits conferred by this warranty are in addition to all<br />
rights and remedies in respect of the product that the<br />
consumer has under the Competition and Consumer Act<br />
2010 and similar state and territory laws.<br />
Our goods come with guarantees that cannot be<br />
excluded under the Australian Consumer Law. You are<br />
entitled to a replacement or refund for a major failure and<br />
for compensation for any other reasonably foreseeable<br />
loss or damage. You are also entitled to have the goods<br />
repaired or replaced if the goods fail to be of<br />
acceptable quality and the failure does not<br />
amount to a major failure.<br />
After Sales Support<br />
Telephone: 1300 884 987<br />
Internet: www.medion.com.au<br />
1
2<br />
Table of <strong>Content</strong>s<br />
Warranty Details ................................................. 1<br />
Notes on how to use these instructions ............... 4<br />
Symbols and key words used in these instructions ....4<br />
Proper use.................................................................6<br />
Safety instructions .............................................. 6<br />
Power supply ............................................................8<br />
Notes on conformity .................................................9<br />
Before use ..........................................................10<br />
Check package contents ......................................... 10<br />
System requirements .............................................. 10<br />
Overview of the device .......................................11<br />
Overview of the LED displays .................................. 12<br />
Initial operation ................................................16<br />
Setting the operating mode .................................... 16<br />
Operating mode ................................................16<br />
Installation as range extender (repeater) ................. 16<br />
Installation as a client .............................................. 24<br />
Installation as an AP (access point) .......................... 31<br />
The Web Interface ............................................ 40<br />
Calling up the web interface ...................................40<br />
Manually setting up DHCP on a Windows PC .......... 41<br />
Home page .............................................................44<br />
Quick setup ............................................................46<br />
WPS settings ........................................................... 47<br />
Advanced settings ...................................................50<br />
<strong>Medion</strong> Finder Tool ........................................... 53<br />
After Sales Support<br />
Telephone: 1300 884 987<br />
Internet: www.medion.com.au
Do you need more help? ................................... 55<br />
Cleaning ........................................................... 56<br />
Disposal ............................................................ 57<br />
Technical data .................................................. 58<br />
Glossary ............................................................ 59<br />
Repair and Refurbished Goods<br />
or Parts Notice .................................................. 64<br />
After Sales Support<br />
Telephone: 1300 884 987<br />
Internet: www.medion.com.au<br />
3
Notes on how to use these<br />
instructions<br />
4<br />
Read these operating instructions carefully<br />
before using the device for the first time. Note<br />
the warnings on the device and in the operating<br />
instructions.<br />
Always keep the operating instructions close to<br />
hand. If you sell the device or give it away, make<br />
sure you also hand over these instructions and<br />
the guarantee card.<br />
Symbols and key words used in these<br />
instructions<br />
After Sales Support<br />
Telephone: 1300 884 987<br />
Internet: www.medion.com.au<br />
DANGER!<br />
Warning: immediate mortal<br />
danger !<br />
WARNING!<br />
Warning: possible mortal danger<br />
and/or serious irreversible injuries!<br />
CAUTION!<br />
Please follow the guidelines to avoid<br />
injuries and/or property damage!<br />
ATT<strong>EN</strong>TION!<br />
Please follow the guidelines to avoid<br />
property damage!
PLEASE NOTE!<br />
Additional information on using the<br />
device<br />
PLEASE NOTE!<br />
Please follow the guidelines in the<br />
operating instructions!<br />
WARNING!<br />
Warning: danger of electric shock!<br />
Bullet point/information on<br />
occurrences during operation<br />
Tasks to be performed<br />
After Sales Support<br />
Telephone: 1300 884 987<br />
Internet: www.medion.com.au<br />
5
6<br />
Proper use<br />
This device is designed to amplify the signal in a wireless<br />
network. In addition, the device can be used as an access<br />
point for devices that communicate wirelessly or as a<br />
client for devices which do not have their own wireless<br />
adaptor. Never use the device for any other purpose. Only<br />
use the device indoors.<br />
The device is intended for private use only and is not<br />
suitable for commercial purposes.<br />
Safety instructions<br />
Please read through this section and all of the<br />
documentation carefully and follow all of the instructions<br />
given. The instructions will help you to operate the device<br />
reliably and help increase its service life.<br />
Always keep these operating instructions near at hand<br />
to the device, but store them safely so that you can pass<br />
them on to a new owner should you sell the device<br />
Should you have any problems with the device, please<br />
only contact our authorised service partner.<br />
Operational safety<br />
This device is not intended for use by people<br />
(including children) with reduced physical, sensory<br />
or mental abilities or by those without experience<br />
and/or knowledge, unless they are supervised by a<br />
person responsible for their safety or they have been<br />
instructed in its use by that person. Children should<br />
be supervised to ensure they do not play with this<br />
After Sales Support<br />
Telephone: 1300 884 987<br />
Internet: www.medion.com.au
device.<br />
Please also follow the operating instructions for any<br />
devices that you connect to the WiFi Range Extender.<br />
Do not place liquid-filled containers, such as vases, on<br />
or near the device. The container may tip over and the<br />
liquid may impair the electrical safety of the device.<br />
Keep the device away from moisture and from water<br />
in droplet or spray form. Avoid vibrations, dust, heat<br />
and direct sunlight in order to prevent malfunctions.<br />
The operating temperature is 5 °C to 35 °C.<br />
Never open the casing. This invalidates the warranty<br />
and may render the device unusable.<br />
After transporting the device, wait until it has reached<br />
room temperature before switching it on. Major<br />
fluctuations in temperature or humidity can lead to<br />
condensation which could cause an electrical shortcircuit.<br />
The device is designed to be connected to computers<br />
with power supply fuse protection (limited power<br />
source according to <strong>EN</strong>60950).<br />
Position the cable so that it cannot be stepped on or<br />
tripped over.<br />
To avoid damaging the cable, do not place any<br />
objects on it.<br />
To avoid static charges, you should not operate the<br />
device in extremely dry conditions.<br />
In circumstances where there are electrostatic<br />
discharges, the device could malfunction. In this case,<br />
the device must be reset to the factory settings.<br />
After Sales Support<br />
Telephone: 1300 884 987<br />
Internet: www.medion.com.au<br />
7
Data backup<br />
We do not accept any liability for claims for compensation<br />
due to loss of data or any damages that are incurred.<br />
Before every update, back up your files on external media<br />
(e.g. CD-R).<br />
8<br />
Power supply<br />
Even when the ON/OFF switch is set to OFF, some<br />
of the components in the device may still be live.<br />
To disconnect the power from your device or to<br />
completely isolate the device from voltage sources,<br />
unplug the device completely from the mains.<br />
Only operate the WiFi Range Extender from an easily<br />
accessible and earthed socket with an AC 100-240 V~<br />
50/60 Hz power supply.<br />
After Sales Support<br />
Telephone: 1300 884 987<br />
Internet: www.medion.com.au
Notes on conformity<br />
Your device fulfils the requirements for electromagnetic<br />
compatibility and electrical safety.<br />
Conformity information as per R&TTE<br />
<strong>Medion</strong> AG hereby declares that these devices conform<br />
to the fundamental requirements and the remaining<br />
pertinent regulations of the 1999/5/EC Directive. Full<br />
declarations of conformity are available at http://www.<br />
medion.com/conformity.<br />
2200<br />
In France, please operate the device inside buildings only!<br />
After Sales Support<br />
Telephone: 1300 884 987<br />
Internet: www.medion.com.au<br />
9
Before use<br />
Check package contents<br />
Please check your purchase to ensure all items are<br />
included and contact us within 14 days of purchase if any<br />
components are missing.<br />
After unpacking, ensure that the following parts have<br />
been supplied:<br />
WiFi Range Extender<br />
LAN cable<br />
Software CD<br />
Operating instructions and guarantee documents<br />
DANGER!<br />
Keep the plastic packaging out of the reach<br />
of children as it can cause suffocation!<br />
System requirements<br />
LAN connection or wireless card that supports the<br />
wireless standard 802.11b/g/n.<br />
Windows XP SP3, Vista SP1 or Windows 7<br />
CD-ROM drive<br />
100 MB free space on the hard drive<br />
After Sales Support<br />
10 Telephone: 1300 884 987<br />
Internet: www.medion.com.au
Overview of the device<br />
1<br />
9<br />
0<br />
ON / OFF<br />
WPS<br />
Signal<br />
WLAN<br />
Power<br />
WPS<br />
LAN<br />
Access Point<br />
Repeater/Verstärker<br />
Client<br />
1) LAN connection<br />
2) Wireless signal strength LED<br />
3) WLAN: Wireless LED<br />
4) Power LED<br />
5) WPS LED<br />
6) LAN LED<br />
7) WPS button/reset button<br />
8) Mode selector (access point; repeater/amplifier;<br />
client)<br />
9) On/off switch<br />
2<br />
3<br />
4<br />
5<br />
After Sales Support<br />
Telephone: 1300 884 987<br />
Internet: www.medion.com.au<br />
6<br />
7<br />
8<br />
11
Overview of the LED displays<br />
LED Colour Status Description<br />
Wireless<br />
signal<br />
strength<br />
LED<br />
Orange<br />
Wireless Green<br />
After Sales Support<br />
12 Telephone: 1300 884 987<br />
Internet: www.medion.com.au<br />
On<br />
constantly<br />
Flashes<br />
Off<br />
Flashes<br />
Off<br />
Good reception<br />
(signal strength 100<br />
– 50%)<br />
Normal reception:<br />
Flashes slowly (50 –<br />
25%)<br />
Poor reception:<br />
Flashes quickly (<<br />
25%)<br />
No reception or LED<br />
Off mode has been<br />
selected<br />
Connection to a<br />
wireless router or<br />
AP (access point) is<br />
active (data are being<br />
transmitted)<br />
The wireless network<br />
is switched off or the<br />
LED Off mode has<br />
been selected
LED Colour Status Description<br />
POWER Green<br />
On<br />
constantly<br />
Flashes<br />
slowly<br />
Off<br />
The repeater is<br />
switched on. In LED<br />
Off mode, all LEDs<br />
are deactivated apart<br />
from the POWER LED.<br />
Via the web interface,<br />
the LED Off mode<br />
can also be set so the<br />
POWER LED is also<br />
deactivated.<br />
The device can now<br />
be reset to the factory<br />
settings.<br />
The repeater is<br />
switched off<br />
After Sales Support<br />
Telephone: 1300 884 987<br />
Internet: www.medion.com.au<br />
13
LED Colour Status Description<br />
WPS Green<br />
After Sales Support<br />
14 Telephone: 1300 884 987<br />
Internet: www.medion.com.au<br />
On<br />
constantly<br />
Flashes<br />
slowly<br />
Flashes<br />
quickly<br />
Off<br />
Once a WPS<br />
connection has been<br />
successfully made,<br />
the WPS LED lights<br />
up for 5 minutes.<br />
A WPS connection is<br />
being established or<br />
the device is waiting<br />
for the WPS signal<br />
from another device.<br />
The WPS LED flashes<br />
for 2 minutes while<br />
the connection is<br />
being established<br />
Error during WPS<br />
connection<br />
No WPS connection<br />
active or the LED<br />
Off mode has been<br />
selected
LED Colour Status Description<br />
LAN Green<br />
On<br />
constantly<br />
Flashes<br />
Off<br />
LAN connection has<br />
been established<br />
LAN connection is<br />
active (data are being<br />
transmitted)<br />
No LAN connection<br />
or the LED Off mode<br />
has been selected<br />
After Sales Support<br />
Telephone: 1300 884 987<br />
Internet: www.medion.com.au<br />
15
Initial operation<br />
Setting the operating mode<br />
Use the mode switch on the WiFi Range Extender to<br />
switch the device to the operating mode that you wish to<br />
use. The usage possibilities are described in the following<br />
chapter.<br />
Operating mode<br />
Installation as range extender (repeater)<br />
Use the repeater mode to use the WiFi Range Extender<br />
to extend the range of your wireless network. This will<br />
reduce the data transmission rate of the wireless network<br />
by half as the repeater must also communicate with the<br />
clients and the wireless access point.<br />
PLEASE NOTE!<br />
When using the device as a repeater for the first<br />
time, place the repeater as close as possible to<br />
the access point to which it is to be connected.<br />
After successful installation, you can reposition<br />
the repeater where the signal is to be amplified.<br />
After Sales Support<br />
16 Telephone: 1300 884 987<br />
Internet: www.medion.com.au
How to set up the WiFi Range Extender for<br />
operation as a range extender (repeater):<br />
Set the mode selection switch to<br />
TGRGCVGT.<br />
Connect the repeater to an<br />
easily accessible mains socket.<br />
Switch on the repeater by<br />
pressing the RQYGT button.<br />
The RQYGT"NGF lights up.<br />
After Sales Support<br />
Telephone: 1300 884 987<br />
Internet: www.medion.com.au<br />
17
Installation as repeater via the<br />
WPS button<br />
The quickest, easiest and most secure way of establishing<br />
a wireless connection between the repeater and the<br />
wireless router is by using the WPS button.<br />
PLEASE NOTE!<br />
This connection method presupposes that both<br />
devices have a WPS button.<br />
Press and hold the WPS button on the repeater for 3<br />
seconds. The WPS LED starts to flash.<br />
Now press the WPS button on the device that you<br />
wish to connect to the repeater. This step must be<br />
carried out within two minutes.<br />
The connection is established and network<br />
information is exchanged.<br />
Once the connection has been established, the WPS<br />
LED lights up for 5 minutes.<br />
After Sales Support<br />
18 Telephone: 1300 884 987<br />
Internet: www.medion.com.au
If the WPS LED flashes, there has been an error during<br />
connection. Wait two minutes until the LED goes out<br />
and restart the connection process.<br />
After the connection has been completely set up, the<br />
signal LED will indicate the quality of the connection.<br />
To make further settings after the successful<br />
establishment of a WPS connection or to set up the<br />
WPS connection manually after a failed connection<br />
attempt, use the web interface (see page 40).<br />
Manual installation as repeater via the web<br />
interface<br />
WiFi Range Extender basic settings in repeater<br />
mode<br />
Before the WiFi Range Extender is configured via the<br />
web interface, DHCP for wireless and LAN is activated.<br />
The SSID is set to “repeater” and no encryption is set.<br />
After the WiFi Range Extender has been set up via the<br />
Quick Setup menu and connected to the home router,<br />
the WiFi Range Extender restarts.<br />
Following the restart, DHCP is deactivated on the<br />
WiFi Range Extender. The WiFi Range Extender now<br />
receives the IP addresses from the router and passes<br />
these on to any devices that are connected to the WiFi<br />
Range Extender.<br />
After Sales Support<br />
Telephone: 1300 884 987<br />
Internet: www.medion.com.au<br />
19
Installation<br />
Using the supplied LAN cable, connect the LAN port<br />
on your computer to the LAN port on the repeater.<br />
OR<br />
Alternatively, you can use the wireless interface<br />
on your computer. Search in the available wireless<br />
networks for the network “repeater” and click on<br />
“EQPPGEV”.<br />
Afterwards, open your web browser and enter<br />
either “http://repeater” or the IP address<br />
“192.168.66.254”.<br />
The repeater’s login window appears. Enter the<br />
default user name “admin” and the default password<br />
“1234”. Then click “QM”.<br />
After Sales Support<br />
20 Telephone: 1300 884 987<br />
Internet: www.medion.com.au
The Quick Setup menu appears.<br />
All available wireless access points are listed. Select<br />
the access point that you would like to connect to the<br />
repeater and click “PGZV”<br />
PLEASE NOTE!<br />
If the desired access point is not listed, ensure<br />
that it is active and move the repeater closer to<br />
the access point. Then click on “WRFCVG”<br />
to update the list of available wireless access<br />
points.<br />
The login window for the selected access point<br />
appears.<br />
Enter the network key and click on “PGZV“.<br />
After Sales Support<br />
Telephone: 1300 884 987<br />
Internet: www.medion.com.au<br />
21
The repeater now displays the connection<br />
information. If all of the connection data are correct,<br />
click “CEEGRV”.<br />
PLEASE NOTE!<br />
The “Device SSID” is the network call sign of<br />
the repeater and, as default, is set to the same<br />
SSID as the access point to which the repeater is<br />
connected. You can, however, enter a different<br />
SSID here if you wish.<br />
Wait a few seconds while the repeater restarts. After<br />
the restart is complete, you can connect the computer<br />
to the repeater’s access point via the list of available<br />
networks.<br />
After Sales Support<br />
22 Telephone: 1300 884 987<br />
Internet: www.medion.com.au
PLEASE NOTE!<br />
After configuration, the repeater’s DHCP server<br />
is deactivated and the DHCP server of the access<br />
point whose signal is being amplified is used<br />
instead.<br />
After configuration<br />
You can remove the LAN cable from the WiFi Range<br />
Extender.<br />
PLEASE NOTE!<br />
You can also connect a LAN cable to the LAN<br />
port on the WiFi Range Extender to connect to<br />
the network for the access point whose signal is<br />
being amplified by the WiFi Range Extender.<br />
You can reposition the repeater at any location within<br />
the range of the access point (home router). Please pay<br />
attention here to the status of the wireless LED (lights<br />
up when reception is good, flashes for poor reception).<br />
Clients (other computers or wireless-capable devices)<br />
within the range of the repeater can now be connected to<br />
the WiFi Range Extender (by entering the network key or<br />
via the WPS button).<br />
PLEASE NOTE!<br />
To call up the Quick Setup menu again at any<br />
time, press down the YRU button for about 10<br />
seconds, until the RQYGT"NGF flashes. The<br />
repeater is now reset to the factory settings and<br />
you can carry out the installation again.<br />
See also „The Web Interface“ on page 40.<br />
After Sales Support<br />
Telephone: 1300 884 987<br />
Internet: www.medion.com.au<br />
23
Installation as a client<br />
Use the client mode to use the WiFi Range Extender as a<br />
wireless adaptor. This allows you to register devices that<br />
only have a LAN port (e.g. set-top boxes, printers...) to<br />
the network via wireless.<br />
WiFi Range Extender basic settings in client mode<br />
Before the WiFi Range Extender is configured via the<br />
web interface, DHCP for wireless and LAN is activated.<br />
After the WiFi Range Extender has been set up via the<br />
Quick Setup menu and connected to the home router,<br />
the WiFi Range Extender restarts.<br />
After the restart, DHCP for LAN and wireless is<br />
deactivated on the WiFi Range Extender. The WiFi<br />
Range Extender now receives IP addresses from the<br />
router.<br />
Connecting as a client to a wireless AP (Wireless<br />
router) using the WPS button<br />
The quickest, easiest and most secure way of establishing<br />
a wireless connection between the repeater (in client<br />
mode) and the wireless router is by using the WPS<br />
button.<br />
PLEASE NOTE!<br />
This connection method presupposes that both<br />
devices have a WPS button or WPS function in<br />
their menu.<br />
After Sales Support<br />
24 Telephone: 1300 884 987<br />
Internet: www.medion.com.au
Set the mode selection switch to<br />
<strong>EN</strong>KGPV.<br />
Connect the repeater to an easily<br />
accessible AC 230 V 50/60 Hz<br />
mains socket.<br />
Switch on the repeater by pressing<br />
the RQYGT button. The<br />
RQYGT"NGF lights up.<br />
Press and hold the WPS button on the repeater for 3<br />
seconds. The WPS LED starts to flash.<br />
After Sales Support<br />
Telephone: 1300 884 987<br />
Internet: www.medion.com.au<br />
25
Now press the WPS button on the router with which you<br />
would like to connect the repeater. This step must be<br />
carried out within two minutes.<br />
The connection is established and network<br />
information is exchanged.<br />
Once the connection has been established, the WPS<br />
LED lights up for 5 minutes.<br />
If the WPS LED flashes, there has been an error during<br />
connection. Wait two minutes until the LED goes out<br />
and restart the connection process.<br />
After the connection has been completely set up, the<br />
signal LED will indicate the quality of the connection.<br />
To make further settings after the successful<br />
establishment of a WPS connection or to set up the<br />
WPS connection manually after a failed connection<br />
attempt, use the web interface (see page 40).<br />
After the repeater has been successfully configured<br />
via the WPS button, you can use the LAN cable to<br />
connect the repeater to the LAN port on the device<br />
that is to be connected via wireless to the network.<br />
Bear in mind the range of the access point (home<br />
router). The Wireless LED lights up when reception is<br />
good and flashes for poor reception.<br />
After Sales Support<br />
26 Telephone: 1300 884 987<br />
Internet: www.medion.com.au
Installation as a client via the<br />
web interface<br />
Set the mode selection switch<br />
to <strong>EN</strong>KGPV.<br />
Connect the repeater to an easily<br />
accessible AC 230 V 50/60 Hz<br />
mains socket.<br />
Switch on the repeater by<br />
pressing the RQYGT button.<br />
The RQYGT"NGF lights up.<br />
Using the supplied LAN cable,<br />
connect the LAN port on your<br />
computer to the LAN port on the<br />
repeater.<br />
PLEASE NOTE!<br />
Your computer’s LAN<br />
connection needs to be set to “Obtain IP<br />
addresses automatically via DHCP”.<br />
After Sales Support<br />
Telephone: 1300 884 987<br />
Internet: www.medion.com.au<br />
27
Open your web browser and enter either “http://<br />
repeater” or the IP address “192.168.66.253”.<br />
The repeater’s login window appears. Enter the default<br />
user name “admin” and the default password “1234”.<br />
Then click “QM”.<br />
The Quick Setup menu appears.<br />
All available wireless access points are listed. Select<br />
the access point that you would like to connect to the<br />
repeater and click “PGZV”<br />
After Sales Support<br />
28 Telephone: 1300 884 987<br />
Internet: www.medion.com.au
PLEASE NOTE!<br />
If the desired access point is not listed, ensure<br />
that it is active and move the repeater closer to<br />
the access point. Then click on “WRFCVG”<br />
to update the list of available wireless access<br />
points.<br />
The login window for the selected access point<br />
appears.<br />
Enter the network key and click on “PGZV“.<br />
The repeater now displays the connection<br />
information. If all of the connection data are correct,<br />
click “CEEGRV”.<br />
Wait a few seconds while the repeater restarts. After<br />
the restart is complete, you can connect the computer<br />
After Sales Support<br />
Telephone: 1300 884 987<br />
Internet: www.medion.com.au<br />
29
via the repeater to a wireless access point from the list<br />
of available networks.<br />
PLEASE NOTE!<br />
To call up the Quick Setup menu again at any<br />
time, press down the YRU button for about<br />
10 seconds, until the RQYGT"NGF flashes.<br />
The repeater is now reset to the factory settings<br />
and you can carry out the installation again.<br />
After Sales Support<br />
30 Telephone: 1300 884 987<br />
Internet: www.medion.com.au
Installation as an AP (access point)<br />
Select AP mode, if you want to operate the repeater as a<br />
wireless access point. In this mode, the repeater acts as a<br />
wireless interface for communication with the network.<br />
For example, you can connect the repeater to a network<br />
router that has no wireless interface so that devices can<br />
now access the network router via the repeater.<br />
Configuration as an AP<br />
Set the mode selection switch to<br />
AP.<br />
Connect the repeater to an<br />
easily accessible AC 230 V<br />
50/60 Hz mains socket.<br />
Switch on the repeater by<br />
pressing the RQYGT button.<br />
The RQYGT"NGF lights up.<br />
After Sales Support<br />
Telephone: 1300 884 987<br />
Internet: www.medion.com.au<br />
31
Search in the available wireless networks for<br />
the unsecured network “repeater” and click on<br />
“EQPPGEV”.<br />
Open your web browser and enter either “http://<br />
repeater” or the IP address “192.168.66.1”.<br />
The repeater’s login window appears. Enter the<br />
default user name “admin” and the default password<br />
“1234”. Then click “QM”.<br />
After Sales Support<br />
32 Telephone: 1300 884 987<br />
Internet: www.medion.com.au
The Quick Setup menu appears.<br />
Enter an SSID (network identification) by which the<br />
repeater can be identified as an AP in the network.<br />
Click on “PGZV“.<br />
The default SSID is “repeater”.<br />
The “Security” window appears.<br />
Select a network encryption type. The encryption<br />
types are as follows: WEP, WPA pre-shared key or WPA<br />
RADIUS.<br />
If all of the connection data are correct, click<br />
“CEEGRV”.<br />
After Sales Support<br />
Telephone: 1300 884 987<br />
Internet: www.medion.com.au<br />
33
Wait a few seconds while the repeater restarts. After the<br />
restart has been completed, the repeater is available as a<br />
wireless access point.<br />
Now use the supplied LAN cable to connect the LAN<br />
port on the WiFi Range Extender to the LAN port on<br />
the home router or a network socket for your home<br />
network.<br />
After Sales Support<br />
34 Telephone: 1300 884 987<br />
Internet: www.medion.com.au
Clients (other computers or wireless-capable<br />
devices) within the range of the repeater can now be<br />
connected to the WiFi Range Extender (by entering<br />
the previously defined network key or via the WPS<br />
button).<br />
Connecting to the repeater’s access<br />
point using the WPS button<br />
The quickest, easiest and most secure way of establishing<br />
a wireless connection between the repeater and the<br />
device that is to be connected to the access point is by<br />
using the WPS button.<br />
To connect to the AP using the YRU button, proceed<br />
as follows:<br />
Press the WPS button on the repeater twice. The WPS<br />
LED starts to flash.<br />
Now press the WPS button on the device that you<br />
wish to connect to the repeater’s AP. This step must<br />
be carried out within two minutes.<br />
The connection is established and network<br />
After Sales Support<br />
Telephone: 1300 884 987<br />
Internet: www.medion.com.au<br />
35
information is exchanged.<br />
Once the connection has been established, the WPS<br />
LED lights up for 5 minutes.<br />
If the WPS LED flashes, there has been an error during<br />
connection. Wait two minutes until the LED goes out<br />
and restart the connection process.<br />
After the connection has been completely set up, the<br />
signal LED will indicate the quality of the connection.<br />
To make further settings after the successful<br />
establishment of a WPS connection or to set up the<br />
WPS connection manually after a failed connection<br />
attempt, use the web interface (see page 40).<br />
After Sales Support<br />
36 Telephone: 1300 884 987<br />
Internet: www.medion.com.au
Configuring the repeater as an access point (AP)<br />
via a LAN connection<br />
Set the mode selection switch to<br />
AP.<br />
Connect the repeater to an<br />
easily accessible AC 230 V 50/60<br />
Hz mains socket.<br />
Switch on the repeater by<br />
pressing the RQYGT button.<br />
The RQYGT"NGF lights up.<br />
Using the supplied LAN cable,<br />
connect the LAN port on your<br />
computer to the LAN port on the repeater.<br />
Open your web browser and enter either “http://<br />
repeater” or the IP address “192.168.66.1”.<br />
The repeater’s login window appears. Enter the<br />
default user name “admin” and the default password<br />
After Sales Support<br />
Telephone: 1300 884 987<br />
Internet: www.medion.com.au<br />
37
“1234”. Then click “QM”.<br />
The Quick Setup menu appears.<br />
Enter an SSID (network identification) by which the<br />
repeater can be identified as an AP in the network.<br />
Click on “PGZV“.<br />
The default SSID is “repeater”.<br />
After Sales Support<br />
38 Telephone: 1300 884 987<br />
Internet: www.medion.com.au
The “Security” window appears.<br />
Select a network encryption type. The encryption<br />
types are as follows: WEP, WPA pre-shared key or WPA<br />
RADIUS.<br />
If all of the connection data are correct, click<br />
“CEEGRV”.<br />
Wait a few seconds while the repeater restarts. After the<br />
restart has been completed, the repeater is available as a<br />
wireless access point.<br />
After Sales Support<br />
Telephone: 1300 884 987<br />
Internet: www.medion.com.au<br />
39
The Web Interface<br />
You can use the web interface to configure the repeater<br />
and set it up to suit your needs or, if the connection via<br />
WPS was not successful, to make a connection.<br />
The appearance of the web interface will change for<br />
each selected mode, as options will be hidden or shown<br />
depending on whether they are required for the selected<br />
mode.<br />
Calling up the web interface<br />
After being configured, the repeater is only accessible via<br />
the management IP. The method for calling up the web<br />
interface differs depending on the operating mode.<br />
Access point: 192.168.66.1<br />
Repeater/amplifier: 192.168.66.254<br />
Client: 192.168.66.253<br />
PLEASE NOTE!<br />
If the repeater has already been configured, the<br />
transfer of the IP address of the PC via which<br />
you want to access the repeater must be set to<br />
manual. See next section.<br />
After Sales Support<br />
40 Telephone: 1300 884 987<br />
Internet: www.medion.com.au
Manually setting up DHCP on a Windows PC<br />
In AP operation, the management IP address of<br />
the repeater is set to 192.168.66.1. Please ensure<br />
that the IP address of your PC is in the range<br />
192.168.66.2~192.168.66.252.<br />
To log in via the web interface, the IP address of your PC must<br />
be manually set to a value in this range. The procedure for<br />
this is described in the next section.<br />
Setting the IP address in Windows XP<br />
Click on the START button on the task bar and then<br />
on Control Panel.<br />
Double-click on Network Connections and then<br />
click on Display connection status.<br />
Select Local Internet settings. The window<br />
Local area connection status appears. Click on<br />
properties.<br />
Select the entry Internet Protocol (TCP/IP) –<br />
General and then enter the IP address as described<br />
below:<br />
IP address: 192.168.66.x (where x can be any number<br />
between 2 and 200. If more than one computer is<br />
using this access point, each computer must use its<br />
own number)<br />
Subnet mask: 255.255.255.0<br />
To finish, click on OK.<br />
After Sales Support<br />
Telephone: 1300 884 987<br />
Internet: www.medion.com.au<br />
41
Setting the IP address in<br />
Windows Vista/7<br />
Click on the START button on the task bar and then<br />
Control Panel.<br />
Click on Network and Sharing Centre. Click on<br />
Change adapter settings.<br />
Click on LAN connection with the right mouse<br />
button and then select Properties.<br />
The LAN properties window appears. Select<br />
Internet Protocol Version 4 (TCP/IPv4) and<br />
then click on Properties.<br />
Select the entry “Use following IP address” and<br />
then enter the IP address as described below:<br />
IP address: 192.168.2.x (where x can be any number<br />
between 2 and 200. If more than one computer is<br />
using this access point, each computer must use its<br />
own number)<br />
Subnet mask: 255.255.255.0<br />
To finish, click on OK.<br />
After Sales Support<br />
42 Telephone: 1300 884 987<br />
Internet: www.medion.com.au
Logging on to the web interface<br />
Enter the relevant management IP in your browser for<br />
the currently set operating mode.<br />
The repeater’s login window appears. Enter the<br />
default user name “admin” and the default password<br />
“1234”. Then click “QM”.<br />
The start page of the configuration menu for the WiFi<br />
Range Extender opens.<br />
After Sales Support<br />
Telephone: 1300 884 987<br />
Internet: www.medion.com.au<br />
43
On the left margin, you will find four menu options for<br />
configuring the repeater. The content of the individual<br />
menus differ depending on which mode the repeater is<br />
set to.<br />
Home page<br />
On the home page, you will find all information about<br />
the repeater and its settings.<br />
System<br />
Operating time<br />
This shows the operating time since the unit was last<br />
switched on.<br />
Device version<br />
This shows the version of the device.<br />
Firmware version<br />
This shows the version of the firmware.<br />
Wireless settings<br />
Mode<br />
In the OQFG line, the currently set mode is displayed:<br />
AP; Universal repeater or Station infrastructure<br />
(client mode).<br />
The information displayed is identical for all three modes.<br />
After Sales Support<br />
44 Telephone: 1300 884 987<br />
Internet: www.medion.com.au
ESSID<br />
This shows the SSID that the WiFi Range Extender has<br />
adopted from the wireless network.<br />
Channel<br />
This shows the channel that the WiFi Range Extender is<br />
transmitting on.<br />
Security<br />
This shows what encryption method the WiFi Range<br />
Extender is set to use. If no encryption has been set, the<br />
entry displays “Deactivated”.<br />
BSSID (MAC)<br />
This shows the MAC address of the repeater’s wireless<br />
adaptor.<br />
Attached clients<br />
In client mode, the line Attached clients does not<br />
appear. Instead, the line State is shown which shows the<br />
repeater’s connection status.<br />
To show a list of all attached devices, click on the<br />
button Show active clients to see a table of all<br />
active clients in a new window.<br />
PLEASE NOTE!<br />
If you are using a pop-up blocker, deactivate<br />
this first otherwise the window cannot be<br />
shown.<br />
After Sales Support<br />
Telephone: 1300 884 987<br />
Internet: www.medion.com.au<br />
45
LAN settings<br />
IP address<br />
This shows the WiFi Range Extender’s IP address.<br />
Subnet mask<br />
This shows the subnet mask which the WiFi Range<br />
Extender is set to.<br />
Standard gateway<br />
This shows the standard gateway which the WiFi Range<br />
Extender is set to.<br />
MAC address<br />
This shows the MAC address of the repeater’s LAN<br />
adaptor.<br />
Quick setup<br />
Repeater and client mode<br />
Start by selecting the access point to which you would<br />
like to connect the repeater.<br />
Then enter the network key for the selected access<br />
point.<br />
The next window displays the repeater’s connection<br />
data.<br />
In repeater mode, you can set the SSID for the<br />
repeater in the next window. The SSID of the access<br />
point is shown automatically.<br />
After Sales Support<br />
46 Telephone: 1300 884 987<br />
Internet: www.medion.com.au
Click theCEEGRV, button to finish the process.<br />
The data are saved and the repeater restarts.<br />
After the restart of the repeater is completed, the<br />
home page of the web interface will reappear. You<br />
can now close the browser.<br />
Access Point mode<br />
Start by selecting an SSID for the access point.<br />
In the next step, you can make the security settings for<br />
the access point.<br />
Select the required method in the option<br />
Encryption.<br />
Depending on the encryption method selected,<br />
further input and selection fields will be displayed.<br />
Finish making your settings by clicking on the<br />
EQPVKPWG button.<br />
Check the selected settings again and click on<br />
CEEGRV, to finish the process.<br />
The data are saved and the repeater restarts.<br />
After the restart of the repeater is completed, the<br />
home page of the web interface will reappear. You<br />
can now close the browser.<br />
WPS settings<br />
In the WPS settings menu, you can configure the<br />
repeater’s WPS function.<br />
WPS functionality is activated by default. To deactivate<br />
this function, remove the tick from the Activate WPS<br />
box.<br />
After Sales Support<br />
Telephone: 1300 884 987<br />
Internet: www.medion.com.au<br />
47
Wi-Fi protected setup information<br />
You will find a list of the WPS settings under the heading<br />
Wi-Fi Protected Setup Information.<br />
WPS status: Shows the status of the security settings.<br />
If you have not yet made any settings in Quick Setup,<br />
the notification Unconfigured will appear.<br />
Self PIN code: Shows the WPS Self PIN code. This code<br />
is used during PIN-style WPS pairing mode: it must be<br />
provided for all wireless clients.<br />
SSID: This shows the WiFi Range Extender’s network<br />
password.<br />
Authentification mode: This shows the selected<br />
encryption mode.<br />
Pass phrase key: Here you can see whether a network<br />
key is being used. If a network key has been set, this is<br />
shown by asterisks (*****) in place of the actual key.<br />
After Sales Support<br />
48 Telephone: 1300 884 987<br />
Internet: www.medion.com.au
Device configuration<br />
Under the heading Device configuration, you have the<br />
option to configure the WPS settings:<br />
Configuration mode: Here you can set the WiFi<br />
Range Extender as either enrollee or registrar for WPS<br />
permissions in the network.<br />
Configuration via push button method: Here you can<br />
execute the WPS function via the software.<br />
This button corresponds to the WPS button on the<br />
device.<br />
Enter client PIN: This code is used in PIN-style WPS<br />
pairing mode. If you want to connect a device that is<br />
secured by PIN-style WPS, enter the PIN code of the<br />
device here.<br />
After Sales Support<br />
Telephone: 1300 884 987<br />
Internet: www.medion.com.au<br />
49
Advanced settings<br />
ATT<strong>EN</strong>TION!<br />
The advanced settings are only for experienced<br />
users with sufficient wireless knowledge. You<br />
should not change any of these settings if you do<br />
not know what effect this will have on the router.<br />
Here is a list of the menu options and their meaning:<br />
Menu option Meaning<br />
Fragment<br />
threshold<br />
After Sales Support<br />
50 Telephone: 1300 884 987<br />
Internet: www.medion.com.au<br />
The fragment threshold setting<br />
is used for the transmission of<br />
fragmented data packets. The<br />
default value is 2346.<br />
RTS threshold This setting is used to define the RTS<br />
value. The default value is 2347.<br />
Beacon interval<br />
DTIM period<br />
Data rate<br />
This setting defines the interval<br />
for sending out the beacon. The<br />
standard value is 100.<br />
This setting defines the interval for<br />
sending out the DTIM signal. The<br />
standard value is 3.<br />
This setting defines the speed of<br />
data transmission.<br />
N data rate<br />
This setting defines the speed of<br />
data transmission.<br />
Channel width Channel width setting.<br />
Preamble type<br />
This setting defines the type of<br />
preamble signal.
Menu option Meaning<br />
Broadcast ESSID<br />
WMM<br />
CTS protect<br />
TX power<br />
This setting defines whether the<br />
ESSID is broadcast or not.<br />
This setting defines whether the<br />
WMM function is activated or<br />
deactivated.<br />
This setting defines the type of CTS<br />
signal.<br />
This setting defines a value for<br />
regulating the transmitting power<br />
of radio systems.<br />
You can switch off the LEDs on the device. To do this,<br />
put a tick in the check box LED Off mode.<br />
The two selection options allow you to define more<br />
precisely which LEDs are to be switched off.<br />
After Sales Support<br />
Telephone: 1300 884 987<br />
Internet: www.medion.com.au<br />
51
MAC filter<br />
If you want to use MAC address filtering, you can use this<br />
menu option to make the required settings.<br />
Device settings<br />
This menu option allows you to the set the password for<br />
the web interface, configure the IP address and set up the<br />
DHCP functionality.<br />
Configuration<br />
This menu option allows you save the menu settings in a<br />
file so that you will not have to completely re-enter them<br />
following a restart of the device.<br />
You can also update the WiFi Range Extender’s firmware<br />
or reset the device to the factory settings.<br />
After Sales Support<br />
52 Telephone: 1300 884 987<br />
Internet: www.medion.com.au
<strong>Medion</strong> Finder Tool<br />
On the supplied CD-ROM, you will find a Finder Tool<br />
that will make access to the web interface easier.<br />
Double-click on the file <strong>Medion</strong>-Finder.exe to start<br />
the Finder Tool.<br />
PLEASE NOTE!<br />
The repeater can only be found by the Finder<br />
Tool during the initial installation.<br />
Your computer must be configured as DHCP<br />
client (“Obtain IP addresses automatically via<br />
DHCP”)<br />
After Sales Support<br />
Telephone: 1300 884 987<br />
Internet: www.medion.com.au<br />
53
Insert the CD-ROM into the CD drive of your<br />
computer. Double-click on the file <strong>Medion</strong>-Finder.<br />
exe to start the Finder Tool.<br />
If you do not want to use the Finder, open your web<br />
browser and enter either “http://repeater” or the<br />
IP address corresponding to the selected mode.<br />
After Sales Support<br />
54 Telephone: 1300 884 987<br />
Internet: www.medion.com.au
Do you need more help?<br />
If the above suggestions did not solve your problem,<br />
please contact us. To make it easier for us to help you,<br />
please have the following information to hand:<br />
What external devices are connected?<br />
When operating the device, at which step did the<br />
problem occur?<br />
What steps have you already taken to try and rectify<br />
the problem?<br />
Please provide your customer number if you have one.<br />
After Sales Support<br />
Telephone: 1300 884 987<br />
Internet: www.medion.com.au<br />
55
Cleaning<br />
You can increase the lifespan of your device with the<br />
following measures:<br />
Always unplug the device and disconnect all cables<br />
before cleaning.<br />
Do not use solvents, corrosive detergents or aerosol<br />
detergents to clean the device.<br />
Clean the device with a soft, lint-free cloth.<br />
Store the packaging material in a safe place; only use this<br />
box to transport the device.<br />
ATT<strong>EN</strong>TION!<br />
None of the parts inside the device require<br />
cleaning or maintenance.<br />
After Sales Support<br />
56 Telephone: 1300 884 987<br />
Internet: www.medion.com.au
Disposal<br />
Packaging<br />
Your device has been packaged to protect it<br />
against transportation damage. Packaging<br />
materials are raw materials and can therefore be<br />
reused or recycled.<br />
Device<br />
At the end of its life, the device should not be<br />
disposed of in the normal household rubbish!<br />
Please consult your local authority for advice on<br />
correct and eco-friendly methods of disposal.<br />
After Sales Support<br />
Telephone: 1300 884 987<br />
Internet: www.medion.com.au<br />
57
Technical data<br />
Input: AC 100 - 240 V ~ 50/60 Hz<br />
Wireless standard: 802.11 b/g/n<br />
Dimensions see diagram<br />
Signal<br />
WLAN<br />
Power<br />
WPS<br />
LAN<br />
After Sales Support<br />
58 Telephone: 1300 884 987<br />
Internet: www.medion.com.au<br />
47 mm 78 mm<br />
WPS<br />
76 mm<br />
Access Point<br />
Repeater/Verstärker<br />
Client<br />
41 mm<br />
Total weight (approx.) 86 g<br />
Operating temperature 5°C to 35°C<br />
Humidity 5 % to 65 %<br />
during operation<br />
Subject to technical and optical changes as well as<br />
printing errors.<br />
N26968
Glossary<br />
Access Point (AP), Wireless AP<br />
Also known as a base station, this is an electronic device<br />
that functions as an interface for wireless communications<br />
devices. End devices make a radio connection to the<br />
wireless access point via a wireless adapter. The access<br />
point can also be connected by cable to a permanently<br />
installed communications network.<br />
Operating system<br />
Software via which the user and the other software<br />
installed on the system can communicate with the<br />
computer hardware and the hard drive.<br />
BSSID (MAC)<br />
The basic service set identification (BSSID) corresponds<br />
to the MAC address of the wireless access point.<br />
Client mode<br />
Client mode is an operating mode of a wireless access<br />
point (here: the WiFi Range Extender) in which the<br />
device behaves like a wireless adaptor towards the higher<br />
level AP. Via an AP operated in client mode, individual<br />
computers can be connected to a higher level network<br />
without their own wireless adaptor.<br />
DHCP – Dynamic Host Configuration Protocol<br />
A protocol to assign an IP address to devices in the<br />
After Sales Support<br />
Telephone: 1300 884 987<br />
Internet: www.medion.com.au<br />
59
network. Dynamic addresses give the device a different<br />
IP address each time it connects to a network. In some<br />
systems, the IP addresses changes automatically while the<br />
device is connected. DHCP also supports a combination<br />
of static and dynamic IP addresses. See also Protocol.<br />
DNS – Domain Name Service<br />
A system that a network name server uses to translate<br />
text host names into numerical IP addresses to uniquely<br />
identify a device connected to the Internet.<br />
Enrollee<br />
The device that searches via the WPS function after<br />
logging into a network. The enrollee always searches for<br />
a registrar.<br />
Ethernet<br />
A standard method of connecting a computer to a local<br />
network (LAN).<br />
ESSID<br />
By providing different network call signs, it is possible to<br />
operate various wirelesss at the same location. The SSID is<br />
set at the base station. To connect several base stations to<br />
the same network, they need to be set to the same SSID;<br />
this is then known as an ESSID (extended SSID).<br />
Gateway<br />
The standard gateway is provided by the computer/router<br />
in the network in which all queries are made which have<br />
After Sales Support<br />
60 Telephone: 1300 884 987<br />
Internet: www.medion.com.au
no address in the local network (queries in the Internet).<br />
It forwards these queries to a computer/router that may<br />
be able to answer these queries. Normally, you enter<br />
the IP address of your home router (DSL router) as the<br />
standard gateway.<br />
IP Address<br />
A binary 32-bit number that uniquely identifies any<br />
computer connected to the internet.<br />
LAN – Local Area Network<br />
A system in which computer users are connected within a<br />
company or an organisation and are often also connected<br />
to central data collections stored on LAN servers.<br />
MAC address<br />
The MAC address (media access control address) is the<br />
hardware address of every individual network adapter. It<br />
serves as a unique identifier for the device in a computer<br />
network.<br />
Pass phrase key<br />
The network key that is used for authentication on a WEP/<br />
WPA2 encrypted network.<br />
Registrar<br />
The device that publishes and withdraws WPS<br />
permissions within a network. A registrar can be<br />
integrated into a wireless access point or be separate from<br />
the access point (AP).<br />
After Sales Support<br />
Telephone: 1300 884 987<br />
Internet: www.medion.com.au<br />
61
Self PIN code<br />
The PIN code that is provided by the registrar for<br />
completing a connection via the WPS function.<br />
SSID<br />
By providing different network call signs, it is possible to<br />
operate various wirelesss at the same location. The SSID is<br />
set at the base station. To connect several base stations to<br />
the same network, they need to be set to the same SSID;<br />
this is then known as an ESSID (extended SSID).<br />
Subnet mask<br />
A subnet is a subordinate part of a network. It collates<br />
several consecutive IP addresses by means of a subnet<br />
mask.<br />
TCP/IP<br />
Transmission control protocol/Internet protocol. A series<br />
of protocols used for communication via connected<br />
networks. The standard for data transmission via<br />
networks. See also Protocol.<br />
WPS<br />
Wi-Fi Protected Setup (WPS) is a standard used to simply<br />
add devices to an existing network without the often<br />
laborious setting up of an adequate encryption.<br />
Your device supports the following WPS methods:<br />
PIN entry:<br />
The device has a sticker or a display for a PIN that must<br />
After Sales Support<br />
62 Telephone: 1300 884 987<br />
Internet: www.medion.com.au
e provided to the registrar (e.g. the access point) when<br />
connecting to a network.<br />
Push Button Configuration(PBC):<br />
The access point and the devices to be connected to it<br />
all have a physical or virtual (software-based) button to<br />
set up a connection. When this is pressed, a two-minute<br />
phase starts in which the devices can join the network.<br />
After Sales Support<br />
Telephone: 1300 884 987<br />
Internet: www.medion.com.au<br />
63
After Sales Support<br />
64 Telephone: 1300 884 987<br />
Internet: www.medion.com.au<br />
Wireless Range Extender<br />
P89137 (MD <strong>86738</strong>)<br />
Repair and Refurbished Goods<br />
or Parts Notice<br />
Unfortunately, from time to time, faulty products are<br />
manufactured which need to be returned to the Supplier for<br />
repair.<br />
Please be aware that if your product is capable of retaining<br />
user-generated data (such as files stored on a computer hard<br />
drive, telephone numbers stored on a mobile telephone,<br />
songs stored on a portable media player, games saved on a<br />
games console or files stored on a USB memory stick) during<br />
the process of repair, some or all of your stored data may be<br />
lost. We recommend you save this data elsewhere prior to<br />
sending the product for repair.<br />
You should also be aware that rather than repairing goods,<br />
we may replace them with refurbished goods of the same<br />
type or use refurbished parts in the repair<br />
process.
Please be assured though, refurbished parts or<br />
replacements are only used where they meet <strong>ALDI</strong>’s<br />
stringent quality specifications.<br />
If at any time you feel your repair is being handled<br />
unsatisfactorily, you may escalate your complaint. Please<br />
telephone us on 1 300 884 987 or write to us at:<br />
MEDION Australia Pty Ltd<br />
St. Leonards, NSW 2065<br />
Australia<br />
MEDION Help Desk 1300 884 987<br />
(Operating Hours : Mon-Fri 08 :30AM to 06 :00PM EST)<br />
Email: australia@medion.com<br />
After Sales Support<br />
Telephone: 1300 884 987<br />
Internet: www.medion.com.au<br />
65
11/12<br />
MEDION Australia Pty Ltd<br />
St Leonards, NSW 2065<br />
Australia<br />
Hotline: 1300 884 987<br />
Opening hours: Mon - Fri 08:30AM to 06:00PM EST<br />
Internet<br />
www.medion.com.au<br />
E-mail Support<br />
australia@medion.com