Configuration with ProSafe Client - Netgear
Configuration with ProSafe Client - Netgear
Configuration with ProSafe Client - Netgear

You also want an ePaper? Increase the reach of your titles
YUMPU automatically turns print PDFs into web optimized ePapers that Google loves.
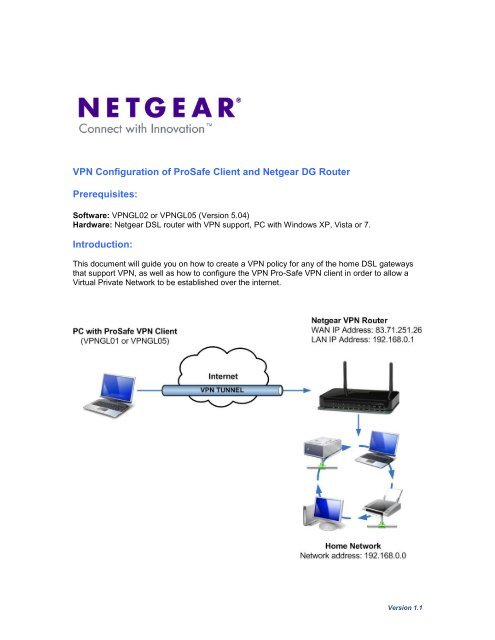
VPN <strong>Configuration</strong> of <strong>ProSafe</strong> <strong>Client</strong> and <strong>Netgear</strong> DG Router<br />
Prerequisites:<br />
Software: VPNGL02 or VPNGL05 (Version 5.04)<br />
Hardware: <strong>Netgear</strong> DSL router <strong>with</strong> VPN support, PC <strong>with</strong> Windows XP, Vista or 7.<br />
Introduction:<br />
This document will guide you on how to create a VPN policy for any of the home DSL gateways<br />
that support VPN, as well as how to configure the VPN Pro-Safe VPN client in order to allow a<br />
Virtual Private Network to be established over the internet.<br />
Version 1.1
Checklist:<br />
As we configure the <strong>Netgear</strong> DSL VPN Gateway, there will be information we’ll add which will<br />
later be used in the configuration of the <strong>ProSafe</strong> <strong>Client</strong> Software. This information will be marked<br />
<strong>with</strong> red numbered circles. The values we will use for this guide are already filled as light grey.<br />
You can print this form to help keep track of this information.<br />
➊<br />
➋<br />
➌<br />
➍<br />
➎<br />
➏<br />
❼<br />
Pre-Shared Key: _ _______________ 12345678 _<br />
<strong>Client</strong> Identifier: _ ___ _____ _____client.com _<br />
Router Identifier: _ _________ _____router.com _<br />
<strong>Client</strong>’s IP Address: _ _______ _ _ __192.168.100.1 _<br />
Router’s Network Address: _ _____ ___192.168.0.0 _<br />
Router’s Network Mask: _ __ _______ 255.255.255.0 _<br />
Router’s WAN IP Address: _ _____________ _86.41.176.179 _<br />
Version 1.1
<strong>Configuration</strong> of the VPN Policy on the DSL Gateway:<br />
➎<br />
➌<br />
➋<br />
➊<br />
➏<br />
➍<br />
From the Router’s GUI, go to<br />
VPN policies under Advanced –<br />
VPN.<br />
Click on Add Auto Policy.<br />
➊ The pre-shared key value<br />
goes here.<br />
This is your Pre-Shared Key.<br />
➋ Here we select “Fully<br />
Qualified Domain Name” and<br />
we give the client a name<br />
This is your <strong>Client</strong> Identifier.<br />
➌ Here we select “Fully<br />
Qualified Domain Name” and<br />
we give the router a name<br />
This is your Router Identifier.<br />
➍ Here we select “Single<br />
Address” and we specify the<br />
IP.<br />
This is your <strong>Client</strong>’s IP<br />
Address.<br />
➎ - ➏ Here we select “Subnet<br />
Address” and add the address<br />
and mask of our router.<br />
This is your Router’s<br />
Network Address and<br />
Router’s Network Mask.<br />
To accept this settings, click<br />
on “Apply”<br />
Version 1.1
<strong>Configuration</strong> of the VPN Policy on the <strong>ProSafe</strong> <strong>Client</strong>:<br />
Before you start configuring the VPN <strong>Client</strong>, go through the Checklist at the start and make sure<br />
you have all the information listed there.<br />
After installing the VPN <strong>Client</strong><br />
Software, click on the plus sign to<br />
open the configuration panel.<br />
Right click on “VPN <strong>Configuration</strong>”<br />
and add a new Phase 1. It will be<br />
added <strong>with</strong> the name Gateway.<br />
Version 1.1
❼<br />
➊<br />
➋<br />
➌<br />
Click on gateway.<br />
❼ The Remote Gateway field will be<br />
the value of your Router’s WAN<br />
IP Address.<br />
➊ Input the Pre-Shared Key that<br />
you have used when creating the<br />
VPN Policy on the Router and<br />
click on the OK Button.<br />
Next, tick the checkbox next to<br />
Use: Secure Gateway Tunnel.<br />
➋ The Local ID Type is DNS, and the<br />
Value for the ID is your <strong>Client</strong><br />
Identifier.<br />
➌ The ID Type field will be the value<br />
of your Router Identifier.<br />
Version 1.1
With this, the configuration is completed. Now we can try our VPN configuration and connect to<br />
our router.<br />
➍<br />
➎<br />
➏<br />
Right click on the Phase 1 and<br />
click on New Phase 2. It will be<br />
added <strong>with</strong> the name “Tunnel”.<br />
Click on Tunnel.<br />
➍ Here we enter the <strong>Client</strong>’s IP<br />
Address.<br />
➎ Here we add the Router’s<br />
Network Address.<br />
➏ Here we add the Router’s<br />
Network Mask.<br />
Make sure PFS is enabled <strong>with</strong><br />
DH2 (1020) Group.<br />
After you are done, click on<br />
Save.<br />
Version 1.1
Connecting:<br />
To connect the VPN Tunnel we configured, do the following:<br />
Go to Tools and click on Connection<br />
Panel.<br />
Double click on the tunnel we<br />
created.<br />
The tray notice box should tell us we<br />
are connected.<br />
The Connection Panel should show a<br />
green button indicating we are<br />
connected.<br />
Now we should be able to access the resources at the DSL Gateway’s network from our <strong>Client</strong><br />
PC.<br />
Version 1.1