Installing Pro Tools LE 7 on Windows XP ... - Sweetwater.com
Installing Pro Tools LE 7 on Windows XP ... - Sweetwater.com
Installing Pro Tools LE 7 on Windows XP ... - Sweetwater.com

You also want an ePaper? Increase the reach of your titles
YUMPU automatically turns print PDFs into web optimized ePapers that Google loves.
<str<strong>on</strong>g>Installing</str<strong>on</strong>g> <str<strong>on</strong>g>Pro</str<strong>on</strong>g> <str<strong>on</strong>g>Tools</str<strong>on</strong>g> <str<strong>on</strong>g>LE</str<strong>on</strong>g> 7 <strong>on</strong> <strong>Windows</strong> <strong>XP</strong><br />
NOTICE: This tutorial is designed to help you install <str<strong>on</strong>g>Pro</str<strong>on</strong>g> <str<strong>on</strong>g>Tools</str<strong>on</strong>g> <str<strong>on</strong>g>LE</str<strong>on</strong>g> 7 <strong>on</strong> your PC running<br />
<strong>Windows</strong> <strong>XP</strong>. <str<strong>on</strong>g>Pro</str<strong>on</strong>g> <str<strong>on</strong>g>Tools</str<strong>on</strong>g> is <strong>on</strong>ly qualified for <strong>XP</strong> Home and <str<strong>on</strong>g>Pro</str<strong>on</strong>g>fessi<strong>on</strong>al Editi<strong>on</strong>s; Media Center,<br />
Tablet, and <str<strong>on</strong>g>Pro</str<strong>on</strong>g> x64 Editi<strong>on</strong>s will NOT work. Make sure you have a qualified editi<strong>on</strong> before<br />
proceeding. Also, please see www.digidesign.<strong>com</strong>/<strong>com</strong>pato/ for a list of <strong>com</strong>patibility issues,<br />
including known in<strong>com</strong>patibilities and re<strong>com</strong>mended systems. After verifying your system, you<br />
may wish to print this document for easy reference.<br />
Preparing to Install<br />
1. Before proceeding, please close any applicati<strong>on</strong>s that may be<br />
running. Also make sure that your Digidesign hardware is c<strong>on</strong>nected<br />
and turned <strong>on</strong><br />
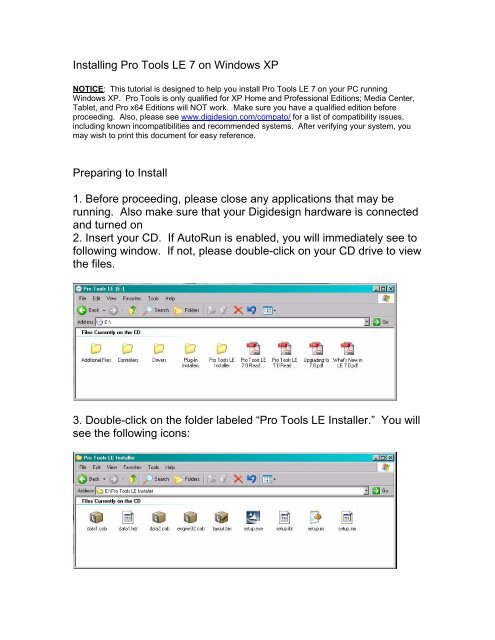
2. Insert your CD. If AutoRun is enabled, you will immediately see to<br />
following window. If not, please double-click <strong>on</strong> your CD drive to view<br />
the files.<br />
3. Double-click <strong>on</strong> the folder labeled “<str<strong>on</strong>g>Pro</str<strong>on</strong>g> <str<strong>on</strong>g>Tools</str<strong>on</strong>g> <str<strong>on</strong>g>LE</str<strong>on</strong>g> Installer.” You will<br />
see the following ic<strong>on</strong>s:
4. Double-click <strong>on</strong> the file labeled “setup.exe.” The <str<strong>on</strong>g>Pro</str<strong>on</strong>g> <str<strong>on</strong>g>Tools</str<strong>on</strong>g><br />
Installati<strong>on</strong> Wizard will begin.<br />
The Installati<strong>on</strong> Wizard<br />
1. After the Installati<strong>on</strong> Wizard loads, you will see the following<br />
screen. Press Next to c<strong>on</strong>tinue.
2. You will then see two license agreements. Please read these and<br />
decide whether to accept or decline the terms. If you accept them,<br />
press Next <strong>on</strong> both agreements to c<strong>on</strong>tinue.<br />
3. You will now be prompted to choose a destinati<strong>on</strong> folder. Unless<br />
you have a VERY specific reas<strong>on</strong> to change the locati<strong>on</strong>, leave it <strong>on</strong><br />
C:\<str<strong>on</strong>g>Pro</str<strong>on</strong>g>gram Files\Digidesign and press Next.<br />
4. Select the <strong>com</strong>p<strong>on</strong>ents you wish to have installed. Leave the top<br />
three choices (<str<strong>on</strong>g>Pro</str<strong>on</strong>g> <str<strong>on</strong>g>Tools</str<strong>on</strong>g> <str<strong>on</strong>g>LE</str<strong>on</strong>g> and both Digidesign Drivers) selected.<br />
Unless you have purchased any of the other <strong>com</strong>p<strong>on</strong>ents (all are sold<br />
separately), leave them unchecked.
5. Press Install to begin the installati<strong>on</strong>.<br />
6. You will see several files flash by very quickly as the progress bar<br />
fills up. Do not press anything while this is happening.
7. As the program files are being installed, you will be notified by<br />
Microsoft that the Digidesign drivers have not passed <strong>Windows</strong> Logo<br />
Testing. The message may appear several times, with a different<br />
device being “tested” each time. Do not worry about this; it will not<br />
affect the way <str<strong>on</strong>g>Pro</str<strong>on</strong>g> <str<strong>on</strong>g>Tools</str<strong>on</strong>g> OR your hardware operates. Choose<br />
C<strong>on</strong>tinue Anyway every time the message appears.
8. After Logo Testing, the Wizard will c<strong>on</strong>tinue to install other<br />
<strong>com</strong>p<strong>on</strong>ents of your <str<strong>on</strong>g>Pro</str<strong>on</strong>g> <str<strong>on</strong>g>Tools</str<strong>on</strong>g> system, such as the DigiRack and<br />
Bomb Factory Plug-Ins. <strong>Windows</strong> will then c<strong>on</strong>figure your installati<strong>on</strong>.<br />
As before, do not do anything while this is happening.<br />
9. Once the Wizard is <strong>com</strong>plete, <str<strong>on</strong>g>Pro</str<strong>on</strong>g> <str<strong>on</strong>g>Tools</str<strong>on</strong>g> will be installed. You still<br />
must reboot the <strong>com</strong>puter for the changes in <strong>Windows</strong> to take effect.<br />
Choose “Yes, I want to…” and press the Finish butt<strong>on</strong>. <strong>Windows</strong> will<br />
automatically reboot.
Verifying the Installati<strong>on</strong><br />
1. When <strong>Windows</strong> reboots, you will see a shortcut created <strong>on</strong> your<br />
Desktop. Double-click <strong>on</strong> it to launch <str<strong>on</strong>g>Pro</str<strong>on</strong>g> <str<strong>on</strong>g>Tools</str<strong>on</strong>g>.<br />
2. After double-clicking, there may several sec<strong>on</strong>ds where nothing<br />
happens. You will not need to launch <str<strong>on</strong>g>Pro</str<strong>on</strong>g> <str<strong>on</strong>g>Tools</str<strong>on</strong>g> again. Wait for the<br />
splash screen to show up:<br />
3. After <str<strong>on</strong>g>Pro</str<strong>on</strong>g> <str<strong>on</strong>g>Tools</str<strong>on</strong>g> launches for the first time, you will be prompted to<br />
enter your authorizati<strong>on</strong> code. It will be <strong>on</strong><strong>on</strong>e the guides listed in the<br />
message, and begin with DIGI0700. Make sure you pay attenti<strong>on</strong> to<br />
capitalizati<strong>on</strong> and spaces, and remember that 0 is a zero, not the<br />
letter O.
4. After entering your code, press the Validate butt<strong>on</strong>. If you entered<br />
it correctly, the window will disappear and you will see a gray<br />
background with nothing in it. Do not be alarmed; this is normal.<br />
Ready to Rock<br />
At this point, you are ready to make music! You can create a sessi<strong>on</strong><br />
and begin recording immediately. C<strong>on</strong>sult the Getting Started Guide<br />
or the additi<strong>on</strong>al training resources included with your <strong>Sweetwater</strong><br />
purchase for further help. If you get any error messages al<strong>on</strong>g the<br />
way, please c<strong>on</strong>tact <strong>Sweetwater</strong> Technical Support.<br />
Enjoy <str<strong>on</strong>g>Pro</str<strong>on</strong>g> <str<strong>on</strong>g>Tools</str<strong>on</strong>g>!