AK-2 PRO SETUP GUIDE V1 - Kelfar.net
AK-2 PRO SETUP GUIDE V1 - Kelfar.net
AK-2 PRO SETUP GUIDE V1 - Kelfar.net

You also want an ePaper? Increase the reach of your titles
YUMPU automatically turns print PDFs into web optimized ePapers that Google loves.
http://www.kelfar.<strong>net</strong><br />
<strong>AK</strong>-2 <strong>PRO</strong> World Scale Tuning<br />
<strong>SETUP</strong> <strong>GUIDE</strong> V2.2<br />
<strong>AK</strong>-2 Pro World Scale Tuning is a MIDI device that converts a wide range of<br />
synthesizers to a specific Scale Tuning. It can adjust the pitch of each note in the octave<br />
(C to B) to -64 to +63 cents.<br />
Key Benefits<br />
• <strong>AK</strong>-2 Pro can be connected simultaneously to two synthesizers via the two<br />
MIDI_OUTS (Primary and Secondary)<br />
• <strong>AK</strong>-2 Pro works on most MIDI synthesizers ( i.e. Yamaha, Roland, Korg,<br />
Ketron, and Kurzweil)<br />
• <strong>AK</strong>-2 Pro works on most Midi synthesizers that support Pitch Bend midi<br />
data Monophonic and *Polyphonic (NEW FEATURE)<br />
• Transpose buttons for Korg Triton series, Fantom x, Korg Pa series,<br />
Ketron,Yamaha, and Keyboards with GM/GM2/XG logo<br />
*Polyphonic in Multitimbral<br />
Supported Instruments/Models:<br />
Korg Pa80, Pa50, Pa60, Pa55Tr, Pa1&2x (Pro), Pa800, Pa3x series, Triton Classic,<br />
Karma, Studio, Extreme, Le, Tr, Micro X, X50, Kronos series, M3 series, and Oasys<br />
Roland Fantom S, X, G, and models with GS logo<br />
Yamaha Motif ES/ MO (preset scale only - Arabic 2) and instruments with XG logo,<br />
Tyros/Psr series, Motif XS (Voice,Song,Pattern), and Motif XF (Voice,Song,Pattern)<br />
Ketron VEGA, SD5, SD1, and AUDYA series<br />
Kontakt with a provided script - Kontakt Script (Native Instruments)<br />
Kurzweil K2600 and K2000 series<br />
World Scales Support (-64 cents to +64 cents)<br />
Equal Tempered Tuning System<br />
Micro Tuning System via User-Programmable Scales<br />
Turkish ( Byselik, Rast, Ussak, Nikirz, Saba, Huazm, Siga, and more)<br />
Byzantine (Modes 1,2,3,4,5,6,7,and 8)<br />
Arabic (Bayati, Rast, Siga, Huseini, Hijaz, amd more)<br />
Persian<br />
Kurdish<br />
Syrian<br />
and more...<br />
1<br />
Copyright © 2005-11 <strong>Kelfar</strong> Technologies
http://www.kelfar.<strong>net</strong><br />
Table of Contents<br />
TABLE OF CONTENTS...........................................................................................................................2<br />
REAR PANEL.......................................................................................................................................3<br />
FRONT PANEL......................................................................................................................................3<br />
LEFT SIDE PANEL................................................................................................................................3<br />
A. INITIAL SETTING AND VIEWING INSTRUMENT SELECTIONS ON POWER-UP.............................................4<br />
B. CHANGING <strong>PRO</strong>GRAMMING/SELECTING THE PRIMARY & SECONDARY INSTRUMENTS.............................4<br />
C. <strong>PRO</strong>GRAMMING MIDI OUT 1 OR 2................................................................................................5<br />
TABLE OF KEY VALUES (SUPPORTED BRANDS AND MODELS).....................................................................6<br />
D. <strong>PRO</strong>GRAMMING UNIVERSAL MODES 1 AND 2 (POLYPHONIC/TWO TRACKS).........................................6<br />
E. <strong>PRO</strong>GRAMMING THE UNIVERSAL MODE 3 (MONOPHONIC/SINGLE TRACK)...........................................7<br />
F. <strong>PRO</strong>GRAMMING THE UNIVERSAL MODE 4 (POLYPHONIC 12 NOTES MAX)..............................................8<br />
G. <strong>PRO</strong>GRAMMING USER SCALES (BANK 01 TO 09):..............................................................................9<br />
OPERATING THE <strong>AK</strong>-2 <strong>PRO</strong>...............................................................................................................10<br />
1. STANDARD MODE...........................................................................................................................10<br />
2. UNIVERSAL MODE.........................................................................................................................10<br />
3. USER SCALES................................................................................................................................12<br />
4. TRANSPOSITION..............................................................................................................................12<br />
5. STANDBY MODE..............................................................................................................................12<br />
<strong>SETUP</strong> INSTRUCTIONS PER KEYBOARD..................................................................................................13<br />
*KORG PA80/60/50/55TR ©..........................................................................................................13<br />
*KORG PA1X / <strong>PRO</strong> ©......................................................................................................................13<br />
*KORG TRITON SERIES ©...................................................................................................................13<br />
*KURZWEIL ©...................................................................................................................................13<br />
*YAMAHA XG ©..............................................................................................................................13<br />
*ROLAND FANTOM X ©.....................................................................................................................13<br />
KORG PA800/ PA2X <strong>PRO</strong>/ PA3X SERIES.............................................................................................14<br />
YAMAHA TYROS AND PSR SERIES........................................................................................................18<br />
KORG M3 SERIES..............................................................................................................................21<br />
IMPORTANT INFORMATION:..................................................................................................................23<br />
Copyright © 2005-11 <strong>Kelfar</strong> Technologies 2
3<br />
http://www.kelfar.<strong>net</strong><br />
<strong>AK</strong>-2 <strong>PRO</strong> World Scale Tuning<br />
<strong>SETUP</strong> <strong>GUIDE</strong> <strong>V1</strong>.9<br />
© KELFAR TECHNOLOGIES<br />
http://www.kelfar.<strong>net</strong><br />
Rear Panel<br />
MIDI OUT(1) DC 5V (13) - RESET/TRANSPOSE + (9/10/11) PA80/60/55TR50(12)<br />
ADJUST<br />
4/5<br />
6<br />
Front Panel<br />
Left Side Panel<br />
MIDI IN/OUT 2(2/3)<br />
Basic Unit Functions<br />
1. Midi Out 1 (rear) - Primary Instrument midi connection. (Standard mode)<br />
2. Midi Out 2 (left side) - Secondary Instrument midi connection. (Standard mode)<br />
3. Midi In (left side) - Enabled for the Universal Mode. (Universal mode)<br />
4. Tune/Setup (front) - Selectable User Scales (User 00 to User 09)<br />
5. Tune/Setup (front) - Programmable User Scales (User 01 to User 09)<br />
Copyright © 2005-11 <strong>Kelfar</strong> Technologies<br />
14<br />
7/8
http://www.kelfar.<strong>net</strong><br />
6. Buttons (C-B) (front) – LED indicators above each denote: Enabled (LED On)<br />
or Disabled (LED Off)<br />
7. Cancel (front) - Resets the pitch of each note to 00 Cents<br />
8. STBY (front) - Power the <strong>AK</strong>2 Pro off (Standby mode)<br />
9. Reset (rear) – Use to return functions to original settings (red)<br />
10. Transpose (rear) - Transposes in Chromatic steps (-12 to +12) via Plus (+) and<br />
Minus (-) buttons (black)<br />
11. Adjust (rear) - Plus (+) and Minus (-) buttons (black)<br />
12. Korg Pa80, 60, 55Tr connector (rear) – input connection for listed Korg<br />
keyboards<br />
13. Power supply connector (rear) - 5vDC<br />
14. Display screen (front) - (2 digits) and minus sign (LED)<br />
User-Programmable Functions<br />
A. Initial Setting and Viewing Instrument Selections on power-up<br />
Primary Instrument:<br />
1. Brand shown on Table of Key Values below using keys indicated.<br />
LED Display shows P1<br />
2. Model shown beneath Brand on table using keys indicated.<br />
LED Display shows P2<br />
Secondary Instrument:<br />
1. Brand shown on table using keys indicated.<br />
LED Display shows S1<br />
2. Model shown beneath Brand on table using keys indicated.<br />
LED Display shows S2<br />
User Scales:<br />
1. User Scale<br />
LED Display shows Ux (x=0-9)<br />
Note: In Universal Mode 1 to 4. The Display shows P1 or P2 or P3 or P4<br />
B. Changing Programming/Selecting the Primary & Secondary Instruments<br />
Press both the CANCEL/STBY and TUNE/<strong>SETUP</strong> buttons<br />
Primary Instrument<br />
LED Display shows P1<br />
1. Press appropriate key to select the Brand of the instrument as shown on Table of Key<br />
Copyright © 2005-11 <strong>Kelfar</strong> Technologies 4
http://www.kelfar.<strong>net</strong><br />
Values below<br />
LED Display shows P2<br />
2. Press appropriate key to select the specific Model of the instrument.<br />
Secondary Instrument<br />
1. After programming the Primary Instrument.<br />
LED Display shows S1<br />
2. Press appropriate key to select the Brand of the instrument.<br />
LED Display shows S2<br />
3. Press appropriate key to select the specific Model of the instrument.<br />
Note: After pressing CANCEL/STBY the LED will turnRED. After sucessfuly inputting the new<br />
settings, the LED will return to GREEN.<br />
C. Programming MIDI OUT 1 or 2<br />
Programming MIDI OUT 1 / Primary Instrument:<br />
1. Press both the CANCEL/STBY and TUNE/<strong>SETUP</strong> buttons<br />
LED Display shows P1<br />
2. Press key to select the Brand of instrument.<br />
LED Display shows P2<br />
3. Press any key to select the instrument Model.<br />
LED Display shows S1<br />
4. Press the CANCEL/STBY<br />
LED Display shows FP<br />
5. <strong>AK</strong>2 Pro will reboot<br />
Programming MIDI OUT 2/Secondary Instrument:<br />
1. Press both the CANCEL/STBY and TUNE/<strong>SETUP</strong> buttons<br />
LED Display shows P1<br />
2. Press CANCEL/STBY again<br />
LED Display shows S1<br />
3. Press key to select instrument Brand.<br />
LED Display shows S2<br />
4. Press key to select instrument Model.<br />
LED Display shows FP<br />
5. <strong>AK</strong>2 Pro will reboot<br />
5<br />
Copyright © 2005-11 <strong>Kelfar</strong> Technologies
http://www.kelfar.<strong>net</strong><br />
Table of Key Values (supported brands and models)<br />
C C# D D# E F F# G<br />
BRAND<br />
Korg Yamaha Kurz<br />
weil<br />
Roland<br />
GS<br />
Ayoub Ketron Native<br />
Instruments<br />
Universal<br />
mode<br />
C Pa1x/Pa800/ Motif-ES (Voice, Kurz 16CH 1CH 16CH Kontakt2 *Mode 1,<br />
500/Pa2x/ pattern and song<br />
16Ch 2 CH, Fine<br />
Pa3x mode only)<br />
Tune<br />
C# Pa80/50/55T XG/1CH(Repeat<br />
16CH *Mode 2,<br />
R/60 mode)<br />
2 CH P.Bend<br />
D Triton_Le/Tr XG: 16CH XG<br />
**Mode 3,<br />
TRANSPOSE<br />
1 CH, Mono,<br />
P. Bend<br />
D# Triton_ XG: 16CH GM<br />
***Mode 4,<br />
Extreme/ TRASNPOSE<br />
12 CH,<br />
Studio<br />
P. Bend<br />
E Triton<br />
Karma<br />
Tyros/Psr series<br />
F Triton Motif XF voice<br />
Classic song pattern<br />
F# micro X / Motif XS voice<br />
X50 song pattern<br />
G Korg M3<br />
/Kronos<br />
G# Trinity<br />
A Korg Z1<br />
D. Programming Universal Modes 1 and 2 (Polyphonic/Two Tracks)<br />
1. Press both the CANCEL/STBY and TUNE/<strong>SETUP</strong> buttons<br />
2. Press the key "G"<br />
LED Display shows P2<br />
3. Select Mode 1 "C" or Mode 2 "C#"<br />
LED Display shows Pc for Mode 1 and Mode 2<br />
4. Select the Midi-In Channel (1-16) 1 by using the TRANSPOSE/ADJUST (+) and (-) buttons<br />
5. Press<br />
LED Display shows SC<br />
6. Select the Midi-Out Channel (1-16) using the TRANSPOSE/ADJUST (+) and (-) buttons 2<br />
7. Press<br />
LED Display shows FP<br />
8. <strong>AK</strong>2 Pro will reboot<br />
LED Display shows P1 or P2<br />
Notes:<br />
1. For Universal Mode to work, connect the <strong>AK</strong>2 Pro MIDI IN/OUT to your multitimbral<br />
Copyright © 2005-11 <strong>Kelfar</strong> Technologies<br />
6
http://www.kelfar.<strong>net</strong><br />
sequencer/Synthesizer/Keyboard Midi-In and Midi-Out. (see figure 1 and 2 )<br />
2. Your keyboard must support Fine Tuning Midi data (for Mode 1) or Pitch Bend Midi<br />
Data (for Mode 2).<br />
3. Set Keyboard to Local control off.(see Figure 1)<br />
4. Set Pitch Bend Range to 2.<br />
5. Only the first detuned note of the User Scale will be applied to the 12 notes. For<br />
example, if User Scale 1, and note C is set to -25 cents then all the selected notes(C-B)<br />
will be set to -25 cents.<br />
(Figure 1)<br />
Connecting <strong>AK</strong>2 Pro to a Computer Sequencer using external Keyboard or Controller:<br />
(Figure 2)<br />
E. Programming the Universal Mode 3 (Monophonic/Single Track)<br />
1. Press both CANCEL/STBY and TUNE/<strong>SETUP</strong> buttons2. Press the key "G"<br />
LED Display shows P2<br />
7<br />
Midi Out<br />
Keyboard/Synth<br />
Controller<br />
midi In<br />
Midi Out<br />
Keyboard /Synth<br />
Midi In<br />
Computer SEQUENCER<br />
or Keyboard SyNTH<br />
Copyright © 2005-11 <strong>Kelfar</strong> Technologies<br />
Local control off<br />
Local control On
3. Select Mode 3 using the "D" key<br />
LED Display shows Pcfor Mode 3<br />
http://www.kelfar.<strong>net</strong><br />
4. Select the incoming Midi-In Ch. (1-16) 1 by using the using the TRANSPOSE/ADJUST (+) and<br />
(-) buttons<br />
5. Press<br />
LED Display shows FP<br />
6. <strong>AK</strong>2 Pro will reboot<br />
LED Display shows P3<br />
Notes:<br />
1. For Universal Mode 3 to work, connect the <strong>AK</strong>2 Pro MIDI IN/OUT to your multitimbral<br />
2. sequencer/Synthesizer/Keyboard Midi-In and Midi-Out. (see Figures 1 and 2 above )<br />
Your keyboard must support Pitch Bend Midi data<br />
3. Set Keyboard to Local control off. (Figure 1)<br />
4. Set Pitch Bend range to 2.<br />
5. You may further adjust the pitch of each note in the octave (C to B) to -64/+63 cents by<br />
programming your own User Scales 01-09. User 00 is set to -50 cents "fixed."<br />
F. Programming the Universal Mode 4 (Polyphonic 12 notes max)<br />
1. Press both CANCEL/STBY and TUNE/<strong>SETUP</strong> buttons<br />
2. Press the key "G"<br />
LED Display shows P2<br />
3. Select key "D#" for Mode 4<br />
LED Display shows FP<br />
4. <strong>AK</strong>2 Pro will reboot<br />
LED Display shows P4<br />
Notes:<br />
1. For this Universal Mode 4 to work, connect the <strong>AK</strong>2Pro MIDI IN/OUT to your<br />
multitimbral sequencer/Synthesizer/Keyboard Midi-In and Midi-Out. (see Figures<br />
2. 1 and 2 above)<br />
Set Keyboard to Channel 1<br />
3. Your keyboard must support Pitch Bend Midi data<br />
4. Set Keyboard to Local control Off. (See Figure 1 above)<br />
5. Set Pitch Bend range to 2.<br />
6. You may further adjust the pitch of each note in the octave (C to B) to -64/+63<br />
cents by programming your own User Scales 01-09. User 00 is set to -50 cents<br />
"fixed."<br />
Copyright © 2005-11 <strong>Kelfar</strong> Technologies<br />
8
http://www.kelfar.<strong>net</strong><br />
G. Programming User Scales (Bank 01 to 09):<br />
1. Press<br />
LED display shows Ux x=0-9<br />
2. Select a User Scale "1=C#, 2 =D, 3=D#, 4=E, 5=F, 6=F#, 7=G, 8=G#, 9=A". User 0<br />
is default of -50 cents and cannot be programmed or edited.<br />
3. Select a note to detune (C-B)<br />
LED display will show the value of the selected note.<br />
4. Use the TRANSPOSE/ADJUST (+) and (-) buttons to adjust the value of the selected note within<br />
the range of -64 cents to + 64 cents.<br />
5. Repeat steps 5 and 6 to program more notes<br />
6. Press to exit and save the User Scale into the <strong>AK</strong> 2 Pro internal memory<br />
Notes :<br />
1. Press CANCEL/STBY to cancel the operation and exit the programming mode without<br />
saving the new user program.<br />
2. Pressing without a note key being pressed will exit the tuning mode.<br />
9<br />
3. Pressing the RESET button without a note key being pressed will reset the selected<br />
user scale to zero.<br />
4. During programming operation the CANCEL/STBY LED is lit red.<br />
5. During programming operation the yellow LED will begin flashing.<br />
Copyright © 2005-11 <strong>Kelfar</strong> Technologies
1. Standard Mode<br />
http://www.kelfar.<strong>net</strong><br />
Operating the <strong>AK</strong>-2 Pro<br />
In Standard Mode, the <strong>AK</strong>-2 Pro sends a particular System Exclusive midi message to a<br />
selected instrument/brand. In order for this operation to work, your midi<br />
keyboard/synthesizer Midi In port should be Enabled and ready to receive System<br />
Exclusive midi data. (Refer to your keyboard/ synth Owner's Manual)<br />
Note: Your Owner's Manual might use a shortcut name for the System Exclusive, e.g.<br />
sysex<br />
The 12 (C-B) buttons are used to detune a keyboard/synthesizer within the octave. Each<br />
time you select a note the LED for that selected note will be lit ON indicating that the<br />
SYSEX message has been sent to your synth and the selected note is detuned.<br />
Example:<br />
Notes (C-B)<br />
To convert synthesizer to play the Bayati makam.<br />
1. Press<br />
2. Press C for Default tuning of -50 cents.<br />
3. Press "E" and "B"<br />
4. Both "E & B" RED LEDs are lit ON indicating that the SYSEX message has been sent<br />
from <strong>AK</strong>2 Pro to the synthesizer<br />
5. Your synthesizer is ready to play the Bayati makam.<br />
Note: Pressing CANCEL/STBY will reset your synthesizer detuning to 0 Cents. All<br />
selected notes LEDs will be turned Off.<br />
2. Universal Mode<br />
In Universal Mode, the <strong>AK</strong>-2 Pro sends Pitch Bend midi data to detune your instrument.<br />
You may have to adjust the Pitch Bend range to two. (Refer to your keyboard/<br />
synthesizer Owner's Manual)<br />
Mode 1 (Fine Tune): Incoming notes will be routed and sent to a selected channel PC or<br />
SC.<br />
Depending on your selection, if no notes are selected then the incoming notes will be sent<br />
to the Primary Channel. However, each selected note will be sent to Secondary Channel<br />
as programmed by the user. (See page 4)<br />
Copyright © 2005-11 <strong>Kelfar</strong> Technologies 10
http://www.kelfar.<strong>net</strong><br />
All incoming midi events received by the Primary Channel will be resent to both Primary<br />
Channel and Secondary Channel.<br />
Midi events supported by the <strong>AK</strong>-2 Pro:<br />
Note on/off, Control Change, Program Change, Aftertouch Polyphonic, Channel<br />
Aftertouch, Pitch Wheel Control, System Exclusive,<br />
Mode 2 (Pitch Bend): Incoming notes will be routed and sent to a selected channel PC or<br />
SC.<br />
Depending on your selection, if no notes are selected then the incoming notes will be sent<br />
to the Primary Channel. However, each selected note will be sent to Secondary Channel<br />
as programmed by the user. (See page 4)<br />
All incoming midi events received by the Primary Channel will be resent to both Primary<br />
Channel and Secondary Channel.<br />
Midi events supported by the <strong>AK</strong>-2 Pro:<br />
Note on/off, Control Change, Program Change, Aftertouch Polyphonic, Channel<br />
Aftertouch, Pitch Wheel Control, and System Exclusive.<br />
Mode 3 (Pitch Bend): In this mode the <strong>AK</strong>2 Pro operation will be in monophonic.<br />
Mode 4 (Pitch Bend): Each selected note will be routed and sent to its own channel as<br />
defined by the <strong>AK</strong>-2 Pro. In order for this mode to work, your midi keyboard must be<br />
operating using Channel One (ch.1). (Refer to your keyboard/ synth Owner's Manual)<br />
Notes (C-B)<br />
Notes:<br />
1. If no notes are selected then the incoming notes will be resent to Channel One.<br />
2. Selected notes will be sent to the following channels:2,3,4,5,6,7,8,9,11,12,13,14,15.<br />
All incoming midi events received by the Primary Channel will be resent to 13 channels.<br />
Midi events supported by the <strong>AK</strong>-2 Pro:<br />
Note on/off, Control Change, Program Change, Aftertouch Polyphonic, Channel<br />
Aftertouch, Pitch Wheel Control, System Exclusive.<br />
11<br />
Copyright © 2005-11 <strong>Kelfar</strong> Technologies
3. User Scales<br />
http://www.kelfar.<strong>net</strong><br />
<strong>AK</strong>-2 Pro User Scales 01 to 09 are programmable. User Scale 00 is the default detuning<br />
of -50 cents. User Scale 00 is predefined by the <strong>AK</strong>-2 Pro and cannot be reprogrammed.<br />
Selecting User Scales in real time.<br />
Example:<br />
To Select User Scale 03<br />
1. Press<br />
2. The Display shows the existing User Scale<br />
3. Press D#<br />
4. Press to exit.<br />
Note: When selecting User Scale 00 the <strong>AK</strong>-2 Pro will recall User 00 and exit the<br />
operation.<br />
4. Transposition<br />
To transpose a keyboard/synthesizer in Chromatic Steps: -12 to +12, use the<br />
TRANSPOSE/ADJUST (+) and (-) buttons.<br />
Red button: Resets the value to 00<br />
Black (+) = Increment in positive values<br />
Black (-) = Decrement in negative values<br />
The values are displayed on the two digits display.<br />
Note:<br />
The transpose feature is defined by your synthesizer and specific to each manufacture.<br />
The following midi events are supported: GM2, XG, Ketron, Fine Tune only (Mode 1 to<br />
4)<br />
5. Standby mode<br />
1. Hold the CANCEL/STBY for more than 5 seconds, and the <strong>AK</strong>-2 Pro will power off.<br />
2. Power-up the <strong>AK</strong>-2 Pro from standby mode by pressing the CANCEL/STBY again.<br />
3. <strong>AK</strong>-2 will reboot.<br />
Copyright © 2005-11 <strong>Kelfar</strong> Technologies 12
http://www.kelfar.<strong>net</strong><br />
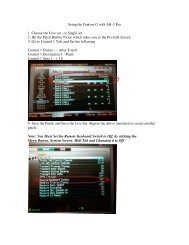
Setup Instructions per Keyboard<br />
*Korg PA80/60/50/55TR ©<br />
Note: You need a ¼" to ¼" cable<br />
1. Turn the Pa power On and do not connect the <strong>AK</strong>-2 Midi_Out to the Pa MIDI_In at this moment!<br />
2. Connect the ¼" jack from the REAR of the <strong>AK</strong>-2 to PA80/60/50/55Tr (Assign. PDL/SW)<br />
3. In the PA Global mode Pa/Sw….<br />
4. Select P/s :Q. Tone<br />
5. In the PA Global mode Midi In Channel<br />
6. Use the Track Button to switch from Ch 01 to 16<br />
7. Select Ch01: Global<br />
8. Save all the SETTINGS by pressing WRITE<br />
9. Lock the SCALE in the Preferences by going to<br />
Pref: Lock (Gbl). WRITE IT!<br />
*Important: It is recommended that you do not touch the keys on the PA while selecting the<br />
scale(s) from the <strong>AK</strong>-2 Pro. That might add or delete extra ¼ notes to the PA.<br />
*Korg Pa1x / Pro ©<br />
*Important: Korg Pa1x / Pro must be first upgraded to OS 2.01 and later before the <strong>AK</strong>-2 Pro<br />
box can work with it.<br />
1- Go to GLOBAL Press MIDI, and choose the FILTERS tab on the bottom of the screen.<br />
2- On the original factory setting, you will see both channel 1 for MIDI IN and MIDI OUT set to "Sys.<br />
Excl." as default. Go ahead and change them both to OFF!<br />
3- Save this setting by opening the drop down menu on this page (loacted in the upper right corner of the<br />
screen) and save both WRITE - GLOBAL SET UP and WRITE - MIDI SET UP.<br />
That's it! The <strong>AK</strong>-2 should be able to control all sounds within all sections of the keyboard, including the<br />
otherwise impossible SOUND MODE!<br />
*Korg Triton series ©<br />
1. Go to Global mode then navigate to MIDI<br />
2. Check the midi filter box for Sysexlusive<br />
3. Write Global into the memory.<br />
4. Change the User Scale for each Program/Combo./Moss to User 00, Scale C and WRITE<br />
Program/Combo/Moss.<br />
*Kurzweil ©<br />
1. Set Sysex ID to 127<br />
*Yamaha XG ©<br />
1. Consult your Yamaha manual to change the midi setup of the Yamaha keyboard/synth.<br />
2. By default in some Yamaha Keyboards, such as the PSR series, the Midi channels are sent to the<br />
Song/Sequencer.<br />
3. On the PSR/Tyros, you will need to make sure that the Midi_In messages are coming to the sounds that<br />
you are playing directly on the keyboard (i.e Main=Ch1, =Ch2, etc…)<br />
4. Make sure the systemexclusive is enabled.<br />
*Roland Fantom X ©<br />
1. Menu > System > Midi > Receive > Remote keyboard Switch > ON<br />
2. Menu > System > Midi > Receive > Receive Exclusive > ON<br />
3. System Write<br />
*(Refer to your keyboard/ synth Owner's Manual)<br />
13<br />
Copyright © 2005-11 <strong>Kelfar</strong> Technologies
http://www.kelfar.<strong>net</strong><br />
Korg Pa800/ Pa2x Pro/ Pa3x series<br />
1. Press the MENU button to open the Global Edit Menu<br />
2. Select Midi<br />
3. Select the FILTERS tab<br />
Copyright © 2005-11 <strong>Kelfar</strong> Technologies 14
http://www.kelfar.<strong>net</strong><br />
4. By default the Midi In Filter is set to Sys. Excl. Change it to Off<br />
5. Press the MENU button to open the Global edit menu. Select General Controls<br />
15<br />
Copyright © 2005-11 <strong>Kelfar</strong> Technologies
6. Select the Transp.Control tab<br />
http://www.kelfar.<strong>net</strong><br />
7. Select the Lock tab. Select Tuning. Unlock Master Transpose.<br />
Lock Perf. M. Transpose, Style Perf. M. Transpose, Subscale/Quarter Tone, STS<br />
Subscale/Quarter Tone, and Auto Octave.<br />
8. Write your settings. Touch the page menu icon to open the menu. Touch a command<br />
to select it. Touch anywhere in the display to close the menu without selecting a<br />
command.<br />
Programming the <strong>AK</strong>-2 Pro<br />
Press both the CANCEL/STBY and TUNE/<strong>SETUP</strong> buttons<br />
Primary Instrument<br />
The Display shows P1<br />
1. Press "C"<br />
The Display shows P2<br />
2. Press "C".<br />
Copyright © 2005-11 <strong>Kelfar</strong> Technologies 16
http://www.kelfar.<strong>net</strong><br />
3. If you do not want to Program the Secondary instrument then press CANCEL/STBY.<br />
17<br />
Copyright © 2005-11 <strong>Kelfar</strong> Technologies
1. Press FUNCTION<br />
2. Select MIDI<br />
3. Select MIDI OFF then Press EDIT<br />
http://www.kelfar.<strong>net</strong><br />
Yamaha Tyros and Psr series<br />
Copyright © 2005-11 <strong>Kelfar</strong> Technologies 18
4. Enable RECEIVE Sysex (SYS/EX.) Rx:ON<br />
http://www.kelfar.<strong>net</strong><br />
5. Select the RECEIVE tab and assign PART to the appropriate MIDIA/USB1 CHANNEL<br />
19<br />
Copyright © 2005-11 <strong>Kelfar</strong> Technologies
http://www.kelfar.<strong>net</strong><br />
6. Press the EXIT button and Select the USER tab<br />
7. Give your MIDI setup a name i.e <strong>AK</strong> 2_pro and select SAVE. Press the [EXIT]<br />
button.<br />
Programming the <strong>AK</strong>-2 Pro<br />
Press both the CANCEL/STBY and TUNE/<strong>SETUP</strong> buttons<br />
Primary Instrument<br />
The Display shows P1<br />
1. Press "C#"<br />
The Display shows P2<br />
2. Press "E"<br />
3. If you do not want to Program the Secondary instrument then press CANCEL/STBY.<br />
Copyright © 2005-11 <strong>Kelfar</strong> Technologies 20
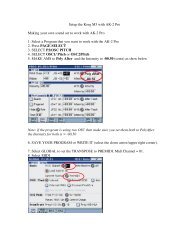
Making your own sound set to work with <strong>AK</strong>-2 Pro<br />
http://www.kelfar.<strong>net</strong><br />
Korg M3 series<br />
1. Select a Program that you want to work with the <strong>AK</strong>-2 Pro<br />
2. Press PAGE SELECT<br />
3. SELECT P2/OSC PITCH<br />
4. SELECT OSC1/ Pitch or OSC2/Pitch<br />
5. M<strong>AK</strong>E AMS to Poly After and the Intensity to -00.50 (cents) as show below<br />
Note: if the program is using two OSC then make sure you set them both to PolyAfter<br />
the Intensity for both is = -00.50<br />
6. SAVE YOUR <strong>PRO</strong>GRAM or WRITE IT (select the down arrow/upper right corner).<br />
7. Select GLOBAL to set the TRANSPOSE to PREMIDI. Midi Channel = 01.<br />
8. Select MIDI<br />
21<br />
Copyright © 2005-11 <strong>Kelfar</strong> Technologies
http://www.kelfar.<strong>net</strong><br />
9. Select Midi Routing<br />
10. Make sure Midi Filter is selected for all of them (as shown in the image below)<br />
11. Write Global Settings. Select the arrow down >Write Global Setting.<br />
The Write Global Setting dialog box will appear.<br />
Programming the <strong>AK</strong>-2 Pro<br />
Press both the CANCEL/STBY and TUNE/<strong>SETUP</strong> buttons<br />
Primary Instrument<br />
The Display shows P1<br />
1. Press "C"<br />
The Display shows P2<br />
2. Press "G".<br />
The Display shows the midi channel number i.e 0c 1<br />
Notes: Make sure that the <strong>AK</strong>-2 Pro's midi channel is the same as the Korg M3's midi channel.<br />
Use the Transpose buttons of the <strong>AK</strong>-2 Pro to select the appropriate midi channel.<br />
3. Press Tune/Setup (yellow button)<br />
4. If you do not want to Program the Secondary instrument then press CANCEL/STBY.<br />
Copyright © 2005-11 <strong>Kelfar</strong> Technologies 22
Important information:<br />
http://www.kelfar.<strong>net</strong><br />
Unit Dimensions 5.8 in x 3.2 in x 1.8 in / 14.7 cm x 8.1 cm x 4.6 cm (metric)<br />
Included with the <strong>AK</strong>-2 Pro:<br />
Power Supply 110v/240v to 5v DC.<br />
Registration:<br />
Register your <strong>AK</strong>-2 Pro today: http://kelfar.<strong>net</strong>/contact.htm<br />
Date of Purchase:<br />
Warranty:<br />
1 year limited warranty by <strong>Kelfar</strong> Technologies from the date of purchase.<br />
Supporting Documents and Software<br />
<strong>AK</strong>-2 Graphic Interface can be found here: http://kelfar.<strong>net</strong>/prod06.htm<br />
For the latest <strong>AK</strong>-2 Pro document: http://kelfar.<strong>net</strong>/prod06.htm<br />
Latest Firmware update http://kelfar.<strong>net</strong>/prod06.htm<br />
Support:<br />
Email: support@kelfar.<strong>net</strong><br />
*Specifications subject to change without notice.<br />
Document last updated: Tuesday, March 27, 2012<br />
23<br />
Copyright © 2005-11 <strong>Kelfar</strong> Technologies