SUMMIT® GAS GRILL - Help - Weber
SUMMIT® GAS GRILL - Help - Weber
SUMMIT® GAS GRILL - Help - Weber

Create successful ePaper yourself
Turn your PDF publications into a flip-book with our unique Google optimized e-Paper software.
8<br />
CHECK FOR <strong>GAS</strong> LEAKS<br />
WARNING : The gas connections of your Summit ®<br />
gas grill have been factory tested. We do however<br />
recommend that you leak check all gas connections<br />
before operating your Summit ® gas grill.<br />
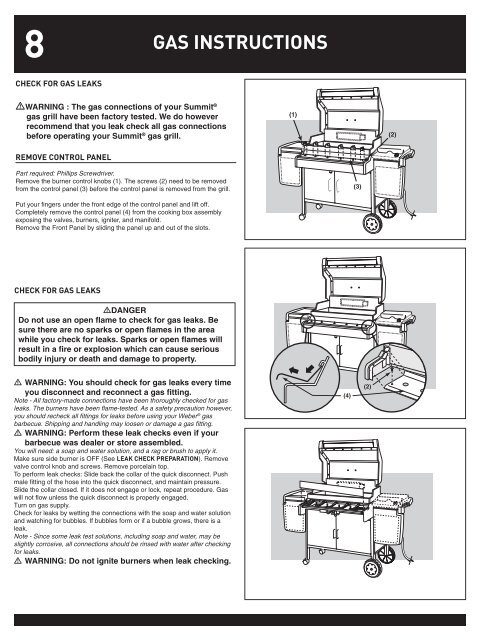
REMOVE CONTROL PANEL<br />
Part required: Phillips Screwdriver.<br />
Remove the burner control knobs (1). The screws (2) need to be removed<br />
from the control panel (3) before the control panel is removed from the grill.<br />
Put your fi ngers under the front edge of the control panel and lift off.<br />
Completely remove the control panel (4) from the cooking box assembly<br />
exposing the valves, burners, igniter, and manifold.<br />
Remove the Front Panel by sliding the panel up and out of the slots.<br />
CHECK FOR <strong>GAS</strong> LEAKS<br />
DANGER<br />
Do not use an open fl ame to check for gas leaks. Be<br />
sure there are no sparks or open fl ames in the area<br />
while you check for leaks. Sparks or open fl ames will<br />
result in a fi re or explosion which can cause serious<br />
bodily injury or death and damage to property.<br />
WARNING: You should check for gas leaks every time<br />
you disconnect and reconnect a gas fi tting.<br />
Note - All factory-made connections have been thoroughly checked for gas<br />
leaks. The burners have been fl ame-tested. As a safety precaution however,<br />
you should recheck all fi ttings for leaks before using your <strong>Weber</strong> ® gas<br />
barbecue. Shipping and handling may loosen or damage a gas fi tting.<br />
WARNING: Perform these leak checks even if your<br />
barbecue was dealer or store assembled.<br />
You will need: a soap and water solution, and a rag or brush to apply it.<br />
Make sure side burner is OFF (See LEAK CHECK PREPARATION). Remove<br />
valve control knob and screws. Remove porcelain top.<br />
To perform leak checks: Slide back the collar of the quick disconnect. Push<br />
male fi tting of the hose into the quick disconnect, and maintain pressure.<br />
Slide the collar closed. If it does not engage or lock, repeat procedure. Gas<br />
will not fl ow unless the quick disconnect is properly engaged.<br />
Turn on gas supply.<br />
Check for leaks by wetting the connections with the soap and water solution<br />
and watching for bubbles. If bubbles form or if a bubble grows, there is a<br />
leak.<br />
Note - Since some leak test solutions, including soap and water, may be<br />
slightly corrosive, all connections should be rinsed with water after checking<br />
for leaks.<br />
WARNING: Do not ignite burners when leak checking.<br />
<strong>GAS</strong> INSTRUCTIONS<br />
(1)<br />
(4)<br />
(3)<br />
(2)<br />
(2)