Eldningsinstruktion och bruksanvisning Cronspisen 100, 200, 500 ...
Eldningsinstruktion och bruksanvisning Cronspisen 100, 200, 500 ...
Eldningsinstruktion och bruksanvisning Cronspisen 100, 200, 500 ...

You also want an ePaper? Increase the reach of your titles
YUMPU automatically turns print PDFs into web optimized ePapers that Google loves.
GB<br />
● Because there is a constant flow of air though the tiled<br />
stove, cold room air is drawn in and hot air released, dust<br />
can gather inside the grille under the tiled stove. Therefore,<br />
one should regularly clean under the tile stove.<br />
● Components close to the centre of the fire may need to<br />
be replaced. An example of such a component is the stove<br />
cladding. The life of these components depends on how<br />
much and in what way the tiled stove has been used.<br />
SWEEPING<br />
Sweeping the tiled stove, chimney ducts and chimney<br />
connections should be carried out by a chimney sweep.<br />
In order to access the flue damper and rear connection<br />
the start damper is opened and the soot hatch is removed.<br />
Remove the smoke baffle and remove the vermiculite<br />
panels from the sides of the stove. There are guide baffles<br />
hanging from the edges of the insert in the smoke channels<br />
on both sides of the stove. Unhook the guide baffles<br />
from the insert and remove them. All the ducts inside the<br />
stove can now be accessed. A soot vacuum cleaner is the<br />
best way to remove soot from the bottom of the tiled stove.<br />
Reinstalling the parts is described in the next section.<br />
If a chimney fire occurs or is suspected, the combustion<br />
damper and the door must be closed. If necessary, contact<br />
the fire brigade to extinguish it. The chimney must always<br />
be inspected by a chimney sweep after a chimney fire.<br />
Components in the firebox<br />
<strong>Cronspisen</strong> <strong>100</strong>, <strong>200</strong><br />
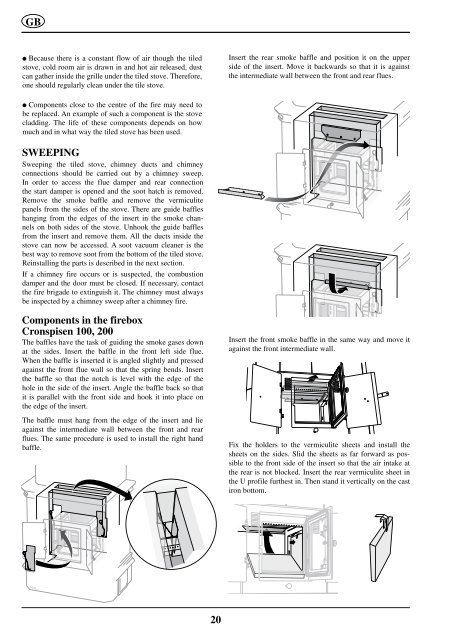
The baffles have the task of guiding the smoke gases down<br />
at the sides. Insert the baffle in the front left side flue.<br />
When the baffle is inserted it is angled slightly and pressed<br />
against the front flue wall so that the spring bends. Insert<br />
the baffle so that the notch is level with the edge of the<br />
hole in the side of the insert. Angle the baffle back so that<br />
it is parallel with the front side and hook it into place on<br />
the edge of the insert.<br />
The baffle must hang from the edge of the insert and lie<br />
against the intermediate wall between the front and rear<br />
flues. The same procedure is used to install the right hand<br />
baffle.<br />
20<br />
Insert the rear smoke baffle and position it on the upper<br />
side of the insert. Move it backwards so that it is against<br />
the intermediate wall between the front and rear flues.<br />
Insert the front smoke baffle in the same way and move it<br />
against the front intermediate wall.<br />
Fix the holders to the vermiculite sheets and install the<br />
sheets on the sides. Slid the sheets as far forward as possible<br />
to the front side of the insert so that the air intake at<br />
the rear is not blocked. Insert the rear vermiculite sheet in<br />
the U profile furthest in. Then stand it vertically on the cast<br />
iron bottom.