Create successful ePaper yourself
Turn your PDF publications into a flip-book with our unique Google optimized e-Paper software.
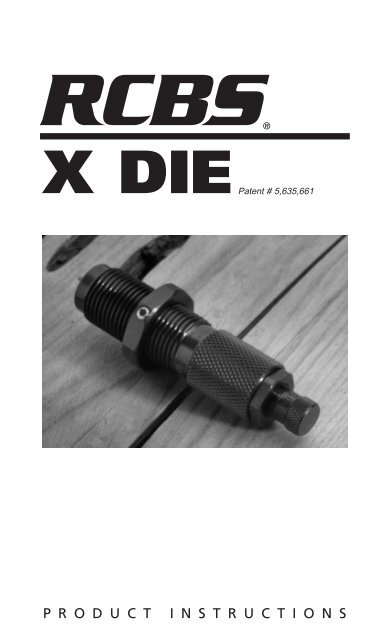
X DIEPatent<br />
# 5,635,661<br />
P R O D U C T I N S T R U C T I O N S
IMPORTANT: READ THIS SECTION FIRST<br />
Before using the <strong>RCBS</strong> X-Sizer <strong>die</strong>, read this instruction manual carefully<br />
to fully learn how to safely operate the related reloading equipment.<br />
Failure to properly operate certain reloading equipment can result in<br />
severe personal injury and/or equipment damage. If you have read<br />
these <strong>instructions</strong>, but do not clearly understand the described operation,<br />
call us at 1-800-533-5000 and a technician will assist you.<br />
This instruction manual contains specific safety and operating information.<br />
It should be considered a permanent part of your reloading equipment and<br />
remain with the equipment at all times for easy reference.<br />
SAFETY<br />
Reloading is an enjoyable and rewarding hobby that can be conducted<br />
safely. But, as with any hobby, carelessness or negligence<br />
can make reloading hazardous. This product has been designed<br />
from the beginning with the user’s safety in mind. When reloading,<br />
safety rules must be followed. By observing these rules, the chance<br />
of a hazardous occurrence causing personal injury or property damage<br />
is minimized.<br />
GENERAL<br />
• Use all equipment as the manufacturer recommends. Study<br />
the <strong>instructions</strong> carefully and become thoroughly familiar<br />
with the operation of the product. If you do not have written<br />
<strong>instructions</strong>, request a copy from the equipment manufacturer.<br />
• Do not take short cuts. Attempting to bypass established<br />
procedures is an invitation to an accident.<br />
• Observe “good housekeeping” in the reloading area. Keep<br />
tools and components neat, clean and orderly. Promptly and<br />
completely clean up primer and powder spills.<br />
• Reload only when you can give your undivided attention. Do<br />
not reload when fatigued or ill, or under the influence of<br />
medications or alcohol. Develop a reloading routine to avoid<br />
mistakes which may prove hazardous. Do not rush - load at a<br />
leisurely pace.<br />
• Always wear adequate eye protection to protect your eyes<br />
from flying particles. You assume unnecessary risk when<br />
reloading without wearing safety glasses.<br />
LOADING DATA<br />
• Use only laboratory tested reloading data. We highly recommend<br />
the SPEER reloading manual and the <strong>RCBS</strong>.load<br />
reloading software.<br />
• OBSERVE ALL WARNINGS ABOUT THE USE OF MAXI-<br />
MUM LISTED LOADS.
PRIMERS AND POWDER<br />
• Store primers and powder beyond the reach of children and<br />
away from heat, dampness, open flames and electrical equipment.<br />
Avoid areas where static electricity is evident.<br />
• Do not use primers of unknown identity. Scrap unknown<br />
primers in accordance with applicable regulations.<br />
• Keep primers in the original factory container until ready to<br />
use. Return unused primers to the same factory packaging for<br />
safety and to preserve their identity. Primer packaging is<br />
designed to provide safe storage.<br />
• DO NOT store primers in bulk. The blast of just a few hundred<br />
primers is sufficient to cause serious injury to anyone<br />
nearby.<br />
• DO NOT force primers. Use care in handling primers.<br />
• DO NOT have more than one can of powder on the bench at<br />
one time. Powder cans should be stored away from the<br />
bench to avoid picking up the wrong one.<br />
• DO NOT use any powder unless its identity is positively<br />
known. The only positive identification is the manufacturer’s<br />
label on the original canister. Discard all mixed<br />
powders and those of uncertain identity.<br />
• If you use a powder measure, replace the lids on both the<br />
powder hopper and powder can after the powder hopper<br />
has been filled.<br />
• When using a powder measure, settle the powder in the<br />
powder hopper before charging any cases. Throw and check<br />
the weight of at least ten charges. This will assure you that<br />
the correct powder charge is being thrown.<br />
• When you finish a reloading session, pour any remaining<br />
powder back into its original factory container. This will preserve<br />
the identity and shelf life of the powder.<br />
• DO NOT smoke while reloading.<br />
RECORD KEEPING<br />
• Keep complete records of reloads. Apply a descriptive label<br />
to each box showing the date produced, and the primer,<br />
powder and bullet used. Labels for this purpose are packed<br />
with SPEER bullets. Never attempt to guess at the<br />
identity of your ammunition.<br />
Because <strong>RCBS</strong> has no control over the type and condition of firearms<br />
used, components selected, assembly of those components<br />
and the use of this product, we assume no responsibility, expressed<br />
or implied, for the use of this product for reloading.
ABOUT THE X DIE<br />
The X-Sizer <strong>die</strong> is a uniquely designed full length resizing <strong>die</strong> for<br />
bottleneck rifle cases. This <strong>die</strong> not only full length resizes the<br />
case, it also limits the growth of the case. This eliminates the<br />
need for repeated trimming after an initial trim is done to standardize<br />
the case. This <strong>die</strong> is not intended to shorten the length of<br />
the case, rather, as the case grows, the mandrel will reduce the<br />
normal rate of growth. This is the result of the case mouth coming<br />
in contact with the mandrel stop during resizing. Cases repeatedly<br />
sized in the X-Sizer <strong>die</strong> will grow a few thousandths of an inch initially,<br />
and will then stabilize below the maximum case length.<br />
Using the X-Sizer <strong>die</strong> eliminates the need to trim after each shot.<br />
X-Sizer <strong>die</strong>s can be used for full-length resizing with or without<br />
the X feature. Partial neck sizing can be done but only without<br />
the X feature.<br />
CLEANING THE X DIE<br />
You MUST clean new <strong>die</strong>s before use. These <strong>die</strong>s contain a<br />
small vent hole through which trapped air escapes during resizing.<br />
Sometimes the vent hole will plug up with factory polishing<br />
material. This material will scratch and dent cases unless it is<br />
removed. To clean, unscrew the mandrel from the <strong>die</strong>. Insert a<br />
straightened paper clip, needle or similar object into the vent hole.<br />
This will push the material into the <strong>die</strong> body. The debris can then<br />
be easily removed by cleaning the inside of the <strong>die</strong> using a patch<br />
saturated with Outers Solvent. Reassemble the <strong>die</strong>.<br />
PREPARING YOUR CASES<br />
All cases must be sized<br />
and trimmed to the same<br />
overall length. For the<br />
best results, full-length<br />
resize each case and trim<br />
to .020” under maximum<br />
case length. This is a<br />
“one-time only” preparation<br />
of any and all cases to<br />
be used in the X-Sizer <strong>die</strong>.<br />
The X-Sizer <strong>die</strong> can be<br />
used for full-length resizing<br />
by setting it as follows:<br />
• Install the proper shell<br />
holder in the ram Photo 1
• Adjust the mandrel so<br />
the decapping pin extends<br />
1/8” below<br />
the <strong>die</strong> (see Photo 1).<br />
• Screw the X-Sizer <strong>die</strong><br />
into the press until the <strong>die</strong><br />
touches the shell holder<br />
when the shell holder is<br />
brought up to the top of the<br />
press stroke. To remove<br />
any play in the press linkage<br />
system, lower the shell<br />
holder and adjust the <strong>die</strong><br />
1/8 to 1/4 of a turn downward<br />
so the press cams<br />
Photo 2<br />
over center. Lower the press<br />
handle all the way and note the “feel” of the cam over in the linkage.<br />
With the handle all the way down, tighten the large <strong>die</strong> lock<br />
ring.<br />
• Insert a lubed case into the shell holder and run it into the <strong>die</strong>.<br />
• Screw the mandrel into the <strong>die</strong> until hard resistance is felt.<br />
• Back the mandrel out 1 to 2 turns and tighten the lock nut on<br />
the mandrel.<br />
• With this setting, lube and resize all the cases you plan to use<br />
in the X-Sizer <strong>die</strong>. After sizing, remove the lube and trim the cases<br />
as directed above.<br />
X DIE SET UP<br />
STEP 1: Back the<br />
mandrel out of the <strong>die</strong> until the decapping pin extends below the<br />
base of the <strong>die</strong> approximately 1/16” to1/8”. See photo 1.<br />
STEP 2: Screw the X-Sizer <strong>die</strong> into the press until the <strong>die</strong> touches<br />
the shell holder when the shell holder is brought up to the top<br />
of the press stroke. To remove any play in the press linkage system,<br />
lower the shell holder and adjust the <strong>die</strong> 1/8 to 1/4 of a turn<br />
downward so the press cams over center. Make every effort possible<br />
to duplicate the same amount of cam force each time the <strong>die</strong> is used.<br />
See photo 2.<br />
This product is covered by the <strong>RCBS</strong> Lifetime<br />
Warranty. If you need a replacement part,<br />
please call or write Customer Service<br />
1-800-533-5000
Photo 3<br />
Photo 4<br />
Photo 5. Observe the bulged<br />
shoulder area in the case on<br />
right.<br />
STEP 3: Tighten the large lock<br />
nut. Insert one of your sized,<br />
decapped, trimmed and lubed<br />
cases into the shell holder and run<br />
the case into the <strong>die</strong> as is done in<br />
full length sizing. See photo 3.<br />
STEP 4: With the case fully<br />
inserted into the <strong>die</strong>, screw the<br />
mandrel into the <strong>die</strong> until hard<br />
resistance is met. Approximately<br />
four turns of threads will be left on<br />
the mandrel above the lock nut. See<br />
photo 4. Tighten the lock nut on the<br />
mandrel.<br />
Note: Maintain this setup throughout<br />
the entire life of the cases in<br />
this trimmed lot.<br />
STEP 5: Reinsert a case in the<br />
<strong>die</strong> and check for any bulging on<br />
the case by:<br />
1) Comparing with photo #5.<br />
2) Chamber the first few cases at<br />
the beginning of the loading session. If<br />
the cases don’t chamber (due to<br />
bulging), the mandrel is too far<br />
down in the <strong>die</strong>. (You will need to<br />
repeat Step 4). Size cases as you<br />
would with any full length sizer <strong>die</strong>.<br />
Note: Adjusting the mandrel too far<br />
down will cause the case to buckle.<br />
If the mandrel is not adjusted far<br />
enough, it will allow the cases to<br />
continue growing. Die adjustment<br />
explained in step 2 is very important<br />
to achieve consistent results.<br />
Cases sized in the X-Sizer <strong>die</strong> will<br />
have growth of a few thousandths<br />
of an inch during the first few sizings<br />
until each case seats against<br />
the mandrel stop.
X DIE PARTS LIST<br />
Key Part # Description<br />
1 • X Die Mandrel Assembly*:<br />
10314 204 Ruger<br />
38314 22 Hornet<br />
37114 22-250 Rem<br />
38814 220 Swift<br />
37014 222 Rem<br />
37214 223 Rem<br />
37214 223 Rem Small Base<br />
10514 223 WSSM<br />
37314 243 Win<br />
11614 243 WSSM<br />
12414 25 WSSM<br />
38964 25-06<br />
39014 260 Rem<br />
38414 6.5x55 Swedish Mauser<br />
31314 270 WSM<br />
37514 270 Win<br />
39064 280 Rem<br />
37614 7mm Rem Mag<br />
31114 7mm Rem SA Ultra Mag<br />
17814 7mm Rem Ultra Mag<br />
39114 7mm STW<br />
31414 7mm WSM<br />
37414 7mm-08 Rem<br />
37714 30-06 Springfield<br />
37714 30-06 Springfield Small Base<br />
37914 30-30 Win<br />
31214 300 Rem SA Ultra Mag<br />
17614 300 Rem Ultra Mag<br />
39214 300 Wby Mag<br />
38914 300 Win Mag<br />
30814 300 WSM<br />
39364 303 British<br />
37814 308 Win<br />
37814 308 Win Small Base<br />
38714 8mmx57 Mauser<br />
17714 338 Rem Ultra Mag<br />
39314 338 Win Mag<br />
30914 375 Rem Ultra Mag<br />
2 • X Die Body<br />
3 87501 Hex Lock Nut Assembly<br />
(7/8-14)<br />
* Includes lock nut 1/2”-32<br />
• Not available separately<br />
Note: Each mandrel and <strong>die</strong> body are caliber specific and are not interchangeable.<br />
1<br />
2<br />
3
PRECISIONEERED ® RELOADING EQUIPMENT<br />
We think that we make the very best<br />
reloading equipment in the world.<br />
If you agree, please tell your friends.<br />
If you disagree, tell us - we want to do something about it!<br />
Customer Service<br />
1-800-533-5000 (US or Canada) or 530-533-5191<br />
Hours: Monday - Thursday, 6:30am - 3:00pm (hours may vary)<br />
e-mail: rcbs.tech@atk.com • www.rcbs.com<br />
<strong>RCBS</strong> • 605 Oro Dam Blvd. • Oroville, CA 95965<br />
X DIE CALIBERS<br />
204 Ruger<br />
22 Hornet<br />
22-250 Rem<br />
220 Swift<br />
222 Remington<br />
223 Remington<br />
223 Rem Small Base<br />
223 WSSM<br />
243 Win<br />
243 WSSM<br />
25 WSSM<br />
25-06<br />
260 Rem<br />
6.5x55 Swedish Mauser<br />
270 WSM<br />
270 Win<br />
280 Rem<br />
7mm Rem Mag<br />
7mm Rem SA Ultra Mag<br />
7mm Rem Ultra Mag<br />
7mm STW<br />
7mm WSM<br />
7mm-08 Rem<br />
30-06 Springfield<br />
30-06 Springfd Small Base<br />
30-30 Win<br />
300 Rem SA Ultra Mag<br />
300 Rem Ultra Mag<br />
300 Wby Mag<br />
300 Win Mag<br />
300 WSM<br />
303 British<br />
308 Win<br />
308 Win Small Base<br />
8mmx57 Mauser<br />
338 Rem Ultra Mag<br />
338 Win Mag<br />
375 Rem Ultra Mag<br />
CCI • SPEER • <strong>RCBS</strong><br />
OUTERS • RAMLINE • ORBEX • FEDERAL<br />
X DIE SETS X-SIZER DIES<br />
10312<br />
38312<br />
37112<br />
38812<br />
37012<br />
37212<br />
38862<br />
10512<br />
37312<br />
11612<br />
12412<br />
38962<br />
39012<br />
38412<br />
31312<br />
37512<br />
39062<br />
37612<br />
31112<br />
17812<br />
39112<br />
31412<br />
37412<br />
37712<br />
39162<br />
37912<br />
31212<br />
17612<br />
39212<br />
38912<br />
30812<br />
39312<br />
37812<br />
39262<br />
38709<br />
17712<br />
39312<br />
30912<br />
7200532/1204<br />
10309<br />
38309<br />
37009<br />
38809<br />
37209<br />
37109<br />
38859<br />
10509<br />
37309<br />
11609<br />
12409<br />
38959<br />
39009<br />
38409<br />
31309<br />
37509<br />
39059<br />
37609<br />
37709<br />
17809<br />
39109<br />
31409<br />
37409<br />
37709<br />
39159<br />
37909<br />
31209<br />
17609<br />
39209<br />
38909<br />
30809<br />
39359<br />
37809<br />
39262<br />
38712<br />
17709<br />
39309<br />
30909<br />
*For automatic, semi-automatic, pump, slide and some lever-action rifles only.


