AmmoMaster® Chronograph Operating Instructions ... - RCBS
AmmoMaster® Chronograph Operating Instructions ... - RCBS
AmmoMaster® Chronograph Operating Instructions ... - RCBS

You also want an ePaper? Increase the reach of your titles
YUMPU automatically turns print PDFs into web optimized ePapers that Google loves.
AmmoMaster ® <strong>Chronograph</strong><br />
<strong>Operating</strong> <strong>Instructions</strong><br />
All of us at <strong>RCBS</strong> ® would like to thank you for purchasing the<br />
AmmoMaster ® <strong>Chronograph</strong>. We believe, dollar for dollar, it is the best<br />
chronograph on the market.<br />
ThoRoughly ReAd All diReCTionS And SAfeTy inSTRuCTionS<br />
inCluded in ThiS pACkAge.<br />
If you have any questions or problems, do not return it to the<br />
store. Instead, call us at (800) 533-5000 or (530) 533-5191 and<br />
we will be happy to help you.<br />
FEATURES<br />
• 86 square inches of available shooting area.<br />
• Detachable Display Unit with 20 foot cord.<br />
• High, Low and Average data-string velocity readings.<br />
• Extreme Spread and Standard Deviation data-string calculations.<br />
• Edit data-string functions and delete data functions.<br />
• Feet/second (f/s) or meter/second (m/s) velocity readings.<br />
• Low battery indicator<br />
• Full string indication<br />
• 10 strings maximum stored in memory with 10 shot velocity<br />
measurements per string<br />
• Warranty of 1 year from date of purchase.<br />
SPECIFICATIONS<br />
Velocity Range: 70 – 7000 fps (21 – 2134 m/s)<br />
Clock speed: 10 MHz<br />
Power Requirements: 9 Volt DC battery<br />
<strong>Operating</strong> Temperature Range: 20 – 120º F<br />
SAFETY AND WARNINGS<br />
READ THOROUGHLY ALL DIRECTIONS AND SAFETY<br />
INSTRUCTIONS INCLUDED IN THIS PACKAGE. FAILURE TO COMPLY<br />
MAY RESULT IN AN UNSAFE FIREARM CONDITION THAT MAY CAUSE<br />
PROPERTY DAMAGE, PERSONAL INJURY OR DEATH.<br />
WARNING!<br />
• TARGET MUST HAVE A SAFE BACKSTOP.<br />
• BYSTANDERS MUST STAY BEHIND THE SHOOTERS AT ALL TIMES.<br />
• ALWAYS WEAR EYE AND HEARING PROTECTION. Shooter must<br />
maintain proper eye relief from optical sighting devices and wear<br />
eye protection at all times.<br />
• FOLLOW LOCAL, STATE AND FEDERAL LAWS REGARDING<br />
FIREARM USE.<br />
ALWAYS FOLLOW THE RULES OF FIREARM SAFETY.<br />
UNLOAD FIREARM, OPEN FIREARM ACTION AND ENGAGE FIREARM<br />
SAFETY BEFORE MAKING ANY FIREARM ADJUSTMENTS. DO NOT<br />
REACH IN FRONT OF FIREARM MUZZLE TO MAKE ADJUSTMENTS.<br />
ALWAYS KEEP FIREARM MUZZLE POINTED IN A SAFE DIRECTION<br />
WHEN MAKING ADJUSTMENTS, LOADING FIREARM AND<br />
DISCHARGING FIREARM. CARE SHOULD BE TAKEN TO ENSURE<br />
THAT THERE IS NOT INTERFERENCE WITH THE FIREARM STOCK,<br />
SLING OR ACTION.<br />
WARNING! Never exceed published recommended gun<br />
powder amounts in reloads to achieve higher velocities in your<br />
ammunition. Increasing the amount of powder could cause a<br />
dangerous condition that may cause property damage, personal<br />
injury or death.<br />
WARNING! Velocity measurements should not be used to<br />
calculate combustion pressures in your cartridge or chamber. Again, do<br />
not exceed published maximum powder levels in your ammunition.<br />
WARNING! do noT try to protect your chronograph with armor<br />
plating. Bullet ricochet from hitting this plating could cause property<br />
damage, personal injury or death. <strong>Chronograph</strong> components are<br />
replaceable.<br />
All chronograph units have inherent uncertainty when recording<br />
velocity measurements. Several uncontrollable variables can affect<br />
each measurement and contribute to this uncertainty, including sunlight<br />
intensity, sunlight orientation, cloud cover, wind, shadows, and ground<br />
reflectivity of cement, water, or snow, etc. When collecting data, be<br />
suspicious of any data points that have greater than a 4% difference of<br />
that ammo’s average string velocity.<br />
Special care should be taken when shooting certain types of<br />
ammunition. gas checks, wads, sabots, etc. can separate and impact<br />
your chronograph causing damage to the device.<br />
Also, as with any electronic device, water can damage certain<br />
components. Be careful when using the chronograph outdoors in rainy<br />
weather to prevent damage to the Keypad/Display Unit or Skyscreens.<br />
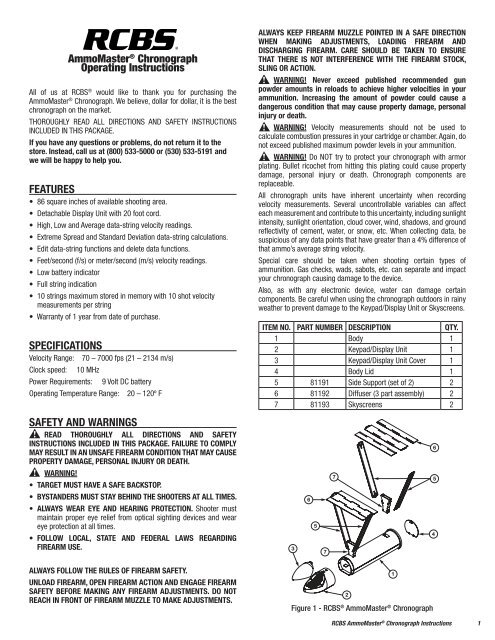
ITEM NO. PART NUMBER DESCRIPTION QTY.<br />
1 Body 1<br />
2 Keypad/Display Unit 1<br />
3 Keypad/Display Unit Cover 1<br />
4 Body lid 1<br />
5 81191 Side Support (set of 2) 2<br />
6 81192 Diffuser (3 part assembly) 2<br />
7 81193 Skyscreens 2<br />
Figure 1 - <strong>RCBS</strong> ® AmmoMaster ® <strong>Chronograph</strong><br />
<strong>RCBS</strong> AmmoMaster ® <strong>Chronograph</strong> <strong>Instructions</strong> 1
UNPACKING<br />
1. Detach the Keypad/Display Unit from the chronograph’s body by<br />
depressing the locking tab on top of the unit and pulling straight off.<br />
Try not to twist or bend display unit while performing this action.<br />
The display will be kept near the shooter during use.<br />
2. The AmmoMaster ® <strong>Chronograph</strong> has an internal storage<br />
compartment. The base or ‘headstamp’ end of the chronograph has<br />
a removable door. Depress the tab to remove the door (See Figure 2).<br />
Figure 2 - Storage Compartment<br />
3. Remove the peripheral equipment from inside the chronograph’s<br />
body. There should be 2 Skyscreens (Item 7), 2 Diffuser Assemblies<br />
(Item 6), and 4 Side Supports (Item 5) shown in Figure 1.<br />
ASSEMBLY<br />
1. Attach the chronograph base unit to any camera tripod (not included)<br />
that uses a standard 1/4"-20 mounting screw or place the unit on a<br />
stable and level surface like a table or workbench (See Figure 3).<br />
Figure 3<br />
2 <strong>RCBS</strong> AmmoMaster ® <strong>Chronograph</strong> <strong>Instructions</strong><br />
Figure 4<br />
2. Unwrap the Skyscreen cable and locate the label at the end of the<br />
cable, which will be labeled “Start” for the Start Skyscreen, or “Stop”<br />
for the Stop Skyscreen. plug the end of the cable, from each of the<br />
two Skyscreens, into the backside of the Display Unit (See Figure 4).<br />
Make sure the Skyscreens are plugged into the correct socket, i.e.,<br />
Start Skyscreen should be plugged into the RgA Jack marked “Start”<br />
and the Stop Skyscreen plugged into the RgA Jack marked “Stop”. The<br />
chronograph will not record velocities accurately if the Start and Stop<br />
Skyscreens are plugged into an incorrect jack. (See Figure 4).<br />
3. Place the Start Skyscreen in the first slot located in the front of the<br />
chronograph’s body/case. Place the Stop Skyscreen in the slot located<br />
at the rear of the case (See Figure 3 and 5). The Skyscreens are<br />
secured in place by a spring clip. once installed, give the skyscreens<br />
a slight pull to ensure they are securely locked into place. Velocity<br />
readings may be inaccurate if the Skyscreens are not fully inserted<br />
into their respective mounting slots.<br />
Figure 5<br />
4. Once the Skyscreens are installed, place one Side Support Arm onto<br />
the side of each Skyscreen by aligning the ball into the keyholeshaped<br />
slot and then press the support arm down to lock the arm<br />
into position (See Figure 6).
Figure 6<br />
5. The next step is to assemble the Diffusers. Each Diffuser consists of<br />
one middle piece and two end pieces. The notches on the diffuser are<br />
numbered with either a number “1” or “2” to help aid in assembly.<br />
Take the middle piece and one of the end pieces, line up the matching<br />
numbers and simply slip into position (See Figure 7).<br />
Figure 7<br />
6. Insert the Diffuser’s tab into the Support Arm’s slot so the ribs on the<br />
diffuser are facing down toward the Skyscreen as shown in figure<br />
8. While holding the Diffuser horizontal, install the other Support Arm<br />
onto the opposite side of this diffuser and then connect this Support<br />
Arm to the Skyscreen the same way you did in Step #4.<br />
Figure 8<br />
7. Repeat steps 4 – 6 for the other Skyscreen location.<br />
SET-UP<br />
ALWAYS WEAR EYE AND HEARING PROTECTION.<br />
1. Place the assembled chronograph unit on a stable surface or tripod<br />
(not included). Ensure the <strong>Chronograph</strong> is level and oriented in the<br />
same direction as the bullet/projectile’s path, otherwise it could give<br />
you erroneous velocity readings.<br />
2. The Front Skyscreen, for typical rifle calibers (.308 or smaller), should<br />
be at least 10 feet away from the muzzle of the weapon (See Figure<br />
9). Larger calibers, magnums, etc., produce more muzzle blast that<br />
can falsely trigger the Skyscreen and produce erroneous velocity<br />
readings. Increase the distance to 16' - 18' to eliminate this issue.<br />
10'<br />
Figure 9<br />
3. Bring the Display Unit back to your firing position. Turn the Display<br />
Unit on by pressing the On/Off button. You will see the following<br />
display for a moment while the unit initializes (See Figure 10).<br />
4"<br />
<strong>RCBS</strong> AmmoMaster ® <strong>Chronograph</strong> <strong>Instructions</strong> 3
Figure 10 - Initialization Screen<br />
4. Once the Display shows a shot number and an indicator next to<br />
“Ready”, the AmmoMaster ® unit is ready to record velocities (See<br />
Figure 11).<br />
Figure 11 - “Ready” on Shot #1<br />
5. Measure the distance between the bore of the weapon system and<br />
the sighting system. Typically this distance is 1.5" on a rifle with an<br />
optical scope. Remember that your line of sight will be higher than<br />
the path of the projectile. The ideal projectile path is centered over the<br />
chronograph at a height of 4.0 inches above the top of the Skyscreen<br />
(See Figure 9). The projectile/ bullet height should be kept within ±<br />
1.5 inches of this location for accurate velocity measurements.<br />
WARNING! BE CAREFUL NOT TO AIM ANY LOWER THAN<br />
THIS, AS IT MAY CAUSE SERIOUS DAMAGE TO THE<br />
SKYSCREEN AND POTENTIALLY CAUSE SERIOUS INJURY TO<br />
THE SHOOTER.<br />
a. We recommend using a bench, sand bags, bi-pods, or other<br />
means to stabilize your weapon.<br />
b. if you are concerned about hitting your chronograph, start by<br />
removing your diffusers and Side Supports. place a paper target<br />
immediately behind your chronograph and aim several inches<br />
above the top surface of the Skyscreens. Work your shots lower<br />
in small increments until your shot placement is in the correct<br />
location. Make note of that aiming spot. if desired, place a piece of<br />
tape on the Side Support as a visual reference for your aim point<br />
of that particular firearm. Repeat this procedure for each weapon<br />
used in conjunction with your chronograph.<br />
6. Shoot a round at the correct aiming point as mentioned above, to<br />
start recording your velocity measurements.<br />
ALWAYS WEAR EYE AND HEARING PROTECTION.<br />
7. Please refer to the detailed instructions listed on pages 5-8<br />
to become more familiar with the full functionality of the<br />
AmmoMaster ® <strong>Chronograph</strong>.<br />
8. ENJOY.<br />
4 <strong>RCBS</strong> AmmoMaster ® <strong>Chronograph</strong> <strong>Instructions</strong><br />
STORAGE<br />
Follow steps 1 – 7 of the “Assembly” section in reverse sequence. Your<br />
<strong>Chronograph</strong> should be stored in a dry, cool place away from direct<br />
sunlight if possible. Although the plastic components of your unit are<br />
manufactured with a uV inhibitor additive, limiting unnecessary uV<br />
exposure of any plastic device is recommended. Do not leave your unit<br />
outside for long periods of time.<br />
KEYPAD LAYOUT<br />
BUTTON FUNCTION DESCRIPTION<br />
power Button Turn unit On. Turn unit Off, depress button and hold for 3-5 sec.<br />
Change units Depress to switch from f/s to m/s.<br />
Scroll left<br />
Scroll Right<br />
Adds data<br />
to string<br />
Scroll to the left (decreasing shot #) while in Stats Mode and<br />
edit String Mode<br />
Scroll to the right (increasing shot #) while in Stats Mode and<br />
edit String Mode<br />
Add data to an existing shot string while in Edit String Mode<br />
no command depress no if choose not to delete velocity or string or clear all.<br />
enter edit<br />
String Mode<br />
delete data<br />
in string<br />
edit String Mode allows editing of recorded velocities in<br />
selected shot strings.<br />
delete current velocity recorded; delete any recorded velocity<br />
in any shot string.<br />
yes command depress yes if choose to delete velocity or string or clear all.<br />
enter Stats<br />
Mode<br />
Clear a<br />
selected string<br />
delete all<br />
recorded data<br />
Accept results<br />
Starts new<br />
shot string<br />
displays statistical data for a selected shot string.<br />
Clear function will clear all data within a selected shot string.<br />
Reset will clear all recorded data in all shot strings.<br />
depress enter to select desired shot string, accepts the results<br />
in the stats mode.<br />
Starts new shot string<br />
FUNCTIONS<br />
On/Off<br />
To turn unit on - depress “On/Off” button and the <strong>Chronograph</strong> is<br />
ready to record data.<br />
To turn unit off - depress “On/Off” button and hold for approximately<br />
3-5 seconds.
m/s – f/s<br />
Switches units from feet per second or meters per second.<br />
To switch between units simply depress the m/s – f/s button.<br />
Enter<br />
depressing the “enter” button accepts the current string and starts<br />
a new string, accepts string while in edit string mode and accepts<br />
the results in the stats mode and readies unit for recording of the<br />
next velocity.<br />
Scroll ( )<br />
Allows user to scroll to the right or the left while in Stats Mode<br />
to view statistical information, and for scrolling through recorded<br />
strings or recorded shot velocities (1, 2, 3,… , 10).<br />
Delete Data<br />
delete current velocity recorded; delete any recorded velocity in<br />
any of the recorded strings, while in edit string mode.<br />
Add Data<br />
depressing “Add data” button while in edit String Mode will<br />
prepare unit to record shot velocity within existing shot string,<br />
if string is not currently full. data will be appended to the end of<br />
the string.<br />
Yes or No<br />
Depressing the “Yes” or “No” button will confirm/deny the deletion of<br />
a recorded velocity, entire shot string, or all recorded shot velocities.<br />
Edit String<br />
Allows user to enter the “edit String” mode and edit the recorded<br />
velocities in a desired shot string.<br />
Clear/Reset<br />
This allows the user to delete a shot string or all recorded data<br />
stored in the unit.<br />
Start New String<br />
A new string may be started at any time. depressing the “enter”<br />
button will accept current string and start a new string.<br />
Delete Velocity<br />
To delete current recorded velocity, simply depress “delete<br />
data” button, “del” will display with an indicator above “Shot”.<br />
Depress “Yes” button to confirm deletion of the last velocity<br />
recorded or the “no” button to deny deletion and ready unit to<br />
record next shot velocity.<br />
For recorded velocity in different string, simply depress “edit<br />
String” button. use “Scroll” buttons to scroll through desired shot<br />
strings; press “enter” to select desired string, use “Scroll” buttons<br />
to scroll through recorded shot velocities. if choose to delete<br />
recorded velocity depress “delete” button, “del” will be displayed<br />
with an indicator above “Shot”. Press “Yes” button to confirm<br />
deletion, if choose not to delete velocity press “No” button. To exit<br />
edit string mode and ready unit for next shot within existing shot<br />
string that is not full, depress the “Add data” button or “enter”<br />
button. for a full string, depress the “enter” button twice to begin<br />
a new shot string.<br />
Delete String<br />
Depress “Edit/String” button and scroll to the desired shot<br />
string. Depress “Enter” Button, to select string. Depress “Clear/<br />
Reset” button “del” will display with an indicator above “String”.<br />
depressing “yes” button will delete current string. if you choose<br />
not to delete string depress the “no” button which will default<br />
back into the edit string mode and allow scrolling through the<br />
recorded shot data.<br />
Statistical Data<br />
depress “Stats” button and the highest velocity reading within<br />
string will be displayed. use “Scroll” button to scroll right to view<br />
the lowest velocity reading, average velocity, extreme spread and<br />
the standard deviation of all shots recorded within the current<br />
shot string. Depress “Enter” button to exit Stats Mode, or if the<br />
statistical data reveals an erroneous velocity the velocity reading<br />
may be discarded by simply depressing the “edit String” button<br />
and scrolling to select desired velocity and repeat the delete<br />
Velocity instructions from above.<br />
Delete All Data<br />
Depressing the “Clear/Reset” button once will display “del”,<br />
depressing the “Clear/Reset” button a second time will display<br />
“res” with an indicator above “String” (see Figure 12). Depressing<br />
the “yes” button will delete all shot velocity data stored in memory,<br />
and the unit will automatically shut down. if you choose not to<br />
delete all memory depress the “No” button to exit out of “Clear/<br />
Reset” mode.<br />
Figure 12 - Reset Display to Delete ALL Data<br />
ADDITIONAL INFORMATION<br />
DISPLAY UNIT<br />
The display unit is what sets the AmmoMaster ® <strong>Chronograph</strong> apart<br />
from the competition. The functionality of the AmmoMaster ® display<br />
was designed with the shooter in mind. it allows the user to easily<br />
review statistical data and to review or edit recorded data in memory<br />
at any time during operation. The keypad was also designed with the<br />
appropriate commands necessary to allow the user to step through<br />
any operation with ease. Though data operations are simple to do, we<br />
strongly encourage the user to read through the appropriate sections<br />
in this manual.<br />
1. Depress On/Off button, “rcbs” will display. The unit will, if there is<br />
no previous recorded data, be ready to record shot #1 in string #1.<br />
The unit will display “1” with an indicator shown directly beneath the<br />
“String” header, then disappear and flash with an indicator displayed<br />
directly beneath “Ready” and “Shot” headers (see Figure 13). This<br />
menu informs the user that the unit is ready to record shot velocity<br />
#1 in string #1.<br />
• If unit has recorded velocities from a previous session, please<br />
read Previous Recorded Data section below. if you would like to<br />
remove all previously recorded shot velocities, refer to the Delete<br />
All Data function on the previous page.<br />
<strong>RCBS</strong> AmmoMaster ® <strong>Chronograph</strong> <strong>Instructions</strong> 5
Figure 13 - “Ready” on “Shot” 1<br />
2. While recording shot velocities, the most recent velocity<br />
measurement can easily be deleted by pressing the “delete data”<br />
button. The word “del” will show on the display (see Figure 14).<br />
Depressing the “Yes” button will confirm the deletion of the last<br />
recorded velocity. depressing the “no” button will prevent deletion<br />
of velocity and resume recording shot velocities within the existing<br />
string.<br />
Figure 14 - Delete Current Velocity Data Point<br />
3. Once you have fired your tenth and final shot in a string, the display<br />
will flash between “FULL” and “1”, (see Figure 15). This means that<br />
string 1 is full with ten recorded shot velocities.<br />
• To start a new shot string, depress “Enter”. If all shot strings are<br />
full, refer to the Delete String and/or the Delete All Data section<br />
above to allow for recording more shot velocities<br />
• To view the High, Low, Average, Extreme Spread, and Standard<br />
Deviation of the current shot string velocities - depress the “Stats”<br />
button and refer to the Statistical Data section below.<br />
• If you choose to scroll through and verify shot velocities recorded<br />
- depress the “Edit String” button and use the “Scroll” buttons to<br />
scroll through the recorded shot velocities.<br />
Note: When 100 shots have been recorded, all memory allocations<br />
are full. Some or all of the data must be deleted in order to continue<br />
collecting velocity data. The chronograph will not overwrite subsequent<br />
data if you continue to shoot.<br />
6 <strong>RCBS</strong> AmmoMaster ® <strong>Chronograph</strong> <strong>Instructions</strong><br />
Figure 15 - Full String of Data<br />
EDIT STRING FUNCTION<br />
1. The Edit String function is one of the most useful functions on the<br />
AmmoMaster ® <strong>Chronograph</strong>. By depressing the “edit String” button,<br />
the unit will default to the highest string number with recorded shot<br />
velocities. For example, if there are nine full shot strings and the<br />
“edit String” button is depressed, the display will show an indicator<br />
displayed directly under “String” and the display will show a “9”.<br />
2. At this point the user is allowed to scroll through shot strings and<br />
select the desired string to review. After determining which string to<br />
review, depressing the “enter” button will select the desired string.<br />
The unit will flash between the last shot velocity recorded in the<br />
string and its corresponding velocity.<br />
3. The user can scroll through and review shot velocities. An erroneous<br />
velocity reading is easily deleted by depressing the “delete data”<br />
button, followed by the “yes” button. This will shift all numbers<br />
down. For example, if there were 8 shot velocities recorded within<br />
a particular string and shot 4 velocity was deleted, shots 1-3 will<br />
remain unchanged. however, the old shot 5 will become the new<br />
shot 4, and the old shot 6 will become the new shot 5, etc. up to<br />
shot 7. The string can be filled by appending new shot velocities by<br />
simply depressing the “Add data” button or the “enter” button. The<br />
display will flash between string and shot, which means the unit is<br />
ready to record the next velocity reading and you can begin shooting.<br />
Or, by pressing “Enter” again, the unit will begin on shot 1 of the next<br />
blank string.<br />
PREVIOUSLY RECORDED DATA<br />
if there is stored shot velocity data, the unit will display “rcbs” and<br />
then automatically default to the highest level string that has no data.<br />
For example, if strings 1-9 have stored velocity data and string 10 has<br />
none, the unit display will flash “10” with an indicator on “String” and<br />
flash “1” with an indicator on “Shot”. This means the unit is ready to<br />
record shot 1 in string 10.<br />
Note: If there are strings that are not completely filled, i.e., having<br />
less than 10 shots per string, the unit will default to the highest level<br />
string containing data. if this string happens to be full the display will<br />
flash between “full” and the string number you are currently in. for<br />
example, if in string 10; the unit display will flash between “FULL” and<br />
“10”; meaning string 10 is full.<br />
it is possible to access and record shot velocities to strings with<br />
no previously recorded data by using the “edit String” function. for<br />
example, if string 4 has no data and all of the remaining strings are<br />
full, the unit will default to string 10 and show that string 10 is full.<br />
(The only way for this to happen is if the user physically deleted<br />
all the recorded shot velocities within string 4.) You can depress<br />
“Edit String” and use “Scroll” to locate string 4. Depressing “Enter”<br />
will select string 4 and the unit display will flash between shot “1”<br />
and velocity “- - - -”, meaning you are in string 4 but there are no
ecorded velocities (see Figure 16). Depressing “Enter” again, or<br />
the “Add Data” button, the display will flash between “String” 4 and<br />
“Ready” on “Shot” 1. Now the unit is ready to record shot 1 in string 4.<br />
Figure 16 - Display for No Data in String<br />
SKYSCREEENS<br />
your AmmoMaster ® Skyscreens operate using standard photocell<br />
technology. The photocell is constantly gathering incoming light. When<br />
an instantaneous change in light is detected, the photocell saves the<br />
time at which this occurs. For example, when a projectile is fired over the<br />
Start Skyscreen of the <strong>Chronograph</strong>, the shadow cast by the projectile<br />
triggers the photocell at a moment in time. The instant the projectile<br />
passes over the Stop Skyscreen, the shadow cast by the projectile<br />
triggers the photocell at another moment in time, thus generating a<br />
start and stop time. Since the Skyscreens are manufactured with a<br />
known distance between them, the projectile velocity can be calculated<br />
using the equation Velocity = Distance ÷ Time.<br />
DIFFUSERS<br />
The diffusers for your AmmoMaster ® <strong>Chronograph</strong> play a very important<br />
role in recording velocity readings. The diffusers are used to help<br />
filter out any unnecessary incoming light. This aids in the photocell’s<br />
ability to detect a slight change in light as a projectile passes over<br />
the Skyscreen. if the diffusers are not used on a clear, sunny day, the<br />
photocell may be saturated by all the incoming light and may not detect<br />
the shadow cast by the projectile. imagine trying to spot an object flying<br />
through the air as it passes directly in front of the sun; this is similar<br />
to using the chronograph without any diffusers on a clear sunny day.<br />
Again, imagine trying to spot the same object flying through the air as<br />
it passes directly in front of the sun but this time, there is an overcast<br />
condition. The object is much easier to see. This analogy is similar to<br />
using diffusers on your <strong>Chronograph</strong>.<br />
LIGHTING CONDITIONS<br />
now that you have a basic understanding of what makes your<br />
chronograph function, you know that the lighting conditions are<br />
very important. A Skyscreen’s accuracy and sensitivity to changes in<br />
illumination is based on the ambient lighting conditions. While they<br />
work most of the time, chronographs do have limitations which will<br />
cause errors. Too much light, as well as not enough light, will inhibit the<br />
chronograph operation.<br />
in low light situations, i.e., early morning, late evening, overcast or<br />
cloudy conditions, the chronograph may produce inconsistent velocity<br />
measurements or may not record velocity readings at all. Try removing<br />
the diffusers to allow more light to reach the photocell.<br />
problems can also arise on clear, sunny days when shooting over snow,<br />
water, or light colored sand/gravel, etc. Reflected light off the ground<br />
can illuminate the bottom of the bullet and cancel the shadow cast onto<br />
the skyscreen causing erroneous velocity readings. When this happens,<br />
try covering the ground around the chronograph with a blanket or nonreflective<br />
tarp. This should minimize the reflected ground light and<br />
alleviate the problem. Another technique is to color the bullet with a<br />
black marker, especially if the bullets have a shiny appearance.<br />
in locations with direct overhead sunlight, the Skyscreen may become<br />
saturated by the incoming light, even when the diffusers are installed.<br />
Excessive light can cause a blind condition and the photocell may not<br />
“see” the bullet pass over. This is because the small bullet’s shadow<br />
is not providing sufficient contrast. To reduce the amount of input light,<br />
try covering the diffuser’s top surface with any material that will absorb<br />
or reflect the light (aluminum foil, cloth material, cardboard, etc.) Don’t<br />
use anything heavy enough to disrupt the units balance or damage the<br />
diffuser or Side Supports. if all else fails, it might be best to come back<br />
and shoot another day or wait until later in the day when the light has<br />
subsided.<br />
INDOOR SHOOTING<br />
To use indoors, you must provide the chronograph with an artificial light<br />
source. Install a standard incandescent light bulb centered 24 inches<br />
above each diffuser to provide a uniform illumination. We recommend<br />
using a 60 – 100 W bulb and an aluminum reflector dish for each<br />
light fixture, if possible. These products are readily available at most<br />
hardware stores.<br />
Other lighting configurations may provide acceptable results (different<br />
installation height, no reflector dish, etc.), but be slightly less accurate.<br />
fluorescent light sources will not work reliably because they do not<br />
provide a continuous light source.<br />
SHOTSHELL VELOCITY<br />
it is highly recommended that you determine your shot’s pattern<br />
size before starting. Only use your Diffusers and Side Supports if your<br />
gun’s shot pattern is small enough to pass through the chronograph’s<br />
shooting area without causing damage. fAiluRe To do So MAy CAuSe<br />
SeRiouS dAMAge To The SkySCReen oR oTheR CoMponenTS And<br />
poTenTiAlly CAuSe SeRiouS inJuRy To The ShooTeR.<br />
To prevent damage to your <strong>Chronograph</strong>, we recommend removing<br />
the diffusers and Side Supports when measuring shotshell velocity.<br />
Position weapon 10 feet away from chronograph (see Figure 9) and<br />
continue using as you would for centerfire rifle ammo. Certain ambient<br />
and environmental conditions can result in erratic measurements when<br />
the diffusers are not used. See “lighting Conditions” section for more<br />
information.<br />
To measure your shot pattern, place a paper target approximately 15<br />
feet from the muzzle of your firing position. Shoot into the target to<br />
measure the diameter of the shot pattern. Then, determine a desired<br />
aiming point to ensure you are shooting approximately 4-6 inches<br />
above the chronograph Skyscreens. once this has been done place<br />
your chronograph so the back of the unit is against the target. Verify<br />
the shot pattern is the correct height above the skyscreens. Move the<br />
target a few feet further away (ie., down range) from the chronograph<br />
and begin recording velocities.<br />
ARROW VELOCITY<br />
for better measurement accuracy, make sure you are far enough away from<br />
the chronograph so that the arrow separates completely from the bow string<br />
before the tip reaches the “Start” skyscreen. Blunt arrow tips work best.<br />
STATISTICAL DATA<br />
Statistical data only applies to the recorded data within a selected shot<br />
string, not multiple strings. Therefore, the largest sample size for any<br />
statistical data measurement will be a sample size of ten.<br />
High Velocity<br />
displays highest recorded velocity within selected shot string.<br />
Low Velocity<br />
displays lowest recorded velocity within selected shot string.<br />
<strong>RCBS</strong> AmmoMaster ® <strong>Chronograph</strong> <strong>Instructions</strong> 7
Average Velocity<br />
displays the statistical average of the recorded velocities within an<br />
existing shot string.<br />
Extreme Spread<br />
displays the difference between the highest and lowest velocity readings.<br />
Standard Deviation<br />
Standard deviation (S.D.) of a string is a measure of uniformity of the<br />
data. it essentially tells you how much scatter is present in the data set<br />
relative to the average velocity. The smaller the number is, the better<br />
your data’s uniformity. A standard deviation of zero would mean that<br />
every velocity was identical. An S.D. value approximates that 68% of<br />
data will fall within ± 1(S.D.) of the Avg. velocity, 95% of all recorded<br />
velocities will fall within ± 2(S.D.) of the Avg. velocity, and 99% of all<br />
recorded velocities will fall within ± 3(S.D.) of the Avg. velocity.<br />
Example: Let’s say we have a full shot string of 10 shots. From pushing<br />
the Stats button we find the following information:<br />
High Velocity: 3100 f/s<br />
Low Velocity: 3000 f/s<br />
Avg. Velocity: 3050 f/s<br />
Extreme Spread: 100 f/s<br />
Standard Deviation: 10 f/s<br />
With a standard deviation of 10 f/s, the worst anyone can expect is that<br />
99% of the shot velocities are within ± 3(S.D.) of the Avg. Velocity or<br />
3050 ± 30 f/s. , which equates to 3080 f/s to 3020 f/s, respectively.<br />
BATTERY INFO<br />
The AmmoMaster ® <strong>Chronograph</strong> operates using a 9V battery.<br />
We recommend using high quality batteries for optimal performance.<br />
A good alkaline battery life under nominal lighting conditions should<br />
last approximately 5 – 6 hours.<br />
REPLACEMENT PARTS<br />
Should you accidentally shoot your chronograph (and most people who use<br />
them long enough eventually will), just call us to order replacement parts.<br />
The following replacement parts are available for purchase from <strong>RCBS</strong>:<br />
Skyscreens # 81193<br />
Diffusers # 81192<br />
Side Supports (2 pack) # 81191<br />
8 <strong>RCBS</strong> AmmoMaster ® <strong>Chronograph</strong> <strong>Instructions</strong><br />
LIMITED WARRANTY<br />
your AmmoMaster ® <strong>Chronograph</strong> is warranted to be free from defects<br />
in material or workmanship for one year from the date of purchase.<br />
This warranty is extended only to the original consumer purchaser.<br />
All <strong>RCBS</strong> products are intended for non-commercial use by hobbyists.<br />
Any other use of these products will void the warranty. Should you<br />
believe that your AmmoMaster <strong>Chronograph</strong> is defective in material<br />
or workmanship, you must return the AmmoMaster <strong>Chronograph</strong> to<br />
Ammunition Accessories Inc. through its Oroville operation (hereinafter<br />
“Oroville Operations”) postage paid, for evaluation. If defective, the<br />
product will be repaired or replaced at oroville operations’ option, at<br />
no charge.<br />
Send a dated proof of purchase to oroville operations for return shipping<br />
and handling, along with the defective product or parts to:<br />
Ammunition Accessories inc., oroville operations<br />
605 Oro Dam Blvd East<br />
Oroville, California 95965<br />
Warranty services cannot be provided without meeting the above<br />
requirements.<br />
To enSuRe ACCuRACy of youR WARRAnTy infoRMATion, Send<br />
youR WARRAnTy CARd To:<br />
Ammunition Accessories inc., oroville operations<br />
605 Oro Dam Blvd East<br />
Oroville, California 95965<br />
ThiS one yeAR liMiTed WARRAnTy doeS noT CoVeR defeCTS oR dAMAge<br />
ReSulTing fRoM: CAReleSSneSS, MiSuSe, CoMMeRCiAl uSe, ABuSe, iMpRopeR<br />
inSTAllATion, ModifiCATion, oR noRMAl WeAR And TeAR. The iMplied WARRAnTieS<br />
of MeRChAnTABiliTy And fiTneSS foR A pARTiCulAR puRpoSe ARe liMiTed To The<br />
duRATion of ThiS one yeAR liMiTed WARRAnTy. oRoVille opeRATionS iS noT liABle<br />
foR dAMAgeS in eXCeSS of The puRChASe pRiCe of The pRoduCT And undeR no<br />
CiRCuMSTAnCeS ShAll oRoVille opeRA TionS Be liABle foR ConSeQuenTiAl oR<br />
inCidenTAl dAMAgeS. hoWeVeR, SoMe STATeS do noT AlloW liMi TATionS on<br />
inCidenTAl, oR ConSeQuenTiAl dAMAgeS, So The ABoVe liMiTATion oR eXCluSion<br />
MAy noT Apply To you.<br />
dAMAge To The uniT CAuSed By BulleT iMpACT iS noT CoVeRed undeR<br />
WARRAnTy.<br />
The above warranty provides the sole and exclusive warranty available to the customer<br />
in the event of a defect in material or workmanship in the AmmoMaster ® <strong>Chronograph</strong>.<br />
This warranty gives you specific legal rights, and you may also have other rights which<br />
vary from State to State.<br />
RC119 9060