AmmoMaster® Chronograph Operating Instructions ... - RCBS
AmmoMaster® Chronograph Operating Instructions ... - RCBS
AmmoMaster® Chronograph Operating Instructions ... - RCBS
You also want an ePaper? Increase the reach of your titles
YUMPU automatically turns print PDFs into web optimized ePapers that Google loves.
UNPACKING<br />
1. Detach the Keypad/Display Unit from the chronograph’s body by<br />
depressing the locking tab on top of the unit and pulling straight off.<br />
Try not to twist or bend display unit while performing this action.<br />
The display will be kept near the shooter during use.<br />
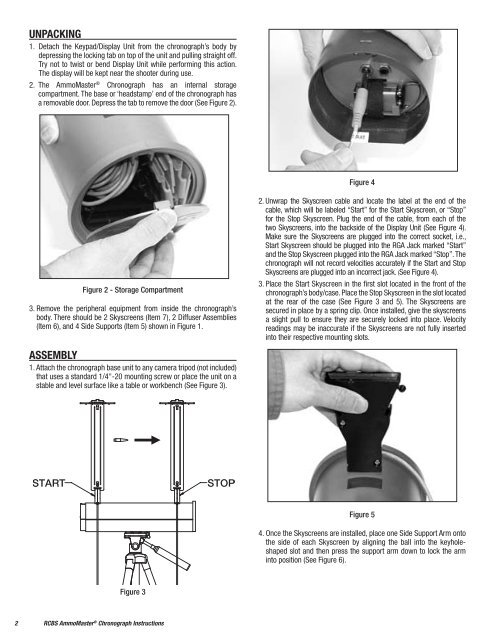
2. The AmmoMaster ® <strong>Chronograph</strong> has an internal storage<br />
compartment. The base or ‘headstamp’ end of the chronograph has<br />
a removable door. Depress the tab to remove the door (See Figure 2).<br />
Figure 2 - Storage Compartment<br />
3. Remove the peripheral equipment from inside the chronograph’s<br />
body. There should be 2 Skyscreens (Item 7), 2 Diffuser Assemblies<br />
(Item 6), and 4 Side Supports (Item 5) shown in Figure 1.<br />
ASSEMBLY<br />
1. Attach the chronograph base unit to any camera tripod (not included)<br />
that uses a standard 1/4"-20 mounting screw or place the unit on a<br />
stable and level surface like a table or workbench (See Figure 3).<br />
Figure 3<br />
2 <strong>RCBS</strong> AmmoMaster ® <strong>Chronograph</strong> <strong>Instructions</strong><br />
Figure 4<br />
2. Unwrap the Skyscreen cable and locate the label at the end of the<br />
cable, which will be labeled “Start” for the Start Skyscreen, or “Stop”<br />
for the Stop Skyscreen. plug the end of the cable, from each of the<br />
two Skyscreens, into the backside of the Display Unit (See Figure 4).<br />
Make sure the Skyscreens are plugged into the correct socket, i.e.,<br />
Start Skyscreen should be plugged into the RgA Jack marked “Start”<br />
and the Stop Skyscreen plugged into the RgA Jack marked “Stop”. The<br />
chronograph will not record velocities accurately if the Start and Stop<br />
Skyscreens are plugged into an incorrect jack. (See Figure 4).<br />
3. Place the Start Skyscreen in the first slot located in the front of the<br />
chronograph’s body/case. Place the Stop Skyscreen in the slot located<br />
at the rear of the case (See Figure 3 and 5). The Skyscreens are<br />
secured in place by a spring clip. once installed, give the skyscreens<br />
a slight pull to ensure they are securely locked into place. Velocity<br />
readings may be inaccurate if the Skyscreens are not fully inserted<br />
into their respective mounting slots.<br />
Figure 5<br />
4. Once the Skyscreens are installed, place one Side Support Arm onto<br />
the side of each Skyscreen by aligning the ball into the keyholeshaped<br />
slot and then press the support arm down to lock the arm<br />
into position (See Figure 6).


