

PLEASE READ BEFORE REFILLING CARTRIDGES - IMS-Ink
PLEASE READ BEFORE REFILLING CARTRIDGES - IMS-Ink
PLEASE READ BEFORE REFILLING CARTRIDGES - IMS-Ink

You also want an ePaper? Increase the reach of your titles
YUMPU automatically turns print PDFs into web optimized ePapers that Google loves.
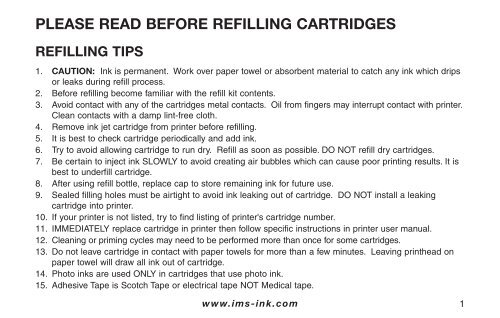
<strong>PLEASE</strong> <strong>READ</strong> <strong>BEFORE</strong> <strong>REFILLING</strong> <strong>CARTRIDGES</strong><br />
<strong>REFILLING</strong> TIPS<br />
1. CAUTION: <strong>Ink</strong> is permanent. Work over paper towel or absorbent material to catch any ink which drips<br />
or leaks during refill process.<br />
2. Before refilling become familiar with the refill kit contents.<br />
3. Avoid contact with any of the cartridges metal contacts. Oil from fingers may interrupt contact with printer.<br />
Clean contacts with a damp lint-free cloth.<br />
4. Remove ink jet cartridge from printer before refilling.<br />
5. It is best to check cartridge periodically and add ink.<br />
6. Try to avoid allowing cartridge to run dry. Refill as soon as possible. DO NOT refill dry cartridges.<br />
7. Be certain to inject ink SLOWLY to avoid creating air bubbles which can cause poor printing results. It is<br />
best to underfill cartridge.<br />
8. After using refill bottle, replace cap to store remaining ink for future use.<br />
9. Sealed filling holes must be airtight to avoid ink leaking out of cartridge. DO NOT install a leaking<br />
cartridge into printer.<br />
10. If your printer is not listed, try to find listing of printer's cartridge number.<br />
11. IMMEDIATELY replace cartridge in printer then follow specific instructions in printer user manual.<br />
12. Cleaning or priming cycles may need to be performed more than once for some cartridges.<br />
13. Do not leave cartridge in contact with paper towels for more than a few minutes. Leaving printhead on<br />
paper towel will draw all ink out of cartridge.<br />
14. Photo inks are used ONLY in cartridges that use photo ink.<br />
15. Adhesive Tape is Scotch Tape or electrical tape NOT Medical tape.<br />
www.ims-ink.com 1
INKJET CLEANING SOLUTION<br />
Cleaning the printhead of your inkjet cartridge may be necessary to achieve satisfactory print. The <strong>IMS</strong><br />
Cleaning Solution is formulated for cleaning/removing dried ink from inkjet printheads.<br />
2<br />
a) For black cartridges - Soak printhead in a small amount of cleaning solution (we<br />
suggest a very shallow saucer or container). Remove cartridge from cleaning solution<br />
after 5 minutes and wipe printhead clean with a water dampened paper towel.<br />
Allow printhead to dry, then install in printer and perform printer cleaning cycle.<br />
(See printer user manual.)<br />
b) For multi-color cartridges - Fold a paper towel twice (4 layers) and place in sink.<br />
Saturate towel with cleaning solution. Place cartridge printhead on the treated<br />
towel. Remove cartridge after 3 to 5 minutes and blot (do not wipe) with a dry<br />
paper towel. Carefully press a dry paper towel (3 to 4 layers) against printhead,<br />
hold for about 10 seconds and remove. All three ink colors should have released<br />
and be visible on paper towel.<br />
www.ims-ink.com
FREQUENTLY ASKED QUESTIONS<br />
What is the shelf life of an opened bottle of replacement ink?<br />
<strong>Ink</strong> jet ink is a water based ink and the ink container should always be covered except when in<br />
use. <strong>Ink</strong> kept capped is good for one year.<br />
I have filled all my ink cartridges and the printer still reads, "<strong>Ink</strong> low". What should I do?<br />
Try removing cartridge and reinstalling. Clean metal contacts with distilled water and a soft<br />
lint-free cloth. (See also "Resetting <strong>Ink</strong> Level".)<br />
I have followed all instructions and now my printer won't print. What do I do?<br />
Perform a print cleaning according to the printer instruction manual. If necessary, clean metal<br />
contacts on cartridge and/or print cartridge (if contacts on print cartridge) with<br />
distilled water and a soft, lint-free cloth.<br />
I have filled ink cartridge and now it is leaking. What do I do?<br />
Cartridge may be overfilled. Place printhead on folded paper towel so that excess ink is<br />
absorbed. Check after 2-3 minutes. Cartridges such as the HP51626A and 51629A may be<br />
"out of balance". Refer to instructions for these cartridges.<br />
Will your ink ruin my printer?<br />
Our ink is filtered to less than fi micron and will not ruin a printer or a printer cartridge.<br />
My particular printer model number does not appear on your list of compatibility.<br />
Can I still use your ink to refill?<br />
A printer may not be listed but it may use the same cartridge as another printer.<br />
Compare cartridge numbers.<br />
www.ims-ink.com 3
PRINTER/CARTRIDGE CROSS REFERENCE<br />
Printer Cartridge Page<br />
Apple Stylewriter I/II, 1200, 1500 M8052 (BC-01), M8041 (BC-02), M4609 (BC-05) 13<br />
Apple Stylewriter 2400/2500 M3240 (BC-20) 17<br />
M3330 (BCI-21Bk), M3329 (BCI-21C) 18<br />
Apple Color Stylewriter 4500 (Black) M5693 (51629A) 32<br />
Apple Color Stylewriter 4500 (Color) M5694 (51649A) 30<br />
Apple Color Stylewriter 6500 (Black) M5658 (51645A) 26<br />
Apple Color Stylewriter 6500 (Color) M5659 (51641A) 27<br />
Brother HJ100/400, WP7000/7500J IN-10 13<br />
Brother MFC-3100/3200/5100/5200c, IntelliFax 1800C LC-21BK/C/M/Y 11<br />
Brother MFC-3220C/5440/5840/210/420/620C LC-31BK/C/M/Y 11<br />
Brother MFC 620/680/820/3240/3340/5440/5840C,<br />
Intellifax 1840/1940/2440C<br />
LC-41BK/C/Y/M 12<br />
Brother MFC-7050 LC-11BK, LC-11CK 36<br />
Brother MFC-7150/7160/9100c LC-02BK/C/M/Y 11<br />
Brother MFC-7300/7400/9200c LC-04BK/C/M/Y 11<br />
Brother WP6400/6500/6700/7700CJ IN-700, IN-710 36<br />
Canon BJ10, BJC-150, 200, 1000 Series,<br />
FaxPhone B60/70/140/160/170<br />
BC-01/02/05 13<br />
Canon BJC-800 Series BJC-643BK/C/M/Y 19<br />
Canon BJC-2000/4000/5000 Series, FaxPhone B740<br />
MultiPASS C530/545/555/560/635/2500/<br />
3000/3500/5500<br />
BC-20/23, BX-20 17<br />
4<br />
www.ims-ink.com
PRINTER/CARTRIDGE CROSS REFERENCE<br />
Printer Cartridge Page<br />
Canon BJC-2000/4000/5000 Series,<br />
MultiPASS C530/545/555/560/635/2500/<br />
3500/5500, S200/300, i250/350/450/455D/<br />
470D/475D, MultiPASS MP F20/360/370/390<br />
PIXMA iP1500/2000<br />
BCI-21BK, BCI-21C, BCI-24BK, BCI-24C 18<br />
Canon BJC-3000/6000/8200, i550/560/850/860/900<br />
/950/960/9900, MultiPASS C755/F30/50/60<br />
/80/MP700/730, PIXMA i3000/4000/5000<br />
/6000/8500, PIXMA MP750/760/780,<br />
S400/450/500/600/750/800/900/9000<br />
BCI-3eBK/C/M/Y, BCI-5/6BK/C/G/M/PC/PM/R/Y 15<br />
Canon iP3300/4200/4300/5200/6600/6700,<br />
MP500/600/800/950/960<br />
PGI-5BK, CLI-8BK/C/M/PC/PM/Y 15<br />
Canon iP1600/1700/1800/6210/6220/3100,D<br />
MP150/160/170/180/450/460<br />
PG-40/50, CL-41/51/52 16<br />
Canon BJC-8500 BCI-8BK/C/M/Y/PBK/PC/PM 15<br />
Canon Fax B300 Series, B400 BX-2 13<br />
Canon FaxPhone B45/540/550/640, MultiPASS 800 BX-3 14<br />
Compaq IJ200 337714-001 (180845-001)<br />
337715-001 (180846-001)<br />
36<br />
Compaq IJ600 203428-001, 203429-001 36<br />
Compaq IJ650 10N0016 (16), 10N0026 (26) 38<br />
www.ims-ink.com 5
PRINTER/CARTRIDGE CROSS REFERENCE<br />
Compaq IJ300/700/750/900/A900 337709-001 (180847-001)<br />
337710-001 (180848-001)<br />
36<br />
Compaq Photo Cartridge (All except IJ200/650) 337711-001 (180849-001) 37<br />
Compaq A1000/1500/3000/4000, 337709-001 (180847-001) 36<br />
1400P, IJ1200 180844-001<br />
Dell 922/924/926/942/944/960/962/964/966 M4640, M4646, J4844, GR274/GR280, GR777/GR282 40<br />
Photo All-in-One MVV173/MVV175, MVV171/MVV174, MVV169<br />
Dell A920 All-in-One, 720 Color Printer T0529, T0530 38<br />
Dell A940/960 All-in-One 7Y743, 7Y745 39<br />
Dell J740 Personal T0601,T0602 39<br />
Epson SQ870, 1170, 1500 S020010, S020062 19<br />
Epson Stylus Color 3000, 5000 S020118/122/126/130 19<br />
Epson Stylus Color 5000 (Photo Cartridges) S020143/147 24<br />
Epson Stylus Color 300/400/440/480/500 (Black) S020089/093/108/138/187/189/191, 21<br />
580/600/640/660/670/740/760/800/850/860/<br />
880/8<br />
T003, T005, T013, T014, T019, T020<br />
3 Printer Cartridge Page<br />
/900/1160/1520/C40, Stylus Photo<br />
700/1200, Stylus Scan 2000 Series<br />
Epson Stylus Color 777, Stylus C42VX, C62, CX1500 T007, T015, T017, T018, T026, T028, T029, 21<br />
CX3200, Stylus Photo 780/785/820/870/890/<br />
1270/1280/2000P*<br />
T036, T037, T038, T039 T040, T041*<br />
Epson Stylus Color II/IIs, 200, 820, 500 (Color) S020047, S020049, S020097 20<br />
6<br />
www.ims-ink.com
PRINTER/CARTRIDGE CROSS REFERENCE<br />
Printer Cartridge Page<br />
Epson Stylus Photo 700/750/1200/EX S020110, S020193, T001 22<br />
Epson Stylus Photo 780/785/820/870/890/1270<br />
1280/2000P*<br />
T008, T009, T016, T027* 22<br />
Epson Photo 960, Photo R200/300/320, RX500/600 T033120/220/320/420/520/620, T048120 23<br />
C64/66/80/82/84/86, CX5200/5400/6400* /220/320/420/520/620, T043120,<br />
T044120/220/320/420, T032120/220/320<br />
/420, T032120/220/320/420, T04220/320/420*<br />
Hewlett Packard Business <strong>Ink</strong>jet 1100/2200/2250/ C4804A (12), C4805A (12), C4806A (12), 28<br />
2600, Color Copier 160/170/260/270/ C4836A (11), C4837A (11), C4838A (11),<br />
cc800ps, Color <strong>Ink</strong>jet cp1700, Color Printer C4840A (10), C4841A (10), C4842A (10),<br />
2230/2250/2280/2600, DesignJet 10/20/30/ C4843A (10), C4844A (10), C4911A (82),<br />
50ps/130/500/800, DesignJet Colorpro GA/CAD, C4912A (82), C4913A (82), C9385A (88), C9386A (88),<br />
DeskJet 2000/2500C Series, Officejet Pro K550 C9387A (88), C9388A (88), C9425A (85), C9426A (85),<br />
C9427A (85), C9428A (85), C9429A (85)<br />
Hewlett Packard Business <strong>Ink</strong>jet CP1160 Series<br />
Digital Copier Printer 610, OfficeJet d Series,<br />
OfficeJet 7100 Series<br />
C5011A/D (14), C5010A/D (14) 33<br />
Hewlett Packard DeskJet/DeskWriter 200/300/ 51626A (26), 51629A (29), C6614A (20) 32<br />
400/500/600 Series, OfficeJet 300/500/600/700 C6628 (19)<br />
Hewlett Packard DeskJet 310, 500/600<br />
Series, OfficeJet 300/500/600 (Color)<br />
51625A (25A), 51649A (49) 30<br />
*Printers use cartridges with smartchip technology. Consult www.ims-ink.com or call 888-304-6125 before refilling.<br />
www.ims-ink.com 7
PRINTER/CARTRIDGE CROSS REFERENCE<br />
Printer Cartridge Page<br />
Hewlett Packard DeskJet 600 Series C1816A (16) 31<br />
Hewlett Packard DeskJet 700/800/900/1200/1600 51640A/C/M/Y (40), 51644C/M/Y (44) 26<br />
Series, 6122, 6127, Color Copier 100 Series<br />
DesignJet 230/250/350/450/550/650/750,<br />
OfficeJet G/K/R/T/Pro/v40/5000 Series<br />
PhotoSmart P1000/1100/1215, 1115/1218/1315<br />
51645A (45), C6615A (15)<br />
Hewlett Packard DeskJet 700/800/900 Series 51641A, C1823 (23), C6578 (78) 27<br />
6122, 6127, Color Copier 100 Series<br />
OfficeJet G/K/R/T/Pro/v40/5000 Series<br />
PhotoSmart P1000/1100/1215, 1115/1218/1315<br />
C6625A (17)<br />
Hewlett Packard DeskJet 3320/3420, 4100 Series C8727A (27), C8728A (28) 35<br />
Hewlett Packard DeskJet 450/4100/5000 Series<br />
OfficeJet 5510, 6610, Photosmart 100/130/<br />
145/230/245, 7150/7350/7550/7660/7760/7960,<br />
9600 Series, PSC 2110/2150/2175/2210<br />
C6656A (56), C6657A (57), C6658A (58) 35<br />
Hewlett Packard DeskJet 3910/3930/3940, PCS 1410 C9351 (21), C9352 (22) 35<br />
Hewlett Packard DeskJet 5440/59405700/6500 Series, C8765 (94), C8766 (95), C8767 (96), 25<br />
6840/9800, OfficeJet 4215/6210, Photosmart C9362 (92), C9361 (93), C9363 (97), C9364 (98)<br />
325/375/2610/2710/8100/8400/8700 Series<br />
C4180/D5140, PSC 1510/2355<br />
C9369 (99)<br />
Lexmark 1000/2000/3000/5000/7000 Series, 13619HC, 13620HC, 13400HC 36<br />
4076, Optra Color 40/45, P122, P700, P3150 1302050, 1302060, 12A1970 (70),<br />
8<br />
www.ims-ink.com
PRINTER/CARTRIDGE CROSS REFERENCE<br />
Printer Cartridge Page<br />
Z-Series X63/73/83/85/125 12A1975 (75), 12A1980 (80), 12A1985 (85),<br />
15M0120 (20), 15M0125 (25),16G0055 (55),<br />
16G0065 (65),17G0050 (50), 17G0060 (60)<br />
Lexmark Photo Cartridge 1361760, 12A1990 (90) 37<br />
Lexmark Z13/23/25/33/35, i3, X75, Z600 Series, X1100 Series 10N0016(16), 10N0026(26), 10N0217(17), 10N0227(27) 38<br />
Lexmark Z55/65, X5150/6150/6170 All-in-One 18L0032 (82), 18L0042 (83), 18L0000 (88) 39<br />
Lexmark P315/915/3350/4350/6250, X5200 Series, X7170, 18C0032 (32), 18C0033 (33), 18C0034 (34),<br />
Z800 Series, X2300/2350/2470/3470/3480, Z730/735 18C0035 (35), 18C0781 (#1)<br />
40<br />
Lexmark P315/915/3350/4350/6250, X5200 Series, X7170, 18C0031 (31)<br />
Z800 Series Photo Cartridge<br />
40<br />
Okidata Okijet 2010 52109301, 52109302 36<br />
Sharp AJ-5010/5030 AJ-C50B, AJ-C50C 36<br />
Sharp UX-2200/2700CM UX-22BC, UX-27CC 36<br />
Xerox Docuprint XJ8C/XJ9C, WorkCenter 480/<br />
490cx, XK35c<br />
8R7880, 8R7881, 8R12591 36<br />
Xerox Docuprint C11/15, WorkCneter Xi70c 8R7903, 8R7904 41<br />
<strong>Ink</strong> Level Reset for HP Cartridges 29<br />
<strong>Ink</strong> Level Reset for HP #56, #57, #58 34<br />
*Printers use cartridges with smartchip technology. Consult www.ims-ink.com or call 888-304-6125 before refilling.<br />
Registered trademarks<br />
www.ims-ink.com 9<br />
®<br />
All brand names and model designations are trademarks of their respective companies.<br />
This product is not associated with nor represented by such companies.
INKJET TERMS<br />
Color Legend<br />
Bk - Black, C - Cyan (blue), M - Magenta (red), Y - Yellow, PC - Photo Cyan (light blue),<br />
PM - Photo Magenta (light red)<br />
Cross contamination<br />
If a three color cartridge is overfilled, an ink<br />
may leak out of the printhead and contaminate<br />
one or more of the other colors.<br />
Exit hole<br />
Cartridges that do not have built in printheads<br />
have exit holes. These are the holes from<br />
which the ink exits and the ink is transferred to<br />
the printheads in the printer.<br />
<strong>Ink</strong> bladder<br />
Some cartridges have a silver colored storage<br />
bag that contains the ink. Care must be taken<br />
not to puncture this bag.<br />
Metal contacts<br />
This is the part of the printhead that contains<br />
the circuitry allowing the cartridge to print.<br />
10<br />
www.ims-ink.com<br />
Photo <strong>Ink</strong><br />
Some printers use photo inks to achieve prints<br />
with smoother color tones. These inks are<br />
lighter than regular inkjet ink.<br />
Printhead<br />
The copper colored portion of an inkjet cartridge<br />
that contains the circuitry and nozzles that<br />
disperses the ink during the printing process.<br />
Vent hole<br />
This hole gives an ink cartridge access to air<br />
and is often used as a fill hole to add ink to a<br />
cartridge.<br />
Vent plug<br />
This is a circular plug that is put in an ink<br />
cartridge after the cartridge is filled with ink.
BROTHER: LC-02BK/C/M/Y, LC-04BK/C/M/Y, LC-21BK/C/M/Y, LC-31BK/C/M/Y<br />
1. Seal ink exit hole on bottom of cartridge with good adhesive tape or blue<br />
seal dot (included).<br />
2. Grab "handle" of black, cyan, magenta, or yellow colored cap<br />
3.<br />
and remove. (May use a small screwdriver to pry off.)<br />
Where cap removed, locate larger of two round silver seals.<br />
Drill Here<br />
4. Using hand drill (included) make a fill hole through the seal in<br />
the area where the seal overlaps foam.<br />
5. Remove cap from filler needle of ink refill bottle.<br />
6. Insert needle of correct color ink refill bottle into fill<br />
hole and push into foam. Pull needle back<br />
slightly then slowly squeeze refill bottle to allow<br />
ink to flow into cartridge.<br />
7. Stop filling when ink bubbles from fill hole.<br />
DO NOT OVERFILL.<br />
8. Replace cap from filler needle of refill bottle.<br />
9. Blot away excess ink with a paper towel.<br />
10. Seal hole using good adhesive tape. A good<br />
seal is necessary to prevent ink from leaking<br />
out exit hole. Put colored cap back on cartridge.<br />
11. Place strip of dark colored tape on back side of cartridge.<br />
12. Remove tape or blue seal from bottom of cartridge.<br />
www.ims-ink.com 11
BROTHER: LC-41BK/C/M/Y<br />
1. Place cartridge on side with clear plastic side facing up.<br />
Use hand drill (included) to create fill hole just below top of<br />
cartridge. Return cartridge to upright position.<br />
2. Remove cap from filler needle of ink refill bottle.<br />
3. Insert needle of correct color ink refill bottle into drilled fill<br />
hole. Slowly squeeze refill bottle to allow ink to flow into ink<br />
tank reservoir. Stop filling before ink reaches fill hole. DO<br />
NOT OVERFILL!<br />
4. Keep cartridge in filling position. Blot away/dry any excess<br />
ink from fill hole with paper towel. Place blue seal dot<br />
(included) or good adhesive tape over fill hole.<br />
5. Replace cap from filler needle of refill bottle.<br />
12<br />
www.ims-ink.com<br />
Fill Hole
APPLE: M4609, M8041, M8052<br />
BROTHER: IN-10<br />
CANON: BC-01, BC-02, BC-05, BX-2<br />
1. Locate vent plug on right side of black cartridges. Insert eye screw<br />
(included) into plug impression. Tilt plug back and forth and pull<br />
to remove plug. For color cartridges there are three vent<br />
plugs to remove. Remove, fill with ink, then re-insert vent plug<br />
for each color one at a time to avoid cross contamination.<br />
2. Remove cap from filler needle of ink refill bottle.<br />
3. Insert needle of correct color ink refill bottle into hole where vent<br />
plug removed. Pull needle back slightly then very slowly squeeze<br />
refill bottle to allow ink to flow into cartridge.<br />
4. Stop filling when ink bubbles from fill hole. DO NOT OVERFILL.<br />
Replace cap from filler needle of refill bottle.<br />
5. Blot away excess ink with a paper towel.<br />
6. Re-insert plug into vent plug hole. Push in gently until slightly<br />
below cartridge surface.<br />
7. Replace cap from filler needle of refill bottle.<br />
NOTE: An overfilled cartridge will leak out the printhead.<br />
Place printhead on a paper towel for a few minutes until leaking stops.<br />
BK<br />
Y M C<br />
www.ims-ink.com 13
CANON: BX-3<br />
1. With translucent panel of cartridge facing upward, push in existing<br />
metal BB to create a fill hole with the plastic ball push tool (included).<br />
2. Remove cap from filler needle of ink refill bottle.<br />
3. Tilt cartridge slightly back raising the fill hole. Insert needle of black<br />
color ink refill bottle into fill hole then very slowly squeeze refill bottle to<br />
allow ink to flow into cartridge.<br />
4. Stop filling when ink reaches fill hole. DO NOT OVERFILL.<br />
5. Replace cap from filler needle of refill bottle.<br />
6. Blot away excess ink with a paper towel.<br />
7. Insert new metal BB (included) firmly into fill hole to replace metal BB<br />
from step 1 to reseal cartridge.<br />
NOTE: An overfilled cartridge will leak out the printhead. Place<br />
cartridge vent plug down (right side) on a paper towel until<br />
leaking stops.<br />
14<br />
www.ims-ink.com<br />
Fill Hole
CANON: BCI-3eBK/C/M/Y/PBK/PC/PM, BCI-5/6BK/C/G/M/PC/PM/R/Y,<br />
BCI-8BK/C/M/Y/PBK/PC/PM, CLI-8BK/C/M/PC/PM/Y*<br />
1. Cover ink exit hole on bottom of cartridge with good adhesive tape or blue<br />
seal dot (included). Use hand drill (included) to create fill hole in circular<br />
Exit Hole<br />
depression on the top back of cartridge (area where label does not cover)<br />
ink tank reservoir.<br />
2. Remove cap from filler needle of ink refill bottle.<br />
3. Insert needle of correct color ink refill bottle into drilled fill hole. Slowly<br />
squeeze refill bottle to allow ink to flow into ink tank reservoir. Tip<br />
cartridge back slightly as ink is absorbed into section with foam. Continue<br />
filling ink tank reservoir until ink level is no higher then top of foam. DO<br />
NOT OVERFILL.<br />
4. Keep cartridge in filling position. Blot away/dry any excess ink from fill<br />
hole with paper towel. Place small black plug (included) firmly in fill hole.<br />
Remove tape or blue seal dot from outlet hole.<br />
5. Replace cap from filler needle of refill bottle.<br />
6. A few drops of ink may drip from exit hole. If ink continues to drip, fill hole<br />
is not sealed airtight. Reseal exit hole, remove plug, blot away excess ink<br />
with paper towel and reinsert plug.<br />
NOTE: Black ink used for regular and photo cartridge.<br />
*Cartridges have a chip. To use refilled cartridge the ink level monitor needs to<br />
be disabled to continue printing. For most models to reset press and hold<br />
RESUME/CANCEL at least five seconds. Monitor ink levels of refilled cartridge<br />
to avoid damage to printhead.<br />
Drill Here<br />
www.ims-ink.com 15
CANON: PG-40/50, CL-41/51, CL-52*<br />
1. Locate fill holes underneath label on top of cartridge. These are<br />
depressions that can be felt by running fingers across label. Pierce label<br />
with eye screw (included) to make hole for refill needle of one color.<br />
(Filling one ink color at a time will reduce possible ink crosscontamination.)<br />
2. Remove cap from filler needle of ink refill bottle.<br />
3. Hold cartridge with label side up. Insert needle of correct color ink refill<br />
bottle through label into fill hole about 3/4”. Pull needle back slightly<br />
then very slowly squeeze refill bottle to allow ink to flow into the desired<br />
chamber.<br />
4. Stop filling when ink first appears where needle inserted or at top of<br />
foam. DO NOT OVERFILL!<br />
5. Replace cap from filler needle of refill bottle.<br />
6. Blot away excess ink with a paper towel.<br />
7. Cover fill hole with good adhesive tape or blue seal dot (included),<br />
making sure not to cover vent notches on side of label.<br />
8. Repeat process for remaining color of color or photo cartridge.<br />
*Cartridges have a chip. To use refilled cartridge the ink level monitor needs<br />
to be disabled to continue printing. For most models, to reset press and hold<br />
RESUME/CANCEL at least 5 seconds. Monitor ink levels of refilled cartridge<br />
to avoid damage to printhead.<br />
16<br />
www.ims-ink.com<br />
BK<br />
C<br />
Fill Hole<br />
M<br />
PC<br />
Y<br />
PM
APPLE: M3240<br />
CANON: BC-20, BC-23, BX-20<br />
1. Locate vent plug on top of cartridge. Insert eye screw (included)<br />
into plug impression. Tilt plug back and forth and pull to remove.<br />
2. Remove cap from filler needle of ink refill bottle.<br />
3. Insert needle of black ink refill bottle into hole where vent plug<br />
removed and push into foam reservoir. Pull needle back slightly<br />
then slowly very squeeze refill bottle to allow ink to flow into<br />
cartridge.<br />
4. Stop filling when ink bubbles from fill hole or out of printhead on<br />
the bottom of the cartridge. DO NOT OVERFILL.<br />
5. Replace cap from filler needle of refill bottle.<br />
6. Blot away excess ink with a paper towel.<br />
7. Replace vent plug on top of cartridge.<br />
Vent Plug<br />
www.ims-ink.com 17
APPLE: M3329, M3330<br />
CANON: BCI-21BK, BCI-21C, BCI-24BK, BCI-24C<br />
Black Cartridge<br />
1. Enlarge vent hole on top of cartridge with hand drill (included) to create fillhole.<br />
2. Remove cap from filler needle of black ink refill bottle.<br />
3. Insert needle of black ink refill bottle into fill hole and push into foam reservoir.<br />
Pull needle back slightly and very slowly squeeze refill bottle to allow ink to flow into cartridge.<br />
4. Stop filling when ink bubbles from fill hole or out the bottom of the cartridge.<br />
DO NOT OVERFILL.<br />
5. Replace cap from filler needle of refill bottle.<br />
6. Blot away excess ink with a paper towel.<br />
Color Cartridge<br />
1.<br />
2.<br />
Carefully remove top cap of color cartridge carefully by scoring with a knife.<br />
Enlarge each of three vent holes on exposed surface with hand drill (enclosed).<br />
Vent Hole<br />
3. Remove cap from filler needle of ink refill bottle.<br />
4. Insert needle of correct color refill bottle into fill hole and<br />
push into foam reservoir. Pull needle back slightly<br />
then very slowly squeeze refill bottle to allow ink to flow into cartridge.<br />
5. Stop filling when ink bubbles from fill hole or out the<br />
bottom of the cartridge. DO NOT OVERFILL.<br />
6.<br />
7.<br />
8.<br />
Replace cap from filler needle of refill bottle.<br />
Blot away excess ink with a paper towel.<br />
Replace cartridge cap and secure with good adhesive tape.<br />
C<br />
M<br />
Y<br />
18<br />
www.ims-ink.com
CANON: BJI-643BK/C/M/Y<br />
EPSON: S020010, S020062, S020118, S020122, S020126, S020130<br />
IBM/LEXMARK: 1380490, 1380491, 1380492, 1380493<br />
1. Remove cap from filler needle of ink refill bottle.<br />
2. Locate soft circular rubber seal on front of cartridge.<br />
(This is the seal that controls the flow of ink from the<br />
cartridge to the printhead when pierced by a<br />
hollow needle inside the printer.)<br />
3. Holding cartridge upright, insert just the tip of needle of<br />
correct color ink refill bottle through cartridge seal taking<br />
care not to puncture internal ink bladder.<br />
4. Very slowly squeeze refill bottle, allowing ink to flow into<br />
cartridge. Do not allow air to enter bladder. If air<br />
enters bladder, remove by sucking out with refill bottle.<br />
5. Stop filling if cartridge swells or if there is increased<br />
back pressure. Remove needle and blot away any<br />
excess ink with a paper towel.<br />
6. Replace cap from filler needle of refill bottle.<br />
Rubber Seal<br />
www.ims-ink.com 19
EPSON: S020047, S020049, S020097<br />
1. Cartridge has a reservoir containing foam with ink exit hole(s) and<br />
an ink reservoir without foam which feeds ink into foam reservoir<br />
through connecting dam.<br />
2. Individually seal each exit hole with good adhesive tape.<br />
3. Use hand drill (included) to create "breather" hole(s) into ink<br />
reservoir(s) without foam on top of cartridge. Leave label in place.<br />
Use eye screw (included) to create fill hole(s) in label at the<br />
depression(s) in center of each color reservoir.<br />
4. Remove cap from filler needle of ink refill bottle.<br />
5. Insert needle of correct color refill bottle through fill hole(s) label.<br />
Pull needle back slightly then VERY slowly squeeze refill bottle.<br />
<strong>Ink</strong> will fill reservoir and foam compartments.<br />
6. After initial filling of reservoir(s) allow cartridge to rest one minute for<br />
ink to be absorbed by foam. Add more ink to reservoir if<br />
necessary to complete the fill. Reservoir should be nearly full.<br />
7. Blot away any excess ink from fill hole(s) with paper towel and cover<br />
with good adhesive tape, as well as the "breather" holes made to<br />
make an airtight seal. Do not remove tape from ink exit hole(s).<br />
8. Replace cap from filler needle of refill bottle.<br />
20<br />
www.ims-ink.com<br />
Fill Holes<br />
Breather<br />
Holes<br />
BK<br />
Exit Holes<br />
Fill Holes<br />
M<br />
C Y
EPSON: S020089, S020093, S020108, S020138, S020187/189/191, T003, T005,<br />
T007*, T013, T014, T015*, T017*, T018*, T019, T020, T026*, T028*, T029*,<br />
T036*, T037*, T040*, T041*<br />
*Cartridges have a smartchip that needs to be reset.<br />
Exit Holes<br />
Consult www.ims-ink.com or call 888-304-6125 before refilling.<br />
1. Individually seal each exit hole with good adhesive tape.<br />
2. Locate depression(s) on top surface of cartridge in labels for fill<br />
holes. They are approximately on center line of cartridge body.<br />
Use eye screw (included) to create fill hole(s) in label at the<br />
depression(s) in center of each color reservoir.<br />
3. Remove cap from filler needle of ink refill bottle.<br />
4. Insert needle through label into hole(s) of foam<br />
reservoir(s). Pull needle back slightly then very slowly squeeze Fill Hole<br />
refill bottle to allow ink to flow into foam reservoir(s).<br />
5. After initial filling of chamber allow cartridge to rest one minute<br />
for ink to be absorbed by foam. Refill the ink chamber a<br />
second time if necessary. Stop filling when ink bubbles from<br />
fill hole. DO NOT OVERFILL.<br />
Fill Hole<br />
C M Y<br />
Fill Hole<br />
6. Blot away any excess ink from the fill hole(s) and exit port(s)<br />
with paper towel. Cover fill holes with good adhesive tape.<br />
7.<br />
Do not remove tape from ink exit hole(s).<br />
Replace cap from filler needle of refill bottle.<br />
BK<br />
BK<br />
C M<br />
Y<br />
www.ims-ink.com 21
EPSON: (PHOTO)* S020110, S020193, T001, T008*, T009*, T016*, T027*<br />
*Cartridges have a smartchip that needs to be reset.<br />
Consult www.ims-ink.com or call 888-304-6125 before refilling.<br />
1. Individually seal each exit hole with good adhesive tape.<br />
2. Locate depression(s) on top surface of cartridge in labels for fill holes.<br />
They are approximately on center line of cartridge body. Use eye<br />
screw (included) to create fill hole(s) in label at the depression(s) in<br />
center of each color reservoir.<br />
3. Remove cap from filler needle of ink refill bottle.<br />
4. Insert needle through label into hole(s) of foam reservoir(s). Pull<br />
needle back slightly then very slowly squeeze refill bottle to allow ink to<br />
flow into foam reservoir(s).<br />
5. After initial filling of chamber allow cartridge to rest one minute for ink<br />
to be absorbed by foam. Refill the ink chamber a second time if<br />
necessary. Stop filling when ink bubbles from fill hole.<br />
DO NOT OVERFILL.<br />
6. Blot away any excess ink from the fill hole(s) and exit port(s) with<br />
paper towel. Cover fill holes with good adhesive tape. Do not<br />
remove tape from ink exit hole(s).<br />
7. Replace cap from filler needle of refill bottle.<br />
22<br />
www.ims-ink.com<br />
C<br />
Exit Holes<br />
PC M PM Y
EPSON: INDIVIDUAL “T” <strong>CARTRIDGES</strong> FOR T03X TO T04X SERIES<br />
Cartridges have a smart chip that needs to be reset.<br />
Please call <strong>IMS</strong> at 888-304-6125 before refilling if you do not have this item.<br />
Note 1: There are two styles of individual “T” cartridges. Determine which<br />
style cartridge style is being refilled – sloped top or flat top.<br />
1. Hold cartridge right side up. Using hand drill (included) make a fill hole<br />
as shown in picture set 1 for a sloped cartridge, approximately 1-1/2”<br />
from right edge of cartridge. For a flat top cartridge make a fill hole as<br />
shown in picture set 2, approximately 1” from right edge<br />
of cartridge.<br />
2. Twist hand drill and drill through the plastic covering no more than 3/8”.<br />
Remove hand drill, and begin filling, and proceed to step 3.<br />
3. Remove cap from filler needle of ink refill bottle.<br />
4. Insert needle of correct color refill bottle through fill hole, no more than<br />
1/4” to 3/8”. VERY slowly inject ink into cartridge by squeezing refill<br />
bottle. Stop filling when ink comes out of hole. Before this happens<br />
some air and ink bubbles will come out of hole.<br />
5. Blot away any remaining excess ink from fill hole(s) with paper towel.<br />
Insert small plug (included) in fill holes as shown in each<br />
corresponding picture set.<br />
6. Replace cap from filler needle of refill bottle.<br />
Note 2: Because of the design of this type cartridge you will not be able to<br />
completely fill cartridge. When ink level gauge reads less than half reset<br />
chip and refill cartridge.<br />
Set 1<br />
Set 2<br />
Fill Holes<br />
Fill Holes<br />
www.ims-ink.com 23
EPSON: (PHOTO) S020143, S020147<br />
1. Remove cap from filler needle of ink refill bottle.<br />
2. Locate soft circular rubber seals on front of cartridge. (These are<br />
the seals that controls the flow of ink from the cartridge to the print<br />
head when pierced by a hollow needle inside the printer.)<br />
3. Insert just the tip of needle of correct color ink refill bottle through<br />
cartridge seal taking care not to puncture internal ink bladder.<br />
4. Very slowly squeeze refill bottle, allowing ink to flow into cartridge. Do<br />
not allow air to enter bladder. If air enters bladder, remove by<br />
sucking out with refill bottle.<br />
5. Stop filling if cartridge swells or if there is increased back pressure.<br />
Remove needle and blot away any excess ink with a paper towel.<br />
6. Replace cap from filler needle of refill bottle.<br />
NOTE: Each cartridge hold similar colors of regular and photo ink. Make<br />
sure to identify proper cartridge before inserting ink.<br />
24<br />
www.ims-ink.com<br />
M with PM<br />
C<br />
or<br />
with<br />
PC
HEWLETT-PACKARD: C9362 (92), C9361 (93), C9364 (98)<br />
1. Locate fill holes underneath label on top of cartridge. These are depressions that can be felt by<br />
running fingers across label. Pierce label with eye screw (included) to make hole for refill needle<br />
of one color. (Filling one ink color at a time will reduce possible ink cross-contamination.)<br />
2.<br />
3.<br />
Remove cap from filler needle of ink refill bottle.<br />
Hold cartridge with label side up.<br />
Insert needle of correct color ink refill<br />
bottle through label into fill hole about<br />
3/4”. Pull needle back slightly then<br />
very slowly squeeze refill bottle to<br />
allow ink to flow into the desired<br />
chamber.<br />
Y<br />
PM<br />
4. Stop filling when ink first appears<br />
where needle inserted or at top of foam.<br />
DO NOT OVERFILL!<br />
Fill Hole<br />
M<br />
5.<br />
6.<br />
Replace cap from filler needle of refill bottle.<br />
Blot away excess ink with a paper towel.<br />
C<br />
PBk<br />
PC<br />
7. Cover fill hole with good adhesive tape or blue seal dot (included), making sure not to cover vent<br />
notches on side of label.<br />
8. Repeat process for remaining colors of color or photo cartridge.<br />
www.ims-ink.com 25
HEWLETT-PACKARD: 51640A/C/M/Y (40), 51644C/M/Y (44), 51645A (45), C6615A (15)<br />
APPLE: M5658<br />
1. Turn cartridge so that print head is pointed straight up. Using a utility knife carefully remove<br />
round label from fill hole to expose metal BB.<br />
2. Push the existing metal BB in fill hole into cartridge with plastic ball push tool (included).<br />
3. Remove cap from filler needle of ink refill bottle.<br />
4. Insert tip of needle through fill hole being careful not to damage ink<br />
bladder, then very slowly squeeze refill bottle to allow ink to flow into<br />
cartridge. When you notice ink coming out of the fill hole, stop filling.<br />
Apply firm pressure to large flat sides of cartridge and hold. This will<br />
force any air and excess ink out fill hole. Blot/dry excess ink with<br />
paper towel.<br />
5. Continue to hold pressure on sides of cartridge. Insert large plug<br />
(included) firmly into fill hole. Cover with blue seal dot (included) to<br />
achieve an airtight seal before releasing pressure on sides of cartridge.<br />
6. Stand cartridge, print head down, on absorbent paper for 2 minutes<br />
to draw out any excess ink and further establish a vacuum in ink<br />
chamber. If leaking continues seal is not airtight, reseal with blue seal dot.<br />
7. Blot away excess ink from print head with paper towel.<br />
8. Replace cap from filler needle of refill bottle.<br />
NOTE: If printer does not recognize refilled cartridge refer to<br />
page 29 for <strong>Ink</strong> Level Reset For HP Cartridges.<br />
26<br />
www.ims-ink.com<br />
Fill Hole<br />
A cartridge is “leaking” only when it is held up, away, from the paper towel, NOT touching the<br />
paper towel.
HEWLETT-PACKARD: 51641 SERIES (41), C1823 SERIES (23), C6578 SERIES (78),<br />
C6625 SERIES (17)<br />
APPLE: M5659<br />
1. Place the cartridge with the label facing upright.<br />
2. Use hand drill (included) to create three fill holes located along the<br />
center line of the label. Two fill holes will be at each edge of the label<br />
and one fill hole in the middle of the label.<br />
3. Remove cap from filler needle of ink refill bottle.<br />
4. Insert needle of correct color refill bottle through fill hole as far as it will<br />
go. Pull needle back slightly then very slowly squeeze refill bottle to<br />
allow ink to flow into ink reservoir(s).<br />
5. Stop filling when ink bubbles from fill hole or out of printhead on the<br />
bottom of the cartridge. DO NOT OVERFILL! (It is best to underfill this<br />
cartridge.)<br />
6. Insert small black plugs (included) firmly into fill holes.<br />
7. Replace cap from filler needle of refill bottle.<br />
8. Blot away any excess ink on the printhead with paper towel.<br />
NOTE: If ink is not coming out, place printhead on damp paper towel to<br />
draw ink out. If printer does not recognize refilled cartridge refer to page 29<br />
for <strong>Ink</strong> Level Reset For HP Cartridges. Y M C<br />
www.ims-ink.com 27
HEWLETT-PACKARD: C4804A (12), C4805A (12), C4806A (12), C4836A (11), C4837A (11),<br />
C4838A (11), C4840A (10), C4841A (10), C4842A (10), C4843A (10), C4844A (10), C4911A (82),<br />
C4912A(82), C4913A (82), C9385A (88), C9386A (88), C9387A (88), C9388A (88), C9425A (85),<br />
C9426A (85), C9427A (85), C9428A (85), C9429A (85)<br />
1. Peel back label on both sides at bottom of cartridge and remove bottom from<br />
top portion of cartridge.<br />
2. Turn top portion of cartridge upside down. Use end of paper clip or other small<br />
pointed object to gently pry out rubber ball form fill hole located at bottom end<br />
of this section.<br />
3. Remove cap from filler needle of ink refill bottle.<br />
4. Insert needle of correct color ink refill bottle no more than 1/2” into fill hole to<br />
prevent puncturing the ink storage bladder. Tilt cartridge back slightly so the fill<br />
hole is elevated. This will result in less air being trapped in the cartridge.<br />
5.<br />
6.<br />
Slowly squeeze refill bottle to allow ink to flow into ink bladder.<br />
Stop filling when ink appears at fill hole. Reseal by pushing back in the rubber<br />
ball which was removed.<br />
Peel Label<br />
7. To remove any excess air from storage bladder, tilt cartridge back so outlet<br />
tube is elevated. Insert filler needle only into outlet tube. (Remove refill needle<br />
Outlet Tube Fill Hole<br />
from ink bottle by turning needle counter clockwise.) Slowly and carefully<br />
depress and release black pump (located in the middle of filling hole and outlet<br />
tube). When ink begins to appear, stop. Blot away excess ink with paper towel.<br />
Pump<br />
8. Place bottom cap of cartridge back in place, replace label to secure to top of<br />
cartridge. Use adhesive tape if necessary to keep bottom in position.<br />
9. Replace cap from filler needle of refill bottle.<br />
NOTE: Cartridge will not work if refilled past cartridge expiration date.<br />
28<br />
www.ims-ink.com
INK LEVEL RESET FOR HP PRINTER <strong>CARTRIDGES</strong><br />
Some HP printers, such as the DeskJet 970cxi, can identify the last two cartridges that have been in<br />
the printer. Therefore it will not recognize a refilled cartridge as not being full when it is put in the<br />
printer. Since these printers can only recognize the last two cartridges installed, place and remove<br />
two sets of cartridges (new or used) one set after the other in the printer. Now the refilled cartridges<br />
will be the third set of cartridges and will not be remembered by the printer. If you don't have two<br />
other cartridges, reset the printer's memory as follows;<br />
1. Turn on printer, then open the cover to remove both cartridges.<br />
2. Place both cartridges so metal contacts are facing towards you.<br />
3. Place adhesive tape on four upper contact points on far left<br />
contact column of both cartridges. (See #1)<br />
4. Re-insert the two cartridges, then close cover.<br />
5. Open cover after 2-3 seconds.<br />
6. Allow cartridge cradle to move to center and stop.<br />
A cartridge problem may be noted. This is normal.<br />
7. Remove two cartridges and place in front of you as before. 1 2 1<br />
2<br />
8. Remove adhesive tape. Now cover the four upper<br />
contacts on the far right column of both cartridges. (See #2)<br />
9. Repeat steps 4 through 7.<br />
10. Remove the adhesive tape and clean the contacts if necessary<br />
with distilled water or rubbing alcohol on a paper towel to<br />
remove any residual adhesive.<br />
Color Cartridge Black Cartridge<br />
11. Re-insert cartridges and close cover.<br />
www.ims-ink.com 29
HEWLETT-PACKARD: 51625A (25), 51649 SERIES (49)<br />
APPLE: M5694<br />
1. Remove/pry off the green/gray cover cap carefully by<br />
scoring/breaking seal to the cartridge body. The vent holes for<br />
filling the three foam color reservoirs will now be visible. The foam<br />
will be white in color. Take care to protect metal contacts from<br />
damage.<br />
2. Remove cap from filler needle of ink refill bottle.<br />
3. Hold cartridge with the vent holes upward. Insert needle of<br />
correct color into vent hole as far as it will go. Pull needle back<br />
slightly then very slowly squeeze refill bottle to allow ink to flow into<br />
the desired ink reservoir.<br />
4. Stop filling when ink first appears where needle inserted or at top<br />
of foam. DO NOT OVERFILL. Keep foam white in color.<br />
5. Replace cap from filler needle of refill bottle.<br />
6. Blot away excess ink with a paper towel.<br />
7. Replace green/gray cover cap on cartridge. Secure in place with<br />
good adhesive tape.<br />
30<br />
www.ims-ink.com<br />
M<br />
C<br />
Y
HEWLETT-PACKARD: C1816A (16) PHOTO<br />
1. Remove/pry off the cover cap carefully by scoring/breaking<br />
seal to the cartridge body. The vent holes for filling the three<br />
foam color reservoirs will now be visible. The foam will be white in<br />
color. Take care to protect metal contacts from damage.<br />
2. Remove cap from filler needle of ink refill bottle.<br />
3. Hold cartridge with the vent holes upward. Insert needle of<br />
correct color into vent hole as far as it will go. Pull needle back<br />
slightly then very slowly squeeze refill bottle to allow ink to flow into<br />
the desired reservoir.<br />
4. Stop filling when ink first appears where needle inserted or at<br />
top of foam. DO NOT OVERFILL. Keep foam white in color.<br />
5. Replace cap from filler needle of refill bottle.<br />
6. Blot away excess ink with a paper towel.<br />
7. Replace cover cap on cartridge. Secure in place with good<br />
adhesive tape.<br />
PM<br />
www.ims-ink.com 31<br />
PC<br />
BK
HEWLETT-PACKARD: 51626 SERIES (26), 51629 SERIES (29), C6614 SERIES (20)<br />
APPLE: M5693<br />
Drill Here<br />
1. Apply blue seal dot (included) over white hole in the middle of green/blue arrow<br />
located on top of cartridge. Apply a second blue seal dot over the small round<br />
hole on bottom of cartridge<br />
2. Hold cartridge so green/blue arrow on the top is pointing forward. On back<br />
right corner on top of cartridge, push white plastic ball into cartridge with ball<br />
push tool (included). For later versions which do not have fill hole on top,<br />
carefully drill a fill hole in this position with hand drill (included).<br />
3. Remove cap from filler needle of ink refill bottle.<br />
4. Insert needle of black refill ink bottle into ink fill hole. Very slowly inject ink<br />
into cartridge by squeezing refill bottle. Filled amount of ink should not<br />
exceed 80% of total capacity of visible chamber.<br />
5. Insert small black plastic plug (included) into fill hole. Seat securely for<br />
6.<br />
airtight seal.<br />
Replace cap from filler needle of refill bottle.<br />
Seal Holes<br />
7. Remove blue seal dot from white hole on top.<br />
8. If ink drips from bottom of cartridge place inflator bulb (included) in top center<br />
white hole and squeeze to pump air. Lift bulb from hole before releasing finger<br />
so air is not drawn out. Repeat procedure 3 to 4 times, more if ink continues to leak.<br />
9. Dripping should now be stopped. Remove blue seal dot from bottom of cartridge.<br />
10. Blot away any ink from printhead with paper towel. Do not touch the copper<br />
assembly.<br />
Bottom View<br />
32<br />
www.ims-ink.com
HEWLETT-PACKARD: C5010A/D (14), C5011A/D (14)<br />
1. Locate three fill holes underneath label on top of cartridge. These are<br />
depressions that can be felt by running fingers across the center of<br />
the label. Use the middle hole for filling the black cartridge. Use the<br />
three holes for filling the color cartridge. Pierce label with eye screw<br />
(included) to make hole for refill needle.<br />
2. Remove cap from filler needle of ink refill bottle.<br />
3. Hold cartridge with the label side up. Insert needle of correct color ink<br />
refill bottle through label into fill hole about 3/4". Pull needle back<br />
slightly then very slowly squeeze refill bottle to allow ink to flow into the<br />
desired chamber<br />
4. Stop filling when ink first appears where needle inserted or at top of<br />
foam. DO NOT OVERFILL.<br />
5. Replace cap from filler needle of refill bottle.<br />
6. Cover fill holes with good adhesive tape or blue seal dots (included).<br />
NOTE: Fill and tape fill hole of each color one at a time to avoid cross contamination<br />
of color. Most printers that use the 14 cartridge have an ink level gauge that can<br />
be overridden when refilling a cartridge. Instructions on how to override the ink<br />
gauge can be found in your printer’s manual or by contacting our technical support<br />
at 888-304-6125 or our website at www.ims-ink.com<br />
www.ims-ink.com 33<br />
C<br />
BK<br />
M<br />
Y
INK LEVEL RESET FOR HP #56, #57 AND #58<br />
1. Remove the cartridge(s) to be reset from the printer.<br />
2. Place a piece of tape over the top left contact as indicated in the<br />
picture by arrow 1.<br />
3. Re-insert the cartridge into the printer, then close cover. Printer<br />
will perform an alignment page.<br />
4. After alignment page has been printed remove cartridge from<br />
printer.<br />
5. Place a piece of tape over the second contact as indicated in the<br />
picture by arrow 2 for the #56 and #58 cartridge, or as indicated<br />
by arrow 3 for the #57 cartridge.<br />
6. Again place cartridge in printer with both pieces of tape into<br />
printer, close cover and allow printer to print another alignment<br />
page.<br />
7. Now remove cartridge form printer and remove the tape from the<br />
contacts. It is very important to make sure that there is not any<br />
residual adhesive on the cartridge contacts. Clean contacts with<br />
distilled water or rubbing alcohol on a soft cloth material.<br />
8. Re-insert cartridge and close cover.<br />
34<br />
www.ims-ink.com<br />
1<br />
2<br />
3
HEWLETT-PACKARD: C8727A (27), C8728A (28), C6656A (56), C6657A (57), C6658A (58),<br />
C9351A (21), C9352A (22)<br />
1. Locate fill holes underneath label on top of cartridge. These are<br />
depressions that can be felt by running fingers across label. Pierce<br />
label with eye screw (included) to make hole for refill needle of first<br />
color.<br />
2. Remove cap from filler needle of ink refill bottle.<br />
3. Hold cartridge with the label side up. Insert needle of correct color<br />
ink refill bottle through label into fill hole about 3/4". Pull needle<br />
back slightly then very slowly squeeze refill bottle to allow ink to flow<br />
into the desired chamber<br />
4. Stop filling when ink first appears where needle inserted or at top of<br />
foam. DO NOT OVERFILL.<br />
Y<br />
5. Replace cap from filler needle of refill bottle.<br />
6. Cover fill holes with good adhesive tape or blue seal dots (included),<br />
making sure not to cover vent notches on side of label. Repeat<br />
process for remaining colors for color or photo cartridge.<br />
NOTE: Fill and tape fill hole of each color one at a time to avoid cross<br />
contamination of color. If printer does not recognize refilled cartridge<br />
refer to page 29 for <strong>Ink</strong> Level Reset For HP Cartridges.<br />
BK<br />
PM<br />
Fill Hole<br />
www.ims-ink.com 35<br />
M<br />
PC<br />
C
COMPAQ: 203428-001, 203429-001, 337709-001, 337710-001, 337711-001, 337715-001<br />
LEXMARK: 12A1970 (70), 12A1975 (75), 12A1980 (80), 12A1985 (85), 13619HC, 13620HC,<br />
13400HC, 15M0120 (20), 15M0125 (25), 16G0055 (55), 16G0065 (65), 17G0050 (50), 17G0060 (60)<br />
SHARP: AJ-C50B, AJ-C50C, UX-22BC, UX-27CC<br />
Fill Hole<br />
OKIDATA: 52109301, 52109302<br />
XEROX: 8R7880, 8R7881, 8R12591 BROTHER: IN-700, IN-701<br />
Black Cartridge<br />
1. It is strongly suggested that a thorough cleaning be done before refilling your cartridge.<br />
See page 2 for instructions.<br />
2. Locate small vent hole on top of cartridge.<br />
3. Use hand drill (included) to enlarge size of vent hole for filling.<br />
4. Remove cap from filler needle of the ink refill bottle.<br />
5. Insert needle of black refill ink bottle into fill hole into foam reservoir. Pull back needle<br />
slightly then very slowly squeeze refill bottle to allow ink to flow into cartridge.<br />
6. Stop filling when ink bubbles from fill hole. DO NOT OVERFILL.<br />
7. Replace cap from fill needle of refill bottle.<br />
8. Overfilled cartridge will leak out of printhead. Blot away excess ink with a paper towel<br />
until leaking stops.<br />
Color Cartridge<br />
1. Carefully remove/pry off the colored cover cap by scoring/breaking seal to cartridge<br />
body. Vent holes for filling three color chambers now visible. The foam will be white in color.<br />
2. Remove cap from filler needle of ink refill bottle.<br />
3. Insert needle of correct color refill ink bottle into vent hole into foam reservoir. Pull back<br />
needle slightly then very slowly squeeze refill bottle to allow ink to flow into cartridge.<br />
4. Stop filling when ink appears at top of foam. DO NOT OVERFILL. Keep foam white in<br />
color.<br />
5. Replace cap from filler needle of refill bottle.<br />
6. Replace colored cover cap on cartridge. Secure in place with good adhesive tape.<br />
36<br />
www.ims-ink.com<br />
C<br />
Y M
COMPAQ: 337711-001 (180849-001)<br />
LEXMARK: 12A1990 (90)<br />
1. Carefully remove/pry off the colored cover cap by scoring/breaking<br />
seal to cartridge body. Vent holes for filling three color chambers<br />
now visible. The foam will be white in color.<br />
2. Remove cap from filler needle of ink refill bottle.<br />
3. Insert needle of correct color refill ink bottle into vent hole into<br />
foam reservoir. Pull back needle slightly then very slowly squeeze<br />
refill bottle to allow ink to flow into cartridge.<br />
4. Stop filling when ink appears at top of foam.<br />
DO NOT OVERFILL. Keep foam white in color.<br />
5. Replace cap from filler needle of refill bottle.<br />
6. Replace colored cover cap on cartridge. Secure in place with<br />
good adhesive tape.<br />
PC BK PM<br />
www.ims-ink.com 37
COMPAQ: 10N0016 (16), 10N0026 (26)<br />
DELL: T0529, T0530, A920/940/960<br />
LEXMARK: 10N0016 (16), 10N0026 (26), 10N0217 (17), 10N0227 (27)<br />
Black Cartridge<br />
1. It is strongly suggested that a thorough cleaning be done before refilling your<br />
cartridge. See page 2 for instructions.<br />
2. Locate small vent hole on top of cartridge.<br />
3. Use hand drill (included) to enlarge size of vent hole for filling.<br />
4. Remove cap from filler needle of the ink refill bottle.<br />
5. Insert needle of black refill ink bottle into fill hole into foam reservoir.<br />
Pull back needle slightly then very slowly squeeze refill bottle to allow ink to<br />
flow into cartridge.<br />
6. Stop filling when ink bubbles from fill hole. DO NOT OVERFILL.<br />
7. Replace cap from fill needle of refill bottle.<br />
8. Overfilled cartridge will leak out of printhead. Blot away excess ink<br />
with a paper towel until leaking stops.<br />
Color Cartridge<br />
1. Carefully remove/pry off the green cover cap. Vent holes for filling three<br />
color chambers now visible.<br />
2. Remove cap from filler needle of refill ink bottle.<br />
3. Insert needle of correct color refill ink bottle into vent hole into foam reservoir.<br />
Pull back needle slightly then very slowly squeeze refill bottle to allow ink to<br />
flow into cartridge.<br />
4. Stop filling when ink appears at top of foam. DO NOT OVERFILL.<br />
5. Replace cap from fill needle of refill bottle.<br />
6. Replace green cover cap on cartridge. Secure in place with good adhesive tape.<br />
38<br />
www.ims-ink.com<br />
Fill Hole<br />
Y M C
DELL: 7Y743, 7Y745, T0601, T0602<br />
LEXMARK: 18L0032 (82), 18L0042 (83), 18L0000 (88)<br />
Black Cartridge<br />
1. It is strongly suggested that a thorough cleaning be done before refilling<br />
your cartridge. See page 2 for instructions.<br />
2. Locate small vent hole on top of cartridge.<br />
3. Use hand drill (included) to create/enlarge size of vent hole for filling.<br />
4. Remove cap from filler needle of the refill ink bottle.<br />
5. Insert needle of black ink refill bottle into fill hole into foam reservoir. Pull<br />
back needle slightly then very slowly squeeze refill bottle to allow ink to flow<br />
into cartridge.<br />
6. Stop filling when ink bubbles from fill hole. DO NOT OVERFILL.<br />
7. Replace cap from fill needle of refill bottle.<br />
8. Overfilled cartridge will leak out of printhead. Blot away excess ink with a<br />
paper towel until leaking stops.<br />
Color Cartridge<br />
1. Carefully remove/pry off the blue cover cap. Vent holes for three color<br />
chambers now visible.<br />
2. Remove cap from filler needle of ink refill bottle.<br />
3. Insert needle of correct color refill bottle into vent hole into foam reservoir<br />
about 3/4". Pull back needle slightly then very slowly squeeze refill bottle to<br />
allow ink to flow into cartridge.<br />
4. Stop filling when ink appears at top of foam. DO NOT OVERFILL.<br />
5. Replace cap from fill needle of refill bottle.<br />
6. Replace blue cover cap on cartridge and push secure in place.<br />
Fill Hole<br />
www.ims-ink.com 39<br />
M<br />
Y<br />
C
DELL: M4640, M4646, J4844, GR274/280, GR777/282, MVV 169, MVV 171/174, MVV 173/175<br />
LEXMARK: 18C0032 (32), 18C0033 (33), 18C0034 (34), 18C0035 (35), 18C0031 (31),<br />
18C0781 (#1) - same as (33) filling position.<br />
1. Locate fill holes underneath label on top of cartridge. These are depressions that can be felt by<br />
running fingers across label. Pierce label with eye screw (included) to make hole for refill needle<br />
of one color. (Filling one ink color at a time will reduce possible ink cross-contamination.)<br />
2. Remove cap from filler needle of ink refill bottle.<br />
3. Hold cartridge with label side up. Insert needle of correct color<br />
ink<br />
refill bottle through label into fill hole about 3/4”. Pull needle<br />
back slightly then very slowly squeeze refill bottle to allow ink to<br />
flow into the desired chamber.<br />
4. Stop filling when ink first appears where needle inserted or at<br />
top of foam. DO NOT OVERFILL!<br />
5. Replace cap from filler needle of refill bottle.<br />
6. Blot away excess ink with a paper towel.<br />
7. Cover fill hole with good adhesive tape or blue seal dot<br />
M<br />
(included), making sure not to cover vent notches on<br />
side of label.<br />
Y<br />
8. Repeat process for remaining colors of color or<br />
photo cartridge.<br />
40<br />
www.ims-ink.com<br />
C<br />
K<br />
C<br />
Fill Hole<br />
M