allen 144a trunk bike rack installation instructions
allen 144a trunk bike rack installation instructions
allen 144a trunk bike rack installation instructions

You also want an ePaper? Increase the reach of your titles
YUMPU automatically turns print PDFs into web optimized ePapers that Google loves.
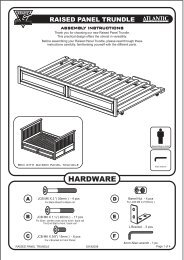
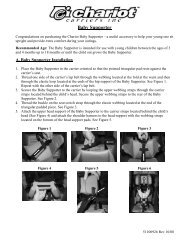
Allen Model144A Bike Rack<br />
English Instructions<br />
Pg. 1<br />
WARNING: Bikes or <strong>rack</strong> falling in road can cause serious accidents resulting in bodily injury - do not use<br />
<strong>rack</strong> on any vehicle on which it can not be properly mounted as described in this instruction sheet.<br />
• Top hooks must be completely hooked over solid metal edges at top/front of <strong>trunk</strong> lid or rear door - never hook<br />
to rain gutters, roof <strong>rack</strong>s, vertical rear glass, rubber or plastic moldings. Never use on trailers or front of vehicle.<br />
• Mount <strong>rack</strong> only with bottom feet on a rigid surface of car (never on glass), and with bottom foot assembly<br />
completely extended.<br />
• Never carry more than 4 <strong>bike</strong>s (max. capacity: 140 lb.) - no tandems, mopeds, or recumbents. Bikes must be securely tied<br />
to <strong>rack</strong> - use individual <strong>bike</strong> tie-down straps or additional straps if necessary. Car tail lights must remain visible.<br />
• Drive conservatively, especially over bumps (never off-road). Check periodically during use that all straps are<br />
tight and <strong>bike</strong>s are secure.<br />
• Do not use if any part of <strong>rack</strong> is damaged or missing. Contact R. A. Allen Co., Inc. for replacement parts.<br />
Caution: Use Allen 144A only in accordance with local motor vehicle and traffic regulations.<br />
• To avoid damage to rear door or <strong>trunk</strong>, do not open <strong>trunk</strong> or rear door when hooks or <strong>rack</strong> are in place.<br />
• Install <strong>rack</strong> and load bicycles only at a safe distance away from moving traffic.<br />
• Only rubber feet and hooks should come into contact with car. Do not allow metal parts of <strong>rack</strong> or bicycles to<br />
scratch car’s finish.<br />
• Make sure that all of <strong>rack</strong> and bicycles are kept at a safe distance from road and hot exhaust.<br />
• Remove <strong>rack</strong> from car when not in use.<br />
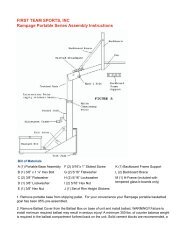
1. Bottom foot assembly must be<br />
completely extended. If the top feet<br />
are mounted on a near horizontal<br />
surface of car, the bottom feet of the<br />
<strong>rack</strong> must be resting on and<br />
supported by the top<br />
horizontal surface of<br />
the bumper.<br />
A.<br />
Setting up<br />
<strong>rack</strong>:<br />
1. Fold out top-foot/ carry<br />
arm assembly.<br />
2. Insert pins at ends of wire<br />
struts into holes in top foot<br />
assembly.<br />
3. Completely fold out<br />
bottom-foot assembly.<br />
B.<br />
Important Installation Notice for 144A:<br />
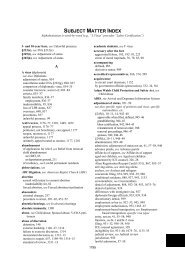
Mounting <strong>rack</strong> on vehicle step #1:<br />
1. Make sure that contact surfaces between car<br />
and rubber feet are thoroughly clean and free of<br />
any dirt, and that all rubber feet remain<br />
properly spaced during use.<br />
Drawing A<br />
2. Only thread top straps through metal<br />
buckles as shown in Drawing A. Never<br />
thread straps through fist slot in metal<br />
buckles as shown in Drawing B.<br />
2. Never install <strong>rack</strong> with its bottom feet<br />
placed on the outside vertical<br />
surface of the bumper.<br />
Drawing B<br />
C.<br />
3. Never install <strong>rack</strong> without bottom foot<br />
assembly in a completely extended<br />
position.<br />
4. It is extremely important to check and retighten bottom and<br />
side straps after bicycles are loaded.<br />
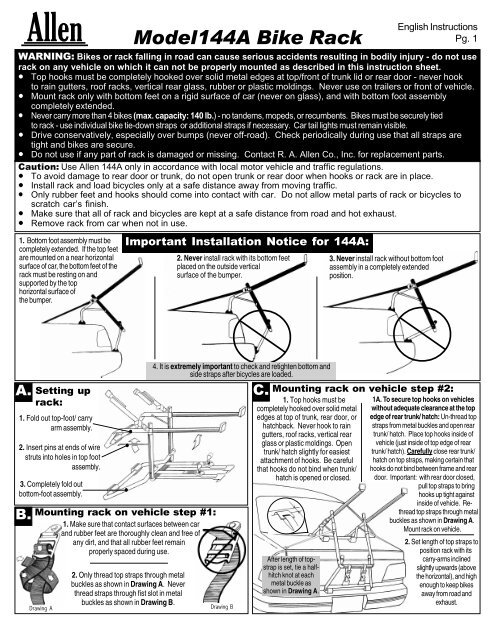
Mounting <strong>rack</strong> on vehicle step #2:<br />
1. Top hooks must be<br />
completely hooked over solid metal<br />
edges at top of <strong>trunk</strong>, rear door, or<br />
hatchback. Never hook to rain<br />
gutters, roof <strong>rack</strong>s, vertical rear<br />
glass or plastic moldings. Open<br />
<strong>trunk</strong>/ hatch slightly for easiest<br />
attachment of hooks. Be careful<br />
that hooks do not bind when <strong>trunk</strong>/<br />
hatch is opened or closed.<br />
After length of topstrap<br />
is set, tie a halfhitch<br />
knot at each<br />
metal buckle as<br />
shown in Drawing A.<br />
1A. To secure top hooks on vehicles<br />
without adequate clearance at the top<br />
edge of rear <strong>trunk</strong>/ hatch: Un-thread top<br />
straps from metal buckles and open rear<br />
<strong>trunk</strong>/ hatch. Place top hooks inside of<br />
vehicle (just inside of top edge of rear<br />
<strong>trunk</strong>/ hatch). Carefully close rear <strong>trunk</strong>/<br />
hatch on top straps, making certain that<br />
hooks do not bind between frame and rear<br />
door. Important: with rear door closed,<br />
pull top straps to bring<br />
hooks up tight against<br />
inside of vehicle. Rethread<br />
top straps through metal<br />
buckles as shown in Drawing A.<br />
Mount <strong>rack</strong> on vehicle.<br />
2. Set length of top straps to<br />
position <strong>rack</strong> with its<br />
carry-arms inclined<br />
slightly upwards (above<br />
the horizontal), and high<br />
enough to keep <strong>bike</strong>s<br />
away from road and<br />
exhaust.
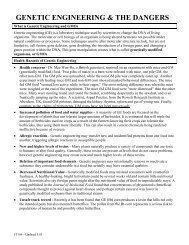
D.<br />
Allen Model 144A Bike Rack<br />
Securing Side, Bottom Straps & Hooks:<br />
Drawing C<br />
R. A. Allen Co., Inc.<br />
P. O. Box 221<br />
Lincoln, MA 01773<br />
1. Completely hook side & bottom<br />
hooks to metal edges to sides &<br />
below bumper or at the<br />
bottom of <strong>trunk</strong>.<br />
2. Completely tighten straps<br />
by pulling on free end of<br />
straps until elastic portion of<br />
straps are completely<br />
stretched. After straps are tightened, tie a half-hitch knot in<br />
each strap near the buckle.<br />
3. Once <strong>rack</strong> is installed, bottom foot assembly must be held<br />
against vehicle in its completely open position.<br />
Note: Make sure that side & bottom straps are threaded<br />
through plastic buckles only as shown in Drawing C.<br />
F. Alternate method #2 for Bottom Straps:<br />
Use if there is no metal edge below bumper for attachment of hooks.<br />
Loop bottom strap around carry-arms near<br />
the top metal buckles. Attach hook to lower<br />
edge of rear <strong>trunk</strong>/ hatch; tighten straps<br />
as described in Section C.<br />
U. S. Patents 4518108, 4709840, 5361959 - Foreign & Other Patents Pending<br />
© 2000 R. A. Allen Co., Inc., All Rights Reserved<br />
www.<strong>allen</strong><strong>rack</strong>s.com<br />
English Instructions<br />
Page 2.<br />
E. Alternate method #1 for Bottom Straps:<br />
Use to this method if bottom foot needs to be supported on outer<br />
horizontal edge of bumper (due to soft/ weak section<br />
closer to vehicle).<br />
Note: On a<br />
square backed<br />
vehicle (minivan/<br />
SUV) it is okay to<br />
position top feet<br />
on glass; NEVER<br />
install <strong>rack</strong> with<br />
bottom feet on<br />
glass.<br />
G. Alternate method #3 for Bottom Straps:<br />
Use if there is no metal edge below bumper or on the <strong>trunk</strong> for<br />
attachment of lower hooks.<br />
H. Loading bicycles onto <strong>rack</strong>:<br />
Remove all loose items from <strong>bike</strong>s (pumps, bags, etc.) and check that all quick-release hubs are tight.<br />
Never carry more than 4 <strong>bike</strong>s (max. capacity: 140 lb.). Car tail lights must remain visible.<br />
Load first <strong>bike</strong> with its chain and gears facing away from <strong>rack</strong>. Make sure that <strong>bike</strong>s do not come into<br />
contact with car (rotate inside pedal if necessary). Place carry arm behind seat tube for women’s<br />
style frames.<br />
Loop bottom straps (with hooks<br />
placed below bumper) around<br />
the lower (horizontal) section of<br />
the middle frame, and also<br />
around lower (horizontal) section<br />
of the bottom foot assembly<br />
(between rubber feet). Attach<br />
hooks to metal edge below<br />
bumper; tighten straps as<br />
described in Section D.<br />
Remove bottom straps from <strong>rack</strong>. Open <strong>trunk</strong><br />
slightly and place bottom hooks just inside<br />
<strong>trunk</strong>/hatch. Carefully close <strong>trunk</strong> on<br />
bottom straps. Pull straps to bring<br />
hooks against inside of <strong>trunk</strong>. Mount<br />
<strong>rack</strong> onto car, rethread straps and<br />
tighten as described in Section B.<br />
After <strong>bike</strong>s are loaded, check and retighten all straps, making sure that <strong>rack</strong> is still firmly held against car. Vision out<br />
of rear window may be restricted - use side mirrors accordingly, especially when backing up.<br />
I. Securing <strong>bike</strong>s to <strong>rack</strong>: All <strong>bike</strong>s must be securely tied to <strong>rack</strong>. Use individual <strong>bike</strong> tie-down straps or additional straps if necessary.<br />
1. Place <strong>bike</strong>s in tie-down<br />
cradles.<br />
Load subsequent <strong>bike</strong>s in alternating directions. For best weight distribution, load heaviest <strong>bike</strong>s first<br />
with lighter <strong>bike</strong>s on outside. Add padding between <strong>bike</strong> contact points, if necessary.<br />
2. Thread straps. 3. Pull tight.<br />
Tel: (800) 722-5536<br />
Fax: (781) 259-4116<br />
email: customerservice@<strong>allen</strong><strong>rack</strong>s.com