Quickwrap Duct Installation.qxd_Duct Installation.qxd - Unifrax
Quickwrap Duct Installation.qxd_Duct Installation.qxd - Unifrax
Quickwrap Duct Installation.qxd_Duct Installation.qxd - Unifrax

You also want an ePaper? Increase the reach of your titles
YUMPU automatically turns print PDFs into web optimized ePapers that Google loves.
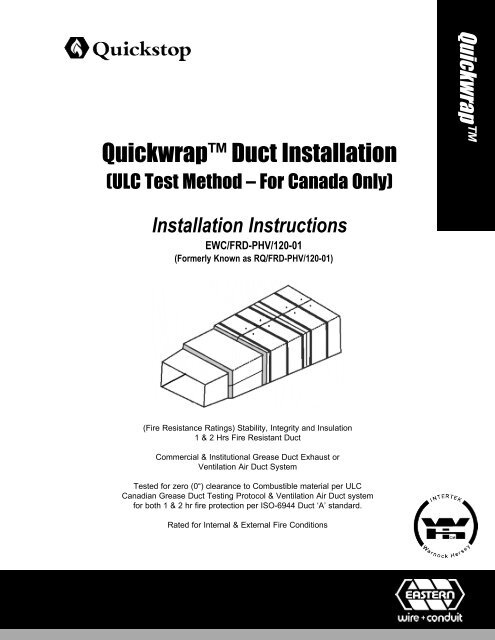
<strong>Quickwrap</strong> <strong>Duct</strong> <strong>Installation</strong><br />
(ULC Test Method – For Canada Only)<br />
<strong>Installation</strong> Instructions<br />
EWC/FRD-PHV/120-01<br />
(Formerly Known as RQ/FRD-PHV/120-01)<br />
(Fire Resistance Ratings) Stability, Integrity and Insulation<br />
1 & 2 Hrs Fire Resistant <strong>Duct</strong><br />
Commercial & Institutional Grease <strong>Duct</strong> Exhaust or<br />
Ventilation Air <strong>Duct</strong> System<br />
Tested for zero (0“) clearance to Combustible material per ULC<br />
Canadian Grease <strong>Duct</strong> Testing Protocol & Ventilation Air <strong>Duct</strong> system<br />
for both 1 & 2 hr fire protection per ISO-6944 <strong>Duct</strong> ‘A’ standard.<br />
Rated for Internal & External Fire Conditions<br />
<strong>Quickwrap</strong>
<strong>Installation</strong> Instructions<br />
<strong>Quickwrap</strong> <strong>Duct</strong> <strong>Installation</strong><br />
(ULC Test Method –<br />
For Canada Only)<br />
Grease & 2-hour Ventilation<br />
Air <strong>Duct</strong> Systems<br />
Two-layers of <strong>Quickwrap</strong> Fire Resistant duct<br />
insulation wrap constructed as follows:<br />
• First Layer installation allows butt seams<br />
throughout.<br />
• Second Layer installed with a MINIMUM 8”<br />
overlapping seam over the first layer using either<br />
butt seam <strong>Quickwrap</strong> Butt Wrap ‘Double<br />
Banding’ Method, <strong>Quickwrap</strong> ‘Pinning Only’<br />
Butt Wrap Method, or <strong>Quickwrap</strong> ‘2nd Layer<br />
Overlap’ Method.<br />
• For 2 or 3-sided systems see <strong>Quickwrap</strong> ‘2 or 3’<br />
Sided Pinning Only Method or <strong>Quickwrap</strong> ‘2 or 3’<br />
Sided Banding Method.<br />
1-hour Ventilation Air <strong>Duct</strong> Systems<br />
• For one hour Ventilation Air <strong>Duct</strong> Systems, only<br />
one layer of <strong>Quickwrap</strong> Fire Resistant duct<br />
insulation wrap is required using butt seaming<br />
methods or 3” overlap method.<br />
Grease <strong>Duct</strong> System<br />
• Maximum 40” x 40” (1600 sq. inch) -<br />
Rectangular, Square, or Round #16 Gauge<br />
Grease <strong>Duct</strong> Assembly<br />
Ventilation Air <strong>Duct</strong> System<br />
• Maximum 2915 sq. inch Rectangular, Square, or<br />
Round #26 Gauge or Greater Air <strong>Duct</strong> Assembly<br />
1<br />
www.easternwire-quickstop.com<br />
<strong>Quickwrap</strong> <strong>Duct</strong><br />
<strong>Installation</strong><br />
rated for maximum 300 Pa negative pressure<br />
within the duct • Complying with SMACNA or<br />
NFPA 90A requirements.<br />
Support Rods & Cradles<br />
• Minimum 3/8” steel threaded rod & 1½” x 1½” x<br />
3/16” steel angle cradles for ductwork not<br />
exceeding 160 sq. inches in size<br />
• Minimum ½” steel threaded rod & 2” x 2” x ¼”<br />
steel angle cradles for ductwork exceeding 160<br />
sq. inches in size<br />
• Support rods to be anchored to concrete using<br />
pass thru method with a nut & washer on the top<br />
of the concrete slab, or by using suitable carbon<br />
or stainless steel masonry anchors penetrating a<br />
minimum 2” depth into the concrete slab.<br />
• Maximum distance of 60” allowed between noninsulated<br />
duct supports.<br />
NOTE:<br />
• As required by site conditions, it is acceptable to<br />
encase the cradle support assembly along with<br />
the duct within the <strong>Quickwrap</strong> insulation (i.e.:<br />
cocoon wrap) during the installation. A slit is<br />
allowed in the duct wrap in order to position<br />
around the threaded rod. Slit must be repaired<br />
and sealed using Quickstop Acrylic Latex<br />
Sealant to a minimum depth of 1/4" with a bead<br />
also placed around the circumference of the<br />
support rod. Seams can be sealed using any<br />
combination of the approved installation<br />
methods.<br />
Banding (not required with ‘Pinning Only’ method)<br />
• ½” stainless steel banding for all grease duct and<br />
2-hour ventilation air duct systems installed as
<strong>Installation</strong> Instructions<br />
outlined in <strong>Quickwrap</strong> Double Banding Method<br />
and <strong>Quickwrap</strong> ‘2nd Layer Overlap’ Method. • ½”<br />
wide carbon steel banding for 1-hour ventilation<br />
air duct systems<br />
Firestop<br />
• Minimum 4” depth of 4 pcf (or heavier) mineral<br />
wool insulation or <strong>Quickwrap</strong> Biosoluble fiber<br />
firmly packed into 1 or 2-hour rated concrete.<br />
• Full depth of mineral wool or <strong>Quickwrap</strong><br />
Biosoluble fiber (less caulking depth) into framed<br />
gypsum wall or framed wood floor/gypsum<br />
ceiling.<br />
• Assemblies are to be topped with Quickstop<br />
Acrylic Latex Sealant to a min. depth of ¼” on<br />
top of floor or both sides of wall assembly.<br />
• Maximum annular space of 4” between duct and<br />
floor or wall substrate is allowed.<br />
• See Intertek Testing Services (ITS) listing<br />
RQ/PHV 120-01 for additional firestop details.<br />
Gypsum Shaft Transition (if required)<br />
• Should a transition be required from a gypsum<br />
shaft system to a <strong>Quickwrap</strong> <strong>Duct</strong> Wrap System<br />
the annular space around the duct and the shaft<br />
must be filled with a minimum of 4” depth of<br />
<strong>Quickwrap</strong> insulation and topped with a ¼”<br />
depth of Quickstop acrylic latex firestop sealant<br />
flush with the surface of the gypsum.<br />
• <strong>Quickwrap</strong> <strong>Duct</strong> insulation used for wrapping the<br />
duct must firmly abut the firestop.<br />
2<br />
www.easternwire-quickstop.com<br />
<strong>Quickwrap</strong> <strong>Duct</strong><br />
<strong>Installation</strong><br />
<strong>Quickwrap</strong> ‘Double-Banding’ Method<br />
<strong>Installation</strong><br />
• Requires two (2) layers of <strong>Quickwrap</strong> fire<br />
resistant duct insulation in accordance with<br />
manufacturer’s instructions for grease & 2-hour<br />
ventilation air duct systems.<br />
• Only single layer of <strong>Quickwrap</strong> required for 1hour<br />
ventilation air duct systems.<br />
• All cut ends of insulation to be repaired with<br />
aluminum tape.<br />
• Longitudinal seams on 2nd layer to overlap<br />
longitudinal seams on 1st layer by minimum of<br />
8”.<br />
• Circumferential seam of 2nd <strong>Quickwrap</strong> layer to<br />
overlap circumferential seam of 1st layer by a<br />
min. of 8”.<br />
• 1st and 2nd layer seams installed either by<br />
compression fitting or by sealing any maximum<br />
¼” wide voids in the insulation seams with<br />
minimum of ½” depth of Quickstop Acrylic Latex<br />
Sealant.<br />
• Pinning required on 2nd layer <strong>Quickwrap</strong> joints<br />
per Figures 1 to 3.
<strong>Installation</strong> Instructions<br />
<strong>Quickwrap</strong> <strong>Duct</strong><br />
<strong>Installation</strong><br />
Note: Additional pins are allowed to enhance the<br />
integrity of the <strong>Quickwrap</strong> <strong>Installation</strong><br />
3<br />
www.easternwire-quickstop.com
<strong>Installation</strong> Instructions<br />
Fastening<br />
• 1/8” copper coated steel insulation pins or Cup-<br />
Head Weldpins® required to be stud welded on<br />
bottom side of a horizontal duct equal to or<br />
exceeding 24” width. Pins are to be located a<br />
maximum 8” from edge of duct and on maximum<br />
12” centers in 2 rows per 24” wide exterior<br />
<strong>Quickwrap</strong> section. Pins are centered between<br />
banding on each individual wrap section – See<br />
bottom pinning detail (Figures 2 & 3).<br />
Note: No pins are required between the<br />
circumference seaming bands other than at the<br />
longitudinal joint. Additional pins may be<br />
installed to enhance the integrity of the<br />
<strong>Quickwrap</strong> installation.<br />
• Pins are also required on widest side of a<br />
vertical duct exceeding 24” in width.<br />
• Maximum pin-free space of 8” in from edge of<br />
ductwork is allowed.<br />
• <strong>Quickwrap</strong> is impaled on pins and held in place<br />
with speed clips or maybe installed prior to<br />
pinning with Cup-Head Weldpins®.<br />
• Longitudinal seams on the outside layer of wrap<br />
material require <strong>Quickwrap</strong> Pinning Only pins or<br />
a double row of Cup-Head Weldpins® located<br />
1½” on both sides of the seam (3” apart) midway<br />
between the banding on each individual exterior<br />
wrap section –see ‘bottom pinning’ detail. (See<br />
Figure 2 & 3)<br />
• <strong>Quickwrap</strong> is held in place by banding the<br />
second layer of insulation around the duct<br />
approx. 1½” on both sides of the seam and in<br />
the center of each external wrap layer.<br />
• No aluminum tape is required on seams, but it<br />
may be used for cosmetic reasons if desired.<br />
• Filament tape may be used around the 1st layer<br />
to hold the material in place while applying the<br />
2nd layer.<br />
4<br />
www.easternwire-quickstop.com<br />
<strong>Quickwrap</strong> <strong>Duct</strong><br />
<strong>Installation</strong><br />
The recommended sizes Cup-Head Weldpins®<br />
to be used:<br />
Cup-Head Weldpins® Size<br />
1-layer <strong>Quickwrap</strong> 1 ½” – 1 5/8”<br />
2-layers <strong>Quickwrap</strong> 3” – 3 1/8”<br />
<strong>Quickwrap</strong> Pinning Only’ Method<br />
<strong>Installation</strong><br />
• Requires two (2) layers of <strong>Quickwrap</strong> fire<br />
resistant duct insulation in accordance with<br />
manufacturer’s instructions for grease & 2 hour<br />
ventilation air duct systems.<br />
• Only single layer of <strong>Quickwrap</strong> required for 1hour<br />
ventilation air duct systems.<br />
• All cut ends of insulation to be repaired with<br />
aluminum tape.<br />
• Longitudinal seams on 2nd layer to overlap<br />
longitudinal seams on 1st layer by minimum of<br />
8”.
<strong>Installation</strong> Instructions<br />
• Circumferential seam of 2nd <strong>Quickwrap</strong> layer to<br />
overlap circumferential seam of 1st layer by a<br />
min. of 8”.<br />
• Seams are installed either by ‘compression fit’ or<br />
by sealing any max. ¼” wide voids in the seams<br />
with a minimum of ½” depth of Quickstop Acrylic<br />
Latex Sealant.<br />
Fastening<br />
• 1/8” copper coated steel insulation pins required<br />
to be stud welded on all sides of duct at max.<br />
12” centers – max. 6” pin-free space from edge<br />
of ductwork is allowed.<br />
• Pins are to be located between the seams of the<br />
1st and 2nd layers of duct insulation when using<br />
Pinning Only pins, or 1½” on either side of<br />
seams (3” apart) when using Cup-Head<br />
Weldpins®<br />
• Install Cup-Head Weldpins® on both sides of<br />
seam. Cup-Head Weldpins® must be located 3”<br />
apart (1½” on either side of the <strong>Quickwrap</strong><br />
insulation seams).<br />
• Longitudinal seams of the outside layer of wrap<br />
material require <strong>Quickwrap</strong> Pinning Only pinning<br />
at max 10 ½” centers and max. 2” from each<br />
edge the ductwrap material.<br />
• For horizontal ductwork where the bottom<br />
surface exceeds 24” wide; pin both sides of the<br />
exposed bottom seam at 1 ½” in from seam<br />
edge and fasten with Cup-Head Weldpins®.<br />
• No aluminum tape is required on seams, but it<br />
may be used for cosmetic reasons if desired.<br />
• Filament tape may be used around the 1st layer<br />
to hold the material in place while applying the<br />
2nd layer.<br />
5<br />
www.easternwire-quickstop.com<br />
<strong>Quickwrap</strong> <strong>Duct</strong><br />
<strong>Installation</strong><br />
The recommended sizes Cup-Head Weldpins® to<br />
be used:<br />
Cup-Head Weldpins® Size<br />
1-layer <strong>Quickwrap</strong> 1 ½” – 1 5/8”<br />
2-layers <strong>Quickwrap</strong> 3” – 3 1/8”<br />
<strong>Quickwrap</strong> ‘2nd Layer Overlap’ Method<br />
<strong>Installation</strong><br />
• Requires two (2) layers of <strong>Quickwrap</strong> fire<br />
resistant duct insulation in accordance with<br />
manufacturer’s instructions for grease & 2 hour<br />
ventilation air duct systems.<br />
• Only single layer of <strong>Quickwrap</strong> required for 1hour<br />
ventilation air duct systems.<br />
• Cut ends of insulation to be repaired with<br />
aluminum tape.<br />
• Longitudinal seams on 2nd layer to overlap<br />
longitudinal seams on 1st layer by minimum of<br />
8”.
<strong>Installation</strong> Instructions<br />
• Circumferential seam of 2nd <strong>Quickwrap</strong> layer to<br />
overlap circumferential seam of 1st layer by a<br />
min. of 8”.<br />
Fastening<br />
• 1/8” copper coated steel insulation pins or Cup-<br />
Head Weldpins® required to be stud welded on<br />
the bottom side of a horizontal duct exceeding<br />
24” in width at maximum 12” centers.<br />
• Pins also required on the widest side of a<br />
vertical duct exceeding 24” in width with<br />
maximum pin-free space of 12” in from edge of<br />
ductwork is allowed.<br />
• 1st layer seams installed with butt joints either<br />
‘compression fit’ or by sealing any max ¼” wide<br />
voids in the insulation seams with a minimum of<br />
½” depth of Quickstop Acrylic Latex Firestop<br />
Sealant.<br />
• 1st layer insulation is fastened using filament<br />
tape awaiting the application of the 2nd layer.<br />
• Second layer of insulation installed around the<br />
duct is overlapped 3” in all directions.<br />
• Wrap is held in place by banding the second<br />
layer of insulation around the duct in the center<br />
of the overlapped seam.<br />
• No aluminum tape is required on seams, but it<br />
may be used for cosmetic reasons if desired.<br />
6<br />
www.easternwire-quickstop.com<br />
<strong>Quickwrap</strong> <strong>Duct</strong><br />
<strong>Installation</strong><br />
<strong>Quickwrap</strong> ‘2 or 3’ Sided<br />
Pinning Only Method<br />
<strong>Installation</strong><br />
• Requires two (2) layers of <strong>Quickwrap</strong> fire<br />
resistant duct insulation in accordance with<br />
manufacturer’s instructions.<br />
• <strong>Duct</strong> to be located a maximum of 6” from the<br />
floor or wall assembly.<br />
Fastening<br />
• Install Pinning Only pins (or alternatively pin<br />
both sides of seam as outlined in <strong>Quickwrap</strong><br />
‘Pinning Only’ Method) on exposed sides of duct<br />
and install <strong>Quickwrap</strong> duct insulation using<br />
instructions shown in <strong>Quickwrap</strong> ‘Pinning Only’<br />
Method.<br />
• Overlap both layers of <strong>Quickwrap</strong> fire resistant<br />
duct insulation over concrete by minimum of 3”<br />
and fasten using min 1 ¼” OD fender washers<br />
over a minimum ¼” diameter steel concrete<br />
anchor inserted a minimum of 1 ½” into concrete<br />
slab spaced a maximum of 8” apart.
<strong>Installation</strong> Instructions<br />
<strong>Quickwrap</strong> ‘2 or 3’ Sided Banding Method<br />
<strong>Installation</strong><br />
• Requires two (2) layers of <strong>Quickwrap</strong> fire<br />
resistant duct insulation in accordance with<br />
manufacturer’s instructions.<br />
• <strong>Duct</strong> to be located a maximum of 6” from the<br />
floor or wall assembly. Fastening<br />
• Install pins on exposed sides of duct (if required)<br />
and install <strong>Quickwrap</strong> duct insulation using<br />
instructions shown in <strong>Quickwrap</strong> ‘Double<br />
Banding’ Method.<br />
• Overlap both layers of <strong>Quickwrap</strong> fire resistant<br />
duct insulation over the concrete by a minimum<br />
of 3”.<br />
• Anchor with a continuous length of min. 3/16” x 1<br />
½” wide steel flat bar over flared ends of the<br />
wrap material and fasten using min. 1 ¼” OD<br />
fender washers over a minimum ¼” diameter<br />
steel concrete anchors inserted a minimum of 1<br />
½” into the concrete slab spaced a maximum of<br />
8” apart.<br />
• Banding to be installed over the wrapped duct<br />
with ends looped around the steel flat bars,<br />
tightened and clipped as required.<br />
• <strong>Quickwrap</strong> fire resistant duct insulation is to be<br />
installed essentially to the requirements of<br />
<strong>Quickwrap</strong> ‘Double Banding’.<br />
7<br />
www.easternwire-quickstop.com<br />
<strong>Quickwrap</strong> <strong>Duct</strong><br />
<strong>Installation</strong>
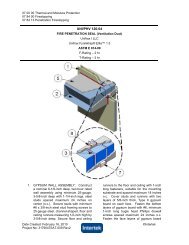
<strong>Installation</strong> Instructions<br />
Access Door Detail<br />
Section View of Assembly<br />
Assembly<br />
• Cut three pieces of <strong>Quickwrap</strong>. Two pieces must<br />
have a min. 1-in overlap over the access door<br />
opening. The third piece is sized to the access<br />
door. Per above drawing.<br />
• Cover all exposed insulation piece ends with foil<br />
tape.<br />
• Weld 4 insulation pins on each corner of a light<br />
gauge galvanized steel cover plate. Tighten all<br />
8<br />
www.easternwire-quickstop.com<br />
<strong>Quickwrap</strong> <strong>Duct</strong><br />
<strong>Installation</strong><br />
three <strong>Quickwrap</strong> layers through the insulations pins<br />
and fasten assembly with speed clips.<br />
• Weld 4 threaded rods to the door flange. Per above<br />
drawing.<br />
• Thread through the threaded rods the access door<br />
cover, and the entire 3-layer <strong>Quickwrap</strong> assembly.<br />
Fasten tightly with butterfly nuts.