
Create successful ePaper yourself
Turn your PDF publications into a flip-book with our unique Google optimized e-Paper software.
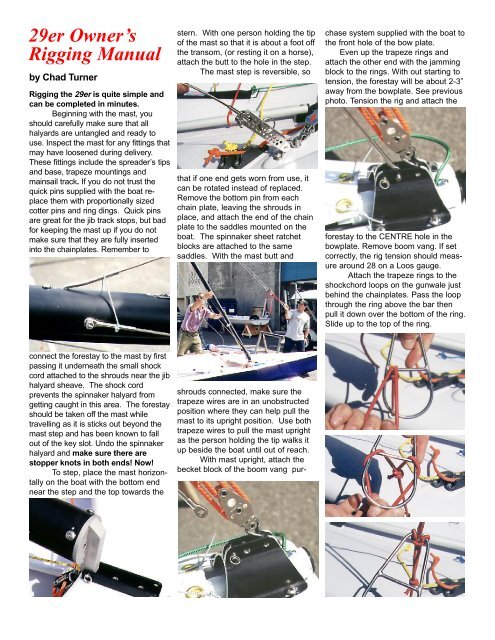
<strong>29er</strong> Owner’s<br />
<strong>Rigging</strong> <strong>Manual</strong><br />
by Chad Turner<br />
<strong>Rigging</strong> the <strong>29er</strong> is quite simple and<br />
can be completed in minutes.<br />
Beginning with the mast, you<br />
should carefully make sure that all<br />
halyards are untangled and ready to<br />
use. Inspect the mast for any fittings that<br />
may have loosened during delivery.<br />
These fittings include the spreader’s tips<br />
and base, trapeze mountings and<br />
mainsail track. If you do not trust the<br />
quick pins supplied with the boat replace<br />
them with proportionally sized<br />
cotter pins and ring dings. Quick pins<br />
are great for the jib track stops, but bad<br />
for keeping the mast up if you do not<br />
make sure that they are fully inserted<br />
into the chainplates. Remember to<br />
connect the forestay to the mast by first<br />
passing it underneath the small shock<br />
cord attached to the shrouds near the jib<br />
halyard sheave. The shock cord<br />
prevents the spinnaker halyard from<br />
getting caught in this area. The forestay<br />
should be taken off the mast while<br />
travelling as it is sticks out beyond the<br />
mast step and has been known to fall<br />
out of the key slot. Undo the spinnaker<br />
halyard and make sure there are<br />
stopper knots in both ends! Now!<br />
To step, place the mast horizontally<br />
on the boat with the bottom end<br />
near the step and the top towards the<br />
stern. With one person holding the tip<br />
of the mast so that it is about a foot off<br />
the transom, (or resting it on a horse),<br />
attach the butt to the hole in the step.<br />
The mast step is reversible, so<br />
that if one end gets worn from use, it<br />
can be rotated instead of replaced.<br />
Remove the bottom pin from each<br />
chain plate, leaving the shrouds in<br />
place, and attach the end of the chain<br />
plate to the saddles mounted on the<br />
boat. The spinnaker sheet ratchet<br />
blocks are attached to the same<br />
saddles. With the mast butt and<br />
shrouds connected, make sure the<br />
trapeze wires are in an unobstructed<br />
position where they can help pull the<br />
mast to its upright position. Use both<br />
trapeze wires to pull the mast upright<br />
as the person holding the tip walks it<br />
up beside the boat until out of reach.<br />
With mast upright, attach the<br />
becket block of the boom vang pur-<br />
chase system supplied with the boat to<br />
the front hole of the bow plate.<br />
Even up the trapeze rings and<br />
attach the other end with the jamming<br />
block to the rings. With out starting to<br />
tension, the forestay will be about 2-3”<br />
away from the bowplate. See previous<br />
photo. Tension the rig and attach the<br />
forestay to the CENTRE hole in the<br />
bowplate. Remove boom vang. If set<br />
correctly, the rig tension should measure<br />
around 28 on a Loos gauge.<br />
Attach the trapeze rings to the<br />
shockchord loops on the gunwale just<br />
behind the chainplates. Pass the loop<br />
through the ring above the bar then<br />
pull it down over the bottom of the ring.<br />
Slide up to the top of the ring.
The boom attaches at the gooseneck<br />
with a quick pin. The boom vang<br />
attaches similarly to a second goose-<br />
neck slightly below the beginning of<br />
the mainsail track, The lower end of<br />
the strut is attached to a “shoe” which<br />
should rest on the top of the boom and<br />
be free to slide. (Spray a little McLube<br />
on the felt under the shoe). The picture<br />
above shows the complete setup of the<br />
vang without the mainsail hoisted. The<br />
purchases on the boom are already<br />
rigged when shipped. Tie a loop in the<br />
end of line. The deck led part of the<br />
vang control attaches to this loop with<br />
the hook block.<br />
The mainsheet and jib sheet can<br />
be rigged as separate lines or tied<br />
together. If separate, the mainsheet<br />
would begin internally in the hole at<br />
the end of the boom, just behind the<br />
hanging block. Pass the line up<br />
through the hole, out the back and put<br />
a figure eight in the end. (Note in the<br />
picture the arrangement of the clew<br />
loop and the outhaul hook block). The<br />
sheet then goes (photo above right)<br />
through the bridle traveler block, back<br />
up to the rear mainsheet hangar block<br />
on the boom, forward THROUGH THE<br />
RED VECTRA LINE<br />
LOOP and then<br />
down through the<br />
mainsheet ratchet<br />
block. Make sure<br />
the ratchet block<br />
clicks when you<br />
sheet in. Ronstan<br />
ratchet blocks are<br />
pressure sensitive,<br />
so you might have<br />
to put a little back<br />
pressure on the<br />
block, to activate it.<br />
If the main and jib sheet are continuous,<br />
the jib sheet will be either spliced<br />
into the end of the main or tied to it.<br />
The jib sheet would then continue<br />
through the jib sheet swivel cleat,<br />
forward under the partner to a bullet<br />
block mounted on the throat to which<br />
the spinnaker sock is attached. From<br />
there it comes back to a block on the<br />
end of the line which actually attaches<br />
to the jib clew, the “final part”, then<br />
forward to the opposite side of the<br />
throat where it ends with a figure eight<br />
knot tied to the small saddle (deck<br />
strap). The final part passes through<br />
the block on the traveler and is tied off<br />
on the clew board (shown here being<br />
held by hand in the photo). The rules<br />
allow a shackle or quick release<br />
device for attachment to the clew.<br />
Continuous sheets are nice<br />
because they enable you to always<br />
have a grasp of both sheets. If the<br />
crew does not have the sheet in hand,<br />
it is easily found by picking it up as it<br />
falls from the skipper’s hand.<br />
Spinnaker setup<br />
The spinnaker setup is a little more<br />
involved, but hopefully this will give<br />
you some tricks to make it easier.<br />
Note: Some boats may be shipped<br />
without the spinnaker sock installed to<br />
avoid mildew - particularly in winter. If<br />
your sock is not installed, lay it out in<br />
the cockpit under the port side of the<br />
thwart. Remove the small screws and<br />
washers in the aluminum throat and<br />
attach the sock to the Velcro tape on<br />
the throat. Line up the pre-drilled holes<br />
in the sock and reinstall the screws.<br />
Tie the back end of the sock to the<br />
deck strap holding the stand-up block<br />
immediately behind it using the supplied<br />
Vectran line.
The first step is to lead the spinnaker<br />
halyard from where it exits the bottom<br />
of the mast straight down through an<br />
eye in the partner where it then passes<br />
forward through the cheek block<br />
mounted directly below on the side of<br />
the mast support. See below. It then<br />
goes towards the bow, UNDER both<br />
the line inside the spin pole and the<br />
pole extension line. See photo below.<br />
From there, it continues forward and<br />
passes through the larger of the two<br />
in-line blocks that are fixed together.<br />
(The line passing through the smaller<br />
block is attached to the pole and<br />
actually launches it during hoisting).<br />
See photo at top of next column.<br />
After that, it comes back towards to<br />
cockpit, passing under everything<br />
including the partner, through a small<br />
eye leading to the spinnaker halyard<br />
cleat and through the cleat. It goes<br />
straight back through a stand-up block<br />
and then over to the port side of the<br />
boat where it passes forward through<br />
another stand-up block. After passing<br />
through this block, this same halyard<br />
turns into the retrieval line for the<br />
spinnaker! Feed the retrieval line<br />
through the aft end on the spinnaker<br />
sock and out under the throat.<br />
At this point, it’s a good idea to<br />
tie the halyard onto the head of the<br />
spinnaker where the green and red<br />
tapes intersect. Attach the tack line,<br />
coming out of the end of the pole, to<br />
the end of the spinnaker where the<br />
green and white tapes meet. Check<br />
to make sure the halyard, tack line,<br />
and retrieval line are all<br />
led to one side of the<br />
forestay and that the<br />
halyard does not do a<br />
wrap around the forestay.<br />
Port side (for a starboard<br />
tack set) would be the<br />
preferred side for racing.<br />
Pull the spinnaker<br />
halyard, now retrieval<br />
line, out of the throat and<br />
pass it UNDER and up<br />
the OUTSIDE of the<br />
spinnaker then through<br />
the lower grommet. Now<br />
lead the retrieval line up<br />
the INSIDE of the<br />
spinnaker through the<br />
upper grommet, and tie<br />
a figure eight knot. You<br />
don’t want this knot to<br />
pull through the grommet,<br />
so make sure your<br />
knot is big or use a light<br />
stopper ball.<br />
The spinnaker sheet<br />
is continuous, with both ends attached<br />
to the clew of the spinnaker. Lead one<br />
end through the port ratchet block,<br />
then through the grommet in theclew of<br />
the spinnaker where the red and<br />
white tapes meet. The other end goes<br />
behind the mast, through the starboard<br />
ratchet block, around the forestay,<br />
above and inside the retrieval line,<br />
and also through the clew grommet.<br />
TIP: Pass the port sheet through the<br />
clew grommet from starboard to port,<br />
(which is the opposite of what you<br />
would normally do!) and do the starboard<br />
sheet from port to starboard<br />
before tying figure eight knots. It<br />
doesn’t look right but it will stop the<br />
clew hanging up on the forestay during<br />
a gybe! In the end, the sheets should<br />
be above everything in the cockpit so<br />
that you have full use of them downwind<br />
from the trapeze.<br />
Take the time to examine the<br />
system used to extend and retract the<br />
pole. The act of extending the pole is<br />
brought about by the spinnaker halyard<br />
pulling the two-in-line block aft<br />
which then pulls the large end of the<br />
pole forward until the knot attaching<br />
the extender line to the deck strap on<br />
the pole hits the block as shown in the<br />
photo above. Notice that, at the other
end of the extension line, there is a<br />
knot on either side of the deck strap.<br />
When the pole is fully extended, photo<br />
above, the extension line is fully<br />
tensioned and the position of the knot<br />
on the line may need to be adjusted so<br />
that the rope over the pole is slightly<br />
slack and can not jam the pole end<br />
tight. If this happens, it may stop the<br />
pole from going out all the way. Once<br />
retraction starts there is no pressure<br />
on the extension line and the second<br />
knot moves up against the deck strap<br />
providing enough slack so that the<br />
pole can swing off centre as it goes<br />
down the starboard side of the cockpit.<br />
You will also find that the line<br />
coming out the end of the pole and<br />
attached to the spinnaker tack has a<br />
knot in the line inside the pole. It is<br />
positioned so that, as the tack is<br />
withdrawn into the sock, the knot will<br />
pull the pole back to the bow fitting.<br />
<strong>Rigging</strong> the sails<br />
The jib clips directly onto the<br />
forestay, and the D ring in the tack is<br />
secured by a clevis pin and ring in the<br />
aft hole, behind the forestay pin.<br />
Attach the halyard to the head of the<br />
jib being sure to screw down the<br />
fastener all the way. This is used<br />
instead of a shackle as it is less likely<br />
to snag the spinnaker. Raise, and hook<br />
the wire loop to the adjustable rope<br />
purchase system. Don’t over tension<br />
the jib halyard in light wind. If the<br />
leading edge of the jib looks stretched<br />
in light wind, it’s too tight. Increase<br />
tension as the wind builds.<br />
Before raising the mainsail it is<br />
imperative that you check the tension<br />
on the battens. They are<br />
shipped un-tensioned and, if the sail<br />
is used this way, the battens are<br />
guaranteed to come out the front<br />
end of the batten pocket and you<br />
will have a repair on your hands that<br />
is not covered by warranty.<br />
There is a key in a small pocket at the<br />
tack of the mainsail. Tension the<br />
battens with this key (counter clockwise)<br />
until they are just starting to<br />
stretch the pocket but not so much so<br />
that the sail is being heavily curved.<br />
To raise the mainsail, attach the<br />
main halyard to the top of the mainsail,<br />
make sure that the halyard is in line<br />
with the track, clear of any tangles,<br />
and hoist. When the sail reaches the<br />
top of the mast, hook the halyard’s<br />
wire loop on to the teeth on the rack<br />
mounted on the side of the mast.<br />
Typically you will be on the first or<br />
second hook. Loop the clew tie-down<br />
over the end of the boom and attach<br />
the outhaul hook. (See earlier picture<br />
on p.2) Set the vang ram on the boom,<br />
and tuck all the halyard ends neatly<br />
inside the mainsail pocket.<br />
At this point you can attach the<br />
downhaul (Cunningham) hooks to the<br />
bottom of each side of the mainsail<br />
making sure that there are no twists in<br />
the purchase to allow for unencumbered<br />
adjustment. Also attach the vang<br />
adjustment hook to a bowline tied in<br />
the end of the vang shoe control line
exiting from the bottom of the boom<br />
near the gooseneck. Zip up the mainsail<br />
sleeve.<br />
Screw in the bow and stern drain<br />
plugs! Now! Note that the bow plug is<br />
provided solely to allow air to pass<br />
through the boat when stored to avoid<br />
collecting condensation in the hull.<br />
<strong>Rigging</strong> Tips<br />
To restrict the spinnaker halyard from<br />
re-cleating during a spinnaker take<br />
down, tie a short piece of shock cord<br />
from the jib sheet cleat mount, under<br />
the spinnaker halyard and onto the<br />
starboard foot-bar.<br />
The following system can help<br />
manage excess spinnaker halyard in<br />
the sets and takedowns. First, attach a<br />
small bullet block to the end of a fourfoot<br />
piece of shock cord. Attach a<br />
second small bullet block to the port,<br />
rear, hiking strap mount. Pass the<br />
shock cord through this bullet block<br />
and tie the end to the forward, port,<br />
hiking strap mount. Lastly, run the<br />
spinnaker halyard from the starboard<br />
stand-up block, through the block on<br />
the shock cord, and then to the port<br />
stand-up block. If rigged correctly, the<br />
shock cord should tug any excess<br />
halyard back toward the transom<br />
instead of allowing it to bunch up by<br />
your feet. Downwind, the long shock<br />
cord will stretch enough to allow the<br />
retrieval line to go out, but also tug on<br />
the excess halyard enough to keep it<br />
organized during manoeuvres.<br />
Friction is a killer! McLube, is a<br />
great idea for most friction-prone<br />
areas and a can is supplied with the<br />
boat as a courtesy from McLube. It’s<br />
not a lubricant for bearings, it just<br />
makes things slippery with out attracting<br />
much dirt. Use plenty of it on your<br />
spinnaker pole, jib track and, particularly,<br />
the entrance to the spinnaker<br />
sock. Spray down into the sock while<br />
you’re at it. It will even prevent your<br />
wet tell-tales from sticking to the sails.<br />
Tape anything and everything<br />
that looks like it could damage your<br />
spinnaker or potentially come undone.<br />
This includes fittings or<br />
fastenings at deck level that could<br />
snag the spinnaker if you were retrieving<br />
it during a capsize (most likely time<br />
to damage the spinnaker). The forestay<br />
and jib tack rings should be<br />
taped, along with the fasteners of the<br />
aluminum throat. Tape all rings,<br />
including the ones holding the mast<br />
up. Heat shrink tubing has been<br />
placed over the Nicopresses on the<br />
trap wires. Check this area as well.<br />
Boat Care<br />
It is best to store the <strong>29er</strong> on a form<br />
fitted trailer or yard dolly. Form fitted<br />
storage devices allow for the weight of<br />
the hull to be spread out over a<br />
greater area, decreasing hull stress<br />
from concentrated loads. Do not leave<br />
your boat on grass for extended<br />
periods or osmosis in the gelcoat<br />
could result.<br />
It’s beneficial to detach the forestay<br />
prior to storage, decreasing load<br />
on the mast and the hull. This can be<br />
achieved by substituting the vang-like<br />
purchase system attached to the<br />
trapeze rings and bow, for the forestay.<br />
In preparation for going on the road,<br />
check to make sure the boat is resting<br />
evenly on the trailer before tying down.<br />
Try to avoid leaving loose metallic<br />
objects such as pieces of the launching<br />
dolly, blades, or boom in the boat while<br />
trailering. The constant vibration of<br />
objects placed in the cockpit can easily<br />
damage your hull. You may remove the<br />
spinnaker pole for trailering, although it’s<br />
not necessary. Wrap a piece of padding<br />
around it and tie it up to the partner.<br />
When the trailer bounces, so does the<br />
spinnaker pole. Over time, constant<br />
bouncing could seriously damage the<br />
rear portion of the pole if its not sufficiently<br />
secured.<br />
Sail Care<br />
The sails are very durable if treated<br />
correctly. Don’t luff any sail more than<br />
needed. Over time, luffing will create<br />
small creases in the material that can<br />
lead to rips. This mostly applies to prestart<br />
manoeuvres when luffing into the<br />
wind for extended lengths of time is<br />
common. Roll the sails for storage and<br />
try to minimize creasing and folds.<br />
49er world champion Chris<br />
Nicholson explains 49er sail care this<br />
way and it applies equally to the <strong>29er</strong><br />
“The design and construction of the<br />
sails give excellent performance<br />
through a wide wind range. The 49er<br />
offers thrills and, when not handled<br />
correctly, spills. It is important for all<br />
crews to respect that lightweight<br />
equipment is the key to performance<br />
and sails are no exception”.<br />
Avoid landing on the mainsail or<br />
jib in a capsize. In a capsize the sails<br />
can not be expected to withstand the<br />
load of crews free falling from the<br />
gunwale height and using the sails to<br />
break their fall. If unavoidable, spread<br />
the load on impact by landing on the<br />
whole length of your body, either face<br />
down or on your back, by somersaulting.<br />
Feet, head or arms first is most<br />
likely to cause damage to the sail. The<br />
best escape is aft diving beyond the<br />
mainsail leech and in this case if you<br />
do land towards the back of the sail<br />
there will be more give to absorb the<br />
shock load than landing around the luff<br />
area which is supported by the mast.<br />
Main and Jib care tips<br />
· Spray the main luff tape and track<br />
regularly with McLube to reduce<br />
wear on the bolt rope, particularly<br />
around the batten ends.<br />
· Minor repairs can be carried out<br />
with adhesive Dacron or ideally<br />
Mylar stickyback. Ensure the<br />
damaged area is dry and salt free,
y wiping it down with Methyl<br />
Hydrate (Rubbing Alcohol).<br />
· Avoid handling the sails on hard<br />
surfaces such as concrete.<br />
· Wash the mainsail zipper with<br />
fresh water regularly. Do not spray<br />
with any lubricants, other than<br />
McLube, as they attract grit.<br />
· Tie a stopper knot in the jib sheet<br />
with the clew 900mm away from<br />
the traveler block. This helps to<br />
restrict the jib from wrapping<br />
around the forestay when capsized,<br />
reducing the principal<br />
cause of broken battens.<br />
Spinnaker care tips<br />
Your spinnaker cloth has a silicone<br />
finish which reduces friction in the<br />
launching chute and when gybing and<br />
with care you can prolong the life of<br />
your sail.<br />
· Avoid drying in direct sunlight or<br />
flapping in the wind.<br />
· Check the mouth of your spinnaker<br />
chute for any sharp edges by<br />
running your fingers firmly over all<br />
surfaces. Sharp surfaces will not<br />
only cut the cloth, they will also<br />
“pull” seam threads.<br />
· Spray your launching chute<br />
regularly with McLube to reduce<br />
friction.<br />
· “Pulled” threads can often be<br />
addressed by laying the gathered<br />
area of the seam out on a flat<br />
surface and carefully adjusting the<br />
tension of the thread back into the<br />
form of the original stitch by retensioning<br />
the thread with a<br />
needle, un-picker or similar tool.<br />
· Tears can be easily repaired with<br />
the use of silicone sealant / glue<br />
and some .75oz spinnaker cloth.<br />
Wash the damaged area with<br />
fresh water and Methyl Hydrate .<br />
Cut a patch that is 25mm larger<br />
that the damaged area, smear a<br />
thin layer of silicone around the<br />
edge of the patch, spread the<br />
damaged area out on a flat surface<br />
and apply the patch. When<br />
dry the damaged cloth may be cut<br />
away leaving the patch. Ordinary<br />
sticky back rip-stop will not stay<br />
adhered to the silicone finish on<br />
the spinnaker.<br />
Launching & Retrieving:<br />
The drawback of having a tall mast<br />
and narrow waterline is that the boat<br />
has less stability when tied up to a<br />
dock. Don’t put the boat into the<br />
water until you are ready to go sailing.<br />
Double check the bow and stern<br />
plugs! When you do put the boat in<br />
the water, try to pull it up along side<br />
the dock to allow one wing to rest on<br />
the upper edge of the dock. This<br />
greatly stabilizes the boat and allows<br />
for the crew to easily slide in the<br />
centerboard and rudder. Don’t be<br />
afraid to use the trapeze wires,<br />
shrouds, or spinnaker halyard to keep<br />
the boat upright if it tips when initially<br />
entering the water.<br />
The crew should enter the boat<br />
first and stand just behind the centreboard<br />
box with feet well apart so that<br />
the boat can be easily balanced when<br />
the skipper comes aboard.<br />
To retrieve from the water, have<br />
the dolly in a position such that the<br />
boat can be pulled directly from the<br />
water up onto the dolly. It’s generally<br />
a good idea to have one person on<br />
each side of the boat, picking it up<br />
and walking it forward, rather than<br />
sliding it onto the dolly.<br />
Hoist launching works well if set<br />
up correctly. The sling should be<br />
centered over the centerboard trunk.<br />
The forward portions of the sling can<br />
be attached to the hull shroud eyes on<br />
each side. The rear portion can go<br />
from the cockpit out through the rear<br />
foot strap, under the hull, back up<br />
through the opposite foot strap into<br />
the cockpit and back to the lifting loop<br />
over the centerboard trunk. The foot<br />
straps should not take any load!<br />
They are just to keep the sling under<br />
the hull from sliding forward. The rear<br />
portion of the sling should be made<br />
from rope to prevent damage to the<br />
hull.<br />
Problems?<br />
If you encounter problems rigging your<br />
boat you can do three things:<br />
1. Put up a message on the website at<br />
www.<strong>29er</strong>.com<br />
2. e-mail the factory at:<br />
PS2000@qc.aira.com<br />
3. Phone the factory at 514 363 5050<br />
Section 2<br />
Sailing Tips<br />
Upwind Sailing:<br />
There are few adjustments to be made<br />
on the <strong>29er</strong> while sailing that will greatly<br />
affect your boat speed. The most<br />
successful sailors will be the ones who<br />
sail the boat most often in a variety of<br />
conditions.<br />
Light Wind, Pre-trapeze<br />
Light wind sailing can be frustrating in<br />
any boat. The <strong>29er</strong> is no exception.<br />
The boat is very sensitive to crew<br />
weight placement. The hull has a fine<br />
entry and a very flat run aft. In flat<br />
water, the goal is to reduce wetted<br />
surface in the stern by sitting forward.<br />
In light air the boat will sail fastest<br />
when it is heeled slightly (to lift the<br />
windward aft bottom out of the water<br />
and so reduce wetted area), and<br />
trimmed bow-down so that the leeward<br />
chine aft just skims the surface (to<br />
reduce drag). For this trim, both skipper<br />
and crew will need to be close<br />
together near the mast partner – in<br />
some cases both will be on the partner!.<br />
The coordination used by the<br />
fastest crews is for the helmsman to<br />
remain as steady as possible and<br />
concentrate on performance, and for<br />
the crew to move, smoothly, as necessary<br />
to maintain balance.<br />
The decision on whether to sit on<br />
the windward or leeward side of the<br />
mast may depend on total crew weight<br />
and wind velocity. Weight distribution<br />
works well with the crew on, or in front<br />
of the partner and the skipper sitting<br />
inside the boat directly on top of the<br />
centerboard or closer to the windward<br />
rail. Keep weight close together. If<br />
there is chop, sitting too far forward<br />
may hurt boat speed. Occasional<br />
waves over the bow are OK, but<br />
constant waves over the bow require<br />
some weight movement aft.<br />
Start with the jib sheet attached to<br />
the upper hole of the clew board and<br />
the track pins on the second hole in<br />
from the rail. Don’t over sheet the jib.<br />
A good reference for sheeting the jib is<br />
the distance from the jib car to the clew.<br />
Four inches is a good starting point.
You can also trim the jib to the point<br />
where the bottom of the sail is just<br />
touching the rail of the boat. The jib<br />
sheet should be adjusted quite regularly<br />
depending on what you want the boat to<br />
do. If pointing is preferred, sheet the jib<br />
in half an inch and give the boat a<br />
slight leeward heel to help pointing. If<br />
you want speed for oncoming chop,<br />
ease the jib sheet an inch and keep the<br />
boat flat.<br />
Pull the mainsheet taut. Downhaul and<br />
boom vang should be snug. Slacken<br />
the outhaul to where the clew is about 3<br />
inches from the end of the boom.<br />
Trapeze Conditions<br />
This is where the <strong>29er</strong> will start to take<br />
off upwind. The crew should be on the<br />
trapeze, either all the way out or standing<br />
on the outside foot rails just aft of<br />
the shrouds. In big chop, moving a foot<br />
aft from the shrouds will help to keep<br />
the bow out of the waves. Don’t move<br />
too far aft too early. The skipper will be<br />
progressing from the inboard position<br />
onto the rail, ending up next to the<br />
crew’s feet.<br />
Pointing shouldn’t be a priority and<br />
speed should be your number one<br />
concern. Keep the jib trimmed in no<br />
less than 4 inches, with the track pins<br />
on the second hole in from the rail.<br />
Tighten the jib halyard as needed to<br />
remove any scallops between the<br />
hanks attaching it to the forestay. The<br />
outhaul should be all the way on.<br />
Tighten the vang and downhaul as the<br />
wind progresses. Be generous with<br />
your control lines and don’t over do it.<br />
When going for speed, keep both<br />
jib tell-tales flowing back and keep the<br />
boat as flat as possible. The mainsheet<br />
should be tight except when you need<br />
to de-power. It can be difficult, but<br />
easing the jib and the main together as<br />
a puff hits can really help your boat<br />
speed. Some people like to have the<br />
crew trim the mainsheet from the<br />
trapeze while the skipper trims the jib.<br />
It takes some communication and<br />
practice, but it can be done very effectively.<br />
TIP: In really heavy air, it is more<br />
important that the jib be cracked even<br />
before the main. This is the principal<br />
reason that a skipper and crew reverse<br />
the sheets as the skipper is the first to<br />
feel the boat “loading up” and will react<br />
faster with the jib than the crew. Nothing,<br />
repeat nothing, slows down a <strong>29er</strong><br />
faster than an over trimmed jib!<br />
If in doubt - let it out!<br />
Tacking<br />
In light wind, make your turn into the<br />
wind slowly in an attempt to maintain<br />
momentum. When headed straight into<br />
the wind, increase the speed of the turn<br />
to minimize time headed directly into<br />
the wind. When your tack is nearly<br />
complete, allow a slight bit of leeward<br />
heel and flatten the boat smoothly with<br />
sails sheeted in.<br />
In trapeze conditions, start your<br />
turn slowly but as soon as the jib luffs,<br />
turn the boat onto the new tack. Try to<br />
minimize the time making the manoeuvre<br />
and maximize the time at which you<br />
are traveling full speed.<br />
Downwind Sailing<br />
Sailing a <strong>29er</strong> off the wind is one of the<br />
most exhilarating feelings in our sport.<br />
It is extremely fast and will always get<br />
your heart pumping when the breeze is<br />
on. It is important for the crew to<br />
concentrate 100% on the spinnaker, the<br />
major driving force of the boat.<br />
Spinnaker sets and takedowns<br />
Before setting or taking down the<br />
spinnaker, head the boat onto a broad<br />
reach, nearly downwind.<br />
To set, pull upward on the spinnaker<br />
halyard from behind the starboard<br />
side stand-up block. The crew should<br />
pull the halyard while skipper looks up<br />
occasionally to tell the crew how much<br />
further they need to pull. When all the<br />
way up, the crew should immediately<br />
reach for the leeward spinnaker sheet<br />
to begin trimming.<br />
To take down, uncleat the spinnaker<br />
halyard, pull the tail of the halyard,<br />
now the retrieval line, from behind the<br />
port side stand-up block until the<br />
spinnaker is sufficiently in the sock.<br />
Light Wind, Pre-trapeze<br />
The same upwind concepts work going<br />
downwind too. Sit forward, keep weight<br />
together and move gently in the boat.<br />
There is a small range of headings<br />
and trim appropriate for flying the<br />
spinnaker in lighter wind. When headed<br />
too close to the wind, the spinnaker will<br />
have to be sheeted hard to remain full,<br />
slowing boat speed. If sailing too far off<br />
the wind, the boat will stall and the<br />
mainsail will block the wind from the<br />
spinnaker. To sail fast, the boat must be<br />
sailed between these two extremes.<br />
When the spinnaker luffs, pull in the<br />
spinnaker sheet. If the spinnaker needs<br />
constant sheeting to remain full, steer<br />
the boat slightly away from the wind. If<br />
the spinnaker looks like it’s just hanging<br />
in front of the boat and not staying full,<br />
try heading towards the wind. If the<br />
spinnaker is full but you are going really<br />
slow, try easing the spinnaker sheet or<br />
head towards the wind a little. Always<br />
try to ease the spinnaker sheet, inches<br />
at a time, until the luff begins to curl.<br />
Trapeze Conditions<br />
The same concepts for light wind<br />
spinnaker trim apply to all wind conditions.<br />
If the wind is barely strong<br />
enough for the crew to flat out trapeze,<br />
use the metal foot-bars inside the<br />
cockpit to trapeze from. Don’t feel like<br />
you have to sail really high angles to<br />
keep your crew all the way out on the<br />
trapeze. If the wind doesn’t allow flat<br />
out planing, try to sail lower angles in an<br />
attempt to surf existing wind chop or<br />
swell. Head towards the wind to gain<br />
speed and then carry your newly<br />
acquired speed down to surf the waves.<br />
As the wind increases, the crew can<br />
get out on the trapeze generally in the<br />
same place they were standing upwind,<br />
moving further back as the wind increases,<br />
to allow the boat to plane on<br />
the aft portion of the hull. It’s important<br />
to not over sheet the spinnaker if you<br />
are trying to go fast. For speed, ease<br />
the spinnaker to where it is just on the<br />
verge of luffing. When there is enough<br />
breeze to trapeze upwind, there is<br />
plenty of wind to trapeze and plane<br />
downwind. If you’re not planing, head up<br />
a bit or ease the spinnaker sheet, or<br />
both. If you become overpowered<br />
sailing with the spinnaker and the<br />
mainsheet is already eased, head the<br />
boat away from the wind.<br />
When the wind gets up above 18<br />
knots, wind chop becomes larger. Big<br />
waves get a little scary downwind when<br />
the <strong>29er</strong> has the potential to travel at
greater than wind speed. These conditions<br />
require special attention:<br />
· The crew can use the foot strap at<br />
the transom of the boat to stabilize<br />
themselves when there are significant<br />
changes in boat speed.<br />
· The crew should lower the trapeze<br />
so that they are in a more reclined<br />
position and not “standing up” on<br />
the rail. This greatly improves<br />
stability when standing further from<br />
the mast.<br />
· The skipper can smoothly steer the<br />
boat and talk to the crew about upcoming<br />
waves or puffs of wind.<br />
· When you are going fast and<br />
encounter a large motor boat wake<br />
or wave, try sheeting in the spinnaker<br />
before crossing the waves to<br />
slow the boat down gradually, rather<br />
than suffering an abrupt decrease in<br />
speed as you fall off the back side of<br />
the wave. This helps to keep your<br />
crew from flying around the forestay.<br />
Gybing Techniques<br />
Gybing techniques can vary depending<br />
on wind strength and skipper/crew boat<br />
handling skills.<br />
In moderate conditions, trimming the<br />
spinnaker to the new side as the skipper<br />
slowly turns through the wind onto the<br />
new gybe, nearly or completely filling the<br />
spinnaker before actually gybing the<br />
boom seems to be very fast. In most<br />
cases, if the turn is smooth and gradual,<br />
the <strong>29er</strong> will only drop off a plane for a<br />
second or two, if at all. It can also be<br />
done on a wave where speed losses are<br />
very small. This method also avoids the<br />
common twisting (hourglass) that can<br />
occur when the spinnaker is blanketed<br />
against the windward side of the jib.<br />
STEPS:<br />
1) Slow turn away from wind. 2) Crew in<br />
from trapeze at same time releasing<br />
spinnaker sheet and grabbing new<br />
sheet - Boat is dead down wind at this<br />
point. 3) Pull in new sheet.<br />
4) At the same time, continue turning the<br />
boat and gybe the boom, gradually<br />
heading up as the crew jumps out onto<br />
the trapeze.<br />
The greater your boat speed, the<br />
easier it is. Don’t try to force the boat<br />
around. Make a nice smooth turn. This<br />
gybe allows for minimal lag time, enabling<br />
the boat to begin accelerating as<br />
soon as the boom is across, using the<br />
wind to help the spinnaker around the<br />
forestay rather than ripping it around<br />
with the sheet after the gybe.<br />
In heavy wind (20+ knots), it is<br />
advantageous to be planing when going<br />
into a gybe. To keep the boat under<br />
control, sustain your speed by gybing<br />
the boom first. After this is achieved,<br />
then gybe the spinnaker. It is important<br />
for the skipper to decisively turn the<br />
boat slightly toward the wind soon after<br />
the gybe to gain stability. Keep in mind,<br />
these are very challenging conditions<br />
and time in the boat will pay off.<br />
Capsize Recovery<br />
Capsizing is inevitable and happens to<br />
the best sailors. Try not to panic and<br />
instead think about how to solve your<br />
particular situation. There will be some<br />
races where the team who rights their<br />
boat the fastest might actually do the<br />
best. It’s a good idea to discuss this<br />
subject with your crew and work out the<br />
steps you are going to take to solve it.<br />
The fail-safe method requires both<br />
sailors to fall in the water and swim<br />
around to the centerboard. Make sure<br />
that the jib sheet is uncleated and get to<br />
the centerboard as fast as possible to<br />
avoid turtling. If the boat does turtle,<br />
use the weight of both skipper and crew<br />
to bring the boat onto its side with the<br />
mast parallel to the water. Do this by<br />
holding the tip of the centerboard while<br />
standing on the rail and leaning out.<br />
To prevent another capsize immediately<br />
after righting the boat, have one<br />
person swim the bow of the boat toward<br />
the wind, with the hull bottom facing the<br />
wind direction. When in position,<br />
attempt to right the boat with both the<br />
skipper and crew on the centerboard.<br />
Don’t try to jump into the boat too soon.<br />
First, stabilize the boat while you are<br />
still in the water on the windward side<br />
and keep the bow from crossing the<br />
wind. Righting the boat in a position<br />
such that the sails will fill slightly upon<br />
recovery will help to counterbalance the<br />
boat as you climb back in on the windward<br />
side. Climb in one at a time with<br />
the first person in getting hold of the<br />
mainsheet AND THE TILLER and<br />
sheeting in enough to put some force in<br />
the main. The principal reason for<br />
turning over again, after a capsize, is<br />
the fact that the main is loose no one<br />
is on the tiller and the boat does a<br />
windward roll, scooting out from under<br />
the crew and turning back over.<br />
If the boat turtles in shallow water<br />
and the mast gets stuck, go to the bow<br />
and swim the boat so that the cockpit is<br />
facing the wind. In this case, the wind<br />
will be pushing the mast out of the mud<br />
rather than into it. Then, have both<br />
skipper and crew get onto the<br />
centerboard. Be patient, it may take<br />
awhile to get the mast unstuck. Once<br />
unstuck, have one person stay on the<br />
centerboard while the other swims the<br />
boat into the capsize recovery position<br />
described above.<br />
If the capsize occurred while<br />
traveling downwind with the spinnaker<br />
hoisted, douse the spinnaker by<br />
uncleating the halyard and pulling on<br />
the retrieval line while capsized. Don’t<br />
fret about getting the spinnaker pulled<br />
completely into the sock. Pull enough<br />
in so that the spinnaker is not going to<br />
flap around in the wind or get dragged<br />
in the water when you right the boat.<br />
Finish dousing the spinnaker when you<br />
get settled.<br />
Acknowledgement<br />
I should very much like to to thank Chad<br />
Turner for all his hard work in getting this<br />
rigging manual together. Chad understands<br />
the importance of doing things<br />
the correct away and it shows in the<br />
narrative. It was undertaken entirely of<br />
his own volition and it was his own<br />
motivation made this manual happen.<br />
He says he did it because he hated to<br />
see sailors not enjoying their sailing<br />
experience in the <strong>29er</strong> to the fullest. Our<br />
sincere thanks. Ian Bruce, Ed.<br />
Note from the Author<br />
The <strong>29er</strong> is an exceptional boat. Its<br />
simplicity still amazes me and its speed<br />
makes everything else seem slow. I<br />
truly believe that this modern design will<br />
contribute greatly to the sport of sailing,<br />
allowing sailors of all ages to keep<br />
learning at a fast pace while remaining<br />
captivated by its performance. This<br />
manual was written with the intent to<br />
help new owners gain a basic understanding<br />
of the boat’s rigging and to<br />
introduce basic skiff sailing concepts.<br />
I would like to officially welcome you to<br />
one of the newest and most exciting<br />
dingy classes in the world. I hope you<br />
enjoy the <strong>29er</strong> as much as I have. See<br />
you on the water.<br />
Chad Turner