Installation Guide - CertainTeed
Installation Guide - CertainTeed
Installation Guide - CertainTeed
You also want an ePaper? Increase the reach of your titles
YUMPU automatically turns print PDFs into web optimized ePapers that Google loves.
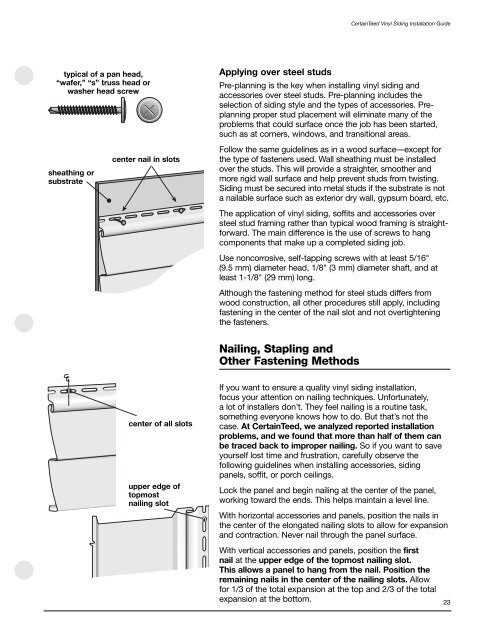
typical of a pan head,<br />
“wafer,” “s” truss head or<br />
washer head screw<br />
sheathing or<br />
substrate<br />
center nail in slots<br />
center of all slots<br />
upper edge of<br />
topmost<br />
nailing slot<br />
Applying over steel studs<br />
Pre-planning is the key when installing vinyl siding and<br />
accessories over steel studs. Pre-planning includes the<br />
selection of siding style and the types of accessories. Preplanning<br />
proper stud placement will eliminate many of the<br />
problems that could surface once the job has been started,<br />
such as at corners, windows, and transitional areas.<br />
Follow the same guidelines as in a wood surface—except for<br />
the type of fasteners used. Wall sheathing must be installed<br />
over the studs. This will provide a straighter, smoother and<br />
more rigid wall surface and help prevent studs from twisting.<br />
Siding must be secured into metal studs if the substrate is not<br />
a nailable surface such as exterior dry wall, gypsum board, etc.<br />
The application of vinyl siding, soffits and accessories over<br />
steel stud framing rather than typical wood framing is straightforward.<br />
The main difference is the use of screws to hang<br />
components that make up a completed siding job.<br />
Use noncorrosive, self-tapping screws with at least 5/16"<br />
(9.5 mm) diameter head, 1/8" (3 mm) diameter shaft, and at<br />
least 1-1/8" (29 mm) long.<br />
Although the fastening method for steel studs differs from<br />
wood construction, all other procedures still apply, including<br />
fastening in the center of the nail slot and not overtightening<br />
the fasteners.<br />
Nailing, Stapling and<br />
Other Fastening Methods<br />
<strong>CertainTeed</strong> Vinyl Siding <strong>Installation</strong> <strong>Guide</strong><br />
If you want to ensure a quality vinyl siding installation,<br />
focus your attention on nailing techniques. Unfortunately,<br />
a lot of installers don’t. They feel nailing is a routine task,<br />
something everyone knows how to do. But that’s not the<br />
case. At <strong>CertainTeed</strong>, we analyzed reported installation<br />
problems, and we found that more than half of them can<br />
be traced back to improper nailing. So if you want to save<br />
yourself lost time and frustration, carefully observe the<br />
following guidelines when installing accessories, siding<br />
panels, soffit, or porch ceilings.<br />
Lock the panel and begin nailing at the center of the panel,<br />
working toward the ends. This helps maintain a level line.<br />
With horizontal accessories and panels, position the nails in<br />
the center of the elongated nailing slots to allow for expansion<br />
and contraction. Never nail through the panel surface.<br />
With vertical accessories and panels, position the first<br />
nail at the upper edge of the topmost nailing slot.<br />
This allows a panel to hang from the nail. Position the<br />
remaining nails in the center of the nailing slots. Allow<br />
for 1/3 of the total expansion at the top and 2/3 of the total<br />
expansion at the bottom.<br />
23


