Installation Guide - CertainTeed
Installation Guide - CertainTeed
Installation Guide - CertainTeed

You also want an ePaper? Increase the reach of your titles
YUMPU automatically turns print PDFs into web optimized ePapers that Google loves.
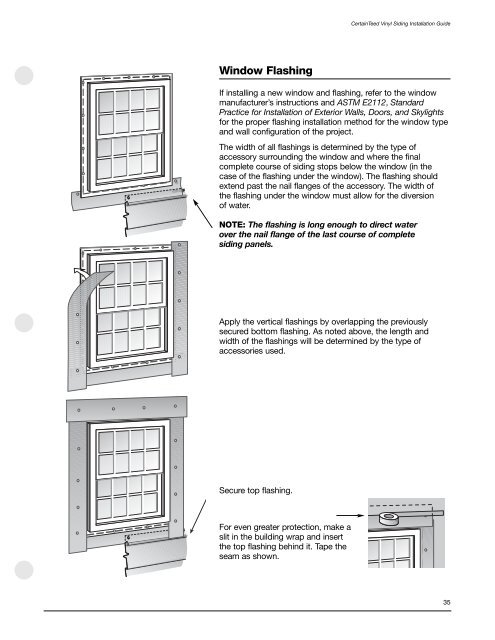
Window Flashing<br />
If installing a new window and flashing, refer to the window<br />
manufacturer’s instructions and ASTM E2112, Standard<br />
Practice for <strong>Installation</strong> of Exterior Walls, Doors, and Skylights<br />
for the proper flashing installation method for the window type<br />
and wall configuration of the project.<br />
The width of all flashings is determined by the type of<br />
accessory surrounding the window and where the final<br />
complete course of siding stops below the window (in the<br />
case of the flashing under the window). The flashing should<br />
extend past the nail flanges of the accessory. The width of<br />
the flashing under the window must allow for the diversion<br />
of water.<br />
NOTE: The flashing is long enough to direct water<br />
over the nail flange of the last course of complete<br />
siding panels.<br />
Apply the vertical flashings by overlapping the previously<br />
secured bottom flashing. As noted above, the length and<br />
width of the flashings will be determined by the type of<br />
accessories used.<br />
Secure top flashing.<br />
For even greater protection, make a<br />
slit in the building wrap and insert<br />
the top flashing behind it. Tape the<br />
seam as shown.<br />
<strong>CertainTeed</strong> Vinyl Siding <strong>Installation</strong> <strong>Guide</strong><br />
35