Motorola Dual Tuner DVR Self Install Guide - Comcast
Motorola Dual Tuner DVR Self Install Guide - Comcast
Motorola Dual Tuner DVR Self Install Guide - Comcast

You also want an ePaper? Increase the reach of your titles
YUMPU automatically turns print PDFs into web optimized ePapers that Google loves.
USING YOUR<br />
BUILT-IN DIGITAL<br />
VIDEO RECORDER<br />
<strong>Dual</strong> <strong>Tuner</strong> <strong>DVR</strong>
CONTENTS INTRODUCING <strong>DVR</strong> WITH COMCAST DIGITAL CABLE<br />
>> INTRODUCING <strong>DVR</strong> WITH COMCAST DIGITAL CABLE 3<br />
>> GETTING STARTED 4-5<br />
>> CONTROL LIVE TV AND RECORDINGS 6-8<br />
>> RECORD AND PLAY BACK PROGRAMS 9-16<br />
>> MANAGE PROGRAMS AND RECORDINGS 17-18<br />
>> PARENTAL LOCKS 19-20<br />
>> FREQUENTLY ASKED QUESTIONS 21-24<br />
>> <strong>DVR</strong> ICONS 25<br />
>> <strong>DVR</strong> REMOTE CONTROL 26<br />
>> <strong>DVR</strong> QUICK TIP CARD 27-28<br />
>> You’ll never watch TV the same way again.<br />
Now you can:<br />
Record All Your Favorite Shows<br />
With Digital Video Recording (<strong>DVR</strong>) from <strong>Comcast</strong>, it’s easy to record your favorite<br />
shows — just highlight a program in your On-Screen <strong>Guide</strong> and press Record. No tapes,<br />
timers, phone lines, or VCR required. You can even record two shows at the same time.<br />
Plus, you can record your favorite high-definition (HD) programs if you have an HDTV set.<br />
With Smart Series Recordings, you can easily program <strong>DVR</strong> to record your favorite<br />
series all season long. You can even set it to skip reruns. And, you never have to worry<br />
about missing an episode because <strong>DVR</strong> detects lineup changes and adjusts recording<br />
times automatically.<br />
Watch Your Favorite Shows Anytime You Want<br />
With <strong>DVR</strong>, there’s always something on you want to watch. Watch shows you have recorded<br />
whenever it’s convenient for you. Feel like watching The West Wing on Friday night? Or a<br />
movie you recorded earlier in the week? Watch what you want when you want.<br />
Take Control of Live TV<br />
With <strong>DVR</strong>, you can take control of live TV so you won’t miss a single minute of a show<br />
you’re watching. Need to answer the phone? Miss the punch line in your favorite sitcom?<br />
Want to see that football play again? With <strong>DVR</strong> you can:<br />
>> Pause a live program.<br />
>> Instantly replay live TV.<br />
>> Watch a scene in slow-motion.<br />
>> Rewind through the portion you have been watching.<br />
>> Fast-forward up to the point of live TV.<br />
With <strong>DVR</strong> You Get More Out of Your TV<br />
2 3
GETTING STARTED<br />
>> Prepare Your Remote Control<br />
After you have connected the <strong>DVR</strong> box to your TV, press Cable on your remote control<br />
to ensure the remote is in Cable mode. You can verify this by pressing the Power key to<br />
see if the <strong>DVR</strong> turns on and off.<br />
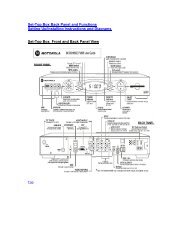
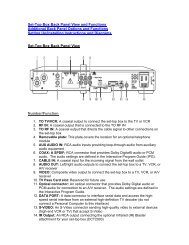
>> Get to Know Your Digital Cable Box with Built-in <strong>DVR</strong><br />
Your <strong>DVR</strong> box is a dual-tuner, HD-capable <strong>Motorola</strong> 6412 — an advanced interactive<br />
digital cable receiver. It supports all the services offered by <strong>Comcast</strong> Digital Cable,<br />
including, where available, <strong>DVR</strong>, ON DEMAND, and HDTV.<br />
Important Safety Instructions<br />
The <strong>DVR</strong> box has an internal hard disk drive. To help reduce potential for damage, it must<br />
be handled in much the same way as a computer. Your <strong>DVR</strong> box has been designed to<br />
operate reliably in a well-ventilated household environment.<br />
1. Position the <strong>DVR</strong> in an open space that allows airflow around the unit (there should<br />
be at least 2 inches of space on all sides).<br />
>> Do not place the <strong>DVR</strong> in an enclosed entertainment unit or cabinet.<br />
>> Do not place the <strong>DVR</strong> on a bed, sofa, rug, or similar surface.<br />
2. Ensure the <strong>DVR</strong> is not near any external heat source that could raise the temperature<br />
around the unit.<br />
3. Plug the <strong>DVR</strong> into a surge protector along with your TV and other audio/video<br />
equipment.<br />
>> Set Your Set-Top Box Settings<br />
To achieve optimal picture quality on your TV, your <strong>DVR</strong> box must have the appropriate<br />
settings for your TV. In most cases, a <strong>Comcast</strong> technician will optimize these settings<br />
for you. However, you may decide to modify the settings for various reasons, such as<br />
getting a new TV. To access and change your settings, go to User Settings on your TV by<br />
following these steps:<br />
Step 1: Access the User Settings Menu*<br />
1. To access the User Settings Menu, power On your TV and power Off the <strong>DVR</strong> box.<br />
2. Press the Menu button on either your remote or the <strong>DVR</strong> box front panel to call up<br />
the on-screen menu. You may use either the <strong>DVR</strong> front panel or remote to navigate<br />
the menu.<br />
3. Press the arrow buttons to select the setting you wish to change. Press the <br />
buttons to select an option for that setting. To exit the setting and move to another<br />
setting, use the arrow buttons.<br />
Step 2: Set Your Preference for Watching Wide-Screen TV<br />
The first user setting, referred to as “TV Type,” tells the <strong>DVR</strong> box what type of TV you<br />
have and how you prefer to watch wide-screen programming.<br />
For standard-screen TVs, choose either of the following two options:<br />
>> 4:3 Pan Scan (wide-screen programming is cropped to fill your screen).<br />
>> 4:3 Letterbox (wide-screen programming will appear in its entirety with black bands<br />
on the top and bottom of the TV screen).<br />
For wide-screen TVs, choose 16:9.<br />
Step 3: Set Picture Resolution from <strong>DVR</strong> Box to TV<br />
The next setting is referred to as Y Pb Pr OUTPUT and indicates the picture resolution<br />
output from the <strong>DVR</strong> box to your TV. The choices are 480i, 480p, 720p, and 1080i.<br />
For most standard TVs, the appropriate setting is 480i. Choose 480p for enhanced<br />
definition TVs. For HDTVs, choose either 720p or 1080i. Refer to your TV owner’s manual<br />
and choose the setting that indicates the highest picture resolution your television will<br />
support.<br />
Step 4: Set 4:3 Override<br />
This setting provides the ability to specify how 4:3 standard definition programs are<br />
displayed on your TV. The choices are OFF, 480i, 480p, or stretch. For most standard<br />
TVs, this should be set to OFF (the <strong>DVR</strong> will default to the resolution selected in the<br />
previous setting). For HDTVs, the appropriate setting is either 480i, 480p, or stretch. If<br />
you have a wide-screen TV and select the stretch setting, 4:3 programs will<br />
automatically be stretched to a wide-screen 16:9 aspect ratio and display video in the<br />
format you specified in Step 3. Consult your HDTV owner’s manual to determine the<br />
appropriate setting.<br />
Step 5: Save Your Settings<br />
Press the Power button on your <strong>DVR</strong> or your remote to exit the menu and save your<br />
settings.<br />
Note: If you purchase an HDTV in the future, these user settings will need to be<br />
modified. Also, be sure to call <strong>Comcast</strong> to have your HDTV channels authorized.<br />
*If the on-screen menu does not appear on your TV screen, your TV may not support<br />
the default setting. Use the <strong>DVR</strong> front panel LED to view and change your settings.<br />
Use the up and down arrows to navigate categories and the left and right arrows to<br />
navigate within categories.<br />
4 5
CONTROL LIVE TV AND RECORDINGS<br />
With <strong>DVR</strong>, you can control your TV in ways you never imagined. Pause live TV when your<br />
best friend calls. View an instant replay, or fast-forward to where the plot thickens — all<br />
with a push of a few buttons on your remote control.<br />
>> Buffered Programs<br />
So how is all this possible? <strong>DVR</strong> creates a temporary recording of all programs you are<br />
watching. This temporary recording is referred to as a buffer. <strong>DVR</strong> automatically buffers at<br />
least the last 45 minutes of the program you’re watching (15 minutes of an HD program)<br />
and continues to buffer the channel until you:<br />
>> Switch to another channel — When you change channels, <strong>DVR</strong> begins to buffer<br />
the program you just tuned to. It removes any previous programs stored in the buffer.<br />
>> Turn off your <strong>DVR</strong> box — When you turn off <strong>DVR</strong>, the buffer is erased.<br />
>> Record a program — When a scheduled recording begins or you press<br />
Record on your remote while watching live TV, <strong>DVR</strong> clears the buffer and stores<br />
it on the hard drive.<br />
TIP: The buffer length varies based on the type of channel you are watching.<br />
>> Analog Channels (typically channels below channel 100) — at least 45 minutes.<br />
>> Digital Channels (typically channels 100 and above) — up to 90 minutes.<br />
>> HD Channels — at least 15 minutes.<br />
Status Bar<br />
The Status Bar appears whenever you use a playback control such as pause,<br />
rewind, or instant replay. It gives you details about the progress of the program you<br />
are watching.<br />
White indicates other programs<br />
stored in the buffer.<br />
Green indicates the portion of the<br />
current program stored in the buffer.<br />
The white line marker<br />
indicates where you are<br />
in the program.<br />
>> You can rewind back to previous programs in the buffer (the white portion). When you do, the status<br />
bar highlights that program by turning it green.<br />
>> If you press Record the entire current program in the buffer will be recorded and turn red, even if<br />
you did not press record at the beginning of the show. Previous programs in the buffer will be deleted.<br />
>> Pause a Live Program<br />
Use Pause to instantly freeze the action. Programs will remain in pause for up to the<br />
buffer length — at least 45 minutes for standard definition programming or 15 minutes<br />
for high-definition programming.<br />
1. As you watch TV, press Pause<br />
pause for at least 45 minutes.<br />
to instantly freeze the scene. <strong>DVR</strong> will remain in<br />
2. Press Play to resume the program.<br />
>> Rewind or Fast-Forward a Live Program<br />
You can rewind or fast-forward at four different speeds: 2x, 15x, 30x, and 60x.<br />
1. Press Rewind or Fast-Forward up to four times to increase the speed.<br />
The display window on your <strong>DVR</strong> box indicates the rewind and fast-forward speeds.<br />
You will see RE1, RE2, RE3, and RE4 when you rewind. You will see FF1, FF2, FF3,<br />
and FF4 when you fast-forward.<br />
2. Press Play to resume watching at normal speed.<br />
TIP: You can only fast-forward up to the point of the live broadcast — in other words,<br />
you can’t fast-forward ahead of live TV.<br />
>> View an Instant Replay<br />
Immediately repeat the last 15 seconds of a live program or a recording.<br />
1. Press Instant Replay to jump back 15 seconds.<br />
2. Continue pressing Instant Replay until you arrive at the part you want to replay.<br />
Every additional press jumps back 15 more seconds.<br />
>> Watch a Program in Slow-Motion<br />
<strong>DVR</strong> is equipped with slow-forward and slow-rewind functions to give you crisp and clear<br />
slow-motion images.<br />
1. To use slow-rewind, press Pause and then press Rewind .<br />
2. To activate slow-forward, press Pause and then press Fast-Forward .<br />
3. Press Play to return to regular speed.<br />
>> Catch Up with a Live TV Program<br />
When you pause or rewind a live program, you can either watch the buffered program<br />
or you can catch up with the live broadcast.<br />
>> Press Live to return to the current portion of the live broadcast.<br />
TIP: The arrow buttons around the OK/Select button will also pause, fast-forward, and<br />
rewind the show you are currently watching. To use these buttons to browse the<br />
Flip Bar or navigate the Mini-<strong>Guide</strong>, press OK/Select to turn off their playback<br />
control functionality.<br />
6 7
Control Two Programs at Once<br />
With <strong>DVR</strong> you don’t have to choose between two programs that are on at the same time.<br />
You can control the action on both programs. This is because your <strong>DVR</strong> has two tuners<br />
and can buffer one program on each tuner. This is great when you want to watch two<br />
sporting events that air at the same time.<br />
Swap Between Two Programs<br />
The Swap feature lets you switch back and forth between the two tuners so you can<br />
use the playback controls on your remote like pause, rewind, and instant replay to<br />
control both programs you are watching.<br />
To use the Swap feature:<br />
1. Tune to the first program you want<br />
to watch.<br />
2. Press Swap SWAP to change tuners.<br />
3. Tune to the second program you<br />
want to view.<br />
4. Press Swap SWAP again to return to<br />
the first program.<br />
5. Continue using the Swap SWAP button to toggle between the two programs.<br />
You can use rewind or instant replay to review what you have missed. Or use<br />
fast-forward to skip through portions you don’t want to see.<br />
TIP: The Swap button is the key to keeping the buffer for both programs. If you<br />
flip between the two programs without using the Swap key, you will lose the buffer.<br />
Note: The Picture-in-Picture On-Off, Move, PIP CH+, and PIP CH- buttons are not<br />
currently functional and are reserved for future use.<br />
RECORD AND PLAY BACK PROGRAMS<br />
<strong>DVR</strong> can record up to 60 hours of standard definition programming or 15 hours of<br />
high-definition programming. Storage space varies based on the type of channel (digital,<br />
analog, HD) you are recording. <strong>DVR</strong> can also record two programs that air at the same<br />
time. <strong>DVR</strong> gives you several ways to record, including one-touch recording.<br />
Record a Single Program<br />
8 9<br />
Record from TV Listings<br />
1. Press <strong>Guide</strong> on your remote<br />
to view the TV Listings.<br />
2. Highlight the program you want to<br />
record.<br />
3. Press Record on your remote.<br />
A red dot appears next to the<br />
program title in the grid so you<br />
know the program is scheduled<br />
to record.<br />
Record While Watching TV<br />
1. Simply press Record on your<br />
remote. A Recording Started notice<br />
appears to indicate recording has<br />
begun.<br />
2. Press OK/Select to hide the<br />
notice or just wait for it to disappear.<br />
Any portion of the program saved in<br />
the buffer also will be recorded.<br />
TIP: If you want to record a second program at the same time, use the Swap<br />
button to change tuners.<br />
Record from a Program<br />
Information Screen<br />
1. Press <strong>Guide</strong> on your remote<br />
to view the TV Listings.<br />
2. Highlight a program and press<br />
OK/Select . The Program<br />
Information screen appears.<br />
3. Press Record<br />
appears.<br />
or select the Record icon. A Confirmation screen<br />
4. Press OK/Select to record the program as planned or select the<br />
Options icon to modify the recording options.
Series Recording<br />
<strong>DVR</strong> makes it easy to record multiple episodes of a TV series. And you never have<br />
to miss an episode since <strong>DVR</strong> detects lineup changes and adjusts recording times<br />
automatically. You can even skip reruns.<br />
Record a Series<br />
1. Press <strong>Guide</strong> to view the TV<br />
Listings.<br />
2. Highlight the TV series you want to<br />
record and press Record twice or<br />
press OK/Select and select the<br />
Record icon from the Program<br />
Information screen.<br />
3. The Confirmation screen appears.<br />
Select the Create a Series Recording<br />
icon.<br />
4. Specify your recording options:<br />
>> Episode type — First run only,<br />
first run and repeats, or all<br />
episodes.*<br />
>> Save no more than — 1-7, or all<br />
episodes.<br />
>> Save recordings until — “Space<br />
is Needed” or “I Delete.”<br />
5. Select the Series Record icon to<br />
schedule the recording or select the<br />
Options icon to access advanced<br />
series setup features like adding minutes to the start and end times. See<br />
page 15 for more details on recording options.<br />
6. Select the Confirm Series Recording icon to confirm the recording.<br />
Note: Your series recordings will appear in your Recordings list with the show<br />
title as its label. Multiple recordings of the same show will have the same label<br />
and will be listed beginning with the most recent recordings first.<br />
* All episodes should only be used when recording shows that do not have<br />
unique program IDs, like game shows.<br />
>> Create a Manual Recording<br />
While scheduling a recording from TV Listings is the quickest way to schedule a<br />
recording, you may also set a manual recording based on a date, time, and channel.<br />
This is helpful when you want to record only a portion of a long program such as CNN<br />
News. Select <strong>DVR</strong> <strong>DVR</strong> from the Quick Menu, then <strong>DVR</strong> Schedule. Next, select<br />
Create a Manual Recording and follow the on-screen prompts.<br />
>> Manage Scheduling Conflicts<br />
Any time you schedule more than two recordings for the same time, you will see a<br />
Scheduling Conflict message that allows you to select the program you want to<br />
record. <strong>DVR</strong> automatically prioritizes your scheduled recordings so you can easily select<br />
the program you wish to record in case of a conflict.<br />
<strong>DVR</strong> uses two rules of prioritization:<br />
>> Single program recordings always take priority over series recordings. For example,<br />
if you try to schedule an individual program to record at the same time as two series<br />
programs are scheduled to record, <strong>DVR</strong> will record the single program instead of one<br />
of the episodes of a Scheduled Series recording.<br />
>> The series you set up first has highest priority and will be recorded in case of a<br />
conflict with another series. As you add new series recordings, they are added to the<br />
bottom of the Series Priority List. You can modify the recording priority of a series<br />
using the Series Priority List. See page 13 for more details.<br />
The Conflict screen automatically hides your highest-priority recording from view so you<br />
can choose between the show you are trying to schedule and the lowest-priority program.<br />
Single Program Conflicts<br />
Keep the new recording, remove old events.<br />
Remove new event, keep old events.<br />
10 11<br />
When trying to schedule a single program<br />
that conflicts with two other programs,<br />
the Conflict screen will indicate the title,<br />
date, and time of the program that will<br />
NOT record if you proceed with the new<br />
recording. Select an icon at the bottom of<br />
the screen to indicate which program you<br />
wish to record.<br />
Note: If you want to delete your highest-priority recording that is not listed on the<br />
Conflict screen, you must delete it from your list of Scheduled Recordings<br />
(see page 13 for details on how to view your list of Scheduled Recordings).
Series Conflicts<br />
To help you manage which series gets recorded when there is a scheduling conflict,<br />
<strong>DVR</strong> automatically creates a Series Priority List. The first series you set to record has<br />
the highest priority and is the program recorded in case of a conflict. Each additional<br />
series you set to record is added to the end of the list.<br />
When you try to schedule a new series<br />
recording at the same time as previously<br />
scheduled series recordings, you will see<br />
a Series Conflict screen. The screen<br />
automatically hides your highest-priority<br />
program. It shows you the conflicts the<br />
new recording has with the lowest priority<br />
series.<br />
1. Use the icons to select the series you<br />
want to record:<br />
>> Select High to give your new<br />
recording the highest scheduling<br />
priority and to capture the most<br />
number of episodes for your new<br />
recording.<br />
>> Select Low to move the new<br />
series back to the bottom of the<br />
Series Priority List. The screen<br />
will refresh and give you revised<br />
results.<br />
2. Select the Record icon to indicate<br />
your selection. The Confirmation<br />
screen appears.<br />
3. Select Confirm to confirm your Series Recording, arrow down to go<br />
directly to your list of Scheduled Recordings or to your Series Priority List.<br />
Modify the Series Priority List<br />
12 13<br />
You can easily change the recording<br />
priority of the series programs you have<br />
scheduled to record. The program with the<br />
highest priority will be recorded in case of<br />
a conflict.<br />
To modify your Series Priority List:<br />
1. Select <strong>DVR</strong> <strong>DVR</strong> from the Quick Menu.<br />
2. Choose <strong>DVR</strong> Schedule.<br />
3. Select Series Priority List.<br />
4. Highlight a listing and use the Page + on your remote to raise the priority<br />
of the series or Page – to lower it.<br />
5. Then select the Checkmark icon to confirm your new Series Priority List.<br />
View a List of Programs Scheduled to Record<br />
To see a list of programs you have<br />
scheduled to record in the future:<br />
1. Select <strong>DVR</strong> <strong>DVR</strong> from the Quick Menu.<br />
2. Select <strong>DVR</strong> Schedule.<br />
3. Select Scheduled Recordings to view<br />
your list.<br />
View a List of Programs Scheduled to Record<br />
>> The Record icon indicates the individual program will record as<br />
scheduled.<br />
>> The Series Record icon indicates the series will record as planned.<br />
>> The Conflict icon indicates a scheduling conflict with a specific episode of<br />
a series you have scheduled to record.<br />
Note: You can modify your Series Priority List to record a program marked<br />
with a Conflict icon. See above for more details.<br />
TIP: Scheduled recordings are listed by days of the week. Press on your<br />
remote to see scheduled recordings for later in the week.
Play Back a Recorded Program<br />
Green indicates the portion of the<br />
recording that has been played back.<br />
Play back recordings whenever you want.<br />
1. Press My <strong>DVR</strong> on your remote<br />
to go directly to a list of your recorded<br />
programs. You may also select the<br />
<strong>DVR</strong> <strong>DVR</strong> icon from the Quick Menu,<br />
then <strong>DVR</strong> Recordings.<br />
>> You can view and sort your<br />
recordings by title, date<br />
recorded, and channel. Use<br />
your right arrow to scroll<br />
through the different views.<br />
2. Highlight a program you want<br />
to play back and press<br />
OK/Select to view the<br />
Information screen.<br />
3. Select a playback option from the icons at the bottom of the screen.<br />
Return to previous screen.<br />
Play or resume from previous position.<br />
Restart from the beginning.<br />
Set a Deletion Priority for this program.<br />
Delete this program.<br />
Set locks for Title, Channel, or Rating.<br />
The Status Bar appears whenever you use a playback control such as pause,<br />
rewind, or instant replay. It gives you details about the progress of the recording<br />
you are watching.<br />
The bar represents the length of the recording.<br />
This area indicates the current<br />
status (paused in this case).<br />
Cancel or Modify a Scheduled Single Recording<br />
You can cancel or modify a Scheduled<br />
Recording at any time, even a recording<br />
that is currently in progress.<br />
1. Select <strong>DVR</strong> <strong>DVR</strong> from the Quick Menu,<br />
then <strong>DVR</strong> Schedule.<br />
2. Select Scheduled Recordings<br />
to view a list of your scheduled<br />
recordings.<br />
3. Select a program title and press OK/Select to view the Information screen.<br />
4. Select the Record icon to view your options.<br />
5. Select the Cancel icon to cancel the recording.<br />
6. Select the Options icon to modify any of the following options:<br />
>> Save recordings until — “I Delete” or “ Space is Needed.”<br />
>> Start Recording — “On time” or 1-15 minutes early.<br />
>> End Recording — “On Time” or up to 2 hours later. This option is great if<br />
you are recording a sporting event that may go into overtime.<br />
Cancel or Modify a Series Recording<br />
1. Select <strong>DVR</strong> <strong>DVR</strong> from the Quick<br />
Menu, then <strong>DVR</strong> Schedule.<br />
2. Select Series Priority List.<br />
3. Highlight the series you want to cancel<br />
or modify and press OK/Select .<br />
4. Select the Delete icon to cancel<br />
the series recording.<br />
5. Select the Options icon to modify any of the following options:<br />
>> Episode type to Record — First run only, first run and repeats, or all<br />
episodes.*<br />
>> Save no more than — 1-7, or all episodes.<br />
>> Save Recordings until — “Space is Needed” or “I Delete.”<br />
>> Channels to Record — “All Channels” or “this channel only.”<br />
>> Start Recording — “On time” or 1-15 minutes early.<br />
>> End Recording — “On time” or up to 2 hours later.<br />
6. Select Record to confirm your new 15 selections.<br />
*All episodes should only be used when recording shows that do not have unique<br />
program IDs like game shows.<br />
14 15
Recording Notices<br />
<strong>DVR</strong> will display notices to alert you when a recording may be interrupted or when a<br />
recording is about to begin.<br />
Recording in Progress<br />
If you try to change the channel while<br />
<strong>DVR</strong> is recording the program you are<br />
watching, you will see a notice reminding<br />
you that your recording will be interrupted<br />
if you change channels.<br />
You may:<br />
>> Select the Cancel icon to continue recording.<br />
>> Select the Confirm icon to change the channel and stop the recording.<br />
TIP: Use the Swap button to change tuners. You may now watch another<br />
program without interrupting the recording on the other tuner.<br />
Recording Starting Notice<br />
Shortly before a recording is scheduled<br />
to begin on the tuner you are watching,<br />
a notice will appear giving you the<br />
opportunity to confirm or cancel the<br />
scheduled recording.<br />
If you do not select either option, <strong>DVR</strong><br />
will automatically tune to the channel and<br />
begin recording at the scheduled time.<br />
Recording Space Low or Full<br />
When the available disk space is 20%<br />
or less, a notice will appear when you try<br />
to schedule a new recording.<br />
When the notice appears, you may:<br />
>> Continue with the recording. If recording space runs out during the recording,<br />
the recording will pause and the Recording Space Full notice will appear.<br />
>> Go to <strong>DVR</strong> Recordings and delete programs to make space for your new<br />
recordings.<br />
Note: Before the alert appears, <strong>DVR</strong> checks to see if there is enough space to<br />
begin the recording and automatically erases programs marked for removal if<br />
space is needed.<br />
MANAGE PROGRAMS AND RECORDINGS<br />
>> Maximize Your Storage Space<br />
With <strong>DVR</strong>, you can save up to 60 hours of standard definition programming or up to 15<br />
hours of HD programming. To maximize your storage space, <strong>DVR</strong> is set to automatically<br />
erase programs when space is needed, beginning with the oldest recordings first.<br />
However, you can delete programs manually or modify the delete priority to save until<br />
“I Delete.” You can also transfer “must have” recordings to a VHS tape.<br />
Delete a Recording or Modify a Delete Priority<br />
16 17<br />
You can delete a recording or modify the<br />
delete priority of a program at any time.<br />
1. Press My <strong>DVR</strong> on your remote<br />
to view a list of your recordings.<br />
2. Highlight a program title and press<br />
OK/Select to view the<br />
Information screen.<br />
3. To delete the program from your list<br />
of recordings, select the Delete<br />
icon. You will be asked to confirm<br />
that you want to delete this recording.<br />
Select Delete again to delete<br />
the recording.<br />
4. To modify how long a recording will be<br />
saved, select the Delete Priority<br />
icon from the Information screen.<br />
From there, you can change the delete<br />
priority to save a recording until<br />
“I Delete.”<br />
TIP: The blue bar at the top of your Recorded Programs List tells you how much<br />
space your recordings are using.
Copy Recordings to a VHS Tape<br />
When you copy recordings to a VHS tape, make sure the recording is displayed on the<br />
main TV screen for the entire time the recording is being copied. If you change channels<br />
or display other <strong>DVR</strong> screens during the copying process, your tape will contain these<br />
images and you may not have a complete copy of the recording.<br />
1. Connect an RCA video cable (yellow) to the VIDEO OUT (yellow) jack on the <strong>DVR</strong><br />
and the VIDEO IN port on the VCR.<br />
2. Connect RCA audio cables (one red and one white) to the AUDIO OUT R (red) and<br />
AUDIO OUT L (white) jacks on the <strong>DVR</strong> and to the AUDIO RIGHT and AUDIO LEFT<br />
inputs on the VCR.<br />
3. Connect an RCA video cable (yellow) to the VIDEO OUT port on the VCR and the<br />
VIDEO INPUT port on the TV.<br />
4. Connect RCA audio cables (one red and one white) to the AUDIO RIGHT and AUDIO<br />
LEFT outputs on the VCR and the AUDIO RIGHT and AUDIO LEFT inputs on the TV.<br />
5. Put a tape in your VCR.<br />
6. Select a program from your list of <strong>DVR</strong> Recordings.<br />
7. From the Information screen, select to play from the beginning.<br />
8. Press Record on your VCR. As the recording plays, it is being taped to your VCR.<br />
Note: To record high-definition programs to a VHS tape, a high-definition VCR is<br />
required and should be hooked up with YPbPr, DVI, or S-Video.<br />
PARENTAL LOCKS<br />
Parental Locks put you in control of what your family watches. Parental Locks let you<br />
block selected ratings, channels, and titles with a Locks Personal Identification Number<br />
(PIN).<br />
Lock Programs<br />
You can set locks anytime while in the <strong>Guide</strong> or while watching television.<br />
18 19<br />
To lock a program or a recording:<br />
1. Press Lock on your remote OR<br />
select the Lock icon from the<br />
Information screen in the <strong>Guide</strong>.<br />
2. Enter your four-digit PIN. If you are<br />
setting a lock for the first time, you will<br />
be prompted to set a four-digit PIN.<br />
This ensures your settings cannot be<br />
modified without your consent.<br />
3. Lock the channel, title, or rating<br />
using the on-screen prompts. A<br />
Lock Indicator will appear<br />
next to the title in TV Listings to let<br />
you know the program is locked.<br />
Note: If you schedule a recording for a program you have locked, the program<br />
will be recorded. However, the audio is muted and no video will be visible while<br />
the program is recording. A restricted notice will appear allowing you to enter<br />
your PIN to view the program during recording.<br />
TIP: You may also restrict the purchase of pay programs with a separate<br />
Purchase PIN. To change your PIN or set up a Purchase PIN, select Setup from<br />
the Main Menu, then PINs.
Locks Setup<br />
The Locks Setup screen allows you to review all of the locks you currently have set<br />
and to make modifications as needed.<br />
3. Select Master Locks to modify all Locks at one time. You can:<br />
>> Bypass Locks — Temporarily opens all locks for easier viewing when<br />
sensitive viewers are not at risk.<br />
>> Restore Locks — Return all locks to their protective state. (You may also<br />
restore locks by turning the cable box off then back on.)<br />
>> Clear Locks — Permanently clears all locks.<br />
4. Press OK/Select to confirm your selections.<br />
View Locked Programs<br />
To access Locks Setup:<br />
1. Select Locks from the Quick<br />
Menu, or select Parental Locks from<br />
the Main Menu.<br />
2. Use the buttons to set or<br />
modify locks, hide adult titles, and<br />
access Master Locks.<br />
To view a locked program:<br />
1. Select the program from TV Listings,<br />
or if it is a recorded program, select it<br />
from your list of <strong>DVR</strong> Recordings.<br />
2. Enter your PIN when prompted.<br />
The program will be displayed.<br />
FREQUENTLY ASKED QUESTIONS<br />
>> Questions About Your Digital Cable Box with Built-in <strong>DVR</strong><br />
How many hours of programming can I store on my <strong>DVR</strong>? What is the<br />
hard drive capacity?<br />
<strong>DVR</strong> can record up to 60 hours of standard definition programming or 15 hours of<br />
high-definition programming. Storage capacity varies based on the type of programs<br />
you record. For example, digital programs take up less space than analog programs.<br />
The hard drive capacity is 120GB.<br />
How many tuners does my <strong>DVR</strong> have?<br />
<strong>DVR</strong> has two tuners, so you can record two programs at the same time.<br />
Where can I find details on installing my <strong>DVR</strong>?<br />
Go to the <strong>DVR</strong> <strong>Self</strong>-<strong>Install</strong> <strong>Guide</strong> on comcast.com. The <strong>Guide</strong> contains documentation on<br />
how to connect your <strong>DVR</strong> to a standard or high-definition television.<br />
Can I receive and record programs in high definition with my <strong>DVR</strong>?<br />
Yes. As long as <strong>DVR</strong> is connected to a high-definition television, you can watch and<br />
record HDTV programming.<br />
What happens if the <strong>DVR</strong> temporarily loses power?<br />
All recordings saved prior to the power loss are preserved, as well as future recording<br />
schedules. You miss only recordings scheduled to record while the power was out.<br />
If the power goes out, will my Parental Control and Purchase PINs,<br />
Favorite Channels, Locks, and Reminders be saved?<br />
Yes. These items should not be lost if the <strong>DVR</strong> box loses power.<br />
>> Questions About Controlling a Live Program<br />
How long can I pause live TV?<br />
The pause length varies based on the type of channel you are watching. You can pause<br />
at least 45 minutes of a program on an analog channel (typically below channel 100)<br />
or at least 15 minutes of an HD channel. Programs on digital channels (typically above<br />
channel 100) can be paused for up to 90 minutes.<br />
How far back can I rewind live TV?<br />
You can rewind at least 45 minutes of standard definition programming and at least 15<br />
minutes of high-definition programming, as long as you were tuned to the same channel.<br />
You can rewind programs on digital channels for up to 90 minutes.<br />
If I’m watching a program in progress and want to record it, can I<br />
record it from the beginning?<br />
Yes. As long as you were tuned to the program when it began. <strong>DVR</strong> saves the portion in<br />
the buffer, plus the remainder of the program.<br />
20 21
How can I catch up to the live point of a program after I’ve paused it?<br />
Press Live on the remote. Or, fast-forward to the point of live programming. The<br />
on-screen indicator will display “LIVE” once you reach the live point of the program.<br />
How can I pause, rewind, and fast-forward two channels at once?<br />
Use the Swap button on your remote to switch between tuners. Use the playback controls<br />
on your remote to control the program. The Swap button is the key to keeping the buffer<br />
for both programs. If you flip between channels without using the Swap key, you will lose<br />
the buffer.<br />
>> Questions About Recording Programs and<br />
Playing Them Back<br />
Can I watch a program while I’m recording?<br />
Sure. You can watch another live program or a previously recorded program while<br />
recording a program.<br />
Can I record two shows that air at the same time?<br />
Yes. Your <strong>DVR</strong> has two tuners, so you can record two programs at the same time. Just<br />
highlight each program in your On-Screen <strong>Guide</strong> and press Record.<br />
Can I watch a show I’m recording before the recording is completed?<br />
Yes. You can either watch it in “real time” as it’s being recorded, or you can rewind the<br />
program you are currently recording and watch it from the beginning while the recording<br />
continues.<br />
Can I record music channels?<br />
Yes. You can record and play back music channels. However, currently the playback<br />
controls (pause, fast-forward, and rewind) are not functional for recorded music.<br />
Can I record ON DEMAND programs?<br />
No. ON DEMAND programs cannot be recorded by the <strong>DVR</strong>. Keep in mind, however,<br />
that ON DEMAND programs are available to watch over a specified period and can start<br />
anytime you choose.<br />
I have a home theater system. Can I record a program in Dolby ®<br />
Digital 5.1?<br />
Yes. If the program is broadcast with Dolby Digital 5.1 audio, the program will be<br />
recorded with Dolby Digital 5.1 audio. If the program was broadcast in analog sound,<br />
your recording will be in analog sound, despite the digital audio system’s connection to<br />
your <strong>DVR</strong>.<br />
What is the picture format of recorded programs?<br />
<strong>DVR</strong> records programs in the same format they are broadcast. For example, programs<br />
broadcast in HDTV format are recorded in HDTV (if your <strong>DVR</strong> is connected to an HDTV).<br />
Can I set up my <strong>DVR</strong> to record every episode of a specific program<br />
title?<br />
Yes. When you create a Series Recording, select the Recording Options icon. Specify<br />
the type(s) of episodes you want to record such as first run, first run and repeats, or all<br />
episodes. To record episodes that may air on other channels, select “All Channels” from<br />
the Channels to Record option.<br />
How do I change the priority of a series recording so that the series I<br />
want to record most gets recorded in case of a scheduling conflict?<br />
The first series you set to record has the highest priority and is the program recorded in<br />
case of a conflict. Each additional series you set to record is added to the bottom of the<br />
list. Select the Series Priority List from the <strong>DVR</strong> Schedule menu and use your Page +/<br />
Page – buttons to modify your recording priorities.<br />
What if the program I want to record runs beyond its scheduled time<br />
slot, such as when a football game goes into overtime? How can I<br />
make sure I record everything?<br />
It’s simple — select End Time from recording options and add minutes or hours to extend<br />
your recording for up to 2 hours (see page 15 for more details on recording options).<br />
Can I increase the rewind and fast-forward speed?<br />
Yes. <strong>DVR</strong> rewinds and fast-forwards at four speeds: 2x, 15x, 30x, and 60x. Each press<br />
of the Rewind or Fast-Forward button increases the speed. RE1, RE2, RE3, and RE4 will<br />
appear in the <strong>DVR</strong> box display when you rewind. FF1, FF2, FF3, and FF4 will appear when<br />
you fast-forward.<br />
Does the <strong>DVR</strong> record the program guide, audio volume changes,<br />
or anything else that appears on the screen when I use the<br />
remote’s keys?<br />
No. <strong>DVR</strong> records only the video and audio of the program you are recording.<br />
On occasion, a recording starts a minute or two after the program has<br />
begun. Why?<br />
<strong>DVR</strong> is synced with TV Listings. If a network starts the program a minute earlier than the<br />
Program <strong>Guide</strong>’s scheduled time, <strong>DVR</strong> will miss that first minute, unless you program <strong>DVR</strong><br />
to start a minute early. Start times may be adjusted on the Recording Options screen.<br />
Only part of my program recorded. Why?<br />
If the beginning of the program did not record, you may have tuned to it after the program<br />
began. If the end of the program did not record, <strong>DVR</strong> may have reached its storage capacity<br />
before it was able to record the entire program. Another possibility is that the box may have<br />
lost power or cable signal during the recording.<br />
22 23
Questions About Managing Your Recordings<br />
How long can I keep my recordings?<br />
You can keep them as long as you want. Just remember, the recording space is limited,<br />
so you may need to erase some recorded programs from time to time in order to make<br />
room for new ones.<br />
How will I know when I’m almost out of recording space?<br />
A message will appear onscreen advising you when recording space is low (80% full)<br />
and when it’s full. Note, if you are recording a program and run out of recording space,<br />
the recording will stop. You can always see how much recording space is available<br />
from the <strong>DVR</strong> Recordings screen. You can also manually erase recordings or set <strong>DVR</strong><br />
to automatically erase recorded programs when space is needed.<br />
Does the <strong>DVR</strong> automatically erase programs when the record space<br />
is full?<br />
Yes. <strong>DVR</strong> is set to automatically erase programs when space is needed. <strong>DVR</strong> deletes<br />
the oldest recordings first. However, you can change the Delete Priority Setting to save<br />
recordings until “I Delete.” See page 17 for details.<br />
Can I erase part of a recording?<br />
No. <strong>DVR</strong> can only erase the entire recording.<br />
How many recordings can I schedule for the future?<br />
There is no limit to the number of recordings you can schedule. Just make sure you have<br />
enough available recording space.<br />
Can I make a VHS tape of a recorded program?<br />
Yes. As you are watching a program you have recorded on your <strong>DVR</strong>, you can record<br />
it onto a VHS tape. Remember, the program you are watching is the one the VCR will<br />
record. If you switch to another channel, <strong>DVR</strong> will send the new channel’s program to the<br />
VCR to be recorded. Also, if you access the Program <strong>Guide</strong>, Flip Bar, or Browse Function,<br />
those graphics will appear on your VHS recording.<br />
Does Parental Control work with <strong>DVR</strong>?<br />
Yes. The Parental Control feature restricts viewing of recorded programs. If you schedule<br />
a recording for a program you have locked, the program will be recorded; but while the<br />
program is recording, the video will not appear onscreen and the audio will be muted. A<br />
restricted notice will appear allowing you to enter your PIN to view the program during<br />
recording.<br />
<strong>DVR</strong> ICONS<br />
<strong>DVR</strong> <strong>DVR</strong> Menu<br />
Search Menu<br />
Series Recording<br />
Record<br />
Recording Options<br />
Play the Recording<br />
Start the Recording from the Beginning<br />
Delete the Program<br />
Change the Delete Priority<br />
Go Back<br />
Tune to the Program<br />
Set a Reminder<br />
Display other Showtimes<br />
Favorite Channel<br />
Set a Parental Lock<br />
Confirm/Yes<br />
Cancel<br />
24 25
<strong>DVR</strong> REMOTE CONTROL<br />
POWER<br />
Press to individually turn on<br />
or off the <strong>DVR</strong>, TV, or AUX<br />
component.<br />
CABLE<br />
Press to enable control of<br />
your digital cable/<strong>DVR</strong> box.<br />
TV<br />
Press to enable control of<br />
your TV. (Note: This feature<br />
requires the digital remote to<br />
be programmed to operate<br />
your TV.)<br />
INSTANT REPLAY<br />
Press to jump back 15<br />
seconds for an instant replay.<br />
MY <strong>DVR</strong><br />
Press to display a list of your<br />
recorded programs.<br />
LOCK<br />
Press while watching a<br />
program or while in a listings<br />
menu to restrict viewing<br />
or purchase.<br />
GUIDE<br />
Press for a shortcut<br />
to TV listings organized<br />
by time.<br />
INFO<br />
Press to see a description of<br />
the highlighted program,<br />
if available.<br />
HELP<br />
When using the <strong>Guide</strong>,<br />
press for helpful on-screen<br />
information.<br />
Quick Reference<br />
SWAP<br />
Use to jump between two<br />
tuners and maintain buffer on<br />
each. See page 8 for details.<br />
All other PIP buttons are not<br />
functional and are reserved<br />
for future use.<br />
Note: Your remote may vary slightly from the one pictured here.<br />
However, basic functions should remain the same.<br />
ON DEMAND<br />
Press ON DEMAND to access<br />
the menu of available<br />
ON DEMAND programming.<br />
(Not available in all areas.)<br />
VIDEO CONTROL<br />
In CABLE mode, these<br />
buttons pause, fast-forward,<br />
rewind, and stop any <strong>DVR</strong><br />
or ON DEMAND program<br />
you select. In the AUX mode,<br />
these buttons will control<br />
a VCR or DVD player, if<br />
programmed.<br />
LIVE<br />
Press to skip forward to live<br />
programming.<br />
MENU<br />
Press once to go to the<br />
Quick Menu or twice to go<br />
to the Main Menu.<br />
OK / SELECT<br />
Press to select a highlighted<br />
item. Also shows or hides<br />
program information while<br />
watching TV.<br />
ARROWS<br />
Press to move the highlight<br />
to the next field in a menu or<br />
screen. Also use to browse<br />
what’s on other channels<br />
while watching TV.<br />
ENTER / HD ZOOM<br />
In TV & AUX mode, press<br />
to enter channels on some<br />
TVs or information on menu<br />
screens.<br />
✄<br />
<strong>DVR</strong> QUICK TIP CARD<br />
Easy Steps to Use the Features of Your <strong>DVR</strong><br />
26 27<br />
How Do I Record a Program?<br />
You can set a recording with just one touch of<br />
the remote.<br />
>> While in the <strong>Guide</strong> , highlight the<br />
program you wish to record and press<br />
Record . A red dot appears in the<br />
Program Information window to indicate<br />
the program will be recorded.<br />
>> While watching live TV, simply press<br />
Record . A Recording Started<br />
notice appears to indicate recording<br />
has begun.<br />
How Do I Record a Series?<br />
1. Highlight the TV series you want to record<br />
in the <strong>Guide</strong> and press Record twice<br />
to view the Overlay screen.<br />
2. Select the Create a Series Recording<br />
icon and specify your recording<br />
options, such as the type of episode you<br />
want to record and how many episodes<br />
you want to save.<br />
3. Select Record to record the series<br />
with these options.<br />
How Do I Watch a Recording?<br />
Press My <strong>DVR</strong> to view a list of your<br />
recorded programs. Highlight a program and<br />
press OK/Select . Select the Play<br />
icon.<br />
How Do I View a List of Programs<br />
Scheduled to Record?<br />
1. Select <strong>DVR</strong> <strong>DVR</strong> from the Quick Menu.<br />
2. Select <strong>DVR</strong> Schedule.<br />
3. Select Scheduled Recordings.
<strong>DVR</strong> QUICK TIP CARD (CONTINUED)<br />
Easy Steps to Use the Features of Your <strong>DVR</strong><br />
How Do I Pause, Rewind, and Instantly Replay Live TV?<br />
Press Pause , Rewind , or Instant Replay on the remote.<br />
How Do I Play in Slow-Motion?<br />
Press Pause , then press Fast-Forward to view slow-motion in<br />
forward mode. Or press Pause<br />
reverse mode.<br />
, then Rewind to view slow-motion in<br />
How Do I Return to Live TV?<br />
Press Live on your remote.<br />
How Do I Change Channels when I am<br />
Watching a Show that I am Recording?<br />
When you get a message saying that changing<br />
the channel will stop this recording, press the<br />
Swap SWAP button to change tuners. You may<br />
now watch another program without interrupting<br />
your recording. All other Picture-in-Picture<br />
buttons are reserved for future use.<br />
How Do I Start a Recording Early or Extend the End Time?<br />
1. Select a program from your list of Scheduled Recordings.<br />
2. Select the Recording Options icon.<br />
3. Arrow down to adjust start and end times.<br />
How Do I Modify My Series Priority<br />
List?<br />
1. Select <strong>DVR</strong> <strong>DVR</strong> from the Quick Menu.<br />
2. Choose <strong>DVR</strong> Schedule.<br />
3. Select Series Priority List.<br />
4. Highlight a listing and use Page+/to<br />
modify the priorities.<br />
Important Notes About Your <strong>DVR</strong><br />
>> <strong>DVR</strong> is set to save programs until “Space is Needed.” You can change the<br />
delete priority to “I Delete” for all programs or for individual programs.<br />
>> You can easily determine how much disk space is available by accessing<br />
<strong>DVR</strong> Recordings. The blue bar indicates how much disk space is occupied.<br />
>> Parental Locks will not prevent a program from recording. However, the<br />
audio is muted and no video appears while it records.<br />
>> You cannot record ON DEMAND programs.<br />
>> You can record music channels. However, the playback controls are not<br />
functional for recorded music.<br />
For more information, visit comcast.com.<br />
<strong>Guide</strong>works <strong>Dual</strong> <strong>Tuner</strong> <strong>DVR</strong> 28<br />
0405<br />
✄