Scout & Goblin Owner's Manual - Bear Archery
Scout & Goblin Owner's Manual - Bear Archery
Scout & Goblin Owner's Manual - Bear Archery

You also want an ePaper? Increase the reach of your titles
YUMPU automatically turns print PDFs into web optimized ePapers that Google loves.
<strong>Scout</strong> & <strong>Goblin</strong><br />
Owner’s <strong>Manual</strong><br />
Members of the ATA<br />
817 Maxwell Avenue Evansville, IN 47711<br />
800-694-9494 fax 812-467-1245<br />
www.<strong>Bear</strong><strong>Archery</strong>Products.com
Contents<br />
<strong>Archery</strong> Safety & Warnings 3-4<br />
Bow Diagram 5<br />
Care & Maintenance 6<br />
Initial Bow Setup 7-8<br />
Shooting the Bow 9-10<br />
Left Handed Archers (<strong>Scout</strong> Only) 11-12<br />
Warranty Statement 13<br />
Record important bow information here<br />
and keep for future reference.<br />
Model:__________________________<br />
Weight Range:___________________<br />
Draw Length:____________________<br />
Purchased From:_________________<br />
Date Purchased:__________________<br />
2
Congratulations! Your new <strong>Bear</strong> <strong>Archery</strong> youth<br />
bow is the finest available. It has been engineered<br />
for accuracy and long life. It was built with<br />
quality and pride. No other bow delivers a higher<br />
performance to value ratio than a <strong>Bear</strong>. We know<br />
how much you are going to enjoy your new bow.<br />
For this reason, we ask you read the Care and<br />
Maintenance section carefully to learn how easy it<br />
is to maintain the quality, performance and level<br />
of satisfaction you expect from a <strong>Bear</strong> <strong>Archery</strong><br />
product.<br />
ENJOY YOUR NEW BOW!<br />
! SAFETY FIRST !<br />
If this was purchased for a young archer, please<br />
be sure he or she uses it under adult supervision.<br />
Before using, everyone should carefully read and<br />
understand the instructions and the proper safe<br />
use of this product. If you have any questions,<br />
contact <strong>Bear</strong> <strong>Archery</strong> or a qualified <strong>Bear</strong> <strong>Archery</strong><br />
dealer.<br />
This bow is not a toy. Adult<br />
supervision is required. Misuse or careless use<br />
may cause serious injury or death.<br />
Dry-firing a bow severely reduces<br />
the life expectancy of the bow and may cause<br />
immediate damage to the bow resulting in injury<br />
to yourself or others. Never dry-fire your bow!<br />
Never pull back and release the bowstring<br />
without an arrow attached to the string. Your<br />
bow is designed to transfer energy to a properly<br />
weighted arrow.<br />
Shooting underweight arrows has<br />
the same effect as dry-firing a bow and may<br />
cause serious injury. Use the proper arrow for<br />
you and your bow. If you are unsure about your<br />
arrow choice, contact your local <strong>Bear</strong> <strong>Archery</strong><br />
dealer or an arrow manufacturer.<br />
3
Inspect your arrows and nocks<br />
regularly. Damaged arrows or nocks may cause<br />
serious injury. Immediately discard any dented,<br />
split, splintered or otherwise damaged arrows and<br />
replace cracked or broken nocks.<br />
Do not draw your bow beyond its<br />
maximum draw length as damage to the limbs,<br />
cables and strings could occur.<br />
The use of safety glasses is recommended with<br />
any archery product.<br />
! SAFETY FIRST !<br />
Targets and Hunting Safety<br />
Be sure of your target. Bowhunters often<br />
wear camouflage and are difficult to<br />
identify.<br />
Never aim at anything you don’t intend to<br />
shoot.<br />
Never point or aim a drawn bow at<br />
another person.<br />
Never draw or shoot when anyone is<br />
between you and your target.<br />
Never shoot at a target or object unless<br />
you are sure that it can stop your arrows.<br />
Make sure the area behind and around<br />
your target is clear.<br />
Before shooting, be sure that no part of<br />
the bow will strike any tree branches or<br />
other obstacles.<br />
Never shoot arrows straight up in the air<br />
or in any direction where you might<br />
destroy property or endanger life.<br />
Pre-shooting checklist<br />
Are these items in good condition?<br />
Properly installed? In working order?<br />
___ Cables ___ Sight<br />
___ String ___ Arrow Rest<br />
___ Screws ___ Arrow Nocks<br />
___ Arrow Shafts<br />
4
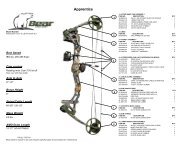
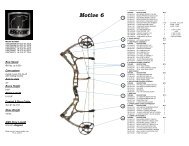
BOW DIAGRAM<br />
Understanding your bow and its component<br />
parts will add to your archery enjoyment.<br />
Although bows differ in performance and<br />
features, this photo represents the components<br />
available in various combinations on most<br />
models. Being familiar with this information will<br />
help you with the instructions throughout this<br />
manual.<br />
5
CARE AND<br />
MAINTENANCE<br />
With proper care and a minimum amount of<br />
routine maintenance, your bow will be kept in<br />
top condition. However, it is still important to<br />
carefully inspect your bow on a regular basis.<br />
Cleaning<br />
Your bow should be kept clean of dust, mud and<br />
grime. Use a damp soft cotton cloth to remove<br />
dirt and moisture. Do not use solvents such as<br />
acetone or mineral spirits as they may ruin the<br />
finish.<br />
Storage and Transportation<br />
Avoid exposing your bow to temperatures over<br />
150 degrees. Excessive heat may damage your<br />
bow. Do not leave your bow unprotected in your<br />
vehicle on a hot sunny day or store in a hot attic<br />
or other hot enclosed area. Clean your bow<br />
thoroughly after each use. Never put your bow<br />
away wet or store it in a damp place. Lightly oil<br />
all steel parts (axles, mounting screws) to prevent<br />
rust. You can relax the limbs if storing for more<br />
than a year.<br />
6
INITIAL BOW SETUP<br />
Before you can safely and effectively shoot your<br />
bow, a number of specific initial bow setup steps<br />
must be taken. These steps can be performed on<br />
your own, if your level of expertise is adequate or<br />
your local <strong>Bear</strong> <strong>Archery</strong> dealer can help you.<br />
Arrow Rest Installation<br />
Arrow rests should be installed according to the<br />
manufacturer’s specifications. Both <strong>Scout</strong> and<br />
<strong>Goblin</strong> come with the arrow rest installed and<br />
ready to use. If the arrow rest ever needs<br />
replaced, simply peel the old one off and stick on<br />
the new one, matching the original orientation.<br />
Sight Installation<br />
Install the sight pin into the slot in the riser as<br />
shown below.<br />
Elevation<br />
Locking Nut<br />
Windage<br />
Locking Nut<br />
Slot in<br />
Riser<br />
Sight Pin<br />
Draw Length Adjustment<br />
The <strong>Scout</strong> does not have an adjustable draw<br />
length but it does have a valley which<br />
accommodates archers of 16-24 inches.<br />
The <strong>Goblin</strong> is a recurve and accommodates<br />
archers of 22-24 inches.<br />
7
INITIAL BOW SETUP<br />
Sight Adjustment<br />
When first sighting in your new bow or bow<br />
sight, the key thing to remember is “Chase the<br />
arrows”. In other words if your arrows are hitting<br />
the target to the right of the bull’s-eye, move<br />
your sight to the right. If the arrows hit high on<br />
the target, raise your sight.<br />
8<br />
Arrow<br />
Group<br />
In the picture, the arrows are hitting the target<br />
high and to the right of the bull’s-eye. To correct<br />
this, adjust your sight up and to the right.<br />
Remember, “Chase the arrows.”
SHOOTING THE BOW<br />
Preparing to Shoot<br />
Put the arm guard on the arm with which you<br />
hold the bow. It should cover the inside of the<br />
lower arm to protect it from being slapped by the<br />
string when the string is released.<br />
The finger tab protects your<br />
fingers from rubbing by the<br />
bow string when string is<br />
released. Slip the finger tab<br />
over your second and third<br />
finger so that the tab is on the<br />
palm side of your hand with the<br />
small lobe up. Bend the tab so<br />
that the small lobe covers your<br />
index finger and the large lobe<br />
covers your middle two fingers.<br />
Shooting Stance<br />
Stand with your body at a<br />
right angle to the target.<br />
Right-handed archers will<br />
have their left shoulder<br />
toward the target. (These<br />
instructions are written for<br />
right handed archers. Left<br />
handed archers simply reverse<br />
the instructions.) Hold the<br />
bow with your left hand.<br />
Extend left arm toward the<br />
target with your head in a<br />
natural “looking at the target”<br />
position.<br />
9
SHOOTING THE BOW<br />
Nocking an Arrow<br />
Before each shot, make sure the arrow does not<br />
have a cracked or loose nock. Immediately<br />
replace any damaged nocks. Also be sure the<br />
shaft of the arrow is not dented or cracked.<br />
Immediately discard any cracked or broken arrow<br />
shafts.<br />
With the bow in the relaxed position, snap the<br />
nock end of the arrow (closest to fletching) onto<br />
the string with the arrow perpendicular to the<br />
string as shown above. The odd colored vane<br />
should be pointing out. Place the arrow in the<br />
arrow rest. The two supports on the EZ Draw<br />
Arrow Rest will keep your arrow on the rest as<br />
you draw the bow.<br />
Drawing the Bow<br />
Place your first finger<br />
around the string above<br />
the nock point and<br />
arrow. Place the middle<br />
finger and third finger<br />
around the string under<br />
the arrow. Draw the<br />
bowstring back to your<br />
jaw, placing your first<br />
finger at the corner of<br />
your mouth. This is called an anchor point.<br />
Keep your left arm slightly bent. Keep the bow<br />
straight up and down. Point the arrow at your<br />
target, aim and let go of the string.<br />
***Remember, never draw back and release your<br />
bow without an arrow in place.***<br />
10
LEFT HANDED<br />
ARCHERS (<strong>Scout</strong> Only)<br />
Your bow is setup for right handed archers when<br />
sent from the factory.<br />
Converting Bow to Left Hand<br />
Place one end of the bow on your foot or a soft<br />
surface. Relax the string and cables by pressing<br />
down on the top limb portion of the bow. This<br />
will compress the bow, relax the string, and allow<br />
the black cam mounting bracket to easily slide off<br />
the end of the bow.<br />
The opposite end of the string assembly will now<br />
slide easily off the opposite end of the bow.<br />
Once the string assembly is removed, simply flip<br />
the bow over and reinstall the string assembly to<br />
prepare the bow for a left handed archer. This is<br />
achieved by reversing the way the string assembly<br />
was attached to the bow. Reinstall the bracket<br />
you removed from the top of the bow onto the<br />
bottom of the bow and reinstall the bracket<br />
11
LEFT HANDED<br />
ARCHERS (<strong>Scout</strong> Only)<br />
Converting Bow to Left Hand (continued)<br />
removed from the bottom of the bow onto the<br />
top. The brackets must be installed ONLY one<br />
way. One side of the brackets has a metal lip.<br />
The opposite side of the bracket should be<br />
installed on the bow first and the bracket must<br />
slide onto the bow fully until the lip contacts the<br />
end of the bow limb. During disassembly and<br />
reassembly, it is very easy for the strings to fall<br />
out of their respective grooves in the cam and<br />
MUST be realigned correctly around the entire<br />
cam before drawing the bow. After assembly, it<br />
is HIGHLY recommended an adult draw the<br />
bow at least three times before allowing children<br />
to use the bow.<br />
No lip<br />
Bracket lip<br />
Example 2 of<br />
incorrect alignment.<br />
12<br />
Example 1 of<br />
incorrect alignment.<br />
Correct alignment
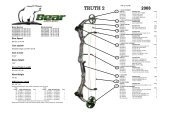
WARRANTY<br />
STATEMENT<br />
All <strong>Bear</strong> <strong>Archery</strong> youth bows are backed with a<br />
90 Day Limited Warranty.<br />
Original Owner:<br />
Warranty applies only to the original owner and<br />
is not transferable. Proof of purchase may be<br />
required.<br />
Items Not Covered:<br />
Cables, strings, bearings, paint and/or film<br />
dipped finishes resulting from normal wear and<br />
tear are not included in this warranty.<br />
Damage Not Covered:<br />
Damage caused by abuse, mishandling, dry firing,<br />
alteration or modification made to original<br />
products are not covered under this warranty.<br />
The use of any bow press other than those<br />
approved by <strong>Bear</strong> <strong>Archery</strong> will void this<br />
warranty. Additionally, shooting of arrows less<br />
than 5 grains per pound of peak draw weight will<br />
void this warranty. <strong>Bear</strong> <strong>Archery</strong> reserves the<br />
right to make parts substitutions on warranty<br />
coverage at <strong>Bear</strong> <strong>Archery</strong>’s sole discretion, for<br />
any reason.<br />
In the event a bow requires warranty service,<br />
please contact the <strong>Bear</strong> <strong>Archery</strong> Customer<br />
Department at 800-694-9494 for a return<br />
authorization (RA) number and return shipping<br />
instructions. For full warranty details, please log<br />
on to <strong>Bear</strong><strong>Archery</strong>Products.com for further<br />
information.<br />
Key Contact data:<br />
Dealer 800 Number: 800-694-9494<br />
Dealer Fax Number: 812-467-1245<br />
Web: www.<strong>Bear</strong><strong>Archery</strong>Products.com<br />
©2008 <strong>Bear</strong> <strong>Archery</strong><br />
Licensed under one or more of the following<br />
U.S. patents: 5,495,843 & 5,534,213 and other<br />
Patents Pending.<br />
13