COMPOUND BOW OWNER'S MANUAL - Bear Archery
COMPOUND BOW OWNER'S MANUAL - Bear Archery
COMPOUND BOW OWNER'S MANUAL - Bear Archery

Create successful ePaper yourself
Turn your PDF publications into a flip-book with our unique Google optimized e-Paper software.
<strong>COMPOUND</strong> <strong>BOW</strong><br />
OWNER’S <strong>MANUAL</strong><br />
4600 SW 41 Blvd. • Gainesville, FL 32608<br />
352-376-2327 • fax 352-376-6115<br />
www.escaladesports.com<br />
1
Contents<br />
<strong>Archery</strong> Safety 4 & 5<br />
Bow Diagrams 6 & 7<br />
Maintenance 8 & 9<br />
Draw Weight Adjustment 10<br />
Xact Timing Adjustment 11<br />
Tiller Adjustment 12<br />
Draw Length Adjustment<br />
Modular Style 13<br />
Tri-Draw Style 14<br />
Perimeter Weighted OneCam 15 & 16<br />
SuperCam 17<br />
Extreme/Strike Cams 18<br />
HatchetCam 19<br />
Micro Perimeter Weighted Cam 20<br />
Original OneCam 21<br />
ActionCam 22<br />
Machlite Energy Wheel 23<br />
Rotating Module Cam 24 & 25<br />
Zen Cam 26<br />
Vortec Cam 27<br />
Initial Bow Setup 28 & 29<br />
Basic Tuning 30<br />
Care and Storage 31<br />
Bow Setup 32, 33, 34<br />
String Replacement 35, 36, 37<br />
Warranties 38 & 39<br />
2
Congratulations! Your new Escalade Sports compound bow<br />
is the finest available. It has been engineered for accuracy<br />
and long life, and built with quality and pride.<br />
Regular waxing of string and buss cables reduces wear<br />
along with serving separations.<br />
Enjoy your new bow!<br />
Record important bow information here and keep for<br />
future reference:<br />
Model______________________________________<br />
Weight Range _______________________________<br />
Draw Length ________________________________<br />
String Length ________________________________<br />
Buss Cable and/or Cable Length ________________<br />
Purchased From _____________________________<br />
Date Purchased______________________________<br />
3
SAFETY FIRST<br />
Before using this equipment, read and follow these manufacturer’s<br />
instructions carefully. If you have any questions,<br />
contact the manufacturer or a qualified dealer or authority.<br />
Never dry-fire you bow.<br />
Never pull back and release the bowstring without an<br />
arrow attached. Your bow is designed to transfer energy to a<br />
properly weighted arrow.<br />
Warning: Dry-firing a bow severely reduces the life<br />
expectancy of the bow and may cause immediate damage<br />
to the bow resulting in injury to yourself or others.<br />
Use the proper arrow for you and your bow. If you are<br />
unsure about your arrow choice, contact your archery dealer<br />
or an arrow manufacturer. A list of manufacturers can be<br />
found on page 34.<br />
Warning: Shooting underweight arrows has the same<br />
effect as dry-firing and may cause serious injury. Use arrows<br />
of the proper length and spine (stiffness) for your bow and<br />
shooting style.<br />
Warning: Do not use wooden arrows. They are not<br />
designed for use with this compound bow and may cause<br />
serious injury.<br />
Inspect your arrows and arrow nocks regularly.<br />
Immediately discard any dented, split, splintered or otherwise<br />
damaged arrows and replace cracked or broken nocks.<br />
Do not draw your bow beyond its maximum draw length<br />
as damage to the limbs, cables and strings could result.<br />
Use of safety glasses is recommended with any archery<br />
product.<br />
4
SAFETY FIRST<br />
Targets and hunting safety<br />
• Be sure of your target. Bowhunters often wear<br />
camouflage and are difficult to identify.<br />
• Never aim at anything you don’t intend to shoot.<br />
• Never shoot at a target or object unless you are sure<br />
that it can stop your arrows. Make sure the area behind<br />
and around your target is clear.<br />
• Before shooting, be sure the bow limbs will not strike any<br />
tree branches or other obstacles.<br />
• Never point or aim a drawn bow at another person.<br />
• Never draw or shoot when anyone is between you and<br />
your target.<br />
• Never allow anyone to retrieve arrows until all arrows<br />
have been shot.<br />
• Never shoot arrows straight up in the air or in any<br />
direction where you might destroy property or<br />
endanger life.<br />
Pre-shooting checklist<br />
Are these items in good condition?<br />
Properly installed? In working order?<br />
___ Cables ___ Arrow rest<br />
___ String ___ Arrow nocks<br />
___ String serving ___ Arrow shafts<br />
___ Nock set ___ Set screws<br />
___ Cable slide ___ Teardrop fittings<br />
5
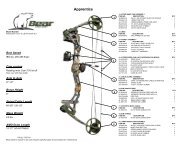
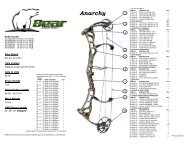
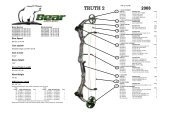
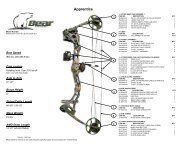
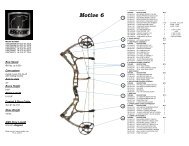
<strong>BOW</strong> DIAGRAMS<br />
Understanding your bow and its component parts will add<br />
to your archery enjoyment. Although bows differ in performance<br />
and features, these photos represent the components<br />
available in various combinations on most models. Being<br />
familiar with this information will help you with the instructions<br />
throughout this manual. Also, you can refer to these<br />
photos when ordering parts or making technical inquiries.<br />
6
<strong>BOW</strong> DIAGRAMS<br />
7
MAINTENANCE<br />
Cleaning<br />
Use a soft cotton cloth to remove dirt and moisture.<br />
Spray-on furniture polish works well. Protect the finish<br />
on target bows with paste wax. On hunting bows, avoid<br />
cleaners with distinctive odors. Do not use solvents such<br />
as acetone or mineral spirits as they will ruin the finish.<br />
Storage and Transportation<br />
Avoid exposing your bow to temperatures over 150<br />
degrees. Excessive heat may damage your bow. Do not<br />
leave your bow unprotected in your car or truck on a hot<br />
sunny day or store in a hot attic or other hot enclosed<br />
area.<br />
Clean your bow thoroughly after each use. Never put<br />
your bow away wet or store it in a damp place. Lightly oil<br />
all steel parts (axles, mounting screws) to prevent rust.<br />
You can relax the limbs if storing for more than<br />
a year. Follow the instructions under Draw Weight<br />
Adjustment on page 10.<br />
Always use a bow case when traveling with you bow.<br />
Bow Presses<br />
Use only “double-pull” type bow presses. A “doublepull”<br />
bow press draws you bow down at two points on<br />
the riser. Older style “single-pull” bow presses that contact<br />
the bow only in the grip area can result in bent or<br />
broken risers.<br />
To reduce unnecessary stress on the riser, back off<br />
the limb bolts 2-3 turns before placing in press.<br />
8
MAINTENANCE<br />
Lubrication<br />
Your Escalade Sports compound bow requires very<br />
little lubrication. Wipe the cableguard periodically to keep<br />
the cable slide running smoothly. Cam and wheel bearings<br />
do not require lubrication. If other lubrication is necessary,<br />
use white lithium grease or Teflon© lubricants.<br />
Avoid excessive lubrication of any item, as this can<br />
attract dirt. On hunting bows, avoid lubricants with obvious<br />
odors.<br />
String and Synthetic Cable Maintenance<br />
Regularly apply a high quality bowstring wax to you<br />
string and synthetic cables systems. Regular waxing<br />
protects your cables and strings from abrasion, wear and<br />
separation.<br />
One twist per 4” of string length will eliminate “dead<br />
strands”. For example, a 47” string should be twisted 11-<br />
12 times. Be sure to twist the string in the direction that<br />
tightens the servings.<br />
Escalade Sports strongly recommends replacing the<br />
bowstring and cable annually or every 12,000 shots. If<br />
the string or cables show signs of wear, replace as soon<br />
as possible with Escalade Sports components.<br />
Directions on replacing the string start on page 35.<br />
9
<strong>BOW</strong> ADJUSTMENTS<br />
Draw Weight Adjustment<br />
Escalade Sports bows have a 10-15 pound peak<br />
weight adjustment range. The weight range is printed on<br />
the sticker on the lower limb. If your bow is equipped<br />
with limb bolt lock downs, make sure these brass-tipped<br />
set screws are loosened 4-5 turns before making any<br />
weight adjustments.<br />
Using a 3/16” hex wrench, turn the limb bolts clockwise<br />
to increase peak weight and counter-clockwise to<br />
reduce peak weight. Bow weight will increase or decrease<br />
approximately two to four pounds per turn. Do not turn<br />
one limb bolt more than two turns ahead of the other.<br />
After making weight adjustments, use a bow scale to<br />
check peak weight and a bow square to check the tiller.<br />
(Does not apply to OneCams)<br />
After all tuning adjustments have been made, engage<br />
the limb bolt lockdown set screws. Screws should be<br />
snug against the limb bolts. (Do not exceed 50 inchpounds<br />
of torque.)<br />
10
<strong>BOW</strong> ADJUSTMENTS<br />
Xact Timing (Two cam bows only)<br />
Timing refers to the synchronization (or lack of synchronization)<br />
that occurs when wheels and cams “break<br />
over” as the string is drawn. “Times” bows break over in<br />
unison (synchronization). “Unlimited” bows do not.<br />
Every Escalade Sports bow is perfectly timed before<br />
it leave the factory. But if you change the weight or draw<br />
length settings or if your cables stretch from heat, cold,<br />
or time, you can quickly detect a timing problem and<br />
easily correct it in minutes.<br />
Check and set your timing using the Xact Timing<br />
Gauge. This gauge is provided with every bow featuring<br />
Xact Timing, or it can be purchased separately.<br />
To adjust timing:<br />
1) Place the bow in a horizontal position.<br />
2) Identify the eccentric with the Reference Line that<br />
is least parallel to the string. This eccentric will<br />
need adjustment.<br />
3) Place the Xact Timing Gauge on the string near<br />
the opposite eccentric; align the Xact Timing<br />
Gauge Indicate with the Reference Line on that<br />
eccentric.<br />
4) Reposition the Xact Timing Gauge on the string<br />
next to the eccentric that needs to be adjusted.<br />
5) Loosen the caphead<br />
screw that<br />
locks the timing<br />
feature in place<br />
using a 3/16” hex<br />
wrench.<br />
11
<strong>BOW</strong> ADJUSTMENTS<br />
Xact timing (continued)<br />
6) Using the supplied box wrench, turn the timing<br />
feature until the Reference Line on the eccentric<br />
is even with the Xact Timing Gauge Indicator.<br />
7) Lock the timing feature in place by tightening<br />
caphead screw.<br />
Tiller Adjustment (Used on Two cam bows)<br />
Tiller is the difference in the distances from the string<br />
to the points where the riser meets the limbs. It can be<br />
measured using a bow square.<br />
This measurement is not particularly critical regardless<br />
of shooting style, but should be maintained for consistency.<br />
The tiller should be even to 1/8” closer on the bottom.<br />
Adjust the tiller by turning the limb bolts (see “Draw<br />
Weight Adjustment”). To increase the tiller measurement<br />
on one limb, turn the limb bolt counter-clockwise. To<br />
decrease the tiller measurement, turn the bolt clockwise.<br />
12
<strong>BOW</strong> ADJUSTMENTS<br />
Draw Length Adjustment - Modular Style<br />
Most Escalade Sports bows, including the single cam<br />
models, have modular cams or wheels. On these bows,<br />
you can adjust your draw length to fit your shooting<br />
style simply be changing the elements. This draw length<br />
adjustment will have a negligible effect on your peak<br />
weight. Some elements can be changed without using a<br />
bow press.<br />
The factory-installed elements will give you the draw<br />
length marked on the bow. Elements are graduated in<br />
one-inch increments.<br />
1) Using a hex wrench, loosen the flathead socket<br />
screws in the cam or wheel until the element falls<br />
off. You may have to press the cables towards the<br />
limb to reach the inner screw.<br />
2) Slip the new element in place and loosely fasten<br />
both screws. Then tighten both screws alternately,<br />
making sure that the element is flush against the<br />
face of the cam or wheel. Do not over tighten<br />
screws.<br />
13
<strong>BOW</strong> ADJUSTMENTS<br />
Draw Length Adjustment - Modular Style (continued)<br />
3) Repeat steps 1 and 2 on other end for dual<br />
eccentric bows. Be sure to use matching elements.<br />
Draw Length Adjustment - Tri-draw style<br />
Some Escalade Sports bows have tri-draw style<br />
wheels. These can be adjusted to one inch longer or one<br />
inch shorter than the factory set draw length.<br />
Note: This draw length adjustment will affect the<br />
peak weight of the bow.<br />
1) Back limb bolts off at least 2 turns.<br />
2) Using a double pull bow press, relax the bow.<br />
3) To increase the draw length by one inch, move<br />
the cable to the inboard slot (toward the center of<br />
the bow). Repeat on opposite end.<br />
4) To reduce the draw length, move the cable to the<br />
outboard slot (toward the limb tip). Repeat on<br />
other end.<br />
5) Be sure the cable and string are firmly seated in<br />
the proper grooves as you release the bow press.<br />
14
ADJUSTING<br />
DRAW<br />
LENGTH<br />
Perimeter<br />
Weighted<br />
OneCam II<br />
Perimeter Weighted<br />
OneCams have a modular draw<br />
length adjustment. Draw length<br />
changes are made by simply<br />
changing modules. Accessory<br />
modules are available from your<br />
dealers in one-inch draw length<br />
increments. Each module is numbered,<br />
with #1 being the longest<br />
draw length module and #8 being<br />
the shortest.<br />
To change modules remove<br />
the socket head screws from<br />
the present module, remove<br />
that module and replace with a<br />
new module. Such module draw<br />
length adjustment will not affect<br />
draw weight.<br />
Additional, fine draw length<br />
(and string stretch) adjustments<br />
of up to 1/2 inch can be made<br />
by repositioning the adjustable<br />
bowstring mounting post near the<br />
center of the cam.<br />
To make such adjustments, it<br />
is first necessary to remove tension<br />
from the harness system<br />
of the bow by relaxing the bow<br />
in a bow press. A fixed or portable<br />
bow press must be used.<br />
Under not circumstances can<br />
this relaxing of the harness<br />
system be accomplished by<br />
simply backing out limb bolts.<br />
15
ADJUSTING<br />
DRAW<br />
LENGTH<br />
Perimeter<br />
Weighted<br />
OneCam II<br />
(continued)<br />
Such mounting post draw<br />
length adjustments will slightly<br />
affect draw length and weight.<br />
Pulling more bowstring up into<br />
the cam will reduce draw length<br />
and weight. Letting it out will<br />
increase draw length and weight.<br />
Wing Module Draw Stop<br />
Feature<br />
A unique optional feature of<br />
the new PWCII is provided by<br />
the new wing modules. The wing<br />
module accepts a draw stop<br />
screw that lets the shooter adjust<br />
the “valley” at full draw.<br />
Without the draw stop screw,<br />
a wide, soft valley is experienced.<br />
With the draw stop screw<br />
installed the shooter can tune the<br />
valley to provide a sharp, solid<br />
wall at full draw.<br />
The bow is shipped without<br />
the draw stop screw in place. A<br />
draw stop screw is included in<br />
the enclosure bag provided with<br />
your bow.<br />
Note: Wing modules #1 &<br />
2 do not accept a draw stop<br />
screw. The physical configuration<br />
does not allow for that<br />
option to be provided.<br />
16
ADJUSTING<br />
DRAW<br />
LENGTH<br />
SuperCam<br />
SuperCams are equipped with<br />
modular draw length adjustment. Draw<br />
length changes are made by simply<br />
changing modules; a bow press is not<br />
needed. Accessory modules are available<br />
from your dealers in one-inch<br />
draw length increments. Each module<br />
is numbered, with #1 being the longest<br />
draw length module and #7 being the<br />
shortest. To change modules remove<br />
the socket head screw from the present<br />
module, remove that module and<br />
replace with a new module. Such<br />
module draw length adjustment will not<br />
affect draw weight.<br />
Additional, fine draw Length (and<br />
string stretch) adjustments of up to 1/2<br />
inch can be made by repositioning the<br />
adjustable bowstring mounting post<br />
near the center of the cam. To make<br />
such adjustments, it is first necessary to<br />
remove tension from the harness system<br />
of the bow by relaxing the bow in<br />
a bow press. A fixed or portable bow<br />
press must be used. Under no circumstances<br />
can this relaxing of the<br />
harness system be accomplished by<br />
simply backing out limb bolts.<br />
Such mounting post draw length<br />
adjustments will slightly affect draw<br />
weight. Pulling more bowstring up into<br />
the cam will lessen draw weight; letting<br />
it out will increase weight.<br />
Most discrepancies in buss cable<br />
length can be adjusted for either by<br />
adding or removing twists from the buss<br />
cable or if larger changes are required<br />
then the buss cable attachment spool<br />
can be repositioned in the cam to one<br />
of its other locations.<br />
17
ADJUSTING<br />
DRAW<br />
LENGTH<br />
Extreme/<br />
Strike<br />
Cams<br />
Extreme Cams are equipped<br />
with a modular draw length<br />
adjustment system. Draw length<br />
changes are made by simply<br />
changing modules on both the<br />
top and bottom cam.<br />
A bow press may be needed<br />
in some instances. Accessory<br />
modules in one-inch increments<br />
are available from your dealer.<br />
When changing modules be<br />
sure that the module numbers<br />
are the same on top and bottom.<br />
There are two sizes of these<br />
cams. The larger body cam, for<br />
longer draw lengths, has four<br />
modules available for it: E/F-1 for<br />
the longest draw length of E/F-4<br />
for the shortest.<br />
The smaller body cam, for<br />
shorter draw lengths has four<br />
modules available: E/F-5 for the<br />
longest draw length to E/F-8 for<br />
the shortest.<br />
To change modules remove<br />
the socket head screw from the<br />
present module, remove that<br />
module and replace with a new<br />
module. Such modular draw<br />
length adjustment will not affect<br />
draw weight.<br />
18
ADJUSTING<br />
DRAW<br />
LENGTH<br />
HatchetCam<br />
HatchetCams are equipped<br />
with modular draw length adjustment.<br />
Draw length changes<br />
are made by simply changing<br />
modules; a bow press may be<br />
needed in certain instances.<br />
Accessory modules are available<br />
from your dealer in one-inch draw<br />
length increments. Each module<br />
is numbered, with #H1 being the<br />
longest draw length module and<br />
#H5 being the shortest.<br />
When changing modules be<br />
sure that the module numbers<br />
are the same on top and bottom.<br />
To change modules, remove<br />
the socket head screw from the<br />
present module, slide the module<br />
from the cam body and replace it<br />
with a new module. Such module<br />
draw length adjustment will not<br />
affect draw weight.<br />
19
ADJUSTING<br />
DRAW<br />
LENGTH<br />
Micro<br />
Perimeter<br />
Weighted<br />
Cams<br />
Micro Perimeter Weighted<br />
OneCams have a modular draw<br />
length adjustment. Draw length<br />
changes are made by simply<br />
changing modules; a bow<br />
press may be needed in certain<br />
instances. Accessory modules<br />
are available from your dealers in<br />
one inch draw length increments.<br />
Each module is numbered, with<br />
MS1 being the shortest draw<br />
length module and MS5 being<br />
the longest.<br />
To change modules remove<br />
the two screws from the present<br />
module, remove that module and<br />
replace with a new module. Such<br />
module draw length adjustment<br />
will not affect draw weight.<br />
Additional, fine draw length<br />
(and string stretch) adjustments<br />
can be made by repositioning the<br />
adjustable bowstring mounting<br />
post near the center of the cam.<br />
This changes the weight slightly.<br />
To make such adjustments, it<br />
is first necessary to remove tension<br />
from the harness system<br />
of the bow by relaxing the bow<br />
in a bow press. Under no circumstances<br />
can this relaxing<br />
of harness system be accomplished<br />
by simply backing out<br />
limb bolts. A fixed or portable<br />
bow press must be used.<br />
20
ADJUSTING<br />
DRAW<br />
LENGTH<br />
Original<br />
OneCams<br />
Original OneCams are<br />
equipped with a bowstring post<br />
draw length adjustment system.<br />
Typically, bows come from<br />
the factory with the bowstring<br />
attached to the center (#2) post.<br />
To make draw length changes,<br />
the bowstring is reattached to<br />
one of the other posts. To make<br />
such adjustments, a fixed or portable<br />
bow press should be used<br />
to relieve tension in the bow’s<br />
harness system.<br />
To increase draw length,<br />
attach the bowstring to a lower<br />
numbered post. Going from post<br />
#2 to post #1 increases draw<br />
length by approximately 1/2 inch.<br />
To decrease draw length,<br />
attach the bowstring to a higher<br />
numbered post. Going from<br />
post #1 to post #3 decreased<br />
draw length by approximately 1<br />
inch. Such bowstring post draw<br />
length adjustments will slightly<br />
affect the bow’s draw weight.<br />
A shorter adjusted draw length<br />
will decrease draw weight. A<br />
longer adjusted draw length will<br />
increase draw weight.<br />
Most discrepancies in buss<br />
cable length can be adjusted<br />
for either by adding or removing<br />
twists from the buss cable or if<br />
larger changes are required then<br />
the buss cable attachment spool<br />
can be repositioned in the cam to<br />
one of its other locations.<br />
21
ADJUSTING<br />
DRAW<br />
LENGTH<br />
ActionCam<br />
ActionCams are equipped<br />
with a modular draw length<br />
adjustment system. Draw length<br />
changes of plus or minus 1 inch<br />
are made by simply changing<br />
modules on both the top and bottom<br />
cam. A bow press may be<br />
needed in some instances.<br />
When changing modules be<br />
sure that the module numbers<br />
are the same on top and bottom.<br />
There are two types of modules<br />
available for the ActionCam,<br />
wheel modules and cam modules.<br />
Wheel modules are designated<br />
W1*, W2*, and W3*. W1*<br />
produces the longest draw length<br />
and W3* produces the shortest.<br />
Your bow was shipped from the<br />
factory with the W2*, or middle,<br />
module installed.<br />
Cam modules are designated<br />
65C1*, 65C2*, 65C3* and follow<br />
the same rules.<br />
To change modules remove<br />
the screw from the present module,<br />
remove that module and<br />
replace with the new module.<br />
Such modular draw length adjustment<br />
will not affect draw weight.<br />
22
ADJUSTING<br />
DRAW<br />
LENGTH<br />
MachLite<br />
Energy Wheel<br />
Machine Lite Wheels are<br />
equipped with a bi-draw length<br />
adjustment system. Draw length<br />
changes are made by repositioning<br />
the bowstring, as it comes out<br />
of the wheel, into one of two different<br />
slots.<br />
To change draw length, it is<br />
first necessary to remove tension<br />
from the harness system of<br />
the bow by relaxing the bow in a<br />
bow press. A bow press must be<br />
used. Under no circumstances<br />
can this relaxing of the harness<br />
system be accomplished<br />
by simply backing out limb<br />
bolts.<br />
With the bow relaxed the<br />
bowstring can then be repositioned<br />
to the desired string slot.<br />
The “S” slot (see diagram) shortens<br />
the draw length. The “L” slot<br />
lengthens the draw length.<br />
For the “middle” draw length,<br />
place string in “S” slot on one<br />
wheel and the “L” slot on the<br />
other wheel. Such bi-draw length<br />
adjustments will affect the bow’s<br />
draw weight.<br />
A shorter adjusted draw<br />
length will decrease draw weight.<br />
A longer adjusted draw length will<br />
increase draw weight.<br />
23
ADJUSTING DRAW LENGTH<br />
Rotating Module Cam<br />
Note the string side of the cam has 2 axle holes numbered<br />
1 and 2 (Fig. 1). You must relax the limbs of the<br />
bow to change the axle locations. This can be achieved<br />
either by relaxing the limb bolts or using a bow compressor.<br />
The opposite side (fig. 2), the rotating module has<br />
the letters A, B, C and D. There are also indicator marks<br />
numbered 1 and 2. The indicator marks correspond to<br />
the axle position on the opposite side of the cam. Use<br />
the below information to set the draw and module position<br />
for the desired draw length.<br />
(Fig. 1 and 2 are on the following page)<br />
Draw Length Axle Hole Module<br />
20 2 2-D<br />
21 2 2-C<br />
22 2 2-B<br />
23 2 2-A<br />
24 1 1-D<br />
25 1 1-C<br />
26 1 1-B<br />
27 1 1-A<br />
24
ADJUSTING DRAW LENGTH<br />
Rotating Module Cam (continued)<br />
The spools on the string side of the cam allow you<br />
to fine tune the draw lengths and compensate for string<br />
stretch. Your bow is shipped from the factory in the center<br />
position. To shorten or lengthen the draw, move the<br />
string to the positions shown in the illustration.<br />
25
ADJUSTING DRAW LENGTH<br />
Zen Cam<br />
The draw length of you Zen Cam is adjustable in 1<br />
inch draw lengths by replacing the cam modules on each<br />
side of the bow.<br />
1) Remove the socket head cap screw shown.<br />
2) Remove the cam module and replace with the<br />
appropriate module to achieve the desired draw<br />
length shown in the chart below.<br />
3) Repeat procedure on reverse side of cam.<br />
Module Draw Length<br />
1 31”<br />
2 30”<br />
3 29”<br />
4 28”<br />
26
ADJUSTING DRAW LENGTH<br />
Vortec Cam<br />
The Vortec Cams are equipped with a multi draw feature.<br />
Draw length changes are made by repositioning the<br />
string spool located on the draw string side of the camp.<br />
Prior to changing draw length, back limb bolts off 2<br />
full turns. To change draw length, it is first necessary to<br />
remove tension from the harness system of the bow by<br />
relaxing the bow in a bow press. A bow press must be<br />
used. Under no circumstances can this relaxing of the<br />
harness system be accomplished by simply backing out<br />
limb bolts.<br />
With the bow relaxed, the bowstring spool can then<br />
be repositioned to the desired string setting. The #1 position<br />
(see diagram) lengthens the draw length. The #5<br />
position shortens the draw length.<br />
The longer adjusted draw length setting will increase<br />
bow weight. A shorter adjusted draw setting will decrease<br />
bow weight.<br />
Before removing bow from bow press, make sure all<br />
strings and cables are properly seated and attached to<br />
the cam. Remember to tighten limb bolts once the procedure<br />
is completed.<br />
27
INITIAL<br />
<strong>BOW</strong><br />
SETUP<br />
Before you can safely and<br />
effectively shoot your bow, a<br />
number of specific initial bow<br />
setup steps must be taken. These<br />
steps can be performed on your<br />
own, if your level of expertise is<br />
adequate. Or, your local archery<br />
dealer can help you.<br />
These are initial setup steps<br />
only. Later, fine tuning (see Basic<br />
Tuning) may be required.<br />
Arrow Rest Selection<br />
Arrow rest selection is best<br />
determined by shooting style.<br />
If you shoot with a mechanical<br />
release, you will be best served<br />
with a “Shoot-Through” type<br />
arrow rest. If you elect to shoot in<br />
the traditional manner with your<br />
fingers, a “Shoot-Around” type<br />
rest will work best for you.<br />
Arrow Rest Installation & Setup<br />
Arrow rests should be<br />
installed according to manufacturer<br />
specifications. Then,<br />
the rest should be adjusted for<br />
proper, initial “Centershot” position.<br />
This initial rest position<br />
setup is quite different, depending<br />
on whether you have elected<br />
to shoot with fingers or with a<br />
mechanical release. See the following<br />
drawings to determine<br />
which is initially correct for you.<br />
28
INITIAL<br />
<strong>BOW</strong><br />
SETUP<br />
Place an arrow on the bowstring.<br />
Inspect for adequate fletch<br />
clearance. If additional fletch<br />
clearance is required, adjust<br />
the cable guard as needed, or<br />
reduce fletching size.<br />
At this same point, adjust<br />
arrow fletch position to correspond<br />
with the configuration of<br />
your arrow rest in order to ensure<br />
clean passage through or past<br />
that arrow rest. Such adjustments<br />
are done by breaking<br />
loose and rotating, or replacing<br />
altogether each arrow’s inexpensive<br />
nock and carefully positioning<br />
the new nock to provide proper<br />
fletch clearance through the<br />
arrow rest. Your archery dealer<br />
can show you how this is easily<br />
accomplished or can provide this<br />
service for you.<br />
INSTALL ALL<br />
ACCESSORIES<br />
Before basic tuning, install all<br />
additional accessories - sights,<br />
bowquivers, silencers, peep<br />
sights, etc. Each of these items<br />
can affect bow tuning results, it<br />
added at a later date.<br />
A mild thread-locker (LokTite)<br />
compound can be used to prevent<br />
loosening of screw-mounted<br />
accessories such as sights,<br />
arrow rests and bowquivers.<br />
29
BASIC<br />
TUNING<br />
Now that we have accomplished<br />
all Initial Bow Setup<br />
procedures, we can proceed to<br />
Basic Bow Tuning. Making final<br />
tuning adjustments to the bow<br />
will enable us to further improve<br />
arrow flight and accuracy.<br />
Firmly attach a sheet of paper<br />
to a stiff frame approximately<br />
24”x24” (an old picture frame<br />
works well). Position the center<br />
of the frame about shoulder<br />
height and around six feet from<br />
the safe target. Stand 6 to 10<br />
feet in front of the paper and<br />
frame. Shoot a fletched arrow<br />
through the center of the paper at<br />
shoulder height and observe how<br />
the paper is torn.<br />
Most often, a tea will initially<br />
result which is a combination of<br />
both horizontal and vertical indications.<br />
Adjust the vertical (nocking<br />
point) part first. Then work on<br />
the horizontal. It should be noted<br />
that a perfect hole is not always<br />
possible for all shooters and all<br />
setups. Neither is it always advisable.<br />
Many top shooters find that<br />
a slightly high-left tear (or RH<br />
shooter, high-right tear for left<br />
hand) provides optimum accuracy.<br />
Paper tuning is a method for<br />
allowing each shooter to discover<br />
what works best for them with a<br />
particular bow setup.<br />
30
CARE AND<br />
STORAGE<br />
With proper care and a minimum<br />
amount of routine maintenance,<br />
your bow will be kept in<br />
top condition.<br />
Carefully inspect your<br />
bow on a regular basis.<br />
Replace frayed bowstrings<br />
and worn cables immediately.<br />
Bowstrings should be replaced<br />
annually or every 10,000 shots.<br />
Keep eccentric wheels,<br />
cams and pulleys rotating freely<br />
by lubricating lightly at the<br />
axle. A very small amount of<br />
silicone or teflon-based lubricant<br />
applied on a regular basis<br />
goes a long way.<br />
Your bow should be kept<br />
clean of dust, mud and grime.<br />
Use a soft cotton cloth to<br />
remove dirt and moisture.<br />
Bowstrings and synthetic<br />
cables should be lightly recoated<br />
with a quality bowstring<br />
wax on a regular basis. Smear<br />
the wax into position. Rub it<br />
gently with your fingers or a<br />
soft piece of leather to melt the<br />
wax into the strands.<br />
When traveling with your<br />
bow, always use a bow case.<br />
Avoid exposing your bow<br />
to temperatures over 150<br />
degrees. Never leave your bow<br />
unprotected in a vehicle on a<br />
hot sunny day.<br />
Never put your bow away<br />
wet or store it in a damp place.<br />
31
<strong>BOW</strong> SET-UP<br />
Cableguard Installed and Adjustment<br />
Post-mount below grip cableguard<br />
Loosen locking screw(s) in side of base and slip<br />
over post below the grip on the riser. Tighten the locking<br />
screw(s) with the cableguard rod in the desired position,<br />
keeping rod rotated toward the grip, rather than toward<br />
the eccentric.<br />
Above grip cableguard<br />
Mound cableguard to the outside of the sight window<br />
using the caphead screws provided. The cableguard<br />
sideplate is compatible with dovetail or bolt-on sights.<br />
To adjust cableguard rod for additional fletch clearance,<br />
loosen the fasteners holding cableguard rod in place and<br />
rotate. It is bast to position the cableguard rod as close<br />
as possible to the center of the bow.<br />
Fixed cableguard<br />
Attach the cableguard to the riser below the grip<br />
using the fasteners provided. This type of cableguard is<br />
not adjustable for fletching clearance. To reduce deflection<br />
of the cableguard rod, loosen the fasteners and slide<br />
the rod back, making sure to allow enough room for the<br />
full travel of your draw length.<br />
Inside/outside cableslide (Available on some 2 cam<br />
models)<br />
In addition to the cableguard adjustments described<br />
above, additional fletch clearance can be obtained by<br />
reversing the cable slide so that the cable rides to the<br />
outside of the cableguard rod.<br />
32
<strong>BOW</strong> SET-UP<br />
Arrow Selection<br />
Arrow selection depends on the peak draw weight,<br />
let-off and draw length settings of your bow. Refer to<br />
arrow manufacturers arrow selection tables using this<br />
information.<br />
The <strong>Archery</strong> Manufactures Organization (AMO) recommends<br />
a minimum of six grains arrow weight per<br />
pound of peak weight. The International Bowhunters<br />
Organization (IBO) allows a minimum of five grains arrow<br />
weight per pound of peak weight. Arrow weight is the<br />
total combined weight of your arrow, nock insert, and<br />
point or broadhead.<br />
To determine the lightest arrow you can safely shoot,<br />
use the following format:<br />
Peak Draw Multiply By =Minimum Safe<br />
Weight 5 Grains Arrow Weight<br />
(Lb) Per Pound (Grains<br />
Exceeding the minimum weight causes no safety<br />
problems. However, do not shoot less than your minimum<br />
arrow weight.<br />
The weight of the arrow you select can be determined<br />
as follows:<br />
1) From an arrow chart, find the weight of your arrow<br />
shaft based on the size and length.<br />
2) Add the weight of your broadhead or point.<br />
3) Add 35 grains to cover the nock, insert and fletching.<br />
For example.<br />
Arrow Point Other Total<br />
2317–30” Mag 125<br />
396 Gr +125 GR +35 Gr =558 Gr<br />
33
<strong>BOW</strong> SET-UP<br />
Warning:<br />
Shooting arrows below these minimum weight<br />
requirements will void the warranty. Using arrows below<br />
five grains per pound of peak weight can approach dryfire<br />
conditions and can severely reduce the life of your<br />
bow, and may cause serious injury.<br />
Contact your archery pro shop or the following arrow<br />
manufacturers for arrow selection recommendations:<br />
Game Tracker Inc True Flight Arrow Co.<br />
P.O. Box 380 2709 S. Freeman Rd.<br />
Flushing, MI 48433 Monticello, IN 47960<br />
(810) 733-6360 (219) 583-5131<br />
Easton Beman USA<br />
5040 W. Harold Gatty Dr. 5040 W. Harold Gatty Dr.<br />
Salt Lake City, UT 84116-2897 Salt Lake City, UT 84116<br />
(801) 539-1400 (801) 539-1433<br />
34
STRING REPLACEMENT<br />
Replacing the String — Fast-flight systems<br />
1) Relax bow in a double pull bow press.<br />
2) Remove string.<br />
3) Attach the end loop of<br />
the new string to the<br />
cam or wheel.<br />
4) Wrap string around<br />
the bottom of the<br />
eccentric, over the top<br />
and back toward the<br />
other end of the bow, keeping string above<br />
the buss cables.<br />
5) Bring the opposite end of the string around the<br />
other eccentric and attach the end loop to the<br />
post.<br />
6) Make sure the string is firmly seated in the eccentric<br />
grooves as you slowly release the bow press.<br />
Replacing the string — Single cam systems<br />
1) Relax the bow in a double pull bow press, and<br />
remove the string, noting the post to which the<br />
string was attached.<br />
2) Attach an end loop to<br />
the appropriate post in<br />
the center of the cam<br />
on the sight window<br />
side. Wrap the string<br />
around the bottom of<br />
the cam, then around<br />
over the top toward<br />
the other end of the<br />
bow.<br />
3) Bring the string over<br />
the top of the concentric idler wheel and back<br />
toward the cam.<br />
35
STRING REPLACEMENT<br />
Replacing the string — Single cam systems (continued)<br />
4) Wrap the string over the top and around the outermost<br />
groove on the opposite side of the cam.<br />
Attach the end loop to the post.<br />
5) Make sure the string and cable are firmly seated<br />
in the proper grooves as you slowly release the<br />
bow press.<br />
Replacing the string — Teardrop systems<br />
Foot method – It is possible to change the string without<br />
using a bow press on bows equipped with teardrop style<br />
string attachments only.<br />
Use the following procedure:<br />
1) Back off the limb bolts 2-3 turns (counter clockwise).<br />
2) Holding bow in one hand, step on the string.<br />
3) Lift bow up, flexing the limbs.<br />
4) Place the new string on the empty sides of the<br />
teardrop fittings. Lower the bow. Both strings are<br />
now strung on the bow.<br />
5) Make sure the new<br />
string is well-seated<br />
in the teardrop<br />
grooves. Carefully,<br />
step on the new<br />
string and lift bow,<br />
again flexing the<br />
limbs.<br />
6) Remove the old<br />
string from teardrops.<br />
Lower the bow with<br />
new string in place.<br />
36
STRING REPLACEMENT<br />
Replacing the string — Teardrop systems (continued)<br />
Bow press method - The strings on Escalade Sports<br />
bows equipped with teardrop style string attachments<br />
can also be changed in a bow press by doing the<br />
following:<br />
1) Relax the bow in a double pull press.<br />
2) Attach the new string to the empty sides of the<br />
teardrop fittings, making sure end loops are well<br />
seated in teardrops.<br />
3) Remove old string from teardrops.<br />
4) Make sure the string and cables are firmly seated<br />
in the proper grooves as bow press is released.<br />
37
Limited Lifetime Warranty<br />
To The Original Owner Only<br />
Please Complete Warranty Registration On Line:<br />
www.escaldesports.com/bow-warranty<br />
Escalade ® Sports warrants every Escalade Sports manufactured<br />
compound bow and crossbow to be free from material or manufacturing<br />
defects under a limited lifetime warranty from the date of purchase.<br />
Warranty excludes strings, cables, cable slides and/or cosmetic appearances<br />
such as scratches, chips, dings, etc. which are typically caused<br />
by normal use and wear of the bow. Warranty extends to the original<br />
owner of the bow and is not transferable. In addition, the original owner<br />
must submit proof of the warranty information requirements to register<br />
the bow for warranty eligibility. Should the warranty information requirements<br />
not be provided, all repairs will be performed at 100% of the cost<br />
of parts and factory labor. Removal of the bow’s serial number will void<br />
all warranty.<br />
All warranty repairs or replacement parts for compound bows and<br />
crossbows will be assessed at current published prices based on date<br />
of purchase as follows:<br />
• 1-3 years – purchaser pays 0% of parts and factory labor.<br />
• 4 years & up – purchaser pays for a percentage of factory labor<br />
and parts on a pro-rated basis. Customer to be notified of charges<br />
prior to repair. Payment due prior to factory refurbishment.<br />
• After the end of the tenth year, the purchaser must pay 100% of<br />
parts and 0% of factory labor. Customer to be notified of charges<br />
prior to repair. Payment due prior to factory refurbishment.<br />
Any compound bow or crossbow returned to The Escalade Sports<br />
for warranty service, the string, cables and cable slide will be inspected<br />
for wear and replaced if necessary. A minimal charge will be assessed<br />
for such replacement. The riser, limb pockets, limbs and eccentrics on<br />
compound bows are all covered under our Limited Lifetime Warranty<br />
as defined above. Warranty will be honored to original owner only.<br />
Defective parts will be replaced or repaired as necessary to restore<br />
the bow to its original shooting condition. At the discretion of Escalade<br />
Sports evidence of abuse, including misuse or modification to the original<br />
design, such as physical reshaping or drilling additional holes, will<br />
void all warranty implied. Additionally, the use of attachments or accessories<br />
that cause excessive stress will void all warranty claims.<br />
Overstressing compound bows or crossbows by using arrows lighter<br />
than <strong>Archery</strong> Manufacturers and Merchants Organization (AMO) recommendations<br />
will void the warranty and may cause damage to the bow<br />
38
and possible injury to the shooter. For this reason, Escalade Sports recommends<br />
the arrow weight be in accordance with the recommendations<br />
of AMO for minimum arrow weight per bow peak weight.<br />
All accessory items must be removed from the bow prior to shipping.<br />
Escalade Sports will not be responsible for damage or loss of any<br />
accessory item left on the bow.<br />
In the interest of product improvement and consumer safety,<br />
Escalade Sports reserves the right to make changes in product design<br />
and specifications without notice.<br />
Damage caused by mishandling, abuse, improper stringing or modification<br />
of the product is not covered and will void the warranty.<br />
Escalade Sports makes no other warranty, either expressed or<br />
implied, except as stated above. To the extent permitted by applicable<br />
law, Escalade Sports shall not be responsible for any incidental or consequential<br />
damages or expenses of any kind or sort, whether relating to<br />
or resulting from personal injury, property damage or otherwise.<br />
This limited warranty gives you specific legal rights. You may also<br />
have other rights, which vary from state to state. Unless prohibited by<br />
applicable law, this limited warranty extends only to you, the original<br />
purchaser, and is not transferable.<br />
In the event a bow requires warranty service, please contact<br />
the Customer Relations Department at (800) 694-9494 for a Return<br />
Authorization Number and return shipping instructions.<br />
Escalade Sports will not be responsible for unauthorized dealer or<br />
retailer labor charges. Transportation and insurance charges for the<br />
return of any bow are not covered under the terms of this warranty and<br />
are the responsibility of the owner.<br />
Contact for any questions or concerns:<br />
customerservice@escaladesports.com<br />
©2003 Escalade ® Sports<br />
39
2L-0748A19