Hiniker 9850 Manual - Snow Plow Stuff
Hiniker 9850 Manual - Snow Plow Stuff
Hiniker 9850 Manual - Snow Plow Stuff

You also want an ePaper? Increase the reach of your titles
YUMPU automatically turns print PDFs into web optimized ePapers that Google loves.
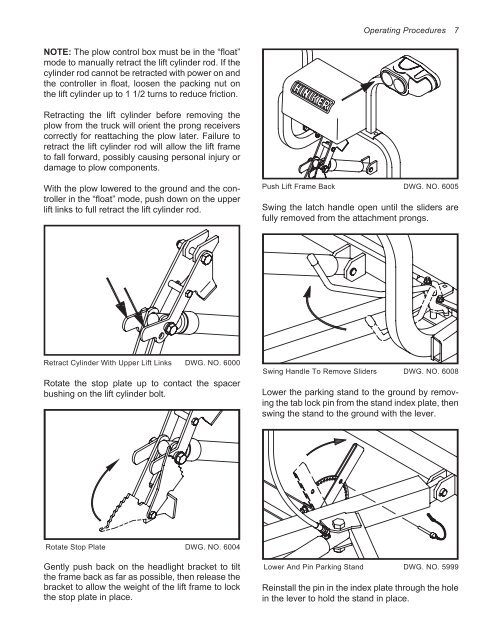
NOTE: The plow control box must be in the “float”<br />
mode to manually retract the lift cylinder rod. If the<br />
cylinder rod cannot be retracted with power on and<br />
the controller in float, loosen the packing nut on<br />
the lift cylinder up to 1 1/2 turns to reduce friction.<br />
Retracting the lift cylinder before removing the<br />
plow from the truck will orient the prong receivers<br />
correctly for reattaching the plow later. Failure to<br />
retract the lift cylinder rod will allow the lift frame<br />
to fall forward, possibly causing personal injury or<br />
damage to plow components.<br />
With the plow lowered to the ground and the controller<br />
in the “float” mode, push down on the upper<br />
lift links to full retract the lift cylinder rod.<br />
Retract Cylinder With Upper Lift Links DWG. NO. 6000<br />
Rotate the stop plate up to contact the spacer<br />
bushing on the lift cylinder bolt.<br />
Rotate Stop Plate DWG. NO. 6004<br />
Gently push back on the headlight bracket to tilt<br />
the frame back as far as possible, then release the<br />
bracket to allow the weight of the lift frame to lock<br />
the stop plate in place.<br />
Operating Procedures 7<br />
Push Lift Frame Back DWG. NO. 6005<br />
Swing the latch handle open until the sliders are<br />
fully removed from the attachment prongs.<br />
Swing Handle To Remove Sliders DWG. NO. 6008<br />
Lower the parking stand to the ground by removing<br />
the tab lock pin from the stand index plate, then<br />
swing the stand to the ground with the lever.<br />
Lower And Pin Parking Stand DWG. NO. 5999<br />
Reinstall the pin in the index plate through the hole<br />
in the lever to hold the stand in place.