

Instructions for Setting up a Sioux Tipi (pdf - Nomadics Tipi Makers
Instructions for Setting up a Sioux Tipi (pdf - Nomadics Tipi Makers
Instructions for Setting up a Sioux Tipi (pdf - Nomadics Tipi Makers

Create successful ePaper yourself
Turn your PDF publications into a flip-book with our unique Google optimized e-Paper software.
The tipi is not a perfectly symmetrical cone, it is an asymmetrical cone. It is the longer<br />
door pole that causes the tipi to tilt to the rear. In the illustration here the dotted lines<br />
represent a perfect cone. The longer, more angular front slope to the tipi helped brace<br />
the tipi against the west winds and also af<strong>for</strong>ded more head room at the back of the tipi<br />
which is the main living space. This also accounts <strong>for</strong> the tipi floor being egg shaped.<br />
LAYING IN THE POLES: Now select your sturdiest pole and set it aside. This will be<br />
your lift pole. It is used to lift the tipi cover into place after all the poles have been laid in.<br />
When carrying a tipi pole around, carry it straight <strong>up</strong> and down, perpendicular to the ground. See 17.<br />
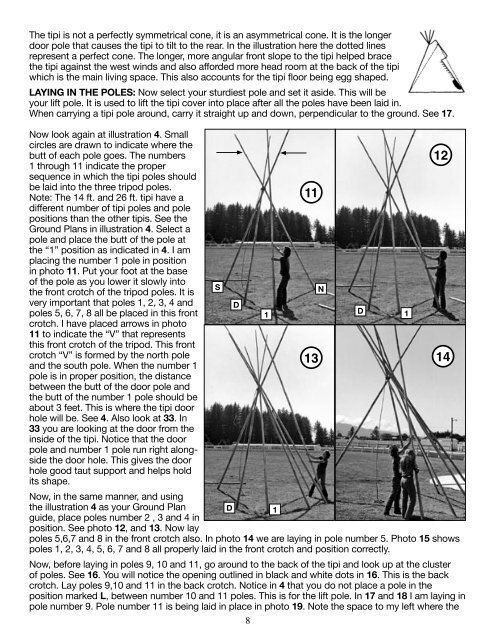
Now look again at illustration 4. Small<br />
circles are drawn to indicate where the<br />
butt of each pole goes. The numbers<br />
1 through 11 indicate the proper<br />
sequence in which the tipi poles should<br />
12<br />
be laid into the three tripod poles.<br />
Note: The 14 ft. and 26 ft. tipi have a<br />
different number of tipi poles and pole<br />
positions than the other tipis. See the<br />
Ground Plans in illustration 4. Select a<br />
pole and place the butt of the pole at<br />
the “1” position as indicated in 4. I am<br />
placing the number 1 pole in position<br />
in photo 11. Put your foot at the base<br />
11<br />
of the pole as you lower it slowly into<br />
the front crotch of the tripod poles. It is<br />
S N<br />
very important that poles 1, 2, 3, 4 and<br />
poles 5, 6, 7, 8 all be placed in this front<br />
crotch. I have placed arrows in photo<br />
11 to indicate the “V” that represents<br />
this front crotch of the tripod. This front<br />
D<br />
1<br />
D 1<br />
crotch “V” is <strong>for</strong>med by the north pole<br />
and the south pole. When the number 1<br />
pole is in proper position, the distance<br />
between the butt of the door pole and<br />
the butt of the number 1 pole should be<br />
about 3 feet. This is where the tipi door<br />
hole will be. See 4. Also look at 33. In<br />
33 you are looking at the door from the<br />
inside of the tipi. Notice that the door<br />
pole and number 1 pole run right alongside<br />
the door hole. This gives the door<br />
hole good taut s<strong>up</strong>port and helps hold<br />
its shape.<br />
Now, in the same manner, and using<br />
13<br />
14<br />
the illustration 4 as your Ground Plan<br />
guide, place poles number 2 , 3 and 4 in<br />
position. See photo 12, and 13. Now lay<br />
D 1<br />
poles 5,6,7 and 8 in the front crotch also. In photo 14 we are laying in pole number 5. Photo 15 shows<br />
poles 1, 2, 3, 4, 5, 6, 7 and 8 all properly laid in the front crotch and position correctly.<br />
Now, be<strong>for</strong>e laying in poles 9, 10 and 11, go around to the back of the tipi and look <strong>up</strong> at the cluster<br />
of poles. See 16. You will notice the opening outlined in black and white dots in 16. This is the back<br />
crotch. Lay poles 9,10 and 11 in the back crotch. Notice in 4 that you do not place a pole in the<br />
position marked L, between number 10 and 11 poles. This is <strong>for</strong> the lift pole. In 17 and 18 I am laying in<br />
pole number 9. Pole number 11 is being laid in place in photo 19. Note the space to my left where the<br />
8