Rakusu Pattern - Upaya Zen Center
Rakusu Pattern - Upaya Zen Center
Rakusu Pattern - Upaya Zen Center

You also want an ePaper? Increase the reach of your titles
YUMPU automatically turns print PDFs into web optimized ePapers that Google loves.
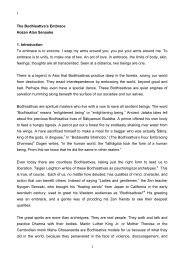
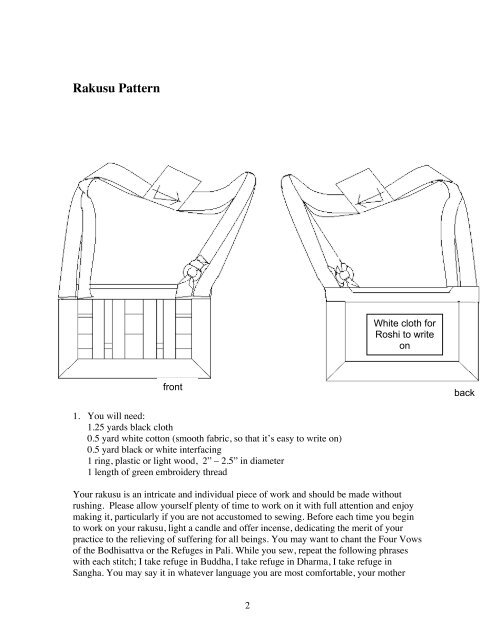
<strong>Rakusu</strong> <strong>Pattern</strong><br />
front fron<br />
t<br />
1. You will need:<br />
1.25 yards black cloth<br />
0.5 yard white cotton (smooth fabric, so that it’s easy to write on)<br />
0.5 yard black or white interfacing<br />
1 ring, plastic or light wood, 2” – 2.5” in diameter<br />
1 length of green embroidery thread<br />
Your rakusu is an intricate and individual piece of work and should be made without<br />
rushing. Please allow yourself plenty of time to work on it with full attention and enjoy<br />
making it, particularly if you are not accustomed to sewing. Before each time you begin<br />
to work on your rakusu, light a candle and offer incense, dedicating the merit of your<br />
practice to the relieving of suffering for all beings. You may want to chant the Four Vows<br />
of the Bodhisattva or the Refuges in Pali. While you sew, repeat the following phrases<br />
with each stitch; I take refuge in Buddha, I take refuge in Dharma, I take refuge in<br />
Sangha. You may say it in whatever language you are most comfortable, your mother<br />
2<br />
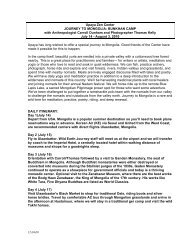
White white cloth cloth for<br />
Roshi for Roshi to write to<br />
write on on<br />
back<br />
bac<br />
k
tongue, or Japanese or Pali if you prefer. (Sino-Japanese: Namo Kie Butsu, Namo Kie<br />
Ho, Namo Kie So Pali: Buddham saranam gacchami, Dhammam saranam gacchami,<br />
Sangham saranam gacchami.) It is very helpful to have a finished rakusu in front of you<br />
while you work. The cd at the end of the book contains pictures of each step.<br />
2. Read all instructions carefully before you begin. If you are making a Peacemaker<br />
<strong>Rakusu</strong> and receiving fabric from friends and family, please roughly cut the pieces to<br />
size and dye them in black dye before continuing with the instructions. If you are<br />
using store-bought black fabric, there is no need to dye the fabric, but it is a good idea<br />
to wash and dry it before continuing. In all cases, iron your fabric flat before<br />
measuring and cutting the pieces.<br />
3. Page 12 shows how to cut out the black or dyed material. First cut out the paper<br />
patterns of the A, B, C and D pieces (see pages 13, 14, 15, 16).and pin them on the<br />
fabric. This will give you the exact measurements for cutting and for the folds of the<br />
center section or “field” of your rakusu. Be aware that A1 and A2 mirror each other,<br />
allowing for outside seams. Please cut each piece 0.5” longer than the paper pattern to<br />
allow for folding. All pattern pieces already include seam allowance so you do not<br />
need to add in for that.<br />
4. Mark all pattern pieces accurately on the cloth before cutting anything, using a sharp<br />
white or lead pencil and a straightedge. Mark along the length of the cloth, using the<br />
selvage as a parallel. However, do not include the selvage in any of the pattern<br />
pieces. There are 16 pieces of black cloth, 2 pieces of interfacing and 2 pieces of<br />
white cloth. Be careful to use the straight grain of cloth at all times<br />
5. First mark:<br />
1 strip E 36” x 4.5”<br />
1 strip J 42” x 4.5” (44” for tall people)<br />
1 strip H 42” x 4.5” (44” for tall people)<br />
1 strip F 14.5” x 4.5”<br />
1 strip G 9” x 2”<br />
1 strip K 10” x 4.5”<br />
1 strip L 9” x 4.5”<br />
2 strips A1 and A2 9” x 2”<br />
4 strips B 7” x 1.5”<br />
2 strips C 8” x 1”<br />
1 strip D 8” x 2.75”<br />
6. Now cut all these pieces using sharp scissors, making square corners and very clean<br />
lines. You will be sewing along the seam allowances, so please be very precise.<br />
7. Lay out all pieces of fabric in the pattern of the rakusu, so that you have a general<br />
idea of what it is going to look like. Check with the picture at the beginning of the<br />
pattern or a finished rakusu, if available.<br />
3
same<br />
horizontal line<br />
8. Mark, then cut from interfacing:<br />
1 piece M 15.25” x 11.5”<br />
1 piece N 10” x 4.5”<br />
and from white cloth:<br />
1 piece P 12.5” x 9”<br />
1 piece O 10” x 3.5”<br />
Soak piece P in a solution of 50% soy milk and 50% water. Then stretch and iron<br />
it. This will make it easier for the teacher to write the verse of the kesa on it.<br />
Put M, N, P and O aside until you get to # 13.<br />
10. Start sewing the center section. Use the paper patterns from pages 13, 14, 15 and<br />
16 to make the lines on the back side of strips A, B, C, and D. Bring marked lines<br />
of tucks together and press the tucks in the direction shown by arrows on the<br />
paper pattern. Check with a finished rakusu. Then pin the edges precisely<br />
together. Baste along stitching line.<br />
11. Join pieces A, B, C, and D (see diagram on front page) following your lines<br />
exactly and, using the step stitch,<br />
sew together: B – D – B<br />
then sew together: A1 – B – C (make sure horizontal lines match)<br />
A2 – B – C<br />
Now: sew the three pieces together, lining up horizontal lines with ruler<br />
first. (See front page)<br />
Then press the seam allowances toward the B pieces and press your whole center piece<br />
flat.<br />
You don’t need to cut off the uneven edges yet ( see fig. on this page)<br />
12. Mark with a pencil a rectangle of 6” x 9.75” on the center field. There should be<br />
at least 0.25” outside your pencil line. (See below.)<br />
A 1 B<br />
C<br />
C<br />
9.75”<br />
B B B A 2<br />
D C<br />
4<br />
6<br />
”<br />
“<br />
leave raw<br />
edges<br />
pencil line<br />
leave edges raw
13. On interfacing piece M, fold and press a 1” edge, turning under all four sides, so<br />
the cloth measures exactly 9.5” x 13.25” from each folded edge. You might have<br />
to adjust the fold so that the cloth measures these dimensions precisely.<br />
14. Fold your center field horizontally and vertically, marking the center with a pin.<br />
Do the same with the interfacing. Using the pins as marks, place the finished<br />
center field exactly in the middle of the interfacing so that there is a 1.75” space<br />
between the pencil line of your center piece and the folded edge of the interfacing.<br />
Pin, then baste with small stitches 0.25” outside of pencil line. Press.<br />
folded edge<br />
1.75<br />
folded<br />
edge<br />
folded edge<br />
15. Now turn the whole thing over (the interfacing piece is now called “the frame”).<br />
Place white cloth piece P in the middle so there is about 0.25” between the raw<br />
edges of P and the folded edge of the frame. Pin, baste with small stitches 0.25”<br />
from the edge of P.<br />
16. Press border piece E exactly in half lengthwise, then press both raw edges inside<br />
so that it measures 1.75” wide.<br />
crease<br />
1.75 M<br />
1.75<br />
1.75”<br />
.5<br />
.5”<br />
1.75”<br />
5<br />
E<br />
1.75<br />
folded<br />
edgeedge<br />
your basting line<br />
a 0.75” from<br />
your pencil line
17. Starting at the top left corner on the front, tuck the front and back border around<br />
the fold edge of the frame, ending at the top right corner. Pin as you go, making<br />
sure that the edge of the frame fits very snugly into the crease of the border. Do<br />
not worry about the corners yet. Just keep the edge and crease together. The fold<br />
of the border E should meet your pencil line on the center section exactly. Does it<br />
look like the diagram? Check with frontpage and with fig on page 6.<br />
M<br />
M<br />
M<br />
M<br />
M<br />
E<br />
M<br />
E<br />
E<br />
18. Now the corners. On the front, fold the excess cloth inside, towards the side<br />
edges. You will have to unpin a little to get the fold to lay neatly, then re-pin. On<br />
the back, fold the excess cloth towards the bottom edge of the frame, to distribute<br />
the thickness evenly.<br />
E<br />
Inner edge<br />
Outer edge<br />
6<br />
* Do the inner edges<br />
meet at 90 degrees?
19. Baste inner and outer edges of the border, taking care not to shift the frame edge<br />
from the crease of the border. Make sure the corners are making a 45 ° angle.<br />
20. Blind-stitch by hand the inner edge of the border and the corners on the front first.<br />
Your stitches should pick up the interfacing but not come through to the back.<br />
Then turn it over and stitch the back in the same way. Press carefully. Are you<br />
satisfied? Trim off the raw ends of E so they are in line with the top edge of the<br />
frame. ( See fig on previous page )<br />
21. Press piece F in the same way as you did E. Fold it over the top edge of the<br />
rakusu, again making sure it’s a snug fit. Pin. Tuck the ends of F neatly inside<br />
themselves with the excess cloth towards the back of the rakusu. Slip-stitch the<br />
front first, then the back.<br />
22. On piece G, press a crease 0.5” from the edge, press a crease 0.25’ from the other<br />
edge.<br />
Back Back edg edge<br />
0.5”<br />
eeedge<br />
0.25”<br />
0,250.25<br />
55””<br />
“”<br />
0.5<br />
”<br />
Front edge<br />
23. Fold G over the top edge of the rakusu, so that 0.25” shows in front and 1” in<br />
back. Is it centered?<br />
back<br />
1.25”<br />
G<br />
F<br />
G<br />
front front<br />
cross Cross section<br />
section<br />
24. Pin G to F, folding in the ends neatly, at a right angle in front and forming a slant<br />
in back. See the drawings on page 2. Baste and blind stitch. ( If you wish, stabstitch<br />
bottom of G through all layers to give the edge a firm finish ).<br />
7
25. Now the straps. Fold pieces J and H lengthwise and pin, raw edges together.<br />
Step stitch 0.5” from raw edges. Stitch across only one end on each piece. Clip<br />
corners and turn inside out with the aid of a chopstick. Press.<br />
.5” ½<br />
‘<br />
1.75<br />
“<br />
fold<br />
clip ”<br />
Stitching line<br />
26. Fold L lengthwise and pin raw edges together. Machine or hand-stitch raw edges<br />
together keeping one end open. Turn inside out with the aid of a chopstick. Fold<br />
and press. See drawings. Fold in 0.5” on one end and close with small stitches.<br />
Fold in .5”<br />
27. Pin K and N together and baste along sides 0.25” from raw edges, allowing K to<br />
be a fraction looser than N. This is because K has to fit around N. Fold in 0.5”<br />
on each side and press.<br />
K<br />
N<br />
Basting bastin<br />
g<br />
3 3.5” ½“<br />
8<br />
Backside of L<br />
1.75“<br />
.5”<br />
½‘ .5”
28. Fold in 0.27” on long sides of piece O and press. Pin O to K/N so that 0.25” of K<br />
shows on either side of O. Baste, then slip-stitch. Fold raw ends over 0.5” and<br />
press. Mark center of each side with a pin.<br />
N<br />
O<br />
29. Pin the finished ends of J and H to the top edge of your rakusu, on the left as you<br />
look at it, as illustrated on page 1. The seamed edges of the strap should be<br />
towards the center of the rakusu and lined up with the bottom of F. Stitch them<br />
securely from the back with double thread, without coming through to the front.<br />
Pin the raw ends of H and L temporarily in place on the right.<br />
30. Draw the raw ends of J and L through the rakusu ring and pin to get an impression<br />
of how it will look. Make sure that J will be on top of H (see front page).<br />
31. Now try it on and check in the mirror. The bottom edge of the rakusu should<br />
come approximately 3” below your navel when you are standing up and cover<br />
your mudra when you sit in zazen. If it is too long, shorten J and L straps on your<br />
left side as you are wearing it. Place hands in shashu to help you judge. When<br />
you are satisfied, pin the straps in place. Edges are still raw.<br />
32. Fold rakusu in half to find the exact center back point of the straps. Mark the<br />
center back on both straps with pencil. Fold the raw ends of K over the straps,<br />
lining up the center points and pin. Cross-stitch the raw ends of K to straps and<br />
place both sides together, so the straps are sandwiched inside K. Slip-stitch<br />
folded edges together. Press so that you don’t see the stitches. (See the following<br />
page for drawing)<br />
9<br />
K
Seam<br />
H<br />
Seam<br />
<strong>Center</strong><br />
J<br />
33. Fold the edges of L, one over the other, to the front, and stitch invisibly but firmly<br />
through all layers, finishing off the raw end neatly. Press well. Stitch it to the<br />
rakusu., like you did with J and H. Draw the other end of L through the ring, fold<br />
in raw edge and stitch it to the top edge of the rakusu at the back (see drawing).<br />
L<br />
same Same as as<br />
F, F=1.75”<br />
1 ¾‘<br />
10<br />
O<br />
K<br />
H<br />
E<br />
L<br />
F<br />
G
34. Finish raw ends of H and sew it on. Finish raw end of J and tie it to the ring. It<br />
may take some practice to get the knot to sit at the right length. It will hold itself<br />
in place if you pull the strap taut after tying it. Check with drawing. Usually, it is<br />
not stitched.<br />
35. Lastly, the broken pine twig. Thread your needle with green embroidery thread<br />
and practice on a spare piece of cloth. If you like, mark the main points with<br />
pencil to guide you. Puch needle through all layers, except for the first and last<br />
stitches. One line is one stitch. The pine twig should be in the center and about 1”<br />
from the edges. The design should look as pleasing on the back as on the front.<br />
The numbers on the drawing indicate in which order to stitch. Press.<br />
11
Stitch from the inside of the cloth to point <br />
At the right side one stitch to point <br />
At the wrong side to point <br />
At the front side to point <br />
At the wrong side to point <br />
At the front side to point <br />
At the wrong side to point <br />
At the front side to point <br />
At the wrong side to point <br />
At the front side to point <br />
At the wrong side to point <br />
At the front side to point <br />
At the wrong side back to point ,<br />
but then come up just through one part of the<br />
cloth and make a a few stitches on top of each<br />
other on the inside, where nobody can see it.<br />
36. You have finished your rakusu. Congratulations and thank you.<br />
12
Cut pattern here<br />
Stitching line<br />
A 1<br />
Cut one piece<br />
This line<br />
goes on<br />
top of<br />
this line<br />
13<br />
Direction to press tucks<br />
in A 1
This line<br />
goes on<br />
top of<br />
this line<br />
A 2<br />
cut one oiece<br />
Stitching line<br />
Cut pattern here<br />
14<br />
A 1 and A 2 are<br />
exactly the<br />
same, except<br />
the seam<br />
allowance is<br />
reversed.<br />
and<br />
Arrows,<br />
indicate the<br />
direction in<br />
which to<br />
press the<br />
tucks.<br />
B<br />
cu<br />
t 2<br />
cut<br />
one<br />
oiec<br />
e
Stitching line<br />
C<br />
Cut 2<br />
pieces<br />
15
D<br />
Cut one piece<br />
16
4.5”<br />
½“<br />
4.5”<br />
4 .5”<br />
4.5”<br />
1.5“<br />
2“<br />
2”<br />
For tall people, pieces J and H should be 44”. For shorter people, pieces J and H<br />
should be 42”<br />
44”<br />
for<br />
J 42“<br />
H 42“<br />
E 36“<br />
A 1 9“ A 2 F 14.5”<br />
½“<br />
K 10“ L 9“<br />
B 7” B 7“ B 7“ B 7“<br />
7“<br />
9“ D 8“ C 8”<br />
G 9“<br />
C 8”<br />
8“<br />
1‘<br />
2.75<br />
”<br />
8“<br />
17