OPERATOR'S MANUAL - Ryobi
OPERATOR'S MANUAL - Ryobi
OPERATOR'S MANUAL - Ryobi

You also want an ePaper? Increase the reach of your titles
YUMPU automatically turns print PDFs into web optimized ePapers that Google loves.
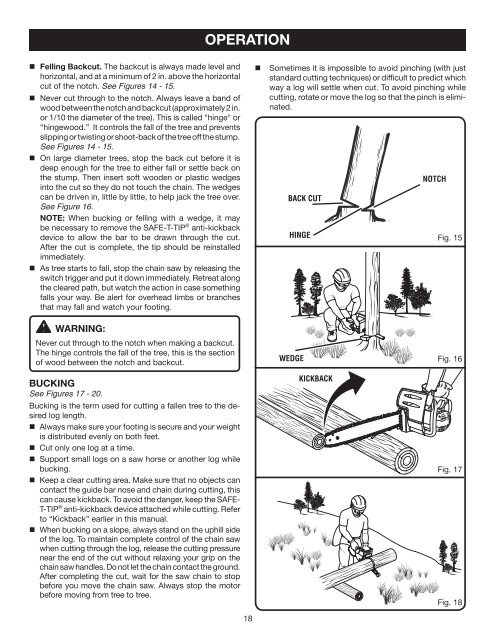
n Felling Backcut. The backcut is always made level and<br />
horizontal, and at a minimum of 2 in. above the horizontal<br />
cut of the notch. See Figures 14 - 15.<br />
n Never cut through to the notch. Always leave a band of<br />
wood between the notch and backcut (approximately 2 in.<br />
or 1/10 the diameter of the tree). This is called "hinge" or<br />
“hingewood.” It controls the fall of the tree and prevents<br />
slipping or twisting or shoot-back of the tree off the stump.<br />
See Figures 14 - 15.<br />
n On large diameter trees, stop the back cut before it is<br />
deep enough for the tree to either fall or settle back on<br />
the stump. Then insert soft wooden or plastic wedges<br />
into the cut so they do not touch the chain. The wedges<br />
can be driven in, little by little, to help jack the tree over.<br />
See Figure 16.<br />
NOTE: When bucking or felling with a wedge, it may<br />
be necessary to remove the SAFE-T-TIP ® anti-kickback<br />
device to allow the bar to be drawn through the cut.<br />
After the cut is complete, the tip should be reinstalled<br />
immediately.<br />
n As tree starts to fall, stop the chain saw by releasing the<br />
switch trigger and put it down immediately. Retreat along<br />
the cleared path, but watch the action in case something<br />
falls your way. Be alert for overhead limbs or branches<br />
that may fall and watch your footing.<br />
WARNING:<br />
Never cut through to the notch when making a backcut.<br />
The hinge controls the fall of the tree, this is the section<br />
of wood between the notch and backcut.<br />
BUCKING<br />
See Figures 17 - 20.<br />
Bucking is the term used for cutting a fallen tree to the desired<br />
log length.<br />
n Always make sure your footing is secure and your weight<br />
is distributed evenly on both feet.<br />
n Cut only one log at a time.<br />
n Support small logs on a saw horse or another log while<br />
bucking.<br />
n Keep a clear cutting area. Make sure that no objects can<br />
contact the guide bar nose and chain during cutting, this<br />
can cause kickback. To avoid the danger, keep the SAFE-<br />
T-TIP ® anti-kickback device attached while cutting. Refer<br />
to “Kickback” earlier in this manual.<br />
n When bucking on a slope, always stand on the uphill side<br />
of the log. To maintain complete control of the chain saw<br />
when cutting through the log, release the cutting pressure<br />
near the end of the cut without relaxing your grip on the<br />
chain saw handles. Do not let the chain contact the ground.<br />
After completing the cut, wait for the saw chain to stop<br />
before you move the chain saw. Always stop the motor<br />
before moving from tree to tree.<br />
OPERATION<br />
18<br />
n Sometimes it is impossible to avoid pinching (with just<br />
standard cutting techniques) or difficult to predict which<br />
way a log will settle when cut. To avoid pinching while<br />
cutting, rotate or move the log so that the pinch is eliminated.<br />
BACK CUT<br />
HINGE<br />
WEDGE<br />
KICKBACK<br />
NOTCH<br />
Fig. 15<br />
Fig. 16<br />
Fig. 17<br />
Fig. 18