OPERATOR'S MANUAL - Ryobi
OPERATOR'S MANUAL - Ryobi
OPERATOR'S MANUAL - Ryobi

You also want an ePaper? Increase the reach of your titles
YUMPU automatically turns print PDFs into web optimized ePapers that Google loves.
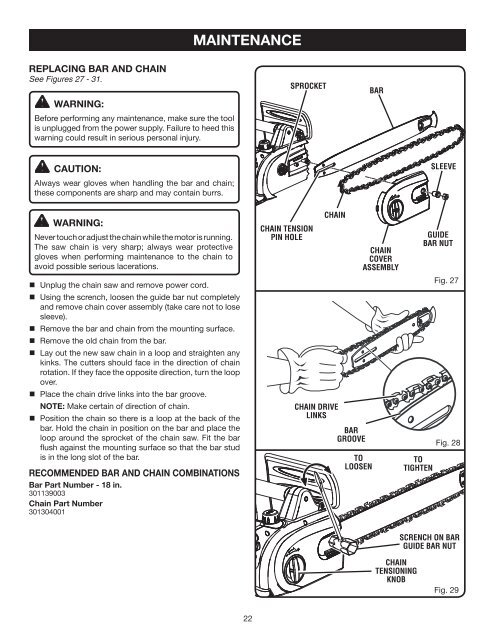
REPLACING BAR AND CHAIN<br />
See Figures 27 - 31.<br />
WARNING:<br />
Before performing any maintenance, make sure the tool<br />
is unplugged from the power supply. Failure to heed this<br />
warning could result in serious personal injury.<br />
CAUTION:<br />
Always wear gloves when handling the bar and chain;<br />
these components are sharp and may contain burrs.<br />
WARNING:<br />
Never touch or adjust the chain while the motor is running.<br />
The saw chain is very sharp; always wear protective<br />
gloves when performing maintenance to the chain to<br />
avoid possible serious lacerations.<br />
n Unplug the chain saw and remove power cord.<br />
n Using the scrench, loosen the guide bar nut completely<br />
and remove chain cover assembly (take care not to lose<br />
sleeve).<br />
n Remove the bar and chain from the mounting surface.<br />
n Remove the old chain from the bar.<br />
n Lay out the new saw chain in a loop and straighten any<br />
kinks. The cutters should face in the direction of chain<br />
rotation. If they face the opposite direction, turn the loop<br />
over.<br />
n Place the chain drive links into the bar groove.<br />
NOTE: Make certain of direction of chain.<br />
n Position the chain so there is a loop at the back of the<br />
bar. Hold the chain in position on the bar and place the<br />
loop around the sprocket of the chain saw. Fit the bar<br />
flush against the mounting surface so that the bar stud<br />
is in the long slot of the bar.<br />
RECOMMENDED BAR AND CHAIN COMBINATIONS<br />
Bar Part Number - 18 in.<br />
301139003<br />
Chain Part Number<br />
301304001<br />
MAINTENANCE<br />
22<br />
SPROCKET<br />
CHAIN TENSION<br />
PIN HOLE<br />
CHAIN<br />
CHAIN DRIVE<br />
LINKS<br />
BAR<br />
GROOVE<br />
TO<br />
LOOSEN<br />
BAR<br />
CHAIN<br />
COVER<br />
ASSEMBLY<br />
TO<br />
TIGHTEN<br />
CHAIN<br />
TENSIONING<br />
KNOB<br />
SLEEVE<br />
GUIDE<br />
BAR NUT<br />
Fig. 27<br />
Fig. 28<br />
SCRENCH ON BAR<br />
GUIDE BAR NUT<br />
Fig. 29