FD 320 Operator Manual, Rev. 3 - Formax
FD 320 Operator Manual, Rev. 3 - Formax
FD 320 Operator Manual, Rev. 3 - Formax

You also want an ePaper? Increase the reach of your titles
YUMPU automatically turns print PDFs into web optimized ePapers that Google loves.
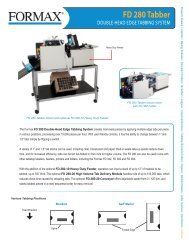
<strong>FD</strong> <strong>320</strong><br />
Document Folder<br />
8/05<br />
OPERATOR MANUAL<br />
THIRD EDITION
TABLE OF CONTENTS<br />
TOPIC PAGE<br />
DESCRIPTION, SPECIFICATIONS 1<br />
UNPACKING, SETUP 2<br />
OPERATION 3<br />
UPPER & LOWER FOLD PLATE REMOVAL 4<br />
TROUBLE-SHOOTING 5
DESCRIPTION<br />
FUNCTION<br />
The <strong>FD</strong> <strong>320</strong> Folder is designed to perform a wide variety of folds using a variety of paper weights. The fold<br />
plates are manually adjusted for standard folds and custom folds.<br />
SPECIFICATIONS<br />
SPEED: Up to 11,000 sheets per hour<br />
MAXIMUM PAPER SIZE: 11.75” x 18” (298 x 457 mm)<br />
MINIMUM PAPE SIZE: 3.125” x 4” (79.4 x 101.6 mm)<br />
FOLD TYPES: Letter, Accordion, Half, and Custom Folds<br />
HOPPER CAPACITY: Up to 250 sheets 20#<br />
WEIGHT: 55 lbs. (25 kg)<br />
POWER: <strong>FD</strong> Model: 120V, 60Hz, 3Amps<br />
FE Model: 220V, 50Hz, 2Amps<br />
1
UNPACKING<br />
Check package for shipping damage. If there is shipping damage, do not discard the box.<br />
CAUTION: Two people must lift machine out of the box.<br />
1. Unfold the infeed paper tray (part 1, figure 1 below) and insert the paper ramp (part 2) into place.<br />
2. Remove packing material from lower fold plate (part 3) and ensure proper installation.<br />
3. Plug cord into wall outlet.<br />
4. Turn machine on by turning the speed control knob (part 4) to the right.<br />
SETUP AND DESCRIPTION<br />
Paper Guides:<br />
Adjust the paper guides so the center of the sheet is aligned with the feed roller and paper can slide<br />
freely between the guides without excessive play. To adjust, grip the guides at the top and bottom<br />
where they are held in place on the cross shaft and slide into position. NOTE: Improper setting of the<br />
paper guides may cause inconsistent folding or skewed folds.<br />
Speed Control (Part #4):<br />
The speed control is a combination on/off switch and speed control and is variable to control sheets<br />
per hour. In general, faster speeds are more suitable for heavier stock and slower speeds for lighter<br />
stock. NOTE: Always make final fold adjustments at the speed you intend to fold.<br />
Stacking Wheels (Part #5):<br />
The function of the stacking wheels, which are located on the conveyor table, is to arrange the folded<br />
sheets into an overlapping stack. Position the stacking wheel assembly so that the leading edge of<br />
the folded sheet touches the wheels when the trailing edge just falls onto the conveyor table.<br />
1<br />
3<br />
4<br />
2<br />
5<br />
2
OPERATION<br />
Adjusting the fold plates:<br />
To adjust fold plates to desired fold and length of paper, first loosen the two thumbscrews on each of<br />
the two fold plates. Second, align the center bar so the marks on each side of the fold plates match<br />
up.<br />
Letter, accordion and half folds are clearly marked on each fold plate with blue lines. An adjustment<br />
can be made by loosening the thumbscrew and slightly moving the center bar up or down. Tighten the<br />
thumbscrews before operation.<br />
For a “half” fold you must remove the lower fold plate and rotate it 180 degrees and reinsert the fold<br />
plate.<br />
NOTE: Remember to tighten the thumbscrews and replace the fold plates before operating.<br />
3
UPPER & LOWER FOLD PLATE REMOVAL<br />
Removing upper fold plate:<br />
Using both hands (putting one hand on the front of the fold plate and one on the end of the fold plate)<br />
holding firmly lift end of plate ½” and pull the fold plate back in the same angle. (Fig. 1)<br />
Installing upper fold plate:<br />
Slide fold plate on the top of the upper guide pins and ensure that the lower guide pins are in the slots<br />
of the front of the fold plate pushing in and then down until plate locks into place. (Fig. 2)<br />
Lower guide pins<br />
Fig. 1<br />
Removing lower fold plate:<br />
(fig 3)Holding end of lower fold plate lift then pull back.<br />
Installing lower fold plate:<br />
(fig 4)Place lower fold plate on top of lower support rod, slide fold plate up between the upper support<br />
rod and the bottom of the paper ramp insure that fold plate locks into place.<br />
Fig. 3<br />
4<br />
Fig. 2<br />
Fig. 4<br />
Paper ramp<br />
Upper guide pins<br />
Lower support rod<br />
Upper support rod
TROUBLESHOOTING<br />
PROBLEM: POSSIBLE CAUSE: SOLUTION:<br />
Folder will not start Machine not plugged into an<br />
active wall outlet<br />
Plug machine into an active outlet<br />
Speed control not turned on Turn speed control on<br />
Fuse blown Replace blown fuse<br />
Fold plate not inserted Insert fold plate<br />
Paper will not feed Paper guides too tight Adjust the paper guides so a single<br />
sheet of paper slides freely between<br />
the guides without excessive play<br />
Improper stacking Stacking wheels improperly set Realign the stacker wheels<br />
Skewed folds Excessive side play between<br />
paper guides and paper edges<br />
Adjust paper guides and skew adjust<br />
Paper not square Readjust the paper in the infeed tray<br />
Infeed table not square Adjust table by turning the skew adjust<br />
knob back and fourth until skew<br />
is eliminated<br />
5