

Automatic Pallet Changer Operator's Addendum - Haas Automation ...
Automatic Pallet Changer Operator's Addendum - Haas Automation ...
Automatic Pallet Changer Operator's Addendum - Haas Automation ...

You also want an ePaper? Increase the reach of your titles
YUMPU automatically turns print PDFs into web optimized ePapers that Google loves.
4<br />
3.1 As s e m b ly, ro u g h le v e l i n g A n D Al i g n m e n t<br />
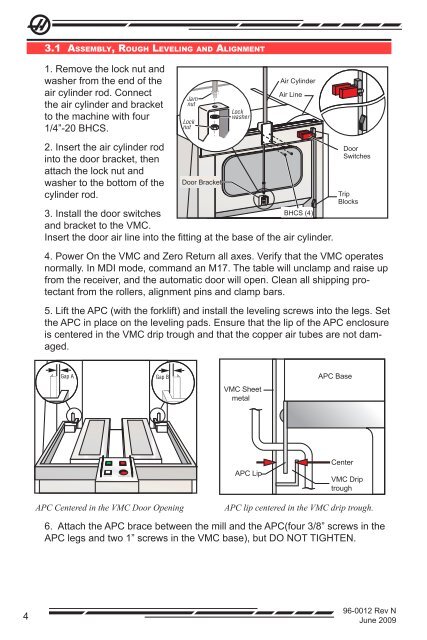
1. Remove the lock nut and<br />
washer from the end of the<br />
air cylinder rod. Connect<br />
the air cylinder and bracket<br />
to the machine with four<br />
1/4”-20 BHCS.<br />
2. Insert the air cylinder rod<br />
into the door bracket, then<br />
attach the lock nut and<br />
washer to the bottom of the<br />
cylinder rod.<br />
Door Bracket<br />
Air Cylinder<br />
Air Line<br />
3. Install the door switches<br />
BHCS (4)<br />
and bracket to the VMC.<br />
Insert the door air line into the fitting at the base of the air cylinder.<br />
Door<br />
Switches<br />
Trip<br />
Blocks<br />
4. Power On the VMC and Zero Return all axes. Verify that the VMC operates<br />
normally. In MDI mode, command an M17. The table will unclamp and raise up<br />
from the receiver, and the automatic door will open. Clean all shipping protectant<br />
from the rollers, alignment pins and clamp bars.<br />
5. Lift the APC (with the forklift) and install the leveling screws into the legs. Set<br />
the APC in place on the leveling pads. Ensure that the lip of the APC enclosure<br />
is centered in the VMC drip trough and that the copper air tubes are not damaged.<br />
APC Centered in the VMC Door Opening APC lip centered in the VMC drip trough.<br />
6. Attach the APC brace between the mill and the APC(four 3/8” screws in the<br />
APC legs and two 1” screws in the VMC base), but DO NOT TIGHTEN.<br />
96-0012 Rev N<br />
June 2009


